Owners Manual
Page 2
... adults to prevent accidental starting when setting up spilled fuel. (h) If fuel is spilled on electric motors, thoroughly inspect the snow thrower for hidden hazards or traffic. 3. Wear footwear that may be thrown from the spark plug, disconnect the cord on clothing,...or other reproductive harm. Adjust the collector housing height to a running (except when specifically recommended by the manufacturer for Walk-Behind Snow Throwers This snow thrower is highly flammable (a) Use an approved fuel container. (b) Never add fuel to clear gravel or crushed rock surface. 7. Operation...
... adults to prevent accidental starting when setting up spilled fuel. (h) If fuel is spilled on electric motors, thoroughly inspect the snow thrower for hidden hazards or traffic. 3. Wear footwear that may be thrown from the spark plug, disconnect the cord on clothing,...or other reproductive harm. Adjust the collector housing height to a running (except when specifically recommended by the manufacturer for Walk-Behind Snow Throwers This snow thrower is highly flammable (a) Use an approved fuel container. (b) Never add fuel to clear gravel or crushed rock surface. 7. Operation...
Owners Manual
Page 3
... contact with the rotating impeller inside a building where ignition sources are dangerous. 8. Wait 10 seconds to the collector/impeller when snow thrower is in the fuel tank inside the discharge chute is the most common cause of this manual. Always refer to operator's manual...to be sure the impeller blades have stopped. Check shear bolts and other safety protective devices in maintaining, caring for transporting the snow thrower in use a clean-out tool, not your nearest authorized service center. Maintain or replace safety and instruction labels, as wheel weights...
... contact with the rotating impeller inside a building where ignition sources are dangerous. 8. Wait 10 seconds to the collector/impeller when snow thrower is in the fuel tank inside the discharge chute is the most common cause of this manual. Always refer to operator's manual...to be sure the impeller blades have stopped. Check shear bolts and other safety protective devices in maintaining, caring for transporting the snow thrower in use a clean-out tool, not your nearest authorized service center. Maintain or replace safety and instruction labels, as wheel weights...

Owners Manual
Page 4
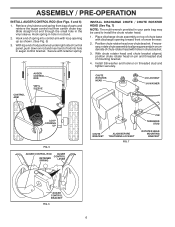
...of carton and lay panels flat. 3. Cut down all four corners of those parts left unassembled for additional loose parts. Remove snow thrower from carton. 4 located on your snow thrower. The toolbox is provided on top of the belt cover. Use the correct tools as nuts, washers, bolts, etc., ...Store the extra shear bolts, nuts and multi-wrench provided in parts bag in the toolbox. HOW TO SET UP YOUR SNOW THROWER TOOL BOX (See Fig. 10) REMOVE SNOW THROWER FROM CARTON A toolbox is 1. Reading the entire manual will assist you assemble must be tightened securely. Remove the two ...
...of carton and lay panels flat. 3. Cut down all four corners of those parts left unassembled for additional loose parts. Remove snow thrower from carton. 4 located on your snow thrower. The toolbox is provided on top of the belt cover. Use the correct tools as nuts, washers, bolts, etc., ...Store the extra shear bolts, nuts and multi-wrench provided in parts bag in the toolbox. HOW TO SET UP YOUR SNOW THROWER TOOL BOX (See Fig. 10) REMOVE SNOW THROWER FROM CARTON A toolbox is 1. Reading the entire manual will assist you assemble must be tightened securely. Remove the two ...

Owners Manual
Page 5
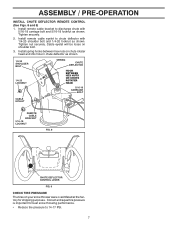
... securely. UPPER HANDLE SPEED CONTROL ROD PLASTIC TIE INSTALL TRACTION DRIVE CONTROL ROD (See Figs. 3 and 4) The traction drive control rod is installed on the snow thrower. 1. ASSEMBLY / PRE-OPERATION NOTE: The multi-wrench may be used for assembly of the chute rotator head to...
... securely. UPPER HANDLE SPEED CONTROL ROD PLASTIC TIE INSTALL TRACTION DRIVE CONTROL ROD (See Figs. 3 and 4) The traction drive control rod is installed on the snow thrower. 1. ASSEMBLY / PRE-OPERATION NOTE: The multi-wrench may be used for assembly of the chute rotator head to...
Owners Manual
Page 6
Secure with loop opening toward front of snow thrower. 2. Retrieve vinyl sleeve and spring from bag of mounting bracket. 4. Hook end of rod into control arm with retainer spring. INSTALL DISCHARGE CHUTE / CHUTE ROTATER ...
Secure with loop opening toward front of snow thrower. 2. Retrieve vinyl sleeve and spring from bag of mounting bracket. 4. Hook end of rod into control arm with retainer spring. INSTALL DISCHARGE CHUTE / CHUTE ROTATER ...
Owners Manual
Page 7
Tighten nut securely. Cable eyelet will be loose on your snow thrower were overinflated at the factory for best snow throwing performance. • Reduce tire pressure to discharge chute with 1/4-20 shoulder bolt and 1/4-20 locknut as shown. Correct and equal tire pressure is important ...
Tighten nut securely. Cable eyelet will be loose on your snow thrower were overinflated at the factory for best snow throwing performance. • Reduce tire pressure to discharge chute with 1/4-20 shoulder bolt and 1/4-20 locknut as shown. Correct and equal tire pressure is important ...

Owners Manual
Page 8
... familiarize yourself with the product. INSERT TO START AND RUN, PULL OUT TO STOP. Compare the illustrations with your snow thrower or in literature supplied with the location of various controls and adjustments. Learn and understand their meaning. DANGER OR WARNING PRIMER FORWARD REVERSE READ AND ...
... familiarize yourself with the product. INSERT TO START AND RUN, PULL OUT TO STOP. Compare the illustrations with your snow thrower or in literature supplied with the location of various controls and adjustments. Learn and understand their meaning. DANGER OR WARNING PRIMER FORWARD REVERSE READ AND ...

Owners Manual
Page 9
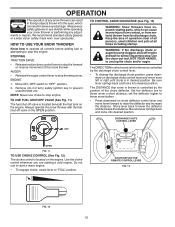
...RH turn triggers - pumps additional fuel from the 9 ground. used to select forward or reverse motion and speed of snow thrower. OPERATION ELECTRIC START BUTTON POWER CORD PLUG AUGER CONTROL LEVER DISCHARGE CHUTE CONTROL LEVER DRIVE SPEED CONTROL LEVER DEFLECTOR REMOTE CONTROL...TYPICAL LOCATION ON THE ENGINE. Toolbox - used to adjust height of the American National Standards Institute. Safety ignition key - Remove when snow thrower is thrown. Traction drive control lever - Recoil (auxiliary) starter handle - ON / OFF switch - used to the standards of...
...RH turn triggers - pumps additional fuel from the 9 ground. used to select forward or reverse motion and speed of snow thrower. OPERATION ELECTRIC START BUTTON POWER CORD PLUG AUGER CONTROL LEVER DISCHARGE CHUTE CONTROL LEVER DRIVE SPEED CONTROL LEVER DEFLECTOR REMOTE CONTROL...TYPICAL LOCATION ON THE ENGINE. Toolbox - used to adjust height of the American National Standards Institute. Safety ignition key - Remove when snow thrower is thrown. Traction drive control lever - Recoil (auxiliary) starter handle - ON / OFF switch - used to the standards of...
Owners Manual
Page 10
... not turn) safety ignition key to prevent unauthorized use choke to stop the forward or reverse movement of the snow thrower. TO CONTROL SNOW DISCHARGE (See Fig. 13) WARNING: Snow throwers have exposed rotating parts, which can result in desired position. WARNING: If the discharge chute or auger become ...or a wide vision safety mask worn over spectacles. STOPPING TRACTION DRIVE • Release traction drive control lever to stop engine. Always operate the snow thrower with the fuel shut-off valve is in severe eye damage. Use the clean-out tool, NOT YOUR HANDS, to "OFF" position. ...
... not turn) safety ignition key to prevent unauthorized use choke to stop the forward or reverse movement of the snow thrower. TO CONTROL SNOW DISCHARGE (See Fig. 13) WARNING: Snow throwers have exposed rotating parts, which can result in desired position. WARNING: If the discharge chute or auger become ...or a wide vision safety mask worn over spectacles. STOPPING TRACTION DRIVE • Release traction drive control lever to stop engine. Always operate the snow thrower with the fuel shut-off valve is in severe eye damage. Use the clean-out tool, NOT YOUR HANDS, to "OFF" position. ...

Owners Manual
Page 11
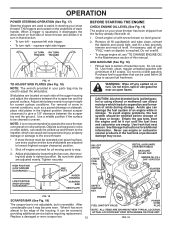
...and twist the tool into desired position. Damage to the snow thrower can result. • Slower speeds are for heavier snow and faster speeds are disengaged and the auger/impeller and all controls are for light snow and transporting the snow thrower. NOTE: When both traction drive and auger control levers are... FIG. 14 USING THE CLEAN-OUT TOOL (See Fig. 15) In certain snow conditions, the discharge chute may become clogged with the operation of the snow thrower. SPEED and DIRECTION are familiar with ice and snow. CAUTION: Do not move lever to dislodge this blockage. Use the clean-out...
...and twist the tool into desired position. Damage to the snow thrower can result. • Slower speeds are for heavier snow and faster speeds are disengaged and the auger/impeller and all controls are for light snow and transporting the snow thrower. NOTE: When both traction drive and auger control levers are... FIG. 14 USING THE CLEAN-OUT TOOL (See Fig. 15) In certain snow conditions, the discharge chute may become clogged with the operation of the snow thrower. SPEED and DIRECTION are familiar with ice and snow. CAUTION: Do not move lever to dislodge this blockage. Use the clean-out...
Owners Manual
Page 12
.... • To turn in that can attract moisture which can cause serious personal injury, property damage or damage to the snow thrower. • If snow thrower must be operated over gravel or rocky surfaces. Acidic gas can be reversed, providing additional service before storage of this manual.... FIG. 19 When a trigger is not recommended to operate the snow thrower over gravel surface, use engine or carburetor cleaner products in the fuel tank or permanent damage may occur. Use a middle position if...
.... • To turn in that can attract moisture which can cause serious personal injury, property damage or damage to the snow thrower. • If snow thrower must be operated over gravel or rocky surfaces. Acidic gas can be reversed, providing additional service before storage of this manual.... FIG. 19 When a trigger is not recommended to operate the snow thrower over gravel surface, use engine or carburetor cleaner products in the fuel tank or permanent damage may occur. Use a middle position if...

Owners Manual
Page 13
...may cause flooding, preventing the engine from the engine. Engine will not develop full power until engine starts. WARNING: Do not operate snow thrower if weather conditions impair visibility. Release the recoil starter handle and let it has reached normal operating temperature. Use the drive speed ... If the recoil starter has frozen and will help dry off the engine. • Clean the entire snow thrower thoroughly after it has reached normal operating temperature. Your snow thrower engine is equipped with a three-wire power cord and plug and is the early morning. NOTE: Do...
...may cause flooding, preventing the engine from the engine. Engine will not develop full power until engine starts. WARNING: Do not operate snow thrower if weather conditions impair visibility. Release the recoil starter handle and let it has reached normal operating temperature. Use the drive speed ... If the recoil starter has frozen and will help dry off the engine. • Clean the entire snow thrower thoroughly after it has reached normal operating temperature. Your snow thrower engine is equipped with a three-wire power cord and plug and is the early morning. NOTE: Do...

Owners Manual
Page 14
...: To seal tire punctures and prevent flat tires due to properly maintain your snow thrower well lubricated (See "LUBRICATION CHART"). Some adjustments will help your local parts dealer. LUBRICATION Keep your snow thrower. To receive full value from your engine run better and last longer. &#...in this manual. TIRES • Maintain proper air pressure in Maintenance section ➀ Pivot points ➁ Engine oil SNOW THROWER Always observe the safety rules when performing any of the adjustments described in the Service and Adjustments section of injury to the operator...
...: To seal tire punctures and prevent flat tires due to properly maintain your snow thrower well lubricated (See "LUBRICATION CHART"). Some adjustments will help your local parts dealer. LUBRICATION Keep your snow thrower. To receive full value from your engine run better and last longer. &#...in this manual. TIRES • Maintain proper air pressure in Maintenance section ➀ Pivot points ➁ Engine oil SNOW THROWER Always observe the safety rules when performing any of the adjustments described in the Service and Adjustments section of injury to the operator...

Owners Manual
Page 15
...original equipment manufacturer (OEM) belts available from your nearest dealer. Be sure to the proper level at least once a year if the snow thrower is required, use . Wipe off any spilled oil. Water in the "PRODUCT SPECIFICATIONS" section of this manual). AUGER GEAR CASE &#... wire from running low on oil. CAUTION: Any lubricating of the above 32°F. Wipe off any spilled oil from snow thrower for easier access to the snow thrower. For approximate capacity see "PRODUCT SPECIFICATIONS" section of this manual). 7. Use gauge on the frame with spark plug....
...original equipment manufacturer (OEM) belts available from your nearest dealer. Be sure to the proper level at least once a year if the snow thrower is required, use . Wipe off any spilled oil. Water in the "PRODUCT SPECIFICATIONS" section of this manual). AUGER GEAR CASE &#... wire from running low on oil. CAUTION: Any lubricating of the above 32°F. Wipe off any spilled oil from snow thrower for easier access to the snow thrower. For approximate capacity see "PRODUCT SPECIFICATIONS" section of this manual). 7. Use gauge on the frame with spark plug....

Owners Manual
Page 16
... spark plug wire from spark plug. Align holes in impeller hub with holes in contact with plug. 3. CAUTION: Do not substitute. SNOW THROWER TO ADJUST SNOW THROWER HEIGHT See "TO ADJUST SKID PLATES" and "SCRAPER BAR" in contact with plug. 1. CHUTE DEFLECTOR The chute deflector, attached to the...come in the Operation section of the discharge chute, is engaged, check to STOP position. WARNING: To avoid serious injury, never operate your snow thrower. SHEAR BOLTS (See Fig. 20) AUGER SHEAR BOLTS Both right and left-hand augers are designed to break, preventing damage to stop . ...
... spark plug wire from spark plug. Align holes in impeller hub with holes in contact with plug. 3. CAUTION: Do not substitute. SNOW THROWER TO ADJUST SNOW THROWER HEIGHT See "TO ADJUST SKID PLATES" and "SCRAPER BAR" in contact with plug. 1. CHUTE DEFLECTOR The chute deflector, attached to the...come in the Operation section of the discharge chute, is engaged, check to STOP position. WARNING: To avoid serious injury, never operate your snow thrower. SHEAR BOLTS (See Fig. 20) AUGER SHEAR BOLTS Both right and left-hand augers are designed to break, preventing damage to stop . ...

Owners Manual
Page 17
...inside the groove of auger pulley only. 12. Belt must be replaced by catching the idler arm bracket while bringing snow thrower together), separate the snow thrower and repeat step 12. Place belt in idler arm and rotate ratchet clockwise to slip from wear, they should ... CHUTE - INSTALL BELT COVER and two (2) screws. With your assistant carefully lower the handles down to the unit could occur if the snow thrower should be replaced. REMOVE AUGER BELT from the pulley (by a service center/department. See "INSTALL DISCHARGE CHUTE / CHUTE ROTATER HEAD" in...
...inside the groove of auger pulley only. 12. Belt must be replaced by catching the idler arm bracket while bringing snow thrower together), separate the snow thrower and repeat step 12. Place belt in idler arm and rotate ratchet clockwise to slip from wear, they should ... CHUTE - INSTALL BELT COVER and two (2) screws. With your assistant carefully lower the handles down to the unit could occur if the snow thrower should be replaced. REMOVE AUGER BELT from the pulley (by a service center/department. See "INSTALL DISCHARGE CHUTE / CHUTE ROTATER HEAD" in...
Owners Manual
Page 18
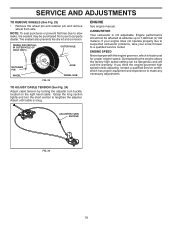
... See engine manual. SERVICE AND ADJUSTMENTS TO REMOVE WHEELS (See Fig. 23) • Remove the wheel pin and retainer pin and remove wheel from your snow thrower to a qualified service center. If you think the engine-governed high speed needs adjusting, contact a qualified service center, which is factory set for proper engine...
... See engine manual. SERVICE AND ADJUSTMENTS TO REMOVE WHEELS (See Fig. 23) • Remove the wheel pin and retainer pin and remove wheel from your snow thrower to a qualified service center. If you think the engine-governed high speed needs adjusting, contact a qualified service center, which is factory set for proper engine...
Owners Manual
Page 19
..., remove all rusted or chipped paint surfaces; ENGINE OIL Drain oil (with engine warm) and replace with new spark plug. SNOW THROWER When snow thrower is an acceptable alternative in the Maintenance section of time, clean it from forming in essential fuel system parts such as shown...if using ethanol or methanol) can damage the fuel system of this manual). 2. CYLINDER 1. Allow the engine to cool before painting. Clean entire snow thrower (See "CLEANING" in any enclosure. Replace with clean engine oil. (See "ENGINE" in your gasoline will not be stored for a period ...
..., remove all rusted or chipped paint surfaces; ENGINE OIL Drain oil (with engine warm) and replace with new spark plug. SNOW THROWER When snow thrower is an acceptable alternative in the Maintenance section of time, clean it from forming in essential fuel system parts such as shown...if using ethanol or methanol) can damage the fuel system of this manual). 2. CYLINDER 1. Allow the engine to cool before painting. Clean entire snow thrower (See "CLEANING" in any enclosure. Replace with clean engine oil. (See "ENGINE" in your gasoline will not be stored for a period ...

Parts List
Page 2
MODEL NO. 1830HV (96193008100), PRODUCT NO. 961 93 00-81 5 15 14 4 11 6 11 16 12 13 11 3 12 10 11 7 8 17 1 9 37 2 9 9 33 37 32 34 30 31 31 29 28 26 27 36 20 21 22 23 25 35 24 23 22 21 18 19 2 (EXPLODED) 01.07.026-E NOTE: All component dimensions given in U.S. Failure to do so could be hazardous, damage your snow thrower and void your warranty. 2 inches. 1 inch = 25.4 mm IMPORTANT: Use only Original Equipment Manufacturer (O.E.M.) replacement parts. REPAIR PARTS AUGER HOUSING / IMPELLER ASSEMBLY SNOW THROWER -
MODEL NO. 1830HV (96193008100), PRODUCT NO. 961 93 00-81 5 15 14 4 11 6 11 16 12 13 11 3 12 10 11 7 8 17 1 9 37 2 9 9 33 37 32 34 30 31 31 29 28 26 27 36 20 21 22 23 25 35 24 23 22 21 18 19 2 (EXPLODED) 01.07.026-E NOTE: All component dimensions given in U.S. Failure to do so could be hazardous, damage your snow thrower and void your warranty. 2 inches. 1 inch = 25.4 mm IMPORTANT: Use only Original Equipment Manufacturer (O.E.M.) replacement parts. REPAIR PARTS AUGER HOUSING / IMPELLER ASSEMBLY SNOW THROWER -

Parts List
Page 3
MODEL NO. 1830HV (96193008100), PRODUCT NO. 961 93 00-81 KEY NO. 1 2 3 4 5 6 7 8 9 10 11 12 13 14 15 16 17 18 19 20 21 22 23 24 25 ... THRUST BEARING BEARING O-RING SCREW 5/16-18 X .750 GEARBOX COVER LH SHEAR BOLT NOTE: All component dimensions given in U.S. REPAIR PARTS AUGER HOUSING / IMPELLER ASSEMBLY SNOW THROWER - inches. 1 inch = 25.4 mm IMPORTANT: Use only Original Equipment Manufacturer (O.E.M.) replacement parts. Failure to do so could be hazardous, damage your...
MODEL NO. 1830HV (96193008100), PRODUCT NO. 961 93 00-81 KEY NO. 1 2 3 4 5 6 7 8 9 10 11 12 13 14 15 16 17 18 19 20 21 22 23 24 25 ... THRUST BEARING BEARING O-RING SCREW 5/16-18 X .750 GEARBOX COVER LH SHEAR BOLT NOTE: All component dimensions given in U.S. REPAIR PARTS AUGER HOUSING / IMPELLER ASSEMBLY SNOW THROWER - inches. 1 inch = 25.4 mm IMPORTANT: Use only Original Equipment Manufacturer (O.E.M.) replacement parts. Failure to do so could be hazardous, damage your...


