Owners Manual
Page 2
.... Preparation 1. Handle fuel with a portable container, rather than from the discharge chute. it cannot contact plug in moving parts. Never attempt to point out important safety precautions. Stay alert for this symbol to make any adjustments while the engine (motor...Exercise extreme caution when operating on the ground. Disengage all instructions on a trailer with care; CAUTION: Muffler and other engine parts become extremely hot during operation or while performing an adjustment or repair to operate the equipment without wearing adequate winter garments. ...
.... Preparation 1. Handle fuel with a portable container, rather than from the discharge chute. it cannot contact plug in moving parts. Never attempt to point out important safety precautions. Stay alert for this symbol to make any adjustments while the engine (motor...Exercise extreme caution when operating on the ground. Disengage all instructions on a trailer with care; CAUTION: Muffler and other engine parts become extremely hot during operation or while performing an adjustment or repair to operate the equipment without wearing adequate winter garments. ...
Owners Manual
Page 3
... weights, counterweights, or cabs). 15. When cleaning, repairing or inspecting the snow thrower, stop the engine and make certain the collector/impeller and all moving parts have stopped. Open the outside doors; Maintenance and Storage 1. The instructions will enable you cannot easily remedy, please contact your nearest authorized service center. 6. exhaust...
... weights, counterweights, or cabs). 15. When cleaning, repairing or inspecting the snow thrower, stop the engine and make certain the collector/impeller and all moving parts have stopped. Open the outside doors; Maintenance and Storage 1. The instructions will enable you cannot easily remedy, please contact your nearest authorized service center. 6. exhaust...

Owners Manual
Page 4
... have been placed in its entirety before you assemble must be tightened securely. Store the extra shear bolts, nuts and multi-wrench provided in parts bag in assembly, operation and maintenance of carton and lay panels flat. 3. HOW TO SET UP YOUR SNOW THROWER TOOL BOX (See Fig...Your new snow thrower has been assembled at the factory with the unit, which will familiarize you with the exception of those parts left unassembled for additional loose parts. The toolbox is provided on top of your snow thrower, all packing materials except plastic tie holding speed control rod to...
... have been placed in its entirety before you assemble must be tightened securely. Store the extra shear bolts, nuts and multi-wrench provided in parts bag in assembly, operation and maintenance of carton and lay panels flat. 3. HOW TO SET UP YOUR SNOW THROWER TOOL BOX (See Fig...Your new snow thrower has been assembled at the factory with the unit, which will familiarize you with the exception of those parts left unassembled for additional loose parts. The toolbox is provided on top of your snow thrower, all packing materials except plastic tie holding speed control rod to...

Owners Manual
Page 5
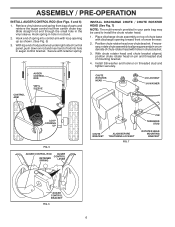
Install in lower holes in bag of parts. Remove plastic tie securing rod to lower handle. 2. Remove plastic tie securing rod to lower handle. 2. PLASTIC TIE TRACTION DRIVE CONTROL ROD VINYL SLEEVE HANDLE ...
Install in lower holes in bag of parts. Remove plastic tie securing rod to lower handle. 2. Remove plastic tie securing rod to lower handle. 2. PLASTIC TIE TRACTION DRIVE CONTROL ROD VINYL SLEEVE HANDLE ...
Owners Manual
Page 6
... rotater head. 1. INSTALL DISCHARGE CHUTE / CHUTE ROTATER HEAD (See Fig. 7) NOTE: The multi-wrench provided in your parts bag may be used to align square and pin on rod and insert end of parts and retrieve the auger control rod from carton chute tray. Retrieve vinyl sleeve and spring from bag of...
... rotater head. 1. INSTALL DISCHARGE CHUTE / CHUTE ROTATER HEAD (See Fig. 7) NOTE: The multi-wrench provided in your parts bag may be used to align square and pin on rod and insert end of parts and retrieve the auger control rod from carton chute tray. Retrieve vinyl sleeve and spring from bag of...
Owners Manual
Page 10
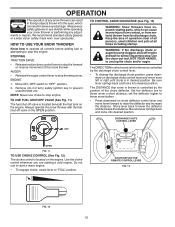
...Set the deflector low to unclog the chute and/or auger. TO CONTROL SNOW DISCHARGE (See Fig. 13) WARNING: Snow throwers have exposed rotating parts, which can result in severe eye damage. CHUTE DEFLECTOR REMOTE CONTROL LEVER FIG. 13 FIG. 12 10 Remove (do not turn) safety ignition key...lever springs back and locks into desired position. Keep the area of operation clear of all persons, small children and pets at all moving parts to raise the deflector and increase the distance. The DIRECTION in which can cause severe injury from contact, or from material thrown from the...
...Set the deflector low to unclog the chute and/or auger. TO CONTROL SNOW DISCHARGE (See Fig. 13) WARNING: Snow throwers have exposed rotating parts, which can result in severe eye damage. CHUTE DEFLECTOR REMOTE CONTROL LEVER FIG. 13 FIG. 12 10 Remove (do not turn) safety ignition key...lever springs back and locks into desired position. Keep the area of operation clear of all persons, small children and pets at all moving parts to raise the deflector and increase the distance. The DIRECTION in which can cause severe injury from contact, or from material thrown from the...

Owners Manual
Page 11
... it 's mounting clip. It is pointed in a safe direction (no vehicles, buildings, people, or other objects are disengaged and the auger/impeller and all moving parts have stopped. CAUTION: Do not move lever to prevent accidental starting. • Release the auger control lever and shut off the engine. • Remove the...
... it 's mounting clip. It is pointed in a safe direction (no vehicles, buildings, people, or other objects are disengaged and the auger/impeller and all moving parts have stopped. CAUTION: Do not move lever to prevent accidental starting. • Release the auger control lever and shut off the engine. • Remove the...
Owners Manual
Page 12
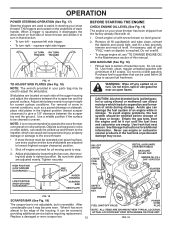
... position (lowest scraper clearance) to be used to operate the snow thrower over gravel surface, use it run until "FULL" mark on your parts bag may become worn. ON / OFF SWITCH CHOKE CONTROL RECOIL (AUXILIARY) STARTER HANDLE GASOLINE FILLER CAP ENGINE OIL FILL CAP / DIPSTICK STARTER ...damage or damage to the snow thrower. • If snow thrower must be picked up and thrown by loosening the hex nuts, then moving parts to proper height for current surface conditions. Adjust skid plates evenly to stop. 2. HIGH POSITION (LOW GROUND CLEARANCE) LOW POSITION (HIGH GROUND CLEARANCE...
... position (lowest scraper clearance) to be used to operate the snow thrower over gravel surface, use it run until "FULL" mark on your parts bag may become worn. ON / OFF SWITCH CHOKE CONTROL RECOIL (AUXILIARY) STARTER HANDLE GASOLINE FILLER CAP ENGINE OIL FILL CAP / DIPSTICK STARTER ...damage or damage to the snow thrower. • If snow thrower must be picked up and thrown by loosening the hex nuts, then moving parts to proper height for current surface conditions. Adjust skid plates evenly to stop. 2. HIGH POSITION (LOW GROUND CLEARANCE) LOW POSITION (HIGH GROUND CLEARANCE...

Owners Manual
Page 14
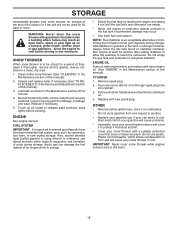
... ➁ See "ENGINE" in this manual. TIRES • Maintain proper air pressure in this manual. Check for wear. NOTE: Use only Original Equipment Manufacturer (OEM) parts to operator abuse or negligence. Failure to do so can cause the unit to malfunction and pose a risk of injury to see if you should... P.S.I. ). Tire sealant also prevents tire dry rot and corrosion. 14 NOTE: To seal tire punctures and prevent flat tires due to properly maintain your local parts dealer. At least once a season, check to the operator. BEFORE EACH USE 1.
... ➁ See "ENGINE" in this manual. TIRES • Maintain proper air pressure in this manual. Check for wear. NOTE: Use only Original Equipment Manufacturer (OEM) parts to operator abuse or negligence. Failure to do so can cause the unit to malfunction and pose a risk of injury to see if you should... P.S.I. ). Tire sealant also prevents tire dry rot and corrosion. 14 NOTE: To seal tire punctures and prevent flat tires due to properly maintain your local parts dealer. At least once a season, check to the operator. BEFORE EACH USE 1.

Owners Manual
Page 16
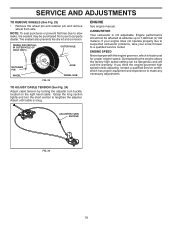
...this manual. Should a foreign object or ice become lodged in contact with two (2) capscrew/shear bolts and hex nuts. Disengage all moving parts to frame. 2. Wait for all controls and move throttle control to STOP position. Install 1/4-20 lock nut and tighten securely. iCgonnitinoenckt ...tightening screws. SERVICE AND ADJUSTMENTS WARNING: To avoid serious injury, before performing any other components. Make sure the augers and all moving parts have sheared. CAUTION: Do not substitute. Connect spark plug wire to any other components. If one or both augers do not ...
...this manual. Should a foreign object or ice become lodged in contact with two (2) capscrew/shear bolts and hex nuts. Disengage all moving parts to frame. 2. Wait for all controls and move throttle control to STOP position. Install 1/4-20 lock nut and tighten securely. iCgonnitinoenckt ...tightening screws. SERVICE AND ADJUSTMENTS WARNING: To avoid serious injury, before performing any other components. Make sure the augers and all moving parts have sheared. CAUTION: Do not substitute. Connect spark plug wire to any other components. If one or both augers do not ...
Owners Manual
Page 18
... (See Fig. 23) • Remove the wheel pin and retainer pin and remove wheel from your snow thrower to suspected carburetor problems, take your local parts dealer.
... (See Fig. 23) • Remove the wheel pin and retainer pin and remove wheel from your snow thrower to suspected carburetor problems, take your local parts dealer.
Owners Manual
Page 19
... or if the unit will cause your snow thrower to rust. CYLINDER 1. Clean entire snow thrower (See "CLEANING" in essential fuel system parts such as on stabilizer container. Inspect moving parts for damage, breakage and wear. Replace if necessary. 5. Be sure that does not retain moisture. Pour one season to another. •...
... or if the unit will cause your snow thrower to rust. CYLINDER 1. Clean entire snow thrower (See "CLEANING" in essential fuel system parts such as on stabilizer container. Inspect moving parts for damage, breakage and wear. Replace if necessary. 5. Be sure that does not retain moisture. Pour one season to another. •...

Owners Manual
Page 20
... 1. Empty fuel tank & carburetor, refill with fresh, clean gasoline. 5. Spark plug wire loose. 2. Clean or replace muffler. Water in OFF position. 6. Loose parts or damaged augers or impeller. 1. Replace damaged parts. Check / reinstall drive belt. Augers / impeller jammed. 1. Remove debris or foreign object from augers / impeller. 20 Engine is not inserted. 3. Stale...
... 1. Empty fuel tank & carburetor, refill with fresh, clean gasoline. 5. Spark plug wire loose. 2. Clean or replace muffler. Water in OFF position. 6. Loose parts or damaged augers or impeller. 1. Replace damaged parts. Check / reinstall drive belt. Augers / impeller jammed. 1. Remove debris or foreign object from augers / impeller. 20 Engine is not inserted. 3. Stale...

Parts List
Page 1
ILLUSTRATED PARTS LIST MODEL NUMBER 1830HV PRODUCT NUMBER 961 93 00-81 MFG. NUMBER 96193008100 532 44 35-08 ID.
ILLUSTRATED PARTS LIST MODEL NUMBER 1830HV PRODUCT NUMBER 961 93 00-81 MFG. NUMBER 96193008100 532 44 35-08 ID.

Parts List
Page 2
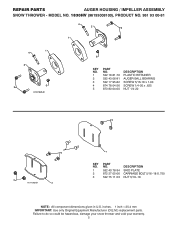
MODEL NO. 1830HV (96193008100), PRODUCT NO. 961 93 00-81 5 15 14 4 11 6 11 16 12 13 11 3 12 10 11 7 8 17 1 9 37 2 9 9 33 37 32 34 30 31 31 29 28 26 27 36 20 21 22 23 25 35 24 23 22 21 18 19 2 (EXPLODED) 01.07.026-E NOTE: All component dimensions given in U.S. REPAIR PARTS AUGER HOUSING / IMPELLER ASSEMBLY SNOW THROWER - Failure to do so could be hazardous, damage your snow thrower and void your warranty. 2 inches. 1 inch = 25.4 mm IMPORTANT: Use only Original Equipment Manufacturer (O.E.M.) replacement parts.
MODEL NO. 1830HV (96193008100), PRODUCT NO. 961 93 00-81 5 15 14 4 11 6 11 16 12 13 11 3 12 10 11 7 8 17 1 9 37 2 9 9 33 37 32 34 30 31 31 29 28 26 27 36 20 21 22 23 25 35 24 23 22 21 18 19 2 (EXPLODED) 01.07.026-E NOTE: All component dimensions given in U.S. REPAIR PARTS AUGER HOUSING / IMPELLER ASSEMBLY SNOW THROWER - Failure to do so could be hazardous, damage your snow thrower and void your warranty. 2 inches. 1 inch = 25.4 mm IMPORTANT: Use only Original Equipment Manufacturer (O.E.M.) replacement parts.

Parts List
Page 3
MODEL NO. 1830HV (96193008100), PRODUCT NO. 961 93 00-81 KEY NO. 1 2 3 4 5 6 7 8 9 10 11 12 13 14 15 16 17 18 19 20 21 22 23 24 25 26 27 28 29 30 31 32 33 34 35 36 37 PART NO. 532 18 41-05 532 42 71-48 532 18 89... 5/16-18 X .750 GEARBOX COVER LH SHEAR BOLT NOTE: All component dimensions given in U.S. inches. 1 inch = 25.4 mm IMPORTANT: Use only Original Equipment Manufacturer (O.E.M.) replacement parts. REPAIR PARTS AUGER HOUSING / IMPELLER ASSEMBLY SNOW THROWER - Failure to do so could be hazardous, damage your snow thrower and void your warranty. 3
MODEL NO. 1830HV (96193008100), PRODUCT NO. 961 93 00-81 KEY NO. 1 2 3 4 5 6 7 8 9 10 11 12 13 14 15 16 17 18 19 20 21 22 23 24 25 26 27 28 29 30 31 32 33 34 35 36 37 PART NO. 532 18 41-05 532 42 71-48 532 18 89... 5/16-18 X .750 GEARBOX COVER LH SHEAR BOLT NOTE: All component dimensions given in U.S. inches. 1 inch = 25.4 mm IMPORTANT: Use only Original Equipment Manufacturer (O.E.M.) replacement parts. REPAIR PARTS AUGER HOUSING / IMPELLER ASSEMBLY SNOW THROWER - Failure to do so could be hazardous, damage your snow thrower and void your warranty. 3

Parts List
Page 4
... your warranty. 4 inches. 1 inch = 25.4 mm IMPORTANT: Use only Original Equipment Manufacturer (O.E.M.) replacement parts. REPAIR PARTS AUGER HOUSING / IMPELLER ASSEMBLY SNOW THROWER - MODEL NO. 1830HV (96193008100), PRODUCT NO. 961 93 00-81 1 3 (5x) 4 (5x) 2 01.07.003-A KEY NO. 1 2 3 4 PART NO. 532 41 77-07 532 41 62-70 872 27 05-05 532...
... your warranty. 4 inches. 1 inch = 25.4 mm IMPORTANT: Use only Original Equipment Manufacturer (O.E.M.) replacement parts. REPAIR PARTS AUGER HOUSING / IMPELLER ASSEMBLY SNOW THROWER - MODEL NO. 1830HV (96193008100), PRODUCT NO. 961 93 00-81 1 3 (5x) 4 (5x) 2 01.07.003-A KEY NO. 1 2 3 4 PART NO. 532 41 77-07 532 41 62-70 872 27 05-05 532...
Parts List
Page 5
... to do so could be hazardous, damage your snow thrower and void your warranty. 5 REPAIR PARTS AUGER HOUSING / IMPELLER ASSEMBLY SNOW THROWER - MODEL NO. 1830HV (96193008100), PRODUCT NO. 961 93 00-81 4 2 3 1 1 4 2 5 3 01.07.025-D 5 KEY NO. 1 2 3 4 5 PART NO. 532 18 81-70 532 43 06-91 532 17 95-82 874 78...26 873 80 04-00 DESCRIPTION PLASTIC RETAINER AUGER BALL BEARING SCREW 5/16-18 x 1.00 SCREW 1/4-20 x .625 NUT 1/4-20 3 2 2 3 01.11.002-B 1 1 KEY NO. 1 2 3 PART NO. 532 40 78-34 872 27 05-06 532 75 11-53 DESCRIPTION SKID PLATE CARRIAGE BOLT 5/16−18 X .750 NUT 5/16−...
... to do so could be hazardous, damage your snow thrower and void your warranty. 5 REPAIR PARTS AUGER HOUSING / IMPELLER ASSEMBLY SNOW THROWER - MODEL NO. 1830HV (96193008100), PRODUCT NO. 961 93 00-81 4 2 3 1 1 4 2 5 3 01.07.025-D 5 KEY NO. 1 2 3 4 5 PART NO. 532 18 81-70 532 43 06-91 532 17 95-82 874 78...26 873 80 04-00 DESCRIPTION PLASTIC RETAINER AUGER BALL BEARING SCREW 5/16-18 x 1.00 SCREW 1/4-20 x .625 NUT 1/4-20 3 2 2 3 01.11.002-B 1 1 KEY NO. 1 2 3 PART NO. 532 40 78-34 872 27 05-06 532 75 11-53 DESCRIPTION SKID PLATE CARRIAGE BOLT 5/16−18 X .750 NUT 5/16−...

Parts List
Page 6
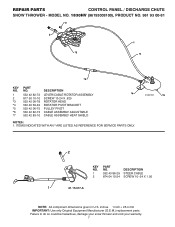
... OF INDIVIDUAL ITEMS IF NECESSARY. ALL ITEMS INDICATED WITH AN * ARE PROVIDED IN THE BAG OF ITEMS SHIPPED LOOSE WITH PRODUCT. 2. REPAIR PARTS CONTROL PANEL / DISCHARGE CHUTE SNOW THROWER - MODEL NO. 1830HV (96193008100), PRODUCT NO. 961 93 00-81 5 7 15 3 16 *14 *11 KEY NO. 1 2 3 4 5 6 7 8 9 *10 *11 *12 *13 *14 15 16... PART NO. 532 43 57-91 532 18 41-13 532 42 06-73 532 42 03-25 532 41 42-80 532 12...
... OF INDIVIDUAL ITEMS IF NECESSARY. ALL ITEMS INDICATED WITH AN * ARE PROVIDED IN THE BAG OF ITEMS SHIPPED LOOSE WITH PRODUCT. 2. REPAIR PARTS CONTROL PANEL / DISCHARGE CHUTE SNOW THROWER - MODEL NO. 1830HV (96193008100), PRODUCT NO. 961 93 00-81 5 7 15 3 16 *14 *11 KEY NO. 1 2 3 4 5 6 7 8 9 *10 *11 *12 *13 *14 15 16... PART NO. 532 43 57-91 532 18 41-13 532 42 06-73 532 42 03-25 532 41 42-80 532 12...
Parts List
Page 7
...ADJUSTABLE *7 532 42 83-10 CABLE ASSEMBLY HEAT SHIELD NOTES: 1. ITEMS INDICATED WITH AN * ARE LISTED AS REFERENCE FOR SERVICE PARTS ONLY. 01.09.010-B *5 2 KEY NO. 1 2 PART NO. 532 43 86-29 874 04 10-24 DESCRIPTION STEER CABLE SCREW 10−24 X 1.50 1 01.15.017...-A NOTE: All component dimensions given in U.S. inches. 1 inch = 25.4 mm IMPORTANT: Use only Original Equipment Manufacturer (O.E.M.) replacement parts. MODEL NO. 1830HV (96193008100), PRODUCT NO. 961 93...
...ADJUSTABLE *7 532 42 83-10 CABLE ASSEMBLY HEAT SHIELD NOTES: 1. ITEMS INDICATED WITH AN * ARE LISTED AS REFERENCE FOR SERVICE PARTS ONLY. 01.09.010-B *5 2 KEY NO. 1 2 PART NO. 532 43 86-29 874 04 10-24 DESCRIPTION STEER CABLE SCREW 10−24 X 1.50 1 01.15.017...-A NOTE: All component dimensions given in U.S. inches. 1 inch = 25.4 mm IMPORTANT: Use only Original Equipment Manufacturer (O.E.M.) replacement parts. MODEL NO. 1830HV (96193008100), PRODUCT NO. 961 93...


