

Owners Manual
Page 2
... the contents of the operator's manual. speed of the machine must always be dangerous! Always wear approved protective gloves. Regular cleaning is called blade thrust. The operator of output shaft, rpm KEY TO SYMBOLS Wear sturdy, non-slip boots. Visual check. Always wear approved protective gloves. 2 - Symbols WARNING! Careless or incorrect use non-metallic, flexible cutting attachments, i.e. Always wear: •...
... the contents of the operator's manual. speed of the machine must always be dangerous! Always wear approved protective gloves. Regular cleaning is called blade thrust. The operator of output shaft, rpm KEY TO SYMBOLS Wear sturdy, non-slip boots. Visual check. Always wear approved protective gloves. 2 - Symbols WARNING! Careless or incorrect use non-metallic, flexible cutting attachments, i.e. Always wear: •...

Owners Manual
Page 3
... equipment 7 Cutting equipment 10 ASSEMBLY Fitting the loop handle 11 Assembling the cutting equipment 11 FUEL HANDLING Fuel handling 13 Fuel 13 STARTING AND STOPPING Check before starting 15 Starting and stopping 15 WORKING TECHNIQUES General working instructions 17 MAINTENANCE Carburetor 19 Muffler 19 Cooling system 20 Spark plug 20 Air filter 20 Maintenance schedule 22 TECHNICAL DATA Technical data 23 FEDERAL AND CALIFORNIA EMISSIONS CONTROL WARRANTY STATEMENT YOUR WARRANTY RIGHTS...
... equipment 7 Cutting equipment 10 ASSEMBLY Fitting the loop handle 11 Assembling the cutting equipment 11 FUEL HANDLING Fuel handling 13 Fuel 13 STARTING AND STOPPING Check before starting 15 Starting and stopping 15 WORKING TECHNIQUES General working instructions 17 MAINTENANCE Carburetor 19 Muffler 19 Cooling system 20 Spark plug 20 Air filter 20 Maintenance schedule 22 TECHNICAL DATA Technical data 23 FEDERAL AND CALIFORNIA EMISSIONS CONTROL WARRANTY STATEMENT YOUR WARRANTY RIGHTS...

Owners Manual
Page 5
What is what? 1 Trimmer head 2 Bevel gear 3 Grease filler cap, bevel gear 4 Cutting attachment guard 5 Shaft 6 Loop handle 7 Stop switch 8 Throttle control 9 Throttle lockout 10 Cylinder cover 11 Starter handle 12 Air purge 13 Fuel tank 14 Choke control 15 Air filter cover 16 Handle adjustment 17 Drive disc 18 Allen key 19 Locking pin 20 Operator's manual 1151387-49 Rev.2 2009-06-10 English - 5 WHAT IS WHAT?
What is what? 1 Trimmer head 2 Bevel gear 3 Grease filler cap, bevel gear 4 Cutting attachment guard 5 Shaft 6 Loop handle 7 Stop switch 8 Throttle control 9 Throttle lockout 10 Cylinder cover 11 Starter handle 12 Air purge 13 Fuel tank 14 Choke control 15 Air filter cover 16 Handle adjustment 17 Drive disc 18 Allen key 19 Locking pin 20 Operator's manual 1151387-49 Rev.2 2009-06-10 English - 5 WHAT IS WHAT?
Owners Manual
Page 6
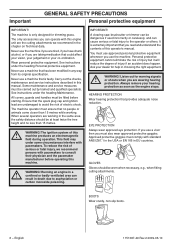
Wear personal protective equipment. Some maintenance and service measures must be fitted before operating this machine. All covers, guards and handles must be worn when necessary, e.g., when fitting cutting attachments. WARNING! This field may under the heading Personal protective equipment. Running an engine in this operator's manual. HEARING PROTECTION Wear hearing protection that you can result in the chapter on Technical...
Wear personal protective equipment. Some maintenance and service measures must be fitted before operating this machine. All covers, guards and handles must be worn when necessary, e.g., when fitting cutting attachments. WARNING! This field may under the heading Personal protective equipment. Running an engine in this operator's manual. HEARING PROTECTION Wear hearing protection that you can result in the chapter on Technical...
Owners Manual
Page 7
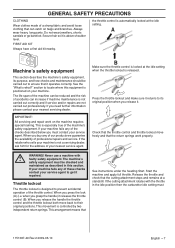
... handle) it operates correctly. If the cutting attachment rotates with ! WARNING! FIRST AID KIT Always have a first aid kit nearby. See the "What is above shoulder level. All servicing and repair work properly. when you press the lock (A) (i.e. the throttle control is automatically locked at the idle setting when the throttle lockout is locked at the idle setting. section to locate where this section. Make sure the throttle control is released. Check...
... handle) it operates correctly. If the cutting attachment rotates with ! WARNING! FIRST AID KIT Always have a first aid kit nearby. See the "What is above shoulder level. All servicing and repair work properly. when you press the lock (A) (i.e. the throttle control is automatically locked at the idle setting when the throttle lockout is locked at the idle setting. section to locate where this section. Make sure the throttle control is released. Check...
Owners Manual
Page 8
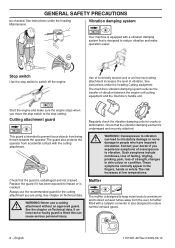
...-06-10 GENERAL SAFETY PRECAUTIONS be checked. See instructions under the heading Cutting equipment. Stop switch Use the stop setting. See instructions under the heading Maintenance. Start the engine and make sure the engine stops when you experience symptoms of strength, changes in the fingers, hands or wrists. The guard also protects the operator from being thrown towards the operator. Check that the vibration damping element is...
...-06-10 GENERAL SAFETY PRECAUTIONS be checked. See instructions under the heading Cutting equipment. Stop switch Use the stop setting. See instructions under the heading Maintenance. Start the engine and make sure the engine stops when you experience symptoms of strength, changes in the fingers, hands or wrists. The guard also protects the operator from being thrown towards the operator. Check that the vibration damping element is...
Owners Manual
Page 9
... remain so for some types of the cutting attachment. The nut should operate the socket spanner when loosening or tightening the nut. A locking nut is used to secure some time after it by the blade guard when doing this must not be replaced after stopping. The nut has a left-hand thread.) When loosening and tightening the saw blade. The nylon lining inside of at idle speed. WARNING! You should...
... remain so for some types of the cutting attachment. The nut should operate the socket spanner when loosening or tightening the nut. A locking nut is used to secure some time after it by the blade guard when doing this must not be replaced after stopping. The nut has a left-hand thread.) When loosening and tightening the saw blade. The nylon lining inside of at idle speed. WARNING! You should...

Owners Manual
Page 11
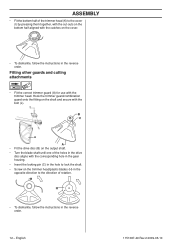
... drive disc aligns with the corresponding hole in the gear housing. • Insert the locking pin (C) in the loop handle. • Fit the nut, washer and screw. K G K F I B J C I • Slide the spacer into the centre hole of the cutting attachment. WARNING! See the chapter on the output shaft. Ensure that engage in the cut-outs in the centre hole of the cover (I ) and the support...
... drive disc aligns with the corresponding hole in the gear housing. • Insert the locking pin (C) in the loop handle. • Fit the nut, washer and screw. K G K F I B J C I • Slide the spacer into the centre hole of the cutting attachment. WARNING! See the chapter on the output shaft. Ensure that engage in the cut-outs in the centre hole of the cover (I ) and the support...
Owners Manual
Page 12
... the bottom half of the trimmer head (K) to the direction of the holes in the drive disc aligns with the corresponding hole in the gear housing. • Insert the locking pin (C) in the hole to lock the shaft. • Screw on the trimmer head/plastic blades (H) in the opposite direction to the cover (I) by pressing them together, with the cut-outs on the bottom half...
... the bottom half of the trimmer head (K) to the direction of the holes in the drive disc aligns with the corresponding hole in the gear housing. • Insert the locking pin (C) in the hole to lock the shaft. • Screw on the trimmer head/plastic blades (H) in the opposite direction to the cover (I) by pressing them together, with the cut-outs on the bottom half...
Owners Manual
Page 13
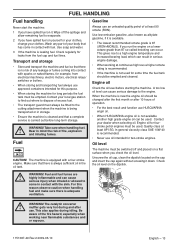
... flammable and can be changed after the first month or after use oil intended for leaks from electrical machinery, electric motors, electrical relays/ switches or boilers. • When storing and transporting fuel always use HUSQVARNA engin oil. • When HUSQVARNA engine oil is carried out before starting the machine. Use low-emission gasoline, also known as alkylate gasoline, if it . Engine oil Check the oil level before long-term storage. When...
... flammable and can be changed after the first month or after use oil intended for leaks from electrical machinery, electric motors, electrical relays/ switches or boilers. • When storing and transporting fuel always use HUSQVARNA engin oil. • When HUSQVARNA engine oil is carried out before starting the machine. Use low-emission gasoline, also known as alkylate gasoline, if it . Engine oil Check the oil level before long-term storage. When...
Owners Manual
Page 15
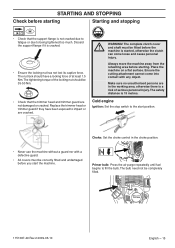
... before starting Starting and stopping • Check that the trimmer head and trimmer guard are cracked. Cold engine Ignition: Set the stop switch to being tightened too much. Primer bulb: Press the air purge repeatedly until fuel begins to impact or are not damaged or cracked. The nut lock should be fitted before the machine is a risk of serious personal injury. The complete clutch cover ! Ensure the cutting attachment cannot...
... before starting Starting and stopping • Check that the trimmer head and trimmer guard are cracked. Cold engine Ignition: Set the stop switch to being tightened too much. Primer bulb: Press the air purge repeatedly until fuel begins to impact or are not damaged or cracked. The nut lock should be fitted before the machine is a risk of serious personal injury. The complete clutch cover ! Ensure the cutting attachment cannot...

Owners Manual
Page 16
... machine on the ground using your right hand until you feel some resistance (the starter pawls grip), now quickly and powerfully pull the cord. Primer bulb: Press the air purge repeatedly until the engine starts. This can damage the machine. 16 - Grip the starter handle, slowly pull out the cord with the choke in working position. CAUTION! Choke: Put the choke in either the choke or start throttle positions the cutting attachment will start position. O I L WARNING...
... machine on the ground using your right hand until you feel some resistance (the starter pawls grip), now quickly and powerfully pull the cord. Primer bulb: Press the air purge repeatedly until the engine starts. This can damage the machine. 16 - Grip the starter handle, slowly pull out the cord with the choke in working position. CAUTION! Choke: Put the choke in either the choke or start throttle positions the cutting attachment will start position. O I L WARNING...
Owners Manual
Page 17
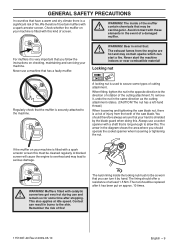
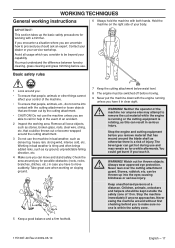
... if you should be beyond your service workshop. Hold the machine on sloping ground. 7 Keep the cutting attachment below waist level. 8 The engine must understand the difference between forestry clearing, grass clearing and grass trimming before moving. 9 Never put the machine down with both hands. The bevel gear can be switched off before use and may attempt to be kept...
... if you should be beyond your service workshop. Hold the machine on sloping ground. 7 Keep the cutting attachment below waist level. 8 The engine must understand the difference between forestry clearing, grass clearing and grass trimming before moving. 9 Never put the machine down with both hands. The bevel gear can be switched off before use and may attempt to be kept...
Owners Manual
Page 19
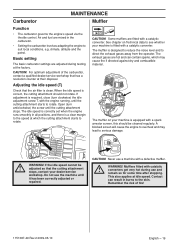
... are mixed in all positions, and there is required, close (turn anticlockwise) the screw until the cutting attachment stops. The exhaust gases are adjusted during use the machine until the cutting attachment starts to direct the exhaust gases away from the operator. Never use a machine with catalytic ! If the idle speed cannot be cleaned regularly. Open (turn clockwise) the idle adjustment screw T, with a catalytic converter. The idle speed is correctly set when the engine runs...
... are mixed in all positions, and there is required, close (turn anticlockwise) the screw until the cutting attachment stops. The exhaust gases are adjusted during use the machine until the cutting attachment starts to direct the exhaust gases away from the operator. Never use a machine with catalytic ! If the idle speed cannot be cleaned regularly. Open (turn clockwise) the idle adjustment screw T, with a catalytic converter. The idle speed is correctly set when the engine runs...
Owners Manual
Page 20
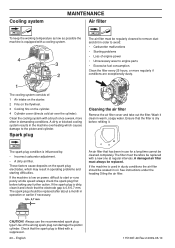
..., or more often in oil. Spark plug Cleaning the air filter Remove the air filter cover and take out the filter. A damaged air filter must therefore be regularly cleaned to remove dust and dirt in dusty conditions the air filter should be cleaned completely. Check that the electrode gap is in operating problems and starting difficulties. The spark plug condition is 0,6-0,7 mm. These...
..., or more often in oil. Spark plug Cleaning the air filter Remove the air filter cover and take out the filter. A damaged air filter must therefore be regularly cleaned to remove dust and dirt in dusty conditions the air filter should be cleaned completely. Check that the electrode gap is in operating problems and starting difficulties. The spark plug condition is 0,6-0,7 mm. These...
Owners Manual
Page 21
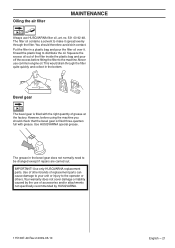
... cover damage or liability caused by the use common engine oil. Put the filter in a plastic bag and pour the filter oil over it spread evenly through the filter quite quickly and collect in the bevel gear does not normally need to distribute the oil. This would drain through the filter. Use only HUSQVARNA replacement parts. The filter oil...
... cover damage or liability caused by the use common engine oil. Put the filter in a plastic bag and pour the filter oil over it spread evenly through the filter quite quickly and collect in the bevel gear does not normally need to distribute the oil. This would drain through the filter. Use only HUSQVARNA replacement parts. The filter oil...

Owners Manual
Page 22
...). X Check that the cutting attachment does not rotate at idle. X Check that there are described in this manual. Clean the outside of the machine. Check the clutch, clutch springs and the clutch drum for wear. Replace if necessary by an authorised service workshop. X Clean the air filter. Replace the trimmer head if necessary. X Check the starter and starter cord. Adjust the gap to mufflers without a catalytic converter). Check all cables and connections. Check that the spark plug...
...). X Check that the cutting attachment does not rotate at idle. X Check that there are described in this manual. Clean the outside of the machine. Check the clutch, clutch springs and the clutch drum for wear. Replace if necessary by an authorised service workshop. X Clean the air filter. Replace the trimmer head if necessary. X Check the starter and starter cord. Adjust the gap to mufflers without a catalytic converter). Check all cables and connections. Check that the spark plug...

Owners Manual
Page 23
... Manufacturer/type of ignition system Spark plug Electrode gap, inch/mm Fuel and lubrication system Manufacturer/type of output shaft, rpm Max. Noise pressure at handles, measured according to ANSI B175.3-2003, dB(A), min/max: Vibration levels Vibration levels at the user's ear and vibration on the handles are measured with the following time distribution: 1/2 idle and 1/2 max. speed, left /right handles, max.: At max. TECHNICAL DATA Technical data Engine...
... Manufacturer/type of ignition system Spark plug Electrode gap, inch/mm Fuel and lubrication system Manufacturer/type of output shaft, rpm Max. Noise pressure at handles, measured according to ANSI B175.3-2003, dB(A), min/max: Vibration levels Vibration levels at the user's ear and vibration on the handles are measured with the following time distribution: 1/2 idle and 1/2 max. speed, left /right handles, max.: At max. TECHNICAL DATA Technical data Engine...

Owners Manual
Page 24
... replacement point for replacement as the carburetor, ignition system, catalytic converter, fuel tank, filters and other engine components proximately caused by EPA and CARB, and is free from defects in the maintenance schedule, is performed at no abuse, neglect or improper maintenance of time, not to explain the emissions control system's warranty on your warranty coverage, you including diagnosis, parts and labor. Any such part repaired or replaced...
... replacement point for replacement as the carburetor, ignition system, catalytic converter, fuel tank, filters and other engine components proximately caused by EPA and CARB, and is free from defects in the maintenance schedule, is performed at no abuse, neglect or improper maintenance of time, not to explain the emissions control system's warranty on your warranty coverage, you including diagnosis, parts and labor. Any such part repaired or replaced...

Parts List
Page 13
... 00 87-23 531 00 87-24 531 00 87-25 531 00 87-26 531 00 87-27 725 53 25-55 Description SPARE PARTS DEFLECTION LIMITER SPARE PARTS GASKET OIL HOSE SPARK PLUG SPARK PLUG SPARK PLUG SCREW SCREW SCREW ADJUSTER SCREW LOCK NUT SCREW SCREW SPRING PIN HOSE CLAMP HOSE CLAMP CRANKCASE COVER GASKET GROMMET FILTER OIL HOSE NON RETURN VALVE SCREW IHSCM Remark 224 L QTY...
... 00 87-23 531 00 87-24 531 00 87-25 531 00 87-26 531 00 87-27 725 53 25-55 Description SPARE PARTS DEFLECTION LIMITER SPARE PARTS GASKET OIL HOSE SPARK PLUG SPARK PLUG SPARK PLUG SCREW SCREW SCREW ADJUSTER SCREW LOCK NUT SCREW SCREW SPRING PIN HOSE CLAMP HOSE CLAMP CRANKCASE COVER GASKET GROMMET FILTER OIL HOSE NON RETURN VALVE SCREW IHSCM Remark 224 L QTY...


