
Owners Manual
Page 2
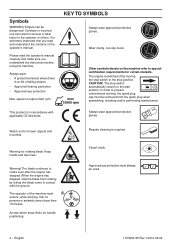
...or fatal injury to the start position. Always wear approved protective gloves. The blade continues to special certification requirements for thrown objects and ricochets. Arrows which show limits for rotating blade. Approved eye protection must ensure, while working, that you read the operator... is extremely important that no persons or animals come in contact with applicable CE directives. When the engine has stopped, stop the blade from the spark plug when assembling, checking and/or performing maintenance. CAUTION! The operator of the operator's manual. Watch out for...
...or fatal injury to the start position. Always wear approved protective gloves. The blade continues to special certification requirements for thrown objects and ricochets. Arrows which show limits for rotating blade. Approved eye protection must ensure, while working, that you read the operator... is extremely important that no persons or animals come in contact with applicable CE directives. When the engine has stopped, stop the blade from the spark plug when assembling, checking and/or performing maintenance. CAUTION! The operator of the operator's manual. Watch out for...
Owners Manual
Page 3
... 6 Personal protective equipment 6 Machine′s safety equipment 7 ASSEMBLY Fitting the loop handle 11 Assembling the angle gear 11 Assembling the cutting equipment 11 Assembling the blade 11 FUEL HANDLING Fuel safety 13 Fuel 13 Fueling 14 STARTING AND STOPPING Check before starting 15 Starting and stopping 15 WORKING TECHNIQUES General working...
... 6 Personal protective equipment 6 Machine′s safety equipment 7 ASSEMBLY Fitting the loop handle 11 Assembling the angle gear 11 Assembling the cutting equipment 11 Assembling the blade 11 FUEL HANDLING Fuel safety 13 Fuel 13 Fueling 14 STARTING AND STOPPING Check before starting 15 Starting and stopping 15 WORKING TECHNIQUES General working...
Owners Manual
Page 5
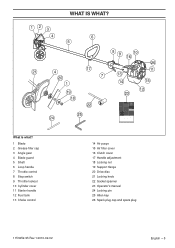
... WHAT? 1 23 4 6 5 21 4 20 1 17 7 19 18 22 25 24 8 9 10 16 13 14 26 11 15 12 23 What is what? 1 Blade 2 Grease filler cap 3 Angle gear 4 Blade guard 5 Shaft 6 Loop handle 7 Throttle control 8 Stop switch 9 Throttle lockout 10 Cylinder cover 11 Starter handle 12 Fuel tank 13 Choke control...
... WHAT? 1 23 4 6 5 21 4 20 1 17 7 19 18 22 25 24 8 9 10 16 13 14 26 11 15 12 23 What is what? 1 Blade 2 Grease filler cap 3 Angle gear 4 Blade guard 5 Shaft 6 Loop handle 7 Throttle control 8 Stop switch 9 Throttle lockout 10 Cylinder cover 11 Starter handle 12 Fuel tank 13 Choke control...
Owners Manual
Page 10
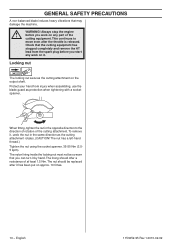
Check that the cutting equipment has stopped completely and remove the HT lead from injury when assembling, use the blade guard as the cutting attachment rotates. (CAUTION! The nut should offer a resistance of at least 1.5 Nm. To remove it has been put on the output ...shaft. The nylon lining inside the locking nut must not be replaced after the throttle is released. GENERAL SAFETY PRECAUTIONS A non-balanced blade induces heavy vibrations that you can turn it by hand. Always stop the engine before you work on any work on it. This continues to...
Check that the cutting equipment has stopped completely and remove the HT lead from injury when assembling, use the blade guard as the cutting attachment rotates. (CAUTION! The nut should offer a resistance of at least 1.5 Nm. To remove it has been put on the output ...shaft. The nylon lining inside the locking nut must not be replaced after the throttle is released. GENERAL SAFETY PRECAUTIONS A non-balanced blade induces heavy vibrations that you can turn it by hand. Always stop the engine before you work on any work on it. This continues to...
Owners Manual
Page 11
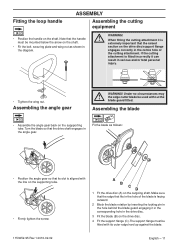
When fitting the cutting attachment it can result in the angle gear. Under no circumstances may ! the edge cutter blade be mounted below the arrow on the shaft. • Fit the bolt, securing plate and wing nut as follows: • Position the angle gear...support flange engages correctly in the drive disc. 3 Fit the blade (B) on the outgoing shaft. Fit the blade as shown in the diagram. The support flange must be used without the blade guard fitted. WARNING! ! Turn the blade so that fits in the hole of the cutting attachment. ...
When fitting the cutting attachment it can result in the angle gear. Under no circumstances may ! the edge cutter blade be mounted below the arrow on the shaft. • Fit the bolt, securing plate and wing nut as follows: • Position the angle gear...support flange engages correctly in the drive disc. 3 Fit the blade (B) on the outgoing shaft. Fit the blade as shown in the diagram. The support flange must be used without the blade guard fitted. WARNING! ! Turn the blade so that fits in the hole of the cutting attachment. ...
Owners Manual
Page 15
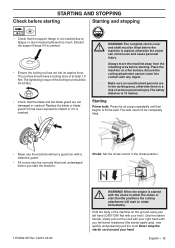
.... Choke: Set the choke control in either the choke or start throttle positions the cutting attachment will start the machine. Replace the blade or blade guard if it has been exposed to being tightened too much. Always move the machine away from the refuelling area before the machine ...no unauthorised persons are not damaged or cracked. The bulb need not be fitted before starting Starting and stopping • Check that the blade and the blade guard are in the working area, otherwise there is a risk of the machine on a flat least 1.5 Nm. Not with your ...
.... Choke: Set the choke control in either the choke or start throttle positions the cutting attachment will start the machine. Replace the blade or blade guard if it has been exposed to being tightened too much. Always move the machine away from the refuelling area before the machine ...no unauthorised persons are not damaged or cracked. The bulb need not be fitted before starting Starting and stopping • Check that the blade and the blade guard are in the working area, otherwise there is a risk of the machine on a flat least 1.5 Nm. Not with your ...

Owners Manual
Page 17
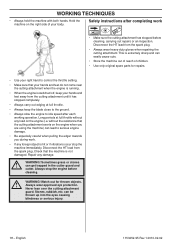
...that there are no -one comes closer than 15 m while you : • To ensure that people, animals or other damage. • Ensure the blade guard is mounted and not damaged. • Check that the handle and safety features are able to be thrown out or become wrapped around you...Check the area around the cutter or cutter guard. • Keep unauthorised persons at a distance. WARNING! Avoid all nuts and screws. • Check the blade for working . • Never allow children to use the machine for the purpose it in bad weather, such as stones, broken glass, nails, steel ...
...that there are no -one comes closer than 15 m while you : • To ensure that people, animals or other damage. • Ensure the blade guard is mounted and not damaged. • Check that the handle and safety features are able to be thrown out or become wrapped around you...Check the area around the cutter or cutter guard. • Keep unauthorised persons at a distance. WARNING! Avoid all nuts and screws. • Check the blade for working . • Never allow children to use the machine for the purpose it in bad weather, such as stones, broken glass, nails, steel ...
Owners Manual
Page 18
... attachment until it has stopped completely. • Always carry out edging at full throttle without the resistance that the machine is switched off, keep the blade close to the ground. • Always slow the engine to control the throttle setting. • Make sure that your body. without any damage. ! Never lean...
... attachment until it has stopped completely. • Always carry out edging at full throttle without the resistance that the machine is switched off, keep the blade close to the ground. • Always slow the engine to control the throttle setting. • Make sure that your body. without any damage. ! Never lean...

Owners Manual
Page 23
.... Check the clutch, clutch springs and the clutch drum for cracks and chips or damage. Check that the vibration damping elements are tight. X Check the blade for wear. Clean the outside of the machine. Weekly maintenance X X X X X X X X Monthly maintenance X X X X X 1153252-95 Rev.1 2010-02-02 English - 23 Most of the items are...
.... Check the clutch, clutch springs and the clutch drum for cracks and chips or damage. Check that the vibration damping elements are tight. X Check the blade for wear. Clean the outside of the machine. Weekly maintenance X X X X X X X X Monthly maintenance X X X X X 1153252-95 Rev.1 2010-02-02 English - 23 Most of the items are...

Owners Manual
Page 24
...(A): 96 Vibration levels (see note 2) aEcqcuoivrdailnegnttovibISraOtio2n28le6v7e,lsm(/ash2v,eq) at handles, measured Front/rear handles: 3,0/3,6 Cutting equipment Blade 503 84 82-02 Blade guard 503 84 65-01 Note 1: Reported data for vibration level has a typical statistical dispersion (standard deviation) of 1.0... Reported data for noise pressure level has a typical statistical dispersion (standard deviation) of 1 m/s2. 24 - TECHNICAL DATA Technical data 323Ex Motor Cylinder displacement, cu.in/cm3 1,50/24,5 Cylinder bore, inch/mm 1,34/34,0 Stroke, inch/mm 1,06/27 Idle ...
...(A): 96 Vibration levels (see note 2) aEcqcuoivrdailnegnttovibISraOtio2n28le6v7e,lsm(/ash2v,eq) at handles, measured Front/rear handles: 3,0/3,6 Cutting equipment Blade 503 84 82-02 Blade guard 503 84 65-01 Note 1: Reported data for vibration level has a typical statistical dispersion (standard deviation) of 1.0... Reported data for noise pressure level has a typical statistical dispersion (standard deviation) of 1 m/s2. 24 - TECHNICAL DATA Technical data 323Ex Motor Cylinder displacement, cu.in/cm3 1,50/24,5 Cylinder bore, inch/mm 1,34/34,0 Stroke, inch/mm 1,06/27 Idle ...


