

Owners Manual
Page 2
... always be dangerous! CAUTION! The operator of the operator's manual. Edgers can result in serious or fatal injury to the stop the blade from the spark plug when assembling, checking and/or performing maintenance. speed of falling objects • Approved hearing protection • Approved eye... protection Max. The engine is switched off by letting the blade come closer than 15 metres. Regular cleaning is a risk of output shaft, rpm KEY TO SYMBOLS Always wear approved protective gloves. Keep...
... always be dangerous! CAUTION! The operator of the operator's manual. Edgers can result in serious or fatal injury to the stop the blade from the spark plug when assembling, checking and/or performing maintenance. speed of falling objects • Approved hearing protection • Approved eye... protection Max. The engine is switched off by letting the blade come closer than 15 metres. Regular cleaning is a risk of output shaft, rpm KEY TO SYMBOLS Always wear approved protective gloves. Keep...

Owners Manual
Page 3
... safety equipment 8 ASSEMBLY Fitting the loop handle 12 Assembling the angle gear (326Ex) 12 Assembling the angle gear (326ES) 12 Assembling the cutting equipment 13 Assembling the blade (326Ex) 13 Assembling the blade (326ES) 13 FUEL HANDLING Fuel safety 14 Fuel 14 Fueling 15 STARTING AND... 23 Spark plug 23 Air filter 24 Angle gear 24 Lubricating the flexible drive shaft (326Ex) 25 Adjusting the edger's cutting depth (326Ex) 25 Adjusting the edger's cutting depth (326ES) 25 Maintenance schedule 26 TECHNICAL DATA Technical data 27 FEDERAL...
... safety equipment 8 ASSEMBLY Fitting the loop handle 12 Assembling the angle gear (326Ex) 12 Assembling the angle gear (326ES) 12 Assembling the cutting equipment 13 Assembling the blade (326Ex) 13 Assembling the blade (326ES) 13 FUEL HANDLING Fuel safety 14 Fuel 14 Fueling 15 STARTING AND... 23 Spark plug 23 Air filter 24 Angle gear 24 Lubricating the flexible drive shaft (326Ex) 25 Adjusting the edger's cutting depth (326Ex) 25 Adjusting the edger's cutting depth (326ES) 25 Maintenance schedule 26 TECHNICAL DATA Technical data 27 FEDERAL...

Owners Manual
Page 5
...? 1 23 4 5 6 21 4 20 1 17 7 19 18 22 25 24 89 10 16 26 11 13 14 15 12 23 What is what? (326Ex) 1 Blade 2 Grease filler cap 3 Angle gear 4 Blade guard 5 Shaft 6 Loop handle 7 Throttle control 8 Stop switch 9 Throttle lockout 10 Cylinder cover 11 Starter handle 12 Fuel tank 13 Choke control...
...? 1 23 4 5 6 21 4 20 1 17 7 19 18 22 25 24 89 10 16 26 11 13 14 15 12 23 What is what? (326Ex) 1 Blade 2 Grease filler cap 3 Angle gear 4 Blade guard 5 Shaft 6 Loop handle 7 Throttle control 8 Stop switch 9 Throttle lockout 10 Cylinder cover 11 Starter handle 12 Fuel tank 13 Choke control...

Owners Manual
Page 6
... 22 20 18 23 24 7 8 13 12 10 9 11 17 14 15 16 26 25 What is what? (326ES) 1 Grease filler cap 2 Angle gear 3 Blade guard 4 Shaft 5 Loop handle 6 Handle adjustment 7 Stop switch 8 Throttle lockout 9 Throttle control 10 Choke control 11 Air purge 12 Clutch cover 13 Cylinder cover 14... cap and spark plug 15 Starter handle 16 Air filter cover 17 Fuel tank 18 Locking screw 19 Washers 20 Support flange 21 Blade 22 Drive disc 23 Locking pin 24 Socket spanner 25 Allen key 26 Operator's manual 6 -
... 22 20 18 23 24 7 8 13 12 10 9 11 17 14 15 16 26 25 What is what? (326ES) 1 Grease filler cap 2 Angle gear 3 Blade guard 4 Shaft 5 Loop handle 6 Handle adjustment 7 Stop switch 8 Throttle lockout 9 Throttle control 10 Choke control 11 Air purge 12 Clutch cover 13 Cylinder cover 14... cap and spark plug 15 Starter handle 16 Air filter cover 17 Fuel tank 18 Locking screw 19 Washers 20 Support flange 21 Blade 22 Drive disc 23 Locking pin 24 Socket spanner 25 Allen key 26 Operator's manual 6 -

Owners Manual
Page 10
... during use a machine that : ! Bear in mind that has a faulty muffler. Cutting equipment Regularly check that may damage the machine. A blocked A non-balanced blade induces heavy vibrations that the muffler is fitted with these elements in burns to serious damage. before you work on any work...
... during use a machine that : ! Bear in mind that has a faulty muffler. Cutting equipment Regularly check that may damage the machine. A blocked A non-balanced blade induces heavy vibrations that the muffler is fitted with these elements in burns to serious damage. before you work on any work...

Owners Manual
Page 11
...attachment on the output shaft. Protect your hand from injury when assembling, use the blade guard as protection when tightening with a socket spanner. GENERAL SAFETY PRECAUTIONS Locking nut (326Ex) The locking nut secures the cutting attachment on the output shaft. The nut should... offer a resistance of the cutting attachment. Protect your hand from injury when assembling, use the blade guard as protection when tightening with a ...
...attachment on the output shaft. Protect your hand from injury when assembling, use the blade guard as protection when tightening with a socket spanner. GENERAL SAFETY PRECAUTIONS Locking nut (326Ex) The locking nut secures the cutting attachment on the output shaft. The nut should... offer a resistance of the cutting attachment. Protect your hand from injury when assembling, use the blade guard as protection when tightening with a ...

Owners Manual
Page 12
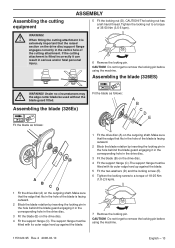
.... 2 2008-03-10 Fitting the loop handle ASSEMBLY Assembling the angle gear (326ES) • Position the handle on the suppporting tube. Turn the blade so that the drive shaft engages in the diagram. • Assemble the angle gear back on the suppporting tube. Note that the handle must be...the arrow on the supporting tube. • Firmly tighten the screw. 12 - Assembling the angle gear (326Ex) • Tighten the two screws. • Assemble the angle gear back on the shaft. Turn the blade so that its slot is aligned with the line on the shaft. • Fit the bolt, securing...
.... 2 2008-03-10 Fitting the loop handle ASSEMBLY Assembling the angle gear (326ES) • Position the handle on the suppporting tube. Turn the blade so that the drive shaft engages in the diagram. • Assemble the angle gear back on the suppporting tube. Note that the handle must be...the arrow on the supporting tube. • Firmly tighten the screw. 12 - Assembling the angle gear (326Ex) • Tighten the two screws. • Assemble the angle gear back on the shaft. Turn the blade so that its slot is aligned with the line on the shaft. • Fit the bolt, securing...
Owners Manual
Page 13
...;ange must be fitted with its outer edge hard up against the blade. 7 Remove the locking pin. The support flange must be used without the blade guard fitted. CAUTION! Assembling the blade (326Ex) Fit the blade as follows: Fit the blade as follows: A B C D E 1 Fit the drive disc (A) on the drive disc/support fl...
...;ange must be fitted with its outer edge hard up against the blade. 7 Remove the locking pin. The support flange must be used without the blade guard fitted. CAUTION! Assembling the blade (326Ex) Fit the blade as follows: Fit the blade as follows: A B C D E 1 Fit the drive disc (A) on the drive disc/support fl...
Owners Manual
Page 16
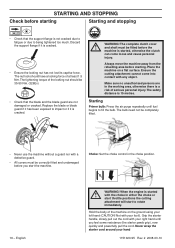
... be correctly fitted and undamaged before starting Starting and stopping • Check that the blade and the blade guard are in the choke position. 16 - and shaft must be 35-50 Nm. (326Ex) • Check that the support flange is a risk of serious personal injury. Choke...to being tightened too much. English WARNING! Discard the support flange if it has been exposed to rotate immediately. Replace the blade or blade guard if it is cracked. Grip the starter handle, slowly pull out the cord with any object. Always move the machine away...
... be correctly fitted and undamaged before starting Starting and stopping • Check that the blade and the blade guard are in the choke position. 16 - and shaft must be 35-50 Nm. (326Ex) • Check that the support flange is a risk of serious personal injury. Choke...to being tightened too much. English WARNING! Discard the support flange if it has been exposed to rotate immediately. Replace the blade or blade guard if it is cracked. Grip the starter handle, slowly pull out the cord with any object. Always move the machine away...

Owners Manual
Page 18
..., string, etc. Do not touch the ! Read the safety instructions carefully. English • Check that the blade and blade guard are in the immediate vicinity. • Make sure the blade does not rotate when idling. • Make sure that all usage which you are uncertain how to use the... Ensure that no fuel leaks and that the handle and safety features are correctly secured. • When adjusting the carburettor, make sure the blade is held against the ground and that no one comes closer than 15 m while you consider to be kept outside its specifications. ...
..., string, etc. Do not touch the ! Read the safety instructions carefully. English • Check that the blade and blade guard are in the immediate vicinity. • Make sure the blade does not rotate when idling. • Make sure that all usage which you are uncertain how to use the... Ensure that no fuel leaks and that the handle and safety features are correctly secured. • When adjusting the carburettor, make sure the blade is held against the ground and that no one comes closer than 15 m while you consider to be kept outside its specifications. ...

Owners Manual
Page 19
... moving. 5 Never put the machine down with both hands. Always stop the machine immediately. Always wear approved eye protection. can be switched off , keep the blade close to the ground. • Always slow the engine to move and stand safely. can get trapped in case you have to idle speed after...
... moving. 5 Never put the machine down with both hands. Always stop the machine immediately. Always wear approved eye protection. can be switched off , keep the blade close to the ground. • Always slow the engine to move and stand safely. can get trapped in case you have to idle speed after...

Owners Manual
Page 26
Replace the guard if it has been exposed to mufflers fitted with a suppressor. X Check the blade for wear. X Check the starter and starter cord. Check that the angle gear is cracked. Replace if necessary. Replace the spark plug. Check and ...leaks from cracks or other defects. X Check that the stop switch works correctly. X Check that the locking nut of the cutting equipment is tighten correctly. (326Ex) X Check that the locking screw of the cutting equipment is fitted with a catalytic converter). Most of the items are not damaged. Check that the...
Replace the guard if it has been exposed to mufflers fitted with a suppressor. X Check the blade for wear. X Check the starter and starter cord. Check that the angle gear is cracked. Replace if necessary. Replace the spark plug. Check and ...leaks from cracks or other defects. X Check that the stop switch works correctly. X Check that the locking nut of the cutting equipment is tighten correctly. (326Ex) X Check that the locking screw of the cutting equipment is fitted with a catalytic converter). Most of the items are not damaged. Check that the...

Owners Manual
Page 27
... data Engine Cylinder displacement, cu.in/cm3 Cylinder bore, inch/mm Stroke, inch/mm Idle speed, rpm Recommended max. speed, rear/front handles: Cutting equipment Blade Blade guard 326Ex 326ES 1,50/24,5 1,34/34,0 1,06/27 2700 8300 0,9/8400 Yes Yes 1,50/24,5 1,34/34,0 1,06/27 2700 8300 0,9/8400 Yes Yes WalbroMB...
... data Engine Cylinder displacement, cu.in/cm3 Cylinder bore, inch/mm Stroke, inch/mm Idle speed, rpm Recommended max. speed, rear/front handles: Cutting equipment Blade Blade guard 326Ex 326ES 1,50/24,5 1,34/34,0 1,06/27 2700 8300 0,9/8400 Yes Yes 1,50/24,5 1,34/34,0 1,06/27 2700 8300 0,9/8400 Yes Yes WalbroMB...

Owners Manual
Page 30
... the owner's residence.) EZ & MZ Zero Turn Riders: 1 year commercial warranty or 600 hours of material due to , belts, blades, blade adapters, bulbs, clutches, clutch drums, filters, guide bars, lubricants, rewind springs, saw crankshafts for commercial/professional use , except as ... limited warranty with R.O.P.S. Rental Warranty: 90 days on zero turn riders, hydraulic pumps and wheel motors. SECTION 2: HUSQVARNA'S OBLIGATIONS UNDER THE WARRANTY Husqvarna will repair or replace defective components without charge for the "Warranty Period" of the product as herein stated. SECTION ...
... the owner's residence.) EZ & MZ Zero Turn Riders: 1 year commercial warranty or 600 hours of material due to , belts, blades, blade adapters, bulbs, clutches, clutch drums, filters, guide bars, lubricants, rewind springs, saw crankshafts for commercial/professional use , except as ... limited warranty with R.O.P.S. Rental Warranty: 90 days on zero turn riders, hydraulic pumps and wheel motors. SECTION 2: HUSQVARNA'S OBLIGATIONS UNDER THE WARRANTY Husqvarna will repair or replace defective components without charge for the "Warranty Period" of the product as herein stated. SECTION ...


