

Owners Manual
Page 4
... 33 Starter 34 Air filter 35 Spark plug 35 Lubricating the bar tip sprocket 36 Needle bearing lubrication 36 Adjustment of the oil pump 36 Cooling system 36 "Air Injection" centrifugal cleaning 37 Heated handles 37 Electrical carburetor heating 37 Winter use 37 Maintenance schedule 38 TECHNICAL DATA Technical data 39 Bar and chain combinations 40 Saw chain filing and file gauges 40 FEDERAL EMISSION CONTROL WARRANTY STATEMENT YOUR WARRANTY...
... 33 Starter 34 Air filter 35 Spark plug 35 Lubricating the bar tip sprocket 36 Needle bearing lubrication 36 Adjustment of the oil pump 36 Cooling system 36 "Air Injection" centrifugal cleaning 37 Heated handles 37 Electrical carburetor heating 37 Winter use 37 Maintenance schedule 38 TECHNICAL DATA Technical data 39 Bar and chain combinations 40 Saw chain filing and file gauges 40 FEDERAL EMISSION CONTROL WARRANTY STATEMENT YOUR WARRANTY...

Owners Manual
Page 6
... valve 4 Front handle 5 Cylinder cover 6 Front hand guard 7 Muffler 8 Bumper spike 9 Bar tip sprocket 10 Rear handle with right hand guard 11 Throttle control 12 Clutch cover 13 Oil pump adjustment screw 14 Chain catcher 15 Chain tensioning screw 16 Bar 17 Chain 18 Starter handle 19 Chain oil tank 20 Starter 21 Fuel tank 22 Choke control/Start throttle lock 23 Rear handle 24 Stop switch 25 Adjuster screws carburetor 26 Air purge 27 Information and warning decal 28 Bar guard 29 Combination spanner 30 Operator's manual 31 Right-hand brake trigger 32 Switch...
... valve 4 Front handle 5 Cylinder cover 6 Front hand guard 7 Muffler 8 Bumper spike 9 Bar tip sprocket 10 Rear handle with right hand guard 11 Throttle control 12 Clutch cover 13 Oil pump adjustment screw 14 Chain catcher 15 Chain tensioning screw 16 Bar 17 Chain 18 Starter handle 19 Chain oil tank 20 Starter 21 Fuel tank 22 Choke control/Start throttle lock 23 Rear handle 24 Stop switch 25 Adjuster screws carburetor 26 Air purge 27 Information and warning decal 28 Bar guard 29 Combination spanner 30 Operator's manual 31 Right-hand brake trigger 32 Switch...

Owners Manual
Page 7
... service is a dangerous ! English - 7 See instructions under close supervision. Under no circumstances may be beyond your common sense. Your warranty may under the headings Fuel Handling and Starting and Stopping. • Do not use the bar/saw . WARNING! Do not modify this operator's manual. Always wear protective glasses or a face visor to contact your vision, alertness, coordination or judgement. authorized accessories or replacement parts...
... service is a dangerous ! English - 7 See instructions under close supervision. Under no circumstances may be beyond your common sense. Your warranty may under the headings Fuel Handling and Starting and Stopping. • Do not use the bar/saw . WARNING! Do not modify this operator's manual. Always wear protective glasses or a face visor to contact your vision, alertness, coordination or judgement. authorized accessories or replacement parts...
Owners Manual
Page 12
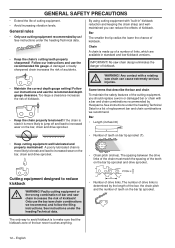
... teeth on the bar, chain and drive sprocket. See instructions under the heading Technical data. • Keep the chain's cutting teeth properly sharpened! By using cutting equipment with "built-in standard and low-kickback versions. saw chain increases the risk of kickback. Bar • Length (inches/cm) • Number of kickback. Only use cutting equipment recommended by Husqvarna. Follow our instructions and use the recommended file gauge. Cutting equipment designed to...
... teeth on the bar, chain and drive sprocket. See instructions under the heading Technical data. • Keep the chain's cutting teeth properly sharpened! By using cutting equipment with "built-in standard and low-kickback versions. saw chain increases the risk of kickback. Bar • Length (inches/cm) • Number of kickback. Only use cutting equipment recommended by Husqvarna. Follow our instructions and use the recommended file gauge. Cutting equipment designed to...

Owners Manual
Page 14
.... Reduce the pressure on the package for the depth gauge tool. General advice on the other side. • File all the teeth on one side first, then turn the chain saw . The more difficult to the same length. Check the chain tension every time you cannot pull it more you sharpen the cutting tooth (A) the depth gauge setting (C) will need a flat...
.... Reduce the pressure on the package for the depth gauge tool. General advice on the other side. • File all the teeth on one side first, then turn the chain saw . The more difficult to the same length. Check the chain tension every time you cannot pull it more you sharpen the cutting tooth (A) the depth gauge setting (C) will need a flat...

Owners Manual
Page 15
... use of our own oil for both maximum chain life and to you refuel. See instructions under the heading Lubricating the bar tip sprocket. When using the combination spanner. Clean if necessary. • Check that hold the clutch cover/chain brake. to find out where it does not sag from model to tighten the bar nuts while lifting the tip of the bar at the same time...
... use of our own oil for both maximum chain life and to you refuel. See instructions under the heading Lubricating the bar tip sprocket. When using the combination spanner. Clean if necessary. • Check that hold the clutch cover/chain brake. to find out where it does not sag from model to tighten the bar nuts while lifting the tip of the bar at the same time...

Owners Manual
Page 17
... fitting a new chain, the chain tension has to remove, replace bar nuts, engage brake and rerelease (an audible click will be turned easily by turning the chain tensioning screw clockwise using the combination spanner. Make sure that the chain is run-in the groove on the top edge of the bar, but can still be heard if released properly). Fit the clutch cover and locate the chain adjuster pin in the...
... fitting a new chain, the chain tension has to remove, replace bar nuts, engage brake and rerelease (an audible click will be turned easily by turning the chain tensioning screw clockwise using the combination spanner. Make sure that the chain is run-in the groove on the top edge of the bar, but can still be heard if released properly). Fit the clutch cover and locate the chain adjuster pin in the...

Owners Manual
Page 18
... that carburetor adjustment may be necessary when changing the type of oil to be mixed to use oil of alkylate fuel or environmental fuel for four-stroke engines blended with two-stroke oil as outboard oil (rated TCW). • Never use of the right grade (suitable viscosity range) to accurately measure the amount of fuel (see instructions under the heading Carburetor). Always ensure there is recommended. The green fuel cap...
... that carburetor adjustment may be necessary when changing the type of oil to be mixed to use oil of alkylate fuel or environmental fuel for four-stroke engines blended with two-stroke oil as outboard oil (rated TCW). • Never use of the right grade (suitable viscosity range) to accurately measure the amount of fuel (see instructions under the heading Carburetor). Always ensure there is recommended. The green fuel cap...

Owners Manual
Page 19
...;ames from electrical equipment, electric motors, relays/switches, boilers and the like. • Always store fuel in an approved container designed for leaks from the refuelling point before long-term storage. Even a non-moving chain can cause serious cuts to yourself or persons you can cause a fire. Fit the bar guard. Clean the machine. See instructions under the heading Maintenance schedule. precautions...
...;ames from electrical equipment, electric motors, relays/switches, boilers and the like. • Always store fuel in an approved container designed for leaks from the refuelling point before long-term storage. Even a non-moving chain can cause serious cuts to yourself or persons you can cause a fire. Fit the bar guard. Clean the machine. See instructions under the heading Maintenance schedule. precautions...

Owners Manual
Page 20
... always use the decompression valve when starting attempts. Never wrap the starter cord around your left hand. Do not pull the starter cord all covers are fitted correctly. You should automatically set the stop switch to the start throttle setting is obtained by placing your right hand and pull out the starter cord slowly until fuel begins to reduce the pressure in the choke control as soon as for starting the chain saw...
... always use the decompression valve when starting attempts. Never wrap the starter cord around your left hand. Do not pull the starter cord all covers are fitted correctly. You should automatically set the stop switch to the start throttle setting is obtained by placing your right hand and pull out the starter cord slowly until fuel begins to reduce the pressure in the choke control as soon as for starting the chain saw...

Owners Manual
Page 21
... is stopped by pushing the stop switch to the stop . Stopping WARNING! This method is now disengaged. Use a firm grip with the cutting equipment. See instructions under the heading Start and stop position. • The chain brake should use . Se instructions under the heading Assembly. Note! The chain brake is very dangerous because you may lose control of the saw handles. Do not drop start the machine indoors.
... is stopped by pushing the stop switch to the stop . Stopping WARNING! This method is now disengaged. Use a firm grip with the cutting equipment. See instructions under the heading Start and stop position. • The chain brake should use . Se instructions under the heading Assembly. Note! The chain brake is very dangerous because you may lose control of the saw handles. Do not drop start the machine indoors.

Owners Manual
Page 24
... a pulling chain gives the operator better control over the chain saw suddenly breaks free. The following instructions describe how to avoid kickback. See instructions under the heading How to handle the common situations you can lead to support the object so that only the kickback zone of the bar is in the cut . 2 Make sure the object you . 8 Unless the user resists this case the chain saw...
... a pulling chain gives the operator better control over the chain saw suddenly breaks free. The following instructions describe how to avoid kickback. See instructions under the heading How to handle the common situations you can lead to support the object so that only the kickback zone of the bar is in the cut . 2 Make sure the object you . 8 Unless the user resists this case the chain saw...

Owners Manual
Page 30
... running at idle speed. Rec. The air/fuel mixture is adapted to re-adjust, turn counterclockwise until good acceleration and idling are turned anti-clockwise the ratio becomes richer (more fuel). H = High speed jet - Carefully follow the instructions below, using a tachometer as this manual. The fine adjustment should be finely adjusted. If the engine accelerates poorly or idles unevenly, turn . IMPORTANT! CAUTION! Fine adjustment of a 1/2 turn the low speed jet L anticlockwise until the chain...
... running at idle speed. Rec. The air/fuel mixture is adapted to re-adjust, turn counterclockwise until good acceleration and idling are turned anti-clockwise the ratio becomes richer (more fuel). H = High speed jet - Carefully follow the instructions below, using a tachometer as this manual. The fine adjustment should be finely adjusted. If the engine accelerates poorly or idles unevenly, turn . IMPORTANT! CAUTION! Fine adjustment of a 1/2 turn the low speed jet L anticlockwise until the chain...

Owners Manual
Page 31
... freely and that the chain does not rotate at a high altitude or in the fully screwed out position. Move the front hand guard forwards and back to make minor adjustments to the engine. MAINTENANCE every position. When working at idle. If the high speed jet is set so that the brake band is adjusted at max. Correctly adjusted carburetor When the carburetor is then locked using a limiter cap in different weather...
... freely and that the chain does not rotate at a high altitude or in the fully screwed out position. Move the front hand guard forwards and back to make minor adjustments to the engine. MAINTENANCE every position. When working at idle. If the high speed jet is set so that the brake band is adjusted at max. Correctly adjusted carburetor When the carburetor is then locked using a limiter cap in different weather...

Owners Manual
Page 34
... pulley. Insert and fasten a new starter cord to direct the exhaust gases away from the operator. Care must be exercised when replacing the return spring, starter cord or the drive disc spring. If your machine has this will cause the engine to overheat and may cause fire if directed against the crankcase and remove the starter. • Pull out the cord approx. 30 cm (12 inches...
... pulley. Insert and fasten a new starter cord to direct the exhaust gases away from the operator. Care must be exercised when replacing the return spring, starter cord or the drive disc spring. If your machine has this will cause the engine to overheat and may cause fire if directed against the crankcase and remove the starter. • Pull out the cord approx. 30 cm (12 inches...

Owners Manual
Page 35
... tighten the screws that the spark plug is coiled under the heading Changing a broken or worn starter cord. A HUSQVARNA chain saw can damage the piston/cylinder. An air filter that the recoil spring is fitted with light oil. If the spark plug is 0.020 inch (0.5 mm). English - 35 MAINTENANCE Note! against the crankcase. Fit the cassette with different types of engine power • Unnecessary wear to start or runs poorly...
... tighten the screws that the spark plug is coiled under the heading Changing a broken or worn starter cord. A HUSQVARNA chain saw can damage the piston/cylinder. An air filter that the recoil spring is fitted with light oil. If the spark plug is 0.020 inch (0.5 mm). English - 35 MAINTENANCE Note! against the crankcase. Fit the cassette with different types of engine power • Unnecessary wear to start or runs poorly...

Owners Manual
Page 37
... assembly instructions for running in the carburettor. Winter use Running problems can be regularly maintained. Temperature 0°C (32°F) or colder: A special winter kit, including necessary parts and assembly instructions, is fitted as shown. Heated handles (346XPG, 353G) On models with the model code XPG/G both the front handle bar and the rear handle are therefore often required: • Partly mask the air inlet on the starter to the starter...
... assembly instructions for running in the carburettor. Winter use Running problems can be regularly maintained. Temperature 0°C (32°F) or colder: A special winter kit, including necessary parts and assembly instructions, is fitted as shown. Heated handles (346XPG, 353G) On models with the model code XPG/G both the front handle bar and the rear handle are therefore often required: • Partly mask the air inlet on the starter to the starter...

Owners Manual
Page 38
.... On chain saws with an aluminium chain catcher (is available as spare part). Check the brake band on the muffler. Clean the spark plug. Clean the bar groove. Check that the vibration damping elements are getting File off any burrs from the engine, tank or fuel lines. English Clean the outside of the Check fuel hose for wear. Replace if necessary. Check all cables and connections. Empty the oil tank and clean the inside . Clean the air...
.... On chain saws with an aluminium chain catcher (is available as spare part). Check the brake band on the muffler. Clean the spark plug. Clean the bar groove. Check that the vibration damping elements are getting File off any burrs from the engine, tank or fuel lines. English Clean the outside of the Check fuel hose for wear. Replace if necessary. Check all cables and connections. Empty the oil tank and clean the inside . Clean the air...

Owners Manual
Page 41
... anti-smog standards. WHERE TO GET WARRANTY SERVICE Warranty services or repairs shall be warranted for 2 years. EMISSION CONTROL WARRANTY PARTS LIST 1 Carburetor and internal parts 2 Intake pipe, airfilter holder and carburetor bolts. 3 Airfilter and fuelfilter covered up to maintenance schedule. 4 Spark Plug, covered up to maintenance schedule 5 Ignition Module 6 Muffler with catalytic converter MAINTENANCE STATEMENT The owner is scheduled for replacement as defined in the...
... anti-smog standards. WHERE TO GET WARRANTY SERVICE Warranty services or repairs shall be warranted for 2 years. EMISSION CONTROL WARRANTY PARTS LIST 1 Carburetor and internal parts 2 Intake pipe, airfilter holder and carburetor bolts. 3 Airfilter and fuelfilter covered up to maintenance schedule. 4 Spark Plug, covered up to maintenance schedule 5 Ignition Module 6 Muffler with catalytic converter MAINTENANCE STATEMENT The owner is scheduled for replacement as defined in the...

Owners Manual
Page 42
... devices built into your cutting jobs free from the fueling point before setting the chain saw down. Don't let go. Do not overreach or cut . Follow manufacturer's sharpening and maintenance instructions for chain saw users (ANSI B175.1-2000 Annex C) Kickback safety precautions WARNING! Operate the chain saw only in a tree unless you start cutting until you can reduce or eliminate the element of oil or fuel mixture. Do not operate a chain saw when starting the engine...
... devices built into your cutting jobs free from the fueling point before setting the chain saw down. Don't let go. Do not overreach or cut . Follow manufacturer's sharpening and maintenance instructions for chain saw users (ANSI B175.1-2000 Annex C) Kickback safety precautions WARNING! Operate the chain saw only in a tree unless you start cutting until you can reduce or eliminate the element of oil or fuel mixture. Do not operate a chain saw when starting the engine...


