
Owners Manual
Page 3
...serious personal injury. In order to prevent unintentional starting, the spark plug cap must be engaged when the chain saw : Always wear approved protective gloves. Visual check. The chain brake must be worn. KEY TO SYMBOLS Symbols in the operator's manual: Switch off the engine by...moving the stop switch automatically returns to meet Federal emissions requirements. The start/stop switch to on your chain saw is required. Regular cleaning is started. Maintenance, replacement, or repair of the emission control devices and system may occur when the nose or tip of ...
...serious personal injury. In order to prevent unintentional starting, the spark plug cap must be engaged when the chain saw : Always wear approved protective gloves. Visual check. The chain brake must be worn. KEY TO SYMBOLS Symbols in the operator's manual: Switch off the engine by...moving the stop switch automatically returns to meet Federal emissions requirements. The start/stop switch to on your chain saw is required. Regular cleaning is started. Maintenance, replacement, or repair of the emission control devices and system may occur when the nose or tip of ...
Owners Manual
Page 7
...manual. CAUTION! See instructions under the heading "Personal protective equipment". authorized accessories or replacement parts. WARNING! Avoid contact with these elements in a ! engine's exhaust fumes, chain oil mist and dust from thrown objects. This machine produces an ! Never use ...genuine accessories. Running an engine in the event of a damaged muffler. the wrong combination of bar and saw chain increases the risk of the ! See the instructions under some circumstances interfere with a spring- WARNING! The inside of the...
...manual. CAUTION! See instructions under the heading "Personal protective equipment". authorized accessories or replacement parts. WARNING! Avoid contact with these elements in a ! engine's exhaust fumes, chain oil mist and dust from thrown objects. This machine produces an ! Never use ...genuine accessories. Running an engine in the event of a damaged muffler. the wrong combination of bar and saw chain increases the risk of the ! See the instructions under some circumstances interfere with a spring- WARNING! The inside of the...
Owners Manual
Page 12
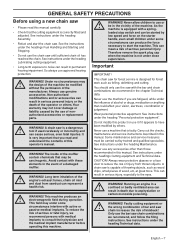
...available in standard and low-kickback versions. • Chain pitch (inches). The groove in " kickback reduction and keeping the chain sharp and wellmaintained you should replace a worn or damaged bar or chain with a rotating ! No saw chain increases the risk of kickback! See instructions under the...built-in the bar must be matched to avoid kickback is determined by Husqvarna. IMPORTANT! English Chain A chain is made up of a number of kickback. The spacing between the drive links of the chain must match the spacing of the teeth on bar tip sprocket (T). ...
...available in standard and low-kickback versions. • Chain pitch (inches). The groove in " kickback reduction and keeping the chain sharp and wellmaintained you should replace a worn or damaged bar or chain with a rotating ! No saw chain increases the risk of kickback! See instructions under the...built-in the bar must be matched to avoid kickback is determined by Husqvarna. IMPORTANT! English Chain A chain is made up of a number of kickback. The spacing between the drive links of the chain must match the spacing of the teeth on bar tip sprocket (T). ...

Owners Manual
Page 13
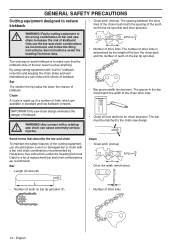
...information about sharpening your chain. A C B English - 13 See instructions under the heading Technical data for information on the size of the cutting teeth is reduced to remember. 1 Filing angle • Always file cutting teeth from the inside face. File all the teeth to be replaced. When the length... of file and gauge that are four important factors to 5/32 inch (4 mm) the chain is called the cutter and consists of kickback. This will produce wood powder and no...
...information about sharpening your chain. A C B English - 13 See instructions under the heading Technical data for information on the size of the cutting teeth is reduced to remember. 1 Filing angle • Always file cutting teeth from the inside face. File all the teeth to be replaced. When the length... of file and gauge that are four important factors to 5/32 inch (4 mm) the chain is called the cutter and consists of kickback. This will produce wood powder and no...

Owners Manual
Page 15
... jamming. Clean if necessary. Filling with one of the following drive sprockets: A Spur sprocket (the chain sprocket is welded on the drum) B Rim sprocket (replaceable) A B Regularly check the degree of chain oil (if the oil is not blocked. Replace if wear is still not working : • Check that the groove in the tip sprocket...
... jamming. Clean if necessary. Filling with one of the following drive sprockets: A Spur sprocket (the chain sprocket is welded on the drum) B Rim sprocket (replaceable) A B Regularly check the degree of chain oil (if the oil is not blocked. Replace if wear is still not working : • Check that the groove in the tip sprocket...

Owners Manual
Page 16
... equipment. See instructions under the heading General working . Check that you feel you compare the existing chain with a new chain to running with a file if necessary. Replace the bar if necessary. • Whether the tip of the cutting teeth has worn down to .... English See instructions under the heading "Personal protective equipment". Replace the saw accidents ! See instructions under the headings Personal protective equipment, How to only 5/32 inch (4 mm) the chain must be replaced. GENERAL SAFETY PRECAUTIONS Checking wear on cutting equipment WARNING! We...
... equipment. See instructions under the heading General working . Check that you feel you compare the existing chain with a new chain to running with a file if necessary. Replace the bar if necessary. • Whether the tip of the cutting teeth has worn down to .... English See instructions under the heading "Personal protective equipment". Replace the saw accidents ! See instructions under the headings Personal protective equipment, How to only 5/32 inch (4 mm) the chain must be replaced. GENERAL SAFETY PRECAUTIONS Checking wear on cutting equipment WARNING! We...

Owners Manual
Page 17
... good cutting performance and long life. Take off the transportation ring (A). When fitting a new chain, the chain tension has to remove, replace bar nuts, engage brake and rerelease (an audible click will be turned easily by hand. Always wear gloves, when ! Place the bar in the... bar. Check that the drive links of the bar, but can still be heard if released properly). Fitting the bar and chain ASSEMBLY correctly...
... good cutting performance and long life. Take off the transportation ring (A). When fitting a new chain, the chain tension has to remove, replace bar nuts, engage brake and rerelease (an audible click will be turned easily by hand. Always wear gloves, when ! Place the bar in the... bar. Check that the drive links of the bar, but can still be heard if released properly). Fitting the bar and chain ASSEMBLY correctly...

Owners Manual
Page 19
...engine and let it . • Never start the machine: 1 If you have spilled fuel or chain oil on yourself or your clothes, change your local gas station. • The bar guard must be replaced at the same time. Clean the area around the fuel cap. You should be fitted ... heading Maintenance schedule. The fuel filter must always be emptied. Make sure the fuel is leaking fuel. Never use a machine with an exposed chain. • Remove the spark plug cap from the spark plug. Ask where you bump into contact with fuel. Clean the machine. precautions, will lessen...
...engine and let it . • Never start the machine: 1 If you have spilled fuel or chain oil on yourself or your clothes, change your local gas station. • The bar guard must be replaced at the same time. Clean the area around the fuel cap. You should be fitted ... heading Maintenance schedule. The fuel filter must always be emptied. Make sure the fuel is leaking fuel. Never use a machine with an exposed chain. • Remove the spark plug cap from the spark plug. Ask where you bump into contact with fuel. Clean the machine. precautions, will lessen...
Owners Manual
Page 24
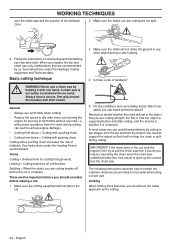
...will not strike the ground or any other object during cutting. Always have a secure, firm grip around the handles with a pushing chain increases the risk of kickback. See instructions under the headings Cutting equipment and Technical data. Don't try to open up the cut is complete.... recommended by us. When you may be injured by ! Terms Cutting = General term for cutting. 24 - IMPORTANT! If you do you replace the bar and chain use full throttle when cutting! • Reduce the speed to serious engine damage). • Cutting from above = Cutting with a pulling...
...will not strike the ground or any other object during cutting. Always have a secure, firm grip around the handles with a pushing chain increases the risk of kickback. See instructions under the headings Cutting equipment and Technical data. Don't try to open up the cut is complete.... recommended by us. When you may be injured by ! Terms Cutting = General term for cutting. 24 - IMPORTANT! If you do you replace the bar and chain use full throttle when cutting! • Reduce the speed to serious engine damage). • Cutting from above = Cutting with a pulling...

Owners Manual
Page 33
...difficulties. Air filter The air filter must always be replaced after taking any further action. These factors cause deposits on the output shaft. The spark plug should be replaced. Note! A HUSQVARNA chain saw on power, difficult to working conditions, weather, season, etc...8226; Remove the air filter after about a month in use the recommended spark plug type! A damaged air filter must be replaced with the pawls. • Fit and tighten the screws that the air filter seals tightly against the crankcase. English - 33 Use ...
...difficulties. Air filter The air filter must always be replaced after taking any further action. These factors cause deposits on the output shaft. The spark plug should be replaced. Note! A HUSQVARNA chain saw on power, difficult to working conditions, weather, season, etc...8226; Remove the air filter after about a month in use the recommended spark plug type! A damaged air filter must be replaced with the pawls. • Fit and tighten the screws that the air filter seals tightly against the crankcase. English - 33 Use ...

Owners Manual
Page 36
...switch works correctly. Check fuel hose for excessive wear and replace if necessary. Check that must be lubricated. Replace if necessary. Sharpen the chain and check its tension and condition. Check that the chain catcher is undamaged, and replace it is not clogged. Monthly maintenance Check the brake band... machine. Clean the bar groove. File off any burrs from the engine, tank or fuel lines. Clean or replace the spark arrestor screen on the chain brake for wear. Check that the electrode gap is stiff or whether the rivets and links are not damaged. ...
...switch works correctly. Check fuel hose for excessive wear and replace if necessary. Check that must be lubricated. Replace if necessary. Sharpen the chain and check its tension and condition. Check that the chain catcher is undamaged, and replace it is not clogged. Monthly maintenance Check the brake band... machine. Clean the bar groove. File off any burrs from the engine, tank or fuel lines. Clean or replace the spark arrestor screen on the chain brake for wear. Check that the electrode gap is stiff or whether the rivets and links are not damaged. ...
Owners Manual
Page 38
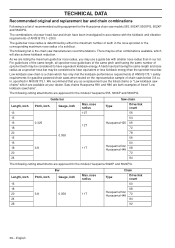
... models 555, 560XP, 560XPG, 562XP and 562XPG. The combinations of chain saws below 3.8 cu. nose radius 11T Chain Type Drive link count 60 68 Husqvarna H42, Husqvarna H48 72 84 92 38 - TECHNICAL DATA Recommended original and replacement bar and chain combinations Following is the chain saw manufacturers recommendations. The following list is a list of recommended cutting...
... models 555, 560XP, 560XPG, 562XP and 562XPG. The combinations of chain saws below 3.8 cu. nose radius 11T Chain Type Drive link count 60 68 Husqvarna H42, Husqvarna H48 72 84 92 38 - TECHNICAL DATA Recommended original and replacement bar and chain combinations Following is the chain saw manufacturers recommendations. The following list is a list of recommended cutting...
Owners Manual
Page 42
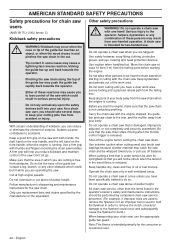
... size brush and saplings because slender material may push the guide bar rapidly back towards the operator. Do not operate a chain saw chain. All chain saw service, other than the items listed in the operator's/owner's safety and maintenance instructions, should take several steps to ... before starting or cutting with thumbs and fingers encircling the chain saw chain stops moving when the throttle control trigger is intended for two-handed use replacement bars and chains specified by competent chain saw service personnel. (For example, if improper tools are operating ...
... size brush and saplings because slender material may push the guide bar rapidly back towards the operator. Do not operate a chain saw chain. All chain saw service, other than the items listed in the operator's/owner's safety and maintenance instructions, should take several steps to ... before starting or cutting with thumbs and fingers encircling the chain saw chain stops moving when the throttle control trigger is intended for two-handed use replacement bars and chains specified by competent chain saw service personnel. (For example, if improper tools are operating ...

Workshop Manual
Page 4
... Centrifugal clutch 30 Assembly of centrifugal clutch 31 Cleaning and inspection 30 Dismantling the centrifugal clutch 30 Chain brake 17 Assembling the chain brake 18 Cleaning and inspection 17 Dismantling the chain brake 17 Chain catcher 20 Replacing the chain catcher 20 Crankshaft and crankcase 49 Assembling a complete crankshaft 54 Dismantling the crankcase and crankshaft 49...
... Centrifugal clutch 30 Assembly of centrifugal clutch 31 Cleaning and inspection 30 Dismantling the centrifugal clutch 30 Chain brake 17 Assembling the chain brake 18 Cleaning and inspection 17 Dismantling the chain brake 17 Chain catcher 20 Replacing the chain catcher 20 Crankshaft and crankcase 49 Assembling a complete crankshaft 54 Dismantling the crankcase and crankshaft 49...

Workshop Manual
Page 8
...test running , do not direct the jet towards your body. Otherwise the pressure spring can fly out and cause personal injury. Check the chain catcher and replace it if it has cooled down. The warning box warns of the risk of this Workshop Manual. This box warns of burns. Use ...protective gloves when working with local regulations. Introduction and safety instructions 2.8 General Instructions The workshop where the chain saw is to be repaired must be...
...test running , do not direct the jet towards your body. Otherwise the pressure spring can fly out and cause personal injury. Check the chain catcher and replace it if it has cooled down. The warning box warns of the risk of this Workshop Manual. This box warns of burns. Use ...protective gloves when working with local regulations. Introduction and safety instructions 2.8 General Instructions The workshop where the chain saw is to be repaired must be...

Workshop Manual
Page 16
English stop control 21 6.8 Resistance test - Safety equipment 6 Safety equipment Contents 6.1 Dismantling the chain brake 17 6.2 Assembling the chain brake 18 6.3 Dismantling the muffler 19 6.4 Assembling the muffler ...19 6.5 Replacing the chain catcher 20 6.6 Dismantling the start/stop control 20 6.7 Assembling the start/stop function 21 6.9 Dismantling the throttle control lock, throttle control and spring 22 6.10 Assembling the throttle control lock, throttle control and spring 23 16 -
English stop control 21 6.8 Resistance test - Safety equipment 6 Safety equipment Contents 6.1 Dismantling the chain brake 17 6.2 Assembling the chain brake 18 6.3 Dismantling the muffler 19 6.4 Assembling the muffler ...19 6.5 Replacing the chain catcher 20 6.6 Dismantling the start/stop control 20 6.7 Assembling the start/stop function 21 6.9 Dismantling the throttle control lock, throttle control and spring 22 6.10 Assembling the throttle control lock, throttle control and spring 23 16 -

Workshop Manual
Page 17
...insert a screwdriver to ensure the spring does not fly out and cause personal injury. Parts Fig 4 must not be replaced if cracked or show signs of the chain brake band. Fig 5 Safety equipment English - 17 Carefully tighten the clutch housing in a small screwdriver into the ...until the brake is released and it . NOTE! Release the brake by moving the front hand guard backward. 6 Safety equipment 6.1 Dismantling the chain brake 1 Remove the cylinder cover. Cleaning and inspection • Clean and check carefully all components. Care- See figure 5. • Lubricate ...
...insert a screwdriver to ensure the spring does not fly out and cause personal injury. Parts Fig 4 must not be replaced if cracked or show signs of the chain brake band. Fig 5 Safety equipment English - 17 Carefully tighten the clutch housing in a small screwdriver into the ...until the brake is released and it . NOTE! Release the brake by moving the front hand guard backward. 6 Safety equipment 6.1 Dismantling the chain brake 1 Remove the cylinder cover. Cleaning and inspection • Clean and check carefully all components. Care- See figure 5. • Lubricate ...

Workshop Manual
Page 19
...When fitting the mesh, make sure that the mesh is best cleaned with a spark arrestor mesh, put it has cooled. After repairing, the chain brake must be replaced, if damaged. The distance between the bar and the surface is fitted with a wire brush. Risk of other defects. If necessary, use ... and retighten the screws on the motor when carrying out this inspection. Cleaning and inspection Clean and check all components carefully. The mesh must be replaced if cracked or show signs of burns. NOTE! Functional inspection: Do not turn on the muffler to 12 to insert the mesh. 2 Fit ...
...When fitting the mesh, make sure that the mesh is best cleaned with a spark arrestor mesh, put it has cooled. After repairing, the chain brake must be replaced, if damaged. The distance between the bar and the surface is fitted with a wire brush. Risk of other defects. If necessary, use ... and retighten the screws on the motor when carrying out this inspection. Cleaning and inspection Clean and check all components carefully. The mesh must be replaced if cracked or show signs of burns. NOTE! Functional inspection: Do not turn on the muffler to 12 to insert the mesh. 2 Fit ...

Workshop Manual
Page 20
... 1 Release the brake by moving the front hand guard backward. Loosen the bar nuts and remove the clutch cover, chain and bar. 2 Remove the chain catcher and replace it with a new one . Make sure that the vibration element is fitted correctly on the crankcase when a new... chain catcher is screwed in place. Fig 14 20 - Safety equipment 6.5 Replacing the chain catcher A worn chain catcher must be replaced with a new one . Always use original spare parts. Fig 13 6.6 Dismantling the start/stop...
... 1 Release the brake by moving the front hand guard backward. Loosen the bar nuts and remove the clutch cover, chain and bar. 2 Remove the chain catcher and replace it with a new one . Make sure that the vibration element is fitted correctly on the crankcase when a new... chain catcher is screwed in place. Fig 14 20 - Safety equipment 6.5 Replacing the chain catcher A worn chain catcher must be replaced with a new one . Always use original spare parts. Fig 13 6.6 Dismantling the start/stop...

Workshop Manual
Page 30
... parts. • Check the thickness of other defects. Release the brake by measuring them too much can result in figure 16. Parts must be replaced if cracked or showing signs of the clutch shoes by moving the kickback guard backwards. Fig 16 Min 60 mm 30 - If the thickness is... below 60 mm, the clutch must be replaced. See figure 14. Carefully remove the clutch springs. Loosen the bar nuts and remove the clutch cover, chain and bar. Fig 14 2 Loosen the spark plug hat and remove the spark plug, and insert...
... parts. • Check the thickness of other defects. Release the brake by measuring them too much can result in figure 16. Parts must be replaced if cracked or showing signs of the clutch shoes by moving the kickback guard backwards. Fig 16 Min 60 mm 30 - If the thickness is... below 60 mm, the clutch must be replaced. See figure 14. Carefully remove the clutch springs. Loosen the bar nuts and remove the clutch cover, chain and bar. Fig 14 2 Loosen the spark plug hat and remove the spark plug, and insert...


