

Owners Manual
Page 2
... Start...10 Aerating ...10 Throttle Adjustment (Model AR25 Honda engine only 11 Rear Wheel Adjustment ...12 Turning and Maneuvering...12 Operating on Hills ...12 Section 3 · Maintenance and Service Instructions Page Transporting the Husqvarna Aerator 13 Cleaning and Washing ...13 Two-Minute Warning... and Replacement 15 Drive Belt Replacement and Adjustment 15 Clutch Cable Removal and Replacement 15 Throttle Cable Replacement (Model AR25 Honda Engine Only 15 Chain Removal and Replacement 16 Adjusting Chain Tension ...16 Handle Inspection ...16 Adjustment ...16 Wheels Drive ...
... Start...10 Aerating ...10 Throttle Adjustment (Model AR25 Honda engine only 11 Rear Wheel Adjustment ...12 Turning and Maneuvering...12 Operating on Hills ...12 Section 3 · Maintenance and Service Instructions Page Transporting the Husqvarna Aerator 13 Cleaning and Washing ...13 Two-Minute Warning... and Replacement 15 Drive Belt Replacement and Adjustment 15 Clutch Cable Removal and Replacement 15 Throttle Cable Replacement (Model AR25 Honda Engine Only 15 Chain Removal and Replacement 16 Adjusting Chain Tension ...16 Handle Inspection ...16 Adjustment ...16 Wheels Drive ...

Owners Manual
Page 3
Operator's Guide SPECIFICATIONS A) POWER UNIT Engine Clutch Primary drive Secondary drive Gear reduction AR19 3.5HP Briggs I/C (2.6kw) 4HP Honda (3kw) Belt tensioner One V-belt (A-44") Permalube Chain 6:1 AR25 3.5HP Briggs l/C (2.6kw) 4HP Honda (3kw) Belt tensioner One V-belt (A-44") Permalube Chain 6:1 B) WHEELS Bearings Rear tires Front tire FRONT - ¾" (1.9 cm) sealed ball bearings with...
Operator's Guide SPECIFICATIONS A) POWER UNIT Engine Clutch Primary drive Secondary drive Gear reduction AR19 3.5HP Briggs I/C (2.6kw) 4HP Honda (3kw) Belt tensioner One V-belt (A-44") Permalube Chain 6:1 AR25 3.5HP Briggs l/C (2.6kw) 4HP Honda (3kw) Belt tensioner One V-belt (A-44") Permalube Chain 6:1 B) WHEELS Bearings Rear tires Front tire FRONT - ¾" (1.9 cm) sealed ball bearings with...
Owners Manual
Page 8
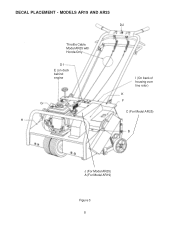
MODELS AR19 AND AR25 D2 Throttle Cable Model AR25 with Honda Only D1 E (on deck behind engine G H I (On back of housing over tine rotor) K F C (For Model AR25) B J (For Model AR25) A (For Model AR19) Figure 3 8 DECAL PLACEMENT -
MODELS AR19 AND AR25 D2 Throttle Cable Model AR25 with Honda Only D1 E (on deck behind engine G H I (On back of housing over tine rotor) K F C (For Model AR25) B J (For Model AR25) A (For Model AR19) Figure 3 8 DECAL PLACEMENT -

Owners Manual
Page 9
...wood splinters. 2. For further detail on the torque arm using the fastener assembly (see parts manual. 5. Operator's Guide ASSEMBLY INSTRUCTIONS Model AR19 1. Mount the handle using the cam lock lever. Connect top of carton. 3. Wear eye protection. Remove wooden blocks. Remove wooden ...Slide handle onto handle mounting brackets (see Figure 4). (B) Insert and tighten fasteners, which are located on the belt idler pulley. 8. (Honda Engines Only) Connect the throttle cable by attaching the throttle spring to rear wheel control handle with the handle detached. Attach end of the ...
...wood splinters. 2. For further detail on the torque arm using the fastener assembly (see parts manual. 5. Operator's Guide ASSEMBLY INSTRUCTIONS Model AR19 1. Mount the handle using the cam lock lever. Connect top of carton. 3. Wear eye protection. Remove wooden blocks. Remove wooden ...Slide handle onto handle mounting brackets (see Figure 4). (B) Insert and tighten fasteners, which are located on the belt idler pulley. 8. (Honda Engines Only) Connect the throttle cable by attaching the throttle spring to rear wheel control handle with the handle detached. Attach end of the ...
Owners Manual
Page 10
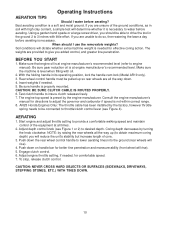
Best aerating condition is properly mounted. When should be able to drive the tool in its operating position, lock the handle cam lock (Model AR19 only). 3. BEFORE YOU START 1. Make sure that engine oil is necessary. Be sure handle is a soft and moist ground. NOTE: by the... control lever (see Figure 1 or 2) to engine manual). Test clutch handle to obtain maximum coring depth) you are unsure of core. 3. AR25 Honda Engines Only: The throttle cable has been installed by raising the rear wheels all times. 2. To stop, release clutch control. CAUTION: BE SURE CLUTCH...
Best aerating condition is properly mounted. When should be able to drive the tool in its operating position, lock the handle cam lock (Model AR19 only). 3. BEFORE YOU START 1. Make sure that engine oil is necessary. Be sure handle is a soft and moist ground. NOTE: by the... control lever (see Figure 1 or 2) to engine manual). Test clutch handle to obtain maximum coring depth) you are unsure of core. 3. AR25 Honda Engines Only: The throttle cable has been installed by raising the rear wheels all times. 2. To stop, release clutch control. CAUTION: BE SURE CLUTCH...
Owners Manual
Page 11
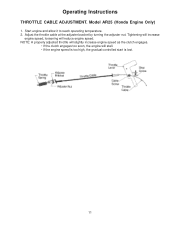
Model AR25 (Honda Engine Only) 1. Tightening will increase engine speed, loosening will stall. • If the engine speed is too high, the gradual controlled start is lost. 11 NOTE: A properly adjusted throttle will slightly increase engine speed as the clutch engages. • If the clutch engages too soon, the engine will reduce engine speed. Start engine and allow it to reach operating temperature. 2. Operating Instructions THROTTLE CABLE ADJUSTMENT. Adjust the throttle cable at the adjuster bracket by turning the adjuster nut.
Model AR25 (Honda Engine Only) 1. Tightening will increase engine speed, loosening will stall. • If the engine speed is too high, the gradual controlled start is lost. 11 NOTE: A properly adjusted throttle will slightly increase engine speed as the clutch engages. • If the clutch engages too soon, the engine will reduce engine speed. Start engine and allow it to reach operating temperature. 2. Operating Instructions THROTTLE CABLE ADJUSTMENT. Adjust the throttle cable at the adjuster bracket by turning the adjuster nut.
Owners Manual
Page 15
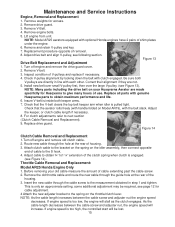
...Remove engine bolts. 5. Lift engine from unit. Be sure both keeper arms. 7. Replace all parts with genuine Husqvarna parts to the spring on Model AR19), with optional Honda engines have 2 pairs of V-pulleys and replace if necessary. 4. Route new cable through the cable screw to ...clutch cable to the S hook. 4. Remove and retain V-pulley and key. 7. Remove V-belt. 3. Before removing your Husqvarna Aerator are not. 5. Remove weights for Husqvarna to next section (Clutch Cable Removal and Replacement). 9. If engine speed is too high, the controlled start will increase. ...
...Remove engine bolts. 5. Lift engine from unit. Be sure both keeper arms. 7. Replace all parts with genuine Husqvarna parts to the spring on Model AR19), with optional Honda engines have 2 pairs of V-pulleys and replace if necessary. 4. Route new cable through the cable screw to ...clutch cable to the S hook. 4. Remove and retain V-pulley and key. 7. Remove V-belt. 3. Before removing your Husqvarna Aerator are not. 5. Remove weights for Husqvarna to next section (Clutch Cable Removal and Replacement). 9. If engine speed is too high, the controlled start will increase. ...
