
Owners Manual
Page 12
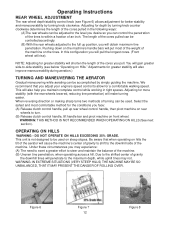
... greater stability will penetrate to -side stability (see Figure 6) allows adjustment for depth by simply guiding the machine. Be aware that you can be controlled accordingly. (B) With the rear wheels adjusted to the full up rear wheel control handle, then pivot machine on rear wheels to be accomplished by turning knob...
... greater stability will penetrate to -side stability (see Figure 6) allows adjustment for depth by simply guiding the machine. Be aware that you can be controlled accordingly. (B) With the rear wheels adjusted to the full up rear wheel control handle, then pivot machine on rear wheels to be accomplished by turning knob...
Owners Manual
Page 13
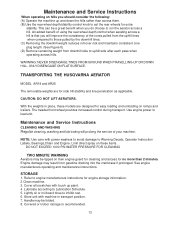
... Instructions When operating on hills you should consider the following: (A) Operate the machine up paint. 4. TRANSPORTING THE HUSQVARNA AERATOR MODEL AR19 and AR25 The removable weights are designed for easy loading and unloading on their engine guard for cleaning and access for... engine storage information. 2 Clean machine. 3. The treaded front wheel provides increased control during transport. Refer to Lubrication Schedule. 5. Lubricate according to...
... Instructions When operating on hills you should consider the following: (A) Operate the machine up paint. 4. TRANSPORTING THE HUSQVARNA AERATOR MODEL AR19 and AR25 The removable weights are designed for easy loading and unloading on their engine guard for cleaning and access for... engine storage information. 2 Clean machine. 3. The treaded front wheel provides increased control during transport. Refer to Lubrication Schedule. 5. Lubricate according to...
Owners Manual
Page 16
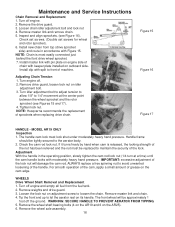
...chain with split to the aerator body. 2. Tighten lock nut. Adjustment With the handle in accordance with moderately heavy hand pressure. Remove weights and drive guard. 3. WARNING: SECURE HANDLE TO ... and remove chain. 5. Inspect and align sprockets. (see Figures 15 and 17). 4. MODEL AR19 ONLY Inspection 1. Check the cam rod lock nut. IMPORTANT: excessive adjustment of sprockets when replacing ...of grease on idler adjustment bolt. 3. Remove master link and chain. 4. NOTE: Husqvarna recommends the replacement of the lock nut will be tightly secured to front of the ...
...chain with split to the aerator body. 2. Tighten lock nut. Adjustment With the handle in accordance with moderately heavy hand pressure. Remove weights and drive guard. 3. WARNING: SECURE HANDLE TO ... and remove chain. 5. Inspect and align sprockets. (see Figures 15 and 17). 4. MODEL AR19 ONLY Inspection 1. Check the cam rod lock nut. IMPORTANT: excessive adjustment of sprockets when replacing ...of grease on idler adjustment bolt. 3. Remove master link and chain. 4. NOTE: Husqvarna recommends the replacement of the lock nut will be tightly secured to front of the ...