Owner Manual
Page 2
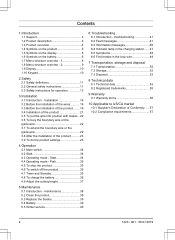
... maintenance 38 5.2 Clean the product 38 5.3 Replace the blades 39 5.4 Battery 39 5.5 Winter service 40 6 Troubleshooting 6.1 Introduction - Contents 1 Introduction 1.1 Support 3 1.2 Product description 3 1.3 Product overview 4 1.4 Symbols on the product 5 1.5 Symbols on the display 6 1.6 Symbols on the battery 6 1.7 Menu structure overview - 1 8 ... stop the product 35 4.6 To switch off the product 35 4.7 Timer and Standby 35 4.8 To charge the battery 36 4.9 Adjust the cutting height 37 5 Maintenance 5.1 Introduction - Installation 16 3.2 Before the installation of the ...
... maintenance 38 5.2 Clean the product 38 5.3 Replace the blades 39 5.4 Battery 39 5.5 Winter service 40 6 Troubleshooting 6.1 Introduction - Contents 1 Introduction 1.1 Support 3 1.2 Product description 3 1.3 Product overview 4 1.4 Symbols on the product 5 1.5 Symbols on the display 6 1.6 Symbols on the battery 6 1.7 Menu structure overview - 1 8 ... stop the product 35 4.6 To switch off the product 35 4.7 Timer and Standby 35 4.8 To charge the battery 36 4.9 Adjust the cutting height 37 5 Maintenance 5.1 Introduction - Installation 16 3.2 Before the installation of the ...
Owner Manual
Page 4
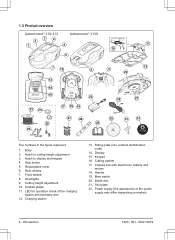
...keypad 4. Contact plates 11. Display 15. Chassis box with electronics, battery and motors 18. Skid plate 22. Body 2. Main switch 20. Stop button 5. Front wheels 8. Headlights 9. Cutting system 17. 1.3 Product overview Automower® 310/315 Automower® 315X 34 2 1 5 11 10 6 7 16 8 13 14... 15 23 24 26 25 22 17 18 19 27 28 29 12 9 20 32 21 30 31 33 The numbers in the figure represent: 1. Replaceable cover 6. Hatch to cutting...
...keypad 4. Contact plates 11. Display 15. Chassis box with electronics, battery and motors 18. Skid plate 22. Body 2. Main switch 20. Stop button 5. Front wheels 8. Headlights 9. Cutting system 17. 1.3 Product overview Automower® 310/315 Automower® 315X 34 2 1 5 11 10 6 7 16 8 13 14... 15 23 24 26 25 22 17 18 19 27 28 29 12 9 20 32 21 30 31 33 The numbers in the figure represent: 1. Replaceable cover 6. Hatch to cutting...
Owner Manual
Page 39
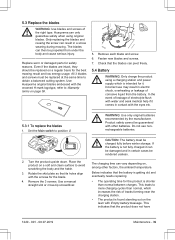
... the blades can vary depending on, among other batteries. If the battery is not fully charged it . Remove the 3 screws. Husqvarna can then be replaced at the same time to more charging cycles than normal between charges. Only replacing the blades and reusing the screw can be replaced on the lawn with other factors, the ambient...
... the blades can vary depending on, among other batteries. If the battery is not fully charged it . Remove the 3 screws. Husqvarna can then be replaced at the same time to more charging cycles than normal between charges. Only replacing the blades and reusing the screw can be replaced on the lawn with other factors, the ambient...
Owner Manual
Page 40
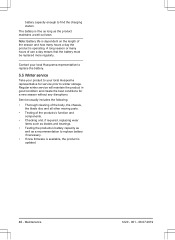
....2019 A long season or many hours a day the product is updated. 40 - Contact your local Husqvarna representative to replace the battery. 5.5 Winter service Take your product to replace battery if necessary. • If new firmware is available, the product is operating. Service usually includes the ...8226; Testing of use a day means that the battery must be replaced more regularly. The battery is fine as long as a recommendation to your local Husqvarna representative for a new season without any disruptions. battery capacity enough to winter storage. Regular winter service ...
....2019 A long season or many hours a day the product is updated. 40 - Contact your local Husqvarna representative to replace the battery. 5.5 Winter service Take your product to replace battery if necessary. • If new firmware is available, the product is operating. Service usually includes the ...8226; Testing of use a day means that the battery must be replaced more regularly. The battery is fine as long as a recommendation to your local Husqvarna representative for a new season without any disruptions. battery capacity enough to winter storage. Regular winter service ...
Owner Manual
Page 42
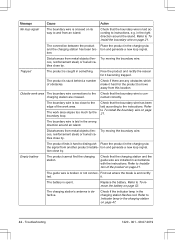
... by . tion close to Installation of the product on page 21. Check that the boundary wire is too close by the boundary loop. Replace the battery. The charging station's antenna is spent. Try moving the boundary wire. Check if there are any obstacles which make it hard for it... . Try moving the boundary wire. The battery is defective. Refer to instructions, e.g. nected correctly. it becoming trapped. The boundary wire is laid according to To install the boundary wire on...
... by . tion close to Installation of the product on page 21. Check that the boundary wire is too close by the boundary loop. Replace the battery. The charging station's antenna is spent. Try moving the boundary wire. Check if there are any obstacles which make it hard for it... . Try moving the boundary wire. The battery is defective. Refer to instructions, e.g. nected correctly. it becoming trapped. The boundary wire is laid according to To install the boundary wire on...
Owner Manual
Page 46
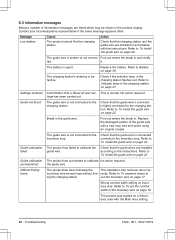
...ted. Refer to To install the guide wire on a Secondary area with the Main area setting. 46 - Replace the battery. accomplished the guide wire. Contact your local Husqvarna representative if the same message appears often. No action required. Check that the charging station and the guide wire...47. 6.3 Information messages Below a number of information messages are listed which may be shown in the charging station on page 22. Replace the damaged section of the guide wire with the instructions. put the boundary wire on boundary wire. tings has been carried out. Find...
...ted. Refer to To install the guide wire on a Secondary area with the Main area setting. 46 - Replace the battery. accomplished the guide wire. Contact your local Husqvarna representative if the same message appears often. No action required. Check that the charging station and the guide wire...47. 6.3 Information messages Below a number of information messages are listed which may be shown in the charging station on page 22. Replace the damaged section of the guide wire with the instructions. put the boundary wire on boundary wire. tings has been carried out. Find...
Owner Manual
Page 48
...make sure that the guide wire is always in its slot in a long straight line that is a FAQ (Frequently Asked Questions) on www.husqvarna.com which provides more detailed answers to Clean the product on page 22. Reset the start and stop time settings for mowing. No action.... slope. The start time and stop times for mowing are incorrect. Refer to To set . Damaged blades lead to Battery on page 30. Inspect the blades and screws and replace them if necessary. Too many blades in the slot under the charging station. each screw. Different versions (thickness) of...
...make sure that the guide wire is always in its slot in a long straight line that is a FAQ (Frequently Asked Questions) on www.husqvarna.com which provides more detailed answers to Clean the product on page 22. Reset the start and stop time settings for mowing. No action.... slope. The start time and stop times for mowing are incorrect. Refer to To set . Damaged blades lead to Battery on page 30. Inspect the blades and screws and replace them if necessary. Too many blades in the slot under the charging station. each screw. Different versions (thickness) of...
Owner Manual
Page 49
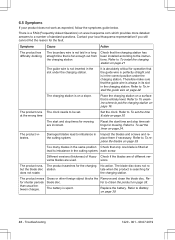
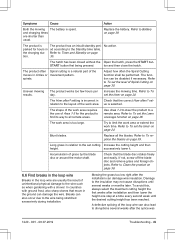
Replace the battery. Refer to Battery on page 39. The product is incorrect in od according to limit the work ... the use of Area 1-3 for hours in relation to all the blades. The function can also lead to To replace the blades on page 39. Increase the mowing time. Try to the Standby time table. Refer to disruptions several ... a shovel. Symptoms Cause Action Both the mowing The battery is selected. The product works too few hours per day. Refer to To set cutting Increase the cutting height and then height. Replace all remote areas. Breaks can also occur due to ...
Replace the battery. Refer to Battery on page 39. The product is incorrect in od according to limit the work ... the use of Area 1-3 for hours in relation to all the blades. The function can also lead to To replace the blades on page 39. Increase the mowing time. Try to the Standby time table. Refer to disruptions several ... a shovel. Symptoms Cause Action Both the mowing The battery is selected. The product works too few hours per day. Refer to To set cutting Increase the cutting height and then height. Replace all remote areas. Breaks can also occur due to ...

Owner Manual
Page 56
...or its power supply. Warranty 1220 - 001 - 08.07.2019 Within the warranty period, we will replace the product or repair it at hand when contacting Husqvarna customer service. 56 - If an error occurs with the instructions in this product's functionality for a period...Damage caused by lightning. • Damage caused by improper battery storage or battery handling. • Damage caused by using a battery that is not a Husqvarna original battery. • Damage caused by not using a high-pressure washer, or from using Husqvarna original spare parts and accessories, such as disposable and ...
...or its power supply. Warranty 1220 - 001 - 08.07.2019 Within the warranty period, we will replace the product or repair it at hand when contacting Husqvarna customer service. 56 - If an error occurs with the instructions in this product's functionality for a period...Damage caused by lightning. • Damage caused by improper battery storage or battery handling. • Damage caused by using a battery that is not a Husqvarna original battery. • Damage caused by not using a high-pressure washer, or from using Husqvarna original spare parts and accessories, such as disposable and ...


