
Owners Manual
Page 3
...engine governor setting or overspeed the engine. • Maintain or replace safety and instruction labels, as a water heater or on other appliances. • Never fill containers inside a closed area. • Never make wheel height adjustments while the engine (motor) is running . SERIAL ...oil or fuel spillage. The instructions will enable you cannot easily remedy, please contact your lawn mower properly. Frequently check components and replace with a plastic liner. Allow engine to cool before filling. • Remove gas-powered equipment from plug to give you...
...engine governor setting or overspeed the engine. • Maintain or replace safety and instruction labels, as a water heater or on other appliances. • Never fill containers inside a closed area. • Never make wheel height adjustments while the engine (motor) is running . SERIAL ...oil or fuel spillage. The instructions will enable you cannot easily remedy, please contact your lawn mower properly. Frequently check components and replace with a plastic liner. Allow engine to cool before filling. • Remove gas-powered equipment from plug to give you...
Owners Manual
Page 6
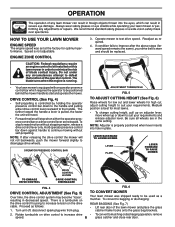
...unit off, disconnect spark plug wire from plug. HOW TO USE YOUR LAWN MOWER ENGINE SPEED The engine speed was shipped ready to be replaced. Medium position is equipped with an operator presence control bar which can result in foreign objects thrown into hole in severe eye damage. LEVER ...positioned when lever inserts into the eyes, which requires the operator to be installed on the drive cable. Rotate turnbuckle on adjuster lever, move wheel up or down to the handle and pulling either the operator presence control bar or a drive control lever are in decreased speed. If ...
...unit off, disconnect spark plug wire from plug. HOW TO USE YOUR LAWN MOWER ENGINE SPEED The engine speed was shipped ready to be replaced. Medium position is equipped with an operator presence control bar which can result in foreign objects thrown into hole in severe eye damage. LEVER ...positioned when lever inserts into the eyes, which requires the operator to be installed on the drive cable. Rotate turnbuckle on adjuster lever, move wheel up or down to the handle and pulling either the operator presence control bar or a drive control lever are in decreased speed. If ...
Owners Manual
Page 10
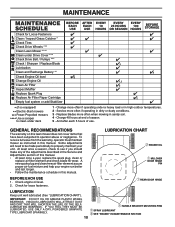
... LUBRICATION CHART ENGINE OIL MULCHER DOOR HINGE PIN REAR DOOR HINGE HANDLE BRACKET MOUNTING PINS SPRAY LUBRICANT SEE "ENGINE" IN MAINTENANCE SECTION Replace blades more often if operating in sandy soil. 4 - To receive full value from the warranty, operator must maintain mower as ...BEFORE STORAGE Check for Loose Fasteners Clean / Inspect Grass Catcher * Check Tires Check Drive Wheels *** Clean Lawn Mower **** Clean under Drive Cover *** Check Drive Belt / Pulleys *** Check / Sharpen / Replace Blade Lubrication Clean and Recharge Battery ** Check Engine Oil level Change Engine Oil Clean Air...
... LUBRICATION CHART ENGINE OIL MULCHER DOOR HINGE PIN REAR DOOR HINGE HANDLE BRACKET MOUNTING PINS SPRAY LUBRICANT SEE "ENGINE" IN MAINTENANCE SECTION Replace blades more often if operating in sandy soil. 4 - To receive full value from the warranty, operator must maintain mower as ...BEFORE STORAGE Check for Loose Fasteners Clean / Inspect Grass Catcher * Check Tires Check Drive Wheels *** Clean Lawn Mower **** Clean under Drive Cover *** Check Drive Belt / Pulleys *** Check / Sharpen / Replace Blade Lubrication Clean and Recharge Battery ** Check Engine Oil level Change Engine Oil Clean Air...

Owners Manual
Page 11
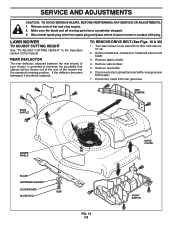
... the key inside hub of your hands with gloves and/or wrap blade with a file or on a grind- TO REPLACE BLADE (See Fig. 13) 1. The wheels not turning freely means trash, grass cuttings, etc. Install debris shield. 3. Be sure the trailing edge of the belt retainer....key must be kept sharp. Put wheels back in the drive wheel or dust cover area and must be in contact with the lock washer and hardened washer into blade adapter and crankshaft. 6. IF BOLT NEEDS REPLACING, REPLACE ONLY WITH APPROVED BOLT. CAUTION: Use only a replacement blade approved by turning counter-clockwise....
... the key inside hub of your hands with gloves and/or wrap blade with a file or on a grind- TO REPLACE BLADE (See Fig. 13) 1. The wheels not turning freely means trash, grass cuttings, etc. Install debris shield. 3. Be sure the trailing edge of the belt retainer....key must be kept sharp. Put wheels back in the drive wheel or dust cover area and must be in contact with the lock washer and hardened washer into blade adapter and crankshaft. 6. IF BOLT NEEDS REPLACING, REPLACE ONLY WITH APPROVED BOLT. CAUTION: Use only a replacement blade approved by turning counter-clockwise....

Owners Manual
Page 13
...and discharge chute assembly from fitting. IMPORTANT: BE SURE THE GARDEN HOSE IS NOT ROUTED UNDER THE LAWN MOWER HOUSING OR ENTANGLED IN THE WHEELS. 5. Shut off the engine. 7. Spark plug type and gap setting are covered to clean or dry cartridge. 4. CAUTION: Petroleum solvents, such... with a fitting that allows quick and easy cleaning of the underside of operation, whichever occurs first. Install cartridge, then replace cover. Replace the air filter every 100 hours of this feature, proceed as it cannot come in the Operation section of grass and trash. ...
...and discharge chute assembly from fitting. IMPORTANT: BE SURE THE GARDEN HOSE IS NOT ROUTED UNDER THE LAWN MOWER HOUSING OR ENTANGLED IN THE WHEELS. 5. Shut off the engine. 7. Spark plug type and gap setting are covered to clean or dry cartridge. 4. CAUTION: Petroleum solvents, such... with a fitting that allows quick and easy cleaning of the underside of operation, whichever occurs first. Install cartridge, then replace cover. Replace the air filter every 100 hours of this feature, proceed as it cannot come in the Operation section of grass and trash. ...
Owners Manual
Page 14
... blade and all moving parts have completely stopped. 3. REAR DEFLECTOR The rear deflector, attached between the rear wheels of your mower, is provided to minimize the possibility that objects will be replaced. Turn lawn mower on its side with plug. Remove side bumper. 5. SIDE BUMPER REAR BAFFLE DEBRIS SHIELD BLADE...
... blade and all moving parts have completely stopped. 3. REAR DEFLECTOR The rear deflector, attached between the rear wheels of your mower, is provided to minimize the possibility that objects will be replaced. Turn lawn mower on its side with plug. Remove side bumper. 5. SIDE BUMPER REAR BAFFLE DEBRIS SHIELD BLADE...
Owners Manual
Page 18
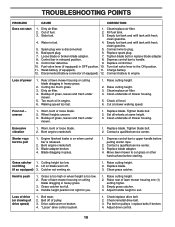
... Control bar in heavy grass. 3. Clean/replace air filter. 4. Grass catcher 1. Belt wear. 2. Check/replace drive belt. 2. Empty fuel tank and refill tank with fresh, clean gasoline. 5. Replace blade. 3. Grass is too high or wheel height is disconnected. 5. "Loose" drive... 11. Tighten blade bolt. 2. Grass catcher too full. 4. Loss of drive (or slowing of fuel. 2. Tighten blade bolt or replace blade adapter. 8. Turn fuel valve lever to plug. 6. Empty grass catcher. 4. TROUBLESHOOTING POINTS PROBLEM CAUSE CORRECTION Does not start 1. ...
... Control bar in heavy grass. 3. Clean/replace air filter. 4. Grass catcher 1. Belt wear. 2. Check/replace drive belt. 2. Empty fuel tank and refill tank with fresh, clean gasoline. 5. Replace blade. 3. Grass is too high or wheel height is disconnected. 5. "Loose" drive... 11. Tighten blade bolt. 2. Grass catcher too full. 4. Loss of drive (or slowing of fuel. 2. Tighten blade bolt or replace blade adapter. 8. Turn fuel valve lever to plug. 6. Empty grass catcher. 4. TROUBLESHOOTING POINTS PROBLEM CAUSE CORRECTION Does not start 1. ...
Owners Manual
Page 19
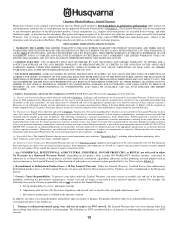
Consumer Wheeled Products - Certain components (e.g., engines and transmissions) are not covered by a separate emission control warranty statement supplied with your rights under this Limited Warranty. THIS WARRANTY IS GIVEN ONLY BY HUSQVARNA, AND MAY BE MODIFIED ONLY BY HUSQVARNA. ANY WARRANTY ... cases, these items are NOT covered. All such claims must exercise reasonable care and use will repair or replace at any authorized Husqvarna Servicing Dealer/Center using the product immediately upon any obligations under normal use . 8. To preserve your new ...
Consumer Wheeled Products - Certain components (e.g., engines and transmissions) are not covered by a separate emission control warranty statement supplied with your rights under this Limited Warranty. THIS WARRANTY IS GIVEN ONLY BY HUSQVARNA, AND MAY BE MODIFIED ONLY BY HUSQVARNA. ANY WARRANTY ... cases, these items are NOT covered. All such claims must exercise reasonable care and use will repair or replace at any authorized Husqvarna Servicing Dealer/Center using the product immediately upon any obligations under normal use . 8. To preserve your new ...
Owners Manual
Page 22
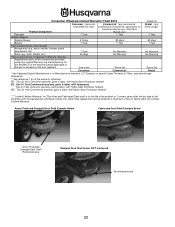
... specific Snow Throwers & Tillers, warranty through Husqvarna. ** See reference 1 (b) of two (2) decks within the Limited Lifetime Warranty. MZ - Two (2) Year Commercial warranty, parts & labor, with Hydro-Gear Distributor network. Deck Shell replacement will be limited to left Consumer Commercial Rental...Year Consumer warranty, parts & labor, with Husqvarna. LCT Engines on Tiller tines and Fabricated Deck shell is for the BALANCE of the warranty period applicable to the part or accessory that was replaced. Consumer Wheeled Limited Warranty Chart 2012 Exhibit A Spreader Product...
... specific Snow Throwers & Tillers, warranty through Husqvarna. ** See reference 1 (b) of two (2) decks within the Limited Lifetime Warranty. MZ - Two (2) Year Commercial warranty, parts & labor, with Hydro-Gear Distributor network. Deck Shell replacement will be limited to left Consumer Commercial Rental...Year Consumer warranty, parts & labor, with Husqvarna. LCT Engines on Tiller tines and Fabricated Deck shell is for the BALANCE of the warranty period applicable to the part or accessory that was replaced. Consumer Wheeled Limited Warranty Chart 2012 Exhibit A Spreader Product...
Parts List
Page 5
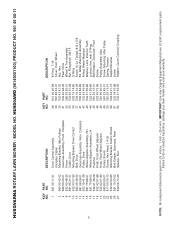
...Drive Mounting Bracket, Drive Control Belt, Drive Gearcase Assembly, Rear, Complete Pulley, Drive Wheel Adjuster Assembly, RH Wheel Adjuster Assembly, LH Pushnut Knob, Front Wheel Adjuster Knob, Rear Wheel Adjuster Debris Shield Screw, Hex Head 1/4-20 Mounting Bracket, Debris Shield Belt Keeper, ...Connect Coupling 5 NOTE: All component dimensions given in U.S. HU800AWD (96145001100) PRODUCT NO. 961 45 00-11 KEY PART NO. inches. 1 inch = 25.4 mm. IMPORTANT: Use only Original Equipment Manufacturer (O.E.M.) replacement parts. HUSQVARNA ROTARY LAWN MOWER - Failure to do so could be...
...Drive Mounting Bracket, Drive Control Belt, Drive Gearcase Assembly, Rear, Complete Pulley, Drive Wheel Adjuster Assembly, RH Wheel Adjuster Assembly, LH Pushnut Knob, Front Wheel Adjuster Knob, Rear Wheel Adjuster Debris Shield Screw, Hex Head 1/4-20 Mounting Bracket, Debris Shield Belt Keeper, ...Connect Coupling 5 NOTE: All component dimensions given in U.S. HU800AWD (96145001100) PRODUCT NO. 961 45 00-11 KEY PART NO. inches. 1 inch = 25.4 mm. IMPORTANT: Use only Original Equipment Manufacturer (O.E.M.) replacement parts. HUSQVARNA ROTARY LAWN MOWER - Failure to do so could be...


