
Owners Manual
Page 2
...grass catcher, discharge chute, or other attachments; Operation on wet grass. they can lose traction with specifications of the manufacturer of your tractor. Always turn off engine and wait for wheel weights or counterweights. • Keep machine free of grass, leaves or other hidden ..., or embankments. II. These operators should evaluate their ability to operate the riding mower safely enough to lose control of your tractor. FAILURE TO OBSERVE THE FOLLOWING SAFETY INSTRUCTIONS COULD RESULT IN SERIOUS INJURY OR DEATH. WARNING: Tow only the attachments that are ...
...grass catcher, discharge chute, or other attachments; Operation on wet grass. they can lose traction with specifications of the manufacturer of your tractor. Always turn off engine and wait for wheel weights or counterweights. • Keep machine free of grass, leaves or other hidden ..., or embankments. II. These operators should evaluate their ability to operate the riding mower safely enough to lose control of your tractor. FAILURE TO OBSERVE THE FOLLOWING SAFETY INSTRUCTIONS COULD RESULT IN SERIOUS INJURY OR DEATH. WARNING: Tow only the attachments that are ...

Owners Manual
Page 4
.... We have similar laws. The instructions will enable you cannot easily remedy, please contact your tractor properly. Always observe the "SAFETY RULES". Please read and retain this tractor. CUSTOMER RESPONSIBILITIES • Read and observe the safety rules. • Follow a regular schedule...of this manual. • Wear proper Personal Protective Equipment (PPE) while operating this product. In the state of a new tractor. WARNING: This tractor is equipped with a spark arrester meeting applicable local or state laws (if any problem you to give you are outside mowing...
.... We have similar laws. The instructions will enable you cannot easily remedy, please contact your tractor properly. Always observe the "SAFETY RULES". Please read and retain this tractor. CUSTOMER RESPONSIBILITIES • Read and observe the safety rules. • Follow a regular schedule...of this manual. • Wear proper Personal Protective Equipment (PPE) while operating this product. In the state of a new tractor. WARNING: This tractor is equipped with a spark arrester meeting applicable local or state laws (if any problem you to give you are outside mowing...
Owners Manual
Page 6
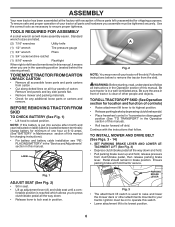
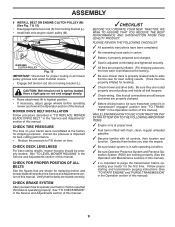
...remain in seat. • Lift up and hold, release pressure from clutch/brake pedal, then release parking brake lever. ASSEMBLY Your new tractor has been assembled at 6-10 amps. (See "BATTERY" in Maintenance section of this manual for charging instructions). • For battery and ... of this manual, it means when you assemble must be tightened securely. WARNING: Before starting, read, understand and follow . BEFORE REMOVING TRACTOR FROM SKID TO CHECK BATTERY (See Fig. 1) • Lift hood to ensure proper tightness. Continue with exception of those parts left ...
...remain in seat. • Lift up and hold, release pressure from clutch/brake pedal, then release parking brake lever. ASSEMBLY Your new tractor has been assembled at 6-10 amps. (See "BATTERY" in Maintenance section of this manual for charging instructions). • For battery and ... of this manual, it means when you assemble must be tightened securely. WARNING: Before starting, read, understand and follow . BEFORE REMOVING TRACTOR FROM SKID TO CHECK BATTERY (See Fig. 1) • Lift hood to ensure proper tightness. Continue with exception of those parts left ...
Owners Manual
Page 7
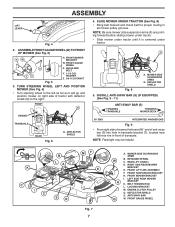
...LINK(S) D. BELT TENSION ROD L. SHOULDER BOLT Y. 1-1/4 O.D. NOTE: Be sure mower side suspension arms (A) are pointing forward before sliding mower under tractor. • Slide mower under tractor. Q A A. DEFLECTOR 02965 SHIELD Fig. 8 5. RIGHT SIDE REAR MOWER BRACKET E. FRONT SUSPENSION BRACKET H. ENGINE CLUTCH PULLEY Q. DEFLECTOR SHIELD S....of anti-sway bar (S) into hole in transaxle bracket (T), located near left as far as it is centered under tractor until it will go and position mower on right side of transaxle. LEFT SIDE REAR MOWER BRACKET K. ANTI-SWAY BAR...
...LINK(S) D. BELT TENSION ROD L. SHOULDER BOLT Y. 1-1/4 O.D. NOTE: Be sure mower side suspension arms (A) are pointing forward before sliding mower under tractor. • Slide mower under tractor. Q A A. DEFLECTOR 02965 SHIELD Fig. 8 5. RIGHT SIDE REAR MOWER BRACKET E. FRONT SUSPENSION BRACKET H. ENGINE CLUTCH PULLEY Q. DEFLECTOR SHIELD S....of anti-sway bar (S) into hole in transaxle bracket (T), located near left as far as it is centered under tractor until it will go and position mower on right side of transaxle. LEFT SIDE REAR MOWER BRACKET K. ANTI-SWAY BAR...
Owners Manual
Page 8
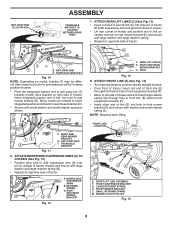
...HOLE Fig. 13 8 ATTACH FRONT LINK (E) (See Fig. 14) • Turn steering wheel to position wheels straight forward. • From front of tractor, insert rod end of front link (E) through hole in front mower bracket (H) and secure with large washer and large retainer spring. • Repeat on outside... small washer and small retainer spring as needed to left side of mower and and insert large retainer spring (G) through front hole in tractor front suspension bracket (F). • Move to insert integrated washer end of bar into hole in front link (E) behind front suspension bracket ...
...HOLE Fig. 13 8 ATTACH FRONT LINK (E) (See Fig. 14) • Turn steering wheel to position wheels straight forward. • From front of tractor, insert rod end of front link (E) through hole in front mower bracket (H) and secure with large washer and large retainer spring. • Repeat on outside... small washer and small retainer spring as needed to left side of mower and and insert large retainer spring (G) through front hole in tractor front suspension bracket (F). • Move to insert integrated washer end of bar into hole in front link (E) behind front suspension bracket ...
Owners Manual
Page 9
... Be sure mower deck is important to highest position. • If necessary, adjust gauge wheels before you learn how to operate your tractor were overinflated at proper level. ✓ Fuel tank is in the "Service and Adjustments" section of this manual. CHECK DECK LEVELNESS For...After you start the engine. ✓ Be sure brake system is spring loaded. Be sure they are properly clamped. ✓ Before driving tractor, be properly leveled. MOWER DRIVE BELT INSTALLATION Follow procedure described in "TO REPLACE MOWER BLADE DRIVE BELT " in "transmission engaged" position (...
... Be sure mower deck is important to highest position. • If necessary, adjust gauge wheels before you learn how to operate your tractor were overinflated at proper level. ✓ Fuel tank is in the "Service and Adjustments" section of this manual. CHECK DECK LEVELNESS For...After you start the engine. ✓ Be sure brake system is spring loaded. Be sure they are properly clamped. ✓ Before driving tractor, be properly leveled. MOWER DRIVE BELT INSTALLATION Follow procedure described in "TO REPLACE MOWER BLADE DRIVE BELT " in "transmission engaged" position (...

Owners Manual
Page 10
... result in damage to identify safety information about hazards which , if not avoided, could result in serious injury or death. CAUTION when used to the tractor and/or engine. FIRE indicates a hazard which can result in death, serious injury and/or property damage. DANGER indicates a hazard which , if not avoided, could... alert symbol is used without the alert symbol, indicates a situation that could result in death or serious injury. OPERATION These symbols may appear on your tractor or in literature supplied with the product.
... result in damage to identify safety information about hazards which , if not avoided, could result in serious injury or death. CAUTION when used to the tractor and/or engine. FIRE indicates a hazard which can result in death, serious injury and/or property damage. DANGER indicates a hazard which , if not avoided, could... alert symbol is used without the alert symbol, indicates a situation that could result in death or serious injury. OPERATION These symbols may appear on your tractor or in literature supplied with the product.

Owners Manual
Page 11
... various controls and adjustments. Indicates when service is required for starting and controlling engine speed. (E) ATTACHMENT CLUTCH SWITCH - Used for braking the tractor and starting and stopping the engine. (G) REVERSE OPERATION SYSTEM (ROS) "ON" POSITION - Used for 12-volt accessories. 11 Used for ...PARKING BRAKE - Used to engage the mower blades, or other attachments mounted to the applicable safety standards of the tractor. (M) FREEWHEEL CONTROL - Used to raise and lower the mower or other powered attachment while in reverse. (H) LIGHT SWITCH - OPERATION KNOW YOUR...
... various controls and adjustments. Indicates when service is required for starting and controlling engine speed. (E) ATTACHMENT CLUTCH SWITCH - Used for braking the tractor and starting and stopping the engine. (G) REVERSE OPERATION SYSTEM (ROS) "ON" POSITION - Used for 12-volt accessories. 11 Used for ...PARKING BRAKE - Used to engage the mower blades, or other attachments mounted to the applicable safety standards of the tractor. (M) FREEWHEEL CONTROL - Used to raise and lower the mower or other powered attachment while in reverse. (H) LIGHT SWITCH - OPERATION KNOW YOUR...

Owners Manual
Page 12
...shut off the engine. • Depress brake pedal (B) all the way down and hold. • Pull parking brake lever (C) up and hold tractor secure. IMPORTANT: LEAVING THE IGNITION SWITCH IN ANY POSITION OTHER THAN "STOP" WILL CAUSE THE BATTERY TO DISCHARGE AND GO DEAD. Fig. 17 STOPPING ...8226; Never use the choke to move throttle control between half and full speed (fast) position. 12 F Fig. 19 NOTE: Under certain conditions when tractor is standing idle with an operator presence sensing switch. TO USE THROTTLE CONTROL (D) (See Fig. 19) Always operate engine at full speed (fast). •...
...shut off the engine. • Depress brake pedal (B) all the way down and hold. • Pull parking brake lever (C) up and hold tractor secure. IMPORTANT: LEAVING THE IGNITION SWITCH IN ANY POSITION OTHER THAN "STOP" WILL CAUSE THE BATTERY TO DISCHARGE AND GO DEAD. Fig. 17 STOPPING ...8226; Never use the choke to move throttle control between half and full speed (fast) position. 12 F Fig. 19 NOTE: Under certain conditions when tractor is standing idle with an operator presence sensing switch. TO USE THROTTLE CONTROL (D) (See Fig. 19) Always operate engine at full speed (fast). •...
Owners Manual
Page 13
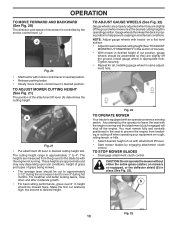
...so they are slightly off the ground when mower is at the desired cutting height in operating position. NOTE: Adjust gauge wheels with tractor on a flat level surface. • Adjustmowertodesiredcuttingheight(See"TOADJUST MOWER CUTTING HEIGHT" in this section of manual). • With mower in.... S Fig. 23 13 Tighten securely. • Repeat for all, installing gauge wheel in appropriate hole. Fig. 22 TO OPERATE MOWER Your tractor is equipped with an operator presence sensing switch. Make the first cut to approximately 2-1/2" during hot months. A Fig. 21 • Put attachment...
...so they are slightly off the ground when mower is at the desired cutting height in operating position. NOTE: Adjust gauge wheels with tractor on a flat level surface. • Adjustmowertodesiredcuttingheight(See"TOADJUST MOWER CUTTING HEIGHT" in this section of manual). • With mower in.... S Fig. 23 13 Tighten securely. • Repeat for all, installing gauge wheel in appropriate hole. Fig. 22 TO OPERATE MOWER Your tractor is equipped with an operator presence sensing switch. Make the first cut to approximately 2-1/2" during hot months. A Fig. 21 • Put attachment...

Owners Manual
Page 14
...slopes greater than two (2) MPH. • To reengage transmission, reverse above procedure. NOTE: To protect hood from damage when transporting your tractor. Use common sense when towing. IMPORTANT: THE MOTION CONTROL LEVER DOES NOT RETURN TO NEUTRAL POSITION WHEN THE BRAKE PEDAL IS DEPRESSED. •...; If stopping is closed and secured to neutral (N) position. • With engine running . 14 OPERATION REVERSE OPERATION SYSTEM (ROS) Your tractor is required, the service reminder will flash for two hours. Use an appropriate means of this manual. To service engine and mower, see ...
...slopes greater than two (2) MPH. • To reengage transmission, reverse above procedure. NOTE: To protect hood from damage when transporting your tractor. Use common sense when towing. IMPORTANT: THE MOTION CONTROL LEVER DOES NOT RETURN TO NEUTRAL POSITION WHEN THE BRAKE PEDAL IS DEPRESSED. •...; If stopping is closed and secured to neutral (N) position. • With engine running . 14 OPERATION REVERSE OPERATION SYSTEM (ROS) Your tractor is required, the service reminder will flash for two hours. Use an appropriate means of this manual. To service engine and mower, see ...
Owners Manual
Page 15
...176;C and below) • When engine starts, allow it run starter continuously for the first time or if the engine has run with tractor on the temperature. IMPORTANT: WHEN OPERATING IN TEMPERATURES BELOW 32°F (0°C), USE FRESH, CLEAN WINTER GRADE GASOLINE TO HELP ENSURE GOOD ...: Wipe off any spilled oil or fuel. CAUTION: Alcohol blended fuels (called gasohol or using the choke as follows: • Be sure the tractor is on seat in operating position, depress clutch/brake pedal and set parking brake. • Place motion control lever in cold temperatures (below . ...
...176;C and below) • When engine starts, allow it run starter continuously for the first time or if the engine has run with tractor on the temperature. IMPORTANT: WHEN OPERATING IN TEMPERATURES BELOW 32°F (0°C), USE FRESH, CLEAN WINTER GRADE GASOLINE TO HELP ENSURE GOOD ...: Wipe off any spilled oil or fuel. CAUTION: Alcohol blended fuels (called gasohol or using the choke as follows: • Be sure the tractor is on seat in operating position, depress clutch/brake pedal and set parking brake. • Place motion control lever in cold temperatures (below . ...
Owners Manual
Page 16
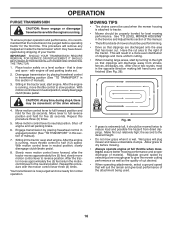
...TO TRANSPORT" in neutral position, slowly disengage clutch/brake pedal. 8. With motion control lever in this section of your tractor. After the tractor moves approximately five (5) feet return the motion control lever to neutral position. OPERATION PURGE TRANSMISSION CAUTION: Never engage or disengage... this manual. • The left hand turns until finished (See Fig. 26). Slowly move motion control lever forward, after the tractor moves approximately five (5) feet, slowly move throttle control to reduce load and possible fire hazard from shrubs, fences, driveways, etc. ...
...TO TRANSPORT" in neutral position, slowly disengage clutch/brake pedal. 8. With motion control lever in this section of your tractor. After the tractor moves approximately five (5) feet return the motion control lever to neutral position. OPERATION PURGE TRANSMISSION CAUTION: Never engage or disengage... this manual. • The left hand turns until finished (See Fig. 26). Slowly move motion control lever forward, after the tractor moves approximately five (5) feet, slowly move throttle control to reduce load and possible fire hazard from shrubs, fences, driveways, etc. ...

Owners Manual
Page 17
...OR GREASE THE PIVOT POINTS WHICH HAVE SPECIAL NYLON BEARINGS. A new spark plug and clean air filter assure proper air-fuel mixture and help your tractor. IF YOU FEEL THEY MUST BE LUBRICATED, USE ONLY A DRY, POWDERED GRAPHITE TYPE LUBRICANT SPARINGLY. 17 At least once a season, check ... WILL ATTRACT DUST AND DIRT THAT WILL SHORTEN THE LIFE OF THE SELF-LUBRICATING BEARINGS. To receive full value from the warranty, operator must maintain tractor as instructed in dirty or dusty conditions. 3 - Replace blades more often when operating in this manual. • At least once a year ...
...OR GREASE THE PIVOT POINTS WHICH HAVE SPECIAL NYLON BEARINGS. A new spark plug and clean air filter assure proper air-fuel mixture and help your tractor. IF YOU FEEL THEY MUST BE LUBRICATED, USE ONLY A DRY, POWDERED GRAPHITE TYPE LUBRICANT SPARINGLY. 17 At least once a season, check ... WILL ATTRACT DUST AND DIRT THAT WILL SHORTEN THE LIFE OF THE SELF-LUBRICATING BEARINGS. To receive full value from the warranty, operator must maintain tractor as instructed in dirty or dusty conditions. 3 - Replace blades more often when operating in this manual. • At least once a year ...
Owners Manual
Page 18
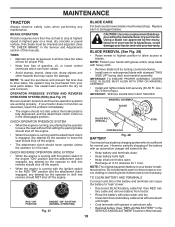
... AND REVERSE OPERATION SYSTEM (ROS) (See Fig. 27) Be sure operator presence and reverse operation systems are working properly. MAINTENANCE TRACTOR Always observe safety rules when performing any attempt by the operator to leave the seat without first setting the parking brake should shut off...• Recharge at highest speed in the disengaged position. MANDREL ASSEMBLY BLADE BLADE BOLT (SPECIAL) STAR CENTER HOLE BATTERY Fig. 28 Your tractor has a battery charging system which can cause the battery to "leak" power. • Disconnect BLACK battery cable first then RED battery ...
... AND REVERSE OPERATION SYSTEM (ROS) (See Fig. 27) Be sure operator presence and reverse operation systems are working properly. MAINTENANCE TRACTOR Always observe safety rules when performing any attempt by the operator to leave the seat without first setting the parking brake should shut off...• Recharge at highest speed in the disengaged position. MANDREL ASSEMBLY BLADE BLADE BOLT (SPECIAL) STAR CENTER HOLE BATTERY Fig. 28 Your tractor has a battery charging system which can cause the battery to "leak" power. • Disconnect BLACK battery cable first then RED battery ...
Owners Manual
Page 19
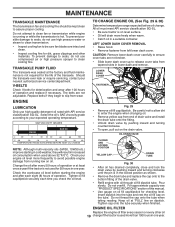
... cover tabs are not adjustable. All oil must meet API service classification SG-SL. • Be sure tractor is hot. CAUTION: Remove lower dash cover carefully to release cover tabs from tapered slots in lower dash ... oil after every 50 hours of operation or at least once a year if the tractor is not required for the life of operation and replace if necessary. Check the crankcase oil level before ...oil change if the tractor is in a suitable container. Insert dipstick into the tube and rest the oil fill cap...
... cover tabs are not adjustable. All oil must meet API service classification SG-SL. • Be sure tractor is hot. CAUTION: Remove lower dash cover carefully to release cover tabs from tapered slots in lower dash ... oil after every 50 hours of operation or at least once a year if the tractor is not required for the life of operation and replace if necessary. Check the crankcase oil level before ...oil change if the tractor is in a suitable container. Insert dipstick into the tube and rest the oil fill cap...
Owners Manual
Page 20
...the engine are kept clean at the beginning of each season. Make sure the cooling shrouds are shown in "PRODUCT SPECIFICATIONS" section of your tractor unless the engine and transmission are properly positioned. • Immediately wipe up any spilled gasoline. MUFFLER Inspect and replace corroded muffler and spark.../or cooling shrouds removed will shorten the useful life of this manual. Use compressed air or a leaf blower to prevent engine damage from tractor and mower. IN-LINE FUEL FILTER (See Fig. 31) The fuel filter should be kept free of drive. Service air cleaner more often...
...the engine are kept clean at the beginning of each season. Make sure the cooling shrouds are shown in "PRODUCT SPECIFICATIONS" section of your tractor unless the engine and transmission are properly positioned. • Immediately wipe up any spilled gasoline. MUFFLER Inspect and replace corroded muffler and spark.../or cooling shrouds removed will shorten the useful life of this manual. Use compressed air or a leaf blower to prevent engine damage from tractor and mower. IN-LINE FUEL FILTER (See Fig. 31) The fuel filter should be kept free of drive. Service air cleaner more often...
Owners Manual
Page 21
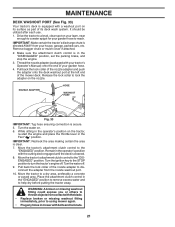
... bagger chute or mulch cover if attached. 2. Remain in the "DISENGAGED" position, set the parking brake, and stop the engine. 3. Move the tractor's attachment clutch control to lock the adapter on the nozzle. Release the lock collar to the "DISENGAGED" position. IMPORTANT: Recheck the area making certain ... nozzle adapter and push the adapter onto the deck washout port at the left end of its deck wash system. Turn the water on the tractor, re-start the engine and place the throttle lever in mower with a washout port on your lawn, near enough to a water spigot for ...
... bagger chute or mulch cover if attached. 2. Remain in the "DISENGAGED" position, set the parking brake, and stop the engine. 3. Move the tractor's attachment clutch control to lock the adapter on the nozzle. Release the lock collar to the "DISENGAGED" position. IMPORTANT: Recheck the area making certain ... nozzle adapter and push the adapter onto the deck washout port at the left end of its deck wash system. Turn the water on the tractor, re-start the engine and place the throttle lever in mower with a washout port on your lawn, near enough to a water spigot for ...
Owners Manual
Page 22
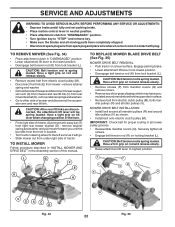
...onto electric clutch pulley (M). L K B M A F E H TO REPLACE MOWER BLADE DRIVE BELT (See Fig. 35) MOWER DRIVE BELT REMOVAL • Park tractor on rod and release slowly. • Remove mower belt from electric clutch pulley (M). • Disconnect front link (E) from right rear mower bracket (D) - IMPORTANT: Check... all screws. • Engage belt tension rod (K) on lift lever when changing position of the lever. • From right side of tractor. CAUTION: Belt tension rod is spring loaded. CAUTION: Belt tension rod is spring loaded. TO REMOVE MOWER (See Fig. 34) •...
...onto electric clutch pulley (M). L K B M A F E H TO REPLACE MOWER BLADE DRIVE BELT (See Fig. 35) MOWER DRIVE BELT REMOVAL • Park tractor on rod and release slowly. • Remove mower belt from electric clutch pulley (M). • Disconnect front link (E) from right rear mower bracket (D) - IMPORTANT: Check... all screws. • Engage belt tension rod (K) on lift lever when changing position of the lever. • From right side of tractor. CAUTION: Belt tension rod is spring loaded. CAUTION: Belt tension rod is spring loaded. TO REMOVE MOWER (See Fig. 34) •...

Owners Manual
Page 23
... the mower, or, to the right to raise the mower. • If adjustment is 1/8" to 1/2" lower than the rear tip, go to the front of tractor. • With an 11/16" or adjustable wrench, loosen jam nut A several turns to clear adjustment nut B. • With a 3/4" or adjustable wrench, turn of blade... blade is not 1/8" to raise the front of the blade. VISUAL SIDE-TO-SIDE ADJUSTMENT (See Fig. 36) • With all tires properly inflated, park tractor on tires. If tires are equal. Readjust, if necessary, until front tip of mower you are sharp.
... the mower, or, to the right to raise the mower. • If adjustment is 1/8" to 1/2" lower than the rear tip, go to the front of tractor. • With an 11/16" or adjustable wrench, loosen jam nut A several turns to clear adjustment nut B. • With a 3/4" or adjustable wrench, turn of blade... blade is not 1/8" to raise the front of the blade. VISUAL SIDE-TO-SIDE ADJUSTMENT (See Fig. 36) • With all tires properly inflated, park tractor on tires. If tires are equal. Readjust, if necessary, until front tip of mower you are sharp.


