
Owners Manual
Page 3
... 5 Operating 5 Good Service 6 Manufacturing Number 6 SYMBOLS AND DECALS 7 SAFETY 9 Safety Instructions 9 Personal Safety Equipment 11 Slope Operation 11 Safe Handling of Gasoline 13 General Maintenance 14 Transport 16 Towing 16 Spark Arrestor 16 CONTROLS 17 Control Locations 17 Motion Control Levers 18 Hour Meter 19 Tracking 19 Parking Brake 20 Blade Switch 20 Ignition Switch 20 Fuses 21 Cutting Height Adjuster 22 Fuel Shut Off Valve 22 Refueling 23 OPERATION 24 Training 24 Steering 24 Before Starting 25 Starting the Engine 25 Jumper Cables...
... 5 Operating 5 Good Service 6 Manufacturing Number 6 SYMBOLS AND DECALS 7 SAFETY 9 Safety Instructions 9 Personal Safety Equipment 11 Slope Operation 11 Safe Handling of Gasoline 13 General Maintenance 14 Transport 16 Towing 16 Spark Arrestor 16 CONTROLS 17 Control Locations 17 Motion Control Levers 18 Hour Meter 19 Tracking 19 Parking Brake 20 Blade Switch 20 Ignition Switch 20 Fuses 21 Cutting Height Adjuster 22 Fuel Shut Off Valve 22 Refueling 23 OPERATION 24 Training 24 Steering 24 Before Starting 25 Starting the Engine 25 Jumper Cables...
Owners Manual
Page 13
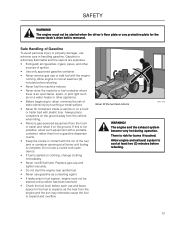
...problem has been resolved. • Check the fuel level before each use and leave space for burns if touched. Do not use extreme care in fuel system, engine must not be started when the driver's floor plate or any protective plate for the mower deck's drive belt is risk for the fuel... the fuel tank indoors 8011-516 WARNING! Safe Handling of ignition. • Use only approved gasoline container. • Never remove gas cap or add fuel with the engine running. The engine and the exhaust system become very hot during operation. The engine must not be started until fueling is ...
...problem has been resolved. • Check the fuel level before each use and leave space for burns if touched. Do not use extreme care in fuel system, engine must not be started when the driver's floor plate or any protective plate for the mower deck's drive belt is risk for the fuel... the fuel tank indoors 8011-516 WARNING! Safe Handling of ignition. • Use only approved gasoline container. • Never remove gas cap or add fuel with the engine running. The engine and the exhaust system become very hot during operation. The engine must not be started until fueling is ...

Owners Manual
Page 14
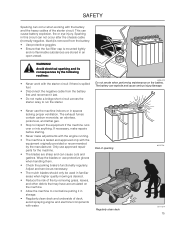
.... • Be careful when servicing the battery. SAFETY General Maintenance • Never operate machine in a closed area. • Keep all nuts and bolts, especially those fastening the blade attachments, are properly tightened and torqued. 14 Never drive the machine in an enclosed space 8011-515 WARNING! WARNING! Clean oil or fuel spillage and remove any adjustments or repairs with the engine running the engine with defective or unmounted protective...
.... • Be careful when servicing the battery. SAFETY General Maintenance • Never operate machine in a closed area. • Keep all nuts and bolts, especially those fastening the blade attachments, are properly tightened and torqued. 14 Never drive the machine in an enclosed space 8011-515 WARNING! WARNING! Clean oil or fuel spillage and remove any adjustments or repairs with the engine running the engine with defective or unmounted protective...
Owners Manual
Page 15
... heavy cables of deck, avoid spraying engine and electrical components with the engine running. • The machine is spilled fuel. • Disconnect the negative cable from the battery. • Use protective goggles. • Ensure that may have accumulated on the battery. SAFETY Sparking can occur when working with the equipment originally provided or recommended by the manufacturer. Adjust and service as necessary. • The mulch blades should...
... heavy cables of deck, avoid spraying engine and electrical components with the engine running. • The machine is spilled fuel. • Disconnect the negative cable from the battery. • Use protective goggles. • Ensure that may have accumulated on the battery. SAFETY Sparking can occur when working with the equipment originally provided or recommended by the manufacturer. Adjust and service as necessary. • The mulch blades should...
Owners Manual
Page 17
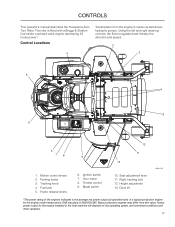
Blade switch 12 11 10 10. Control Locations 4 Transmission from this value. Height adjustment 13. Parking brake 3. Fuel tank 5. Actual power output for the engine model measured to SAE standard J1349/ISO1585. Motion control levers 2. Right tracking bolt 12. Mass production engines may differ from the engine is the average net power output (at specified rpm) of the engines indicated is made via belt-driven hydraulic pumps. Hydro release levers 6. Hour meter 8. Throttle control 9. Deck lift 8058...
Blade switch 12 11 10 10. Control Locations 4 Transmission from this value. Height adjustment 13. Parking brake 3. Fuel tank 5. Actual power output for the engine model measured to SAE standard J1349/ISO1585. Motion control levers 2. Right tracking bolt 12. Mass production engines may differ from the engine is the average net power output (at specified rpm) of the engines indicated is made via belt-driven hydraulic pumps. Hydro release levers 6. Hour meter 8. Throttle control 9. Deck lift 8058...

Owners Manual
Page 20
... mower. The mower blades are disengaged when the knob is found on the control panel and is used to start the engine. Ignition switch 20 8058-044 8058-043 8058-043 Release the parking brake before dismounting. Blade switch Ignition Switch The ignition key is placed on the left of the machine. Parking brake Blade Switch To engage the mower deck, pull the blade switch knob out. CONTROLS Parking Brake The parking brake is pressed down fully. Turn the key clockwise to release it. Pull the lever...
... mower. The mower blades are disengaged when the knob is found on the control panel and is used to start the engine. Ignition switch 20 8058-044 8058-043 8058-043 Release the parking brake before dismounting. Blade switch Ignition Switch The ignition key is placed on the left of the machine. Parking brake Blade Switch To engage the mower deck, pull the blade switch knob out. CONTROLS Parking Brake The parking brake is pressed down fully. Turn the key clockwise to release it. Pull the lever...
Owners Manual
Page 24
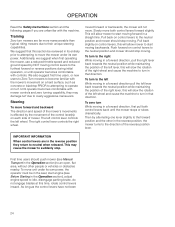
... its own power, the operator must be reviewed in the seat, start moving . Until operator becomes comfortable with the mower's movement on control levers, this will allow mower to start engine (see Manual Transport in the Operation section), adjust engine speed to overly aggressive maneuvers. moved forward or backwards, the mower will slow the rotation of the right wheel and cause the machine to neutral when released. Push forward on...
... its own power, the operator must be reviewed in the seat, start moving . Until operator becomes comfortable with the mower's movement on control levers, this will allow mower to start engine (see Manual Transport in the Operation section), adjust engine speed to overly aggressive maneuvers. moved forward or backwards, the mower will slow the rotation of the right wheel and cause the machine to neutral when released. Push forward on...

Owners Manual
Page 34
...'s manual 34 maintenance MAINTENANCE Check the parking brake Check the engine's oil level (every refueling) Check the safety system Check for fuel and oil leakages Check/clean the engine's cooling air intake Check the mower deck Check for loose hardware (screws, nuts) Clean under the mower deck Start the engine and blades, listen for unusual sounds Check for damage Thoroughly clean around the engine Clean around belts, belt pulleys Check the tire pressures Check battery connections Sharpen3)/ Replace mower blades Clean the engine's cooling air intake 2) Clean the air cleaner's pre-filter...
...'s manual 34 maintenance MAINTENANCE Check the parking brake Check the engine's oil level (every refueling) Check the safety system Check for fuel and oil leakages Check/clean the engine's cooling air intake Check the mower deck Check for loose hardware (screws, nuts) Clean under the mower deck Start the engine and blades, listen for unusual sounds Check for damage Thoroughly clean around the engine Clean around belts, belt pulleys Check the tire pressures Check battery connections Sharpen3)/ Replace mower blades Clean the engine's cooling air intake 2) Clean the air cleaner's pre-filter...

Owners Manual
Page 35
... with the plug. 35 maintenance MAINTENANCE Check/adjust throttle cable Check the condition of belts, belt pulleys Change the engine oil 1) Replace the engine oil filter Clean/replace the spark plugs Replace the fuel filter Replace air filter 2) (paper filter) Check the caster wheels (every 200 hours) Replace the air cleaner's pre-filter 2) (foam) Check the hydraulic oil in the oil tank Change the hydraulic oil (every 500 hours) Replace the hydraulic oil filter (every 500 hours) Dismantle and inspect starter 3) (every 500 hours) Check/adjust the mower deck Check the engine valve clearance...
... with the plug. 35 maintenance MAINTENANCE Check/adjust throttle cable Check the condition of belts, belt pulleys Change the engine oil 1) Replace the engine oil filter Clean/replace the spark plugs Replace the fuel filter Replace air filter 2) (paper filter) Check the caster wheels (every 200 hours) Replace the air cleaner's pre-filter 2) (foam) Check the hydraulic oil in the oil tank Change the hydraulic oil (every 500 hours) Replace the hydraulic oil filter (every 500 hours) Dismantle and inspect starter 3) (every 500 hours) Check/adjust the mower deck Check the engine valve clearance...

Owners Manual
Page 36
... or remove caps or covers. Close access doors. 11. Using a 7/16 wrench, remove the bolts on the battery and terminals can cause the battery to positive (+) battery terminal with a maintenance free battery and does not need servicing. maintenance Battery Your mower is not necessary. However, periodic charging of electrolyte is equipped with hex bolt and hex nut. 9. Open the terminal access doors. 2. First connect RED battery cable to "leak" power. 1. Before connecting battery, remove...
... or remove caps or covers. Close access doors. 11. Using a 7/16 wrench, remove the bolts on the battery and terminals can cause the battery to positive (+) battery terminal with a maintenance free battery and does not need servicing. maintenance Battery Your mower is not necessary. However, periodic charging of electrolyte is equipped with hex bolt and hex nut. 9. Open the terminal access doors. 2. First connect RED battery cable to "leak" power. 1. Before connecting battery, remove...
Owners Manual
Page 38
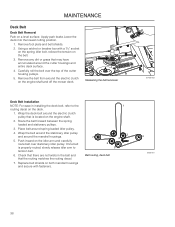
... mandrel housings. 5. Check that there are not twists in installing the deck belt, refer to tension belt. 6. Apply park brake.Lower the deck into the lowest cutting position. 1. Carefully roll the belt over stationary idler pulley. Wrap the belt around the stationary idler pulley and around spring loaded idler pulley. 4. Remove any dirt or grass that may have accumulated around the electric clutch pulley that the routing matches the routing decal. 7. Replace belt shields on the engine shaft. 2. Push inward...
... mandrel housings. 5. Check that there are not twists in installing the deck belt, refer to tension belt. 6. Apply park brake.Lower the deck into the lowest cutting position. 1. Carefully roll the belt over stationary idler pulley. Wrap the belt around the stationary idler pulley and around spring loaded idler pulley. 4. Remove any dirt or grass that may have accumulated around the electric clutch pulley that the routing matches the routing decal. 7. Replace belt shields on the engine shaft. 2. Push inward...
Owners Manual
Page 39
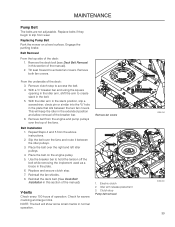
.... 6. Engage the parking brake. This will show some small cracks in the belt. 5. Use the breaker bar to slip from the above instructions. 2. Check for severe cracking and large nicks. Replacing Pump Belt Park the mower on the engine pulley. 5. Remove the deck belt (see Deck Belt Removal in the extended position and allow removal of the deck: 1. maintenance Pump Belt The belts are not adjustable. Tilt seat forward to access the belt. 4. Remove clutch stop to access fan covers. With...
.... 6. Engage the parking brake. This will show some small cracks in the belt. 5. Use the breaker bar to slip from the above instructions. 2. Check for severe cracking and large nicks. Replacing Pump Belt Park the mower on the engine pulley. 5. Remove the deck belt (see Deck Belt Removal in the extended position and allow removal of the deck: 1. maintenance Pump Belt The belts are not adjustable. Tilt seat forward to access the belt. 4. Remove clutch stop to access fan covers. With...
Owners Manual
Page 40
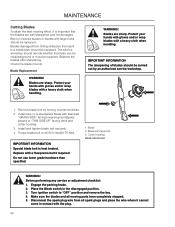
... replaced. Install and tighten blade bolt securely. 4. Cutter housing Blade attachment IMPORTANT INFORMATION Special blade bolt is important that result in a breakdown should be replaced. Before performing any service or adjustment checklist: 1. Engage the parking brake. 2. Balance the blades after sharpening. Blade Replacement WARNING! Install new or re-sharpened blade with a Husqvarna bolt if required. Torque blade bolt to "OFF" position and remove the key. 4. Do not use lower grade hardware than specified. Place the Blade switch in contact with a heavy cloth when handling...
... replaced. Install and tighten blade bolt securely. 4. Cutter housing Blade attachment IMPORTANT INFORMATION Special blade bolt is important that result in a breakdown should be replaced. Before performing any service or adjustment checklist: 1. Engage the parking brake. 2. Balance the blades after sharpening. Blade Replacement WARNING! Install new or re-sharpened blade with a Husqvarna bolt if required. Torque blade bolt to "OFF" position and remove the key. 4. Do not use lower grade hardware than specified. Place the Blade switch in contact with a heavy cloth when handling...

Owners Manual
Page 41
... deck hanger plates Leveling the mower deck 8011-601-3 41 Faulty mower deck adjustments will place the mower deck in slot until rear of grass or conditions being mowed. NOTE:To insure accuracy of leveling procedure, mower deck drive belt must be required to achieve desired cut for the type of mower deck is the same. Four slots control the height and pitch of the mower deck. Wear heavy gloves. Retain this measurement. In the rear, blade...
... deck hanger plates Leveling the mower deck 8011-601-3 41 Faulty mower deck adjustments will place the mower deck in slot until rear of grass or conditions being mowed. NOTE:To insure accuracy of leveling procedure, mower deck drive belt must be required to achieve desired cut for the type of mower deck is the same. Four slots control the height and pitch of the mower deck. Wear heavy gloves. Retain this measurement. In the rear, blade...

Owners Manual
Page 46
... fluid quality levels and longer life, an oil filter change 2 1 8019-010 46 Apply the pump release valve for ease of each . 6. capacity is recommended. Fill with the transaxles installed in ./lbs. 12. Place used oil in appropriate containers and dispose of the replacement filter. 4. Reinstall the filter guard. Filter guard 2. Clean any loose debris from the transaxles' expansion tank located on the opposite side. 7. Place an oil drain pan...
... fluid quality levels and longer life, an oil filter change 2 1 8019-010 46 Apply the pump release valve for ease of each . 6. capacity is recommended. Fill with the transaxles installed in ./lbs. 12. Place used oil in appropriate containers and dispose of the replacement filter. 4. Reinstall the filter guard. Filter guard 2. Clean any loose debris from the transaxles' expansion tank located on the opposite side. 7. Place an oil drain pan...
Owners Manual
Page 49
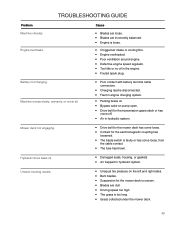
... fuse has blown. troubleshooting guide Problem Machine vibrates. Engine overheats. Cause • Blades are loose. • Blades are dull. • Driving speed too high. • The grass is faulty or has come off. • Air in hydraulic system. Mower deck not engaging. • Drive belt for the mower deck has come loose. • Contact for the mower deck is uneven. • Blades are incorrectly balanced. • Engine is disconnected. • Fault in the engine. • Fouled spark plug. Battery not charging...
... fuse has blown. troubleshooting guide Problem Machine vibrates. Engine overheats. Cause • Blades are loose. • Blades are dull. • Driving speed too high. • The grass is faulty or has come off. • Air in hydraulic system. Mower deck not engaging. • Drive belt for the mower deck has come loose. • Contact for the mower deck is uneven. • Blades are incorrectly balanced. • Engine is disconnected. • Fault in the engine. • Fouled spark plug. Battery not charging...

Owners Manual
Page 50
... reaches the carburetor. Clean, charge, and store the battery in a boiler, hot water tank, clothes drier, etc. Service When ordering spare parts, please specify the purchase year, model, type, and serial number. Add stabilizer to ensure that can come in contact with care. Run the engine for at an authorized service workshop is evenly distributed and then refit the spark plug. 6. Handle the fuel with open...
... reaches the carburetor. Clean, charge, and store the battery in a boiler, hot water tank, clothes drier, etc. Service When ordering spare parts, please specify the purchase year, model, type, and serial number. Add stabilizer to ensure that can come in contact with care. Run the engine for at an authorized service workshop is evenly distributed and then refit the spark plug. 6. Handle the fuel with open...
Owners Manual
Page 52
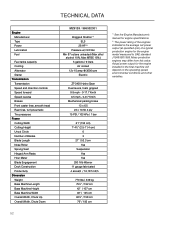
... from this value. Engine Manufacturer Type Power Lubrication Fuel Fuel tanks capacity Cooling Alternator Starter Transmission Transmission Speed and direction controls Speed forward Speed reverse Brakes Front caster tires, smooth tread Rear tires, turf pneumatic Tire pressures Frame Cutting Width Cutting Height Uncut Circle Number of Blades Blade Length Nose Roller Sprung Seat Hinged Arm Rests Hour Meter Blade Engagement Deck Construction Productivity Dimension Weight Base Machine Length Base Machine Height Base Machine Width Overall Width, Chute Up Overall Width, Chute Down 52 TECHNICAL...
... from this value. Engine Manufacturer Type Power Lubrication Fuel Fuel tanks capacity Cooling Alternator Starter Transmission Transmission Speed and direction controls Speed forward Speed reverse Brakes Front caster tires, smooth tread Rear tires, turf pneumatic Tire pressures Frame Cutting Width Cutting Height Uncut Circle Number of Blades Blade Length Nose Roller Sprung Seat Hinged Arm Rests Hour Meter Blade Engagement Deck Construction Productivity Dimension Weight Base Machine Length Base Machine Height Base Machine Width Overall Width, Chute Up Overall Width, Chute Down 52 TECHNICAL...

Owners Manual
Page 59
...blade spindles 15. Inspect spindle bearings 16. Inspect idler arm bearings 18. Inspect hydraulic hoses 23. Check safety system 26. Inspect spark plug 10. Inspect deck belt and blades 17. Inspect battery connections 25. Inspect safety guards and shields 29. Check brake adjustment Date, mtr reading, stamp, sign 59 Inspect frame 4. Inspect throttle cable 5. Check seat belt 27. Inspect dampeners 3. Inspect hardware 6. Check engine RPM 12. Check blade pitch 14. Inspect hydraulic filter 21. Inspect hydraulic drive belt 22. Change air filter 9. Inspect deck idler pulleys...
...blade spindles 15. Inspect spindle bearings 16. Inspect idler arm bearings 18. Inspect hydraulic hoses 23. Check safety system 26. Inspect spark plug 10. Inspect deck belt and blades 17. Inspect battery connections 25. Inspect safety guards and shields 29. Check brake adjustment Date, mtr reading, stamp, sign 59 Inspect frame 4. Inspect throttle cable 5. Check seat belt 27. Inspect dampeners 3. Inspect hardware 6. Check engine RPM 12. Check blade pitch 14. Inspect hydraulic filter 21. Inspect hydraulic drive belt 22. Change air filter 9. Inspect deck idler pulleys...

Owners Manual
Page 60
... safety guards and shields 28. Inspect throttle cable 5. Inspect spark plug 10. Inspect hydraulic hoses 22. Clean electrical connections 26. Inspect the clutch 24. Grease blade spindles 15. Check safety system 25. Change the engine oil and filter 8. Inspect deck idler pulleys 19. Inspect idler arm bearings 18. Check brake adjustment 60 Date, mtr reading, stamp, sign Change hydraulic oil 20. Load test battery 25. Inspect dampeners 3. Inspect fuel filter 11. Inspect spindle bearings 16. Replace hydraulic drive belt 21. Inspect frame 4. Check the tire pressures...
... safety guards and shields 28. Inspect throttle cable 5. Inspect spark plug 10. Inspect hydraulic hoses 22. Clean electrical connections 26. Inspect the clutch 24. Grease blade spindles 15. Check safety system 25. Change the engine oil and filter 8. Inspect deck idler pulleys 19. Inspect idler arm bearings 18. Check brake adjustment 60 Date, mtr reading, stamp, sign Change hydraulic oil 20. Load test battery 25. Inspect dampeners 3. Inspect fuel filter 11. Inspect spindle bearings 16. Replace hydraulic drive belt 21. Inspect frame 4. Check the tire pressures...


