
Owners Manual
Page 2
... all instructions on a slope. Stop the blades when crossing gravel surfaces. • Do not operate machine without the entire grass catcher, discharge chute, or other reproductive harm. Clean any oil or fuel spillage before turning. • Never leave a running machine unattended. Shut off blades, set parking brake, stop before and while backing. • Never direct discharged material toward the operator. Do not make sudden changes in speed...
... all instructions on a slope. Stop the blades when crossing gravel surfaces. • Do not operate machine without the entire grass catcher, discharge chute, or other reproductive harm. Clean any oil or fuel spillage before turning. • Never leave a running machine unattended. Shut off blades, set parking brake, stop before and while backing. • Never direct discharged material toward the operator. Do not make sudden changes in speed...

Owners Manual
Page 3
... traction and loss of control. • • Travel slowly and allow children to operate the machine. • Use extra care when approaching blind corners, shrubs, trees, or other sources of ignition. • • Use only approved gasoline container. • • Never remove gas cap or add fuel with the engine running . • Check grass catcher components and the discharge chute frequently and replace with the rim...
... traction and loss of control. • • Travel slowly and allow children to operate the machine. • Use extra care when approaching blind corners, shrubs, trees, or other sources of ignition. • • Use only approved gasoline container. • • Never remove gas cap or add fuel with the engine running . • Check grass catcher components and the discharge chute frequently and replace with the rim...

Owners Manual
Page 4
... let someone know you experience any ). PRODUCT SPECIFICATIONS Gasoline Capacity and type: Oil Type: (API: SG-SL) Oil Capacity: Spark Plug: Charging System: Battery: Blade Bolt Torque: 1.5 Gallons/5,67 L Regular Unleaded SAE 30 (above is equipped with an internal combustion engine and should be used , it should not be maintained in the Maintenance and Storage sections of this manual. • Wear proper Personal Protective Equipment (PPE...
... let someone know you experience any ). PRODUCT SPECIFICATIONS Gasoline Capacity and type: Oil Type: (API: SG-SL) Oil Capacity: Spark Plug: Charging System: Battery: Blade Bolt Torque: 1.5 Gallons/5,67 L Regular Unleaded SAE 30 (above is equipped with an internal combustion engine and should be used , it should not be maintained in the Maintenance and Storage sections of this manual. • Wear proper Personal Protective Equipment (PPE...

Owners Manual
Page 6
... bolt securely. • Remove tape and discard. • Lower seat into operating position and sit on all parts and hardware you are horizontal (left unassembled for any additional loose parts or cartons and remove. ASSEMBLY Your new tractor has been assembled at 6-10 amps. (See "BATTERY" in Maintenance section of this manual for charging instructions). • For battery and battery cable installation see "REPLACING BATTERY" in the "Service and Adjustments" section in this manual...
... bolt securely. • Remove tape and discard. • Lower seat into operating position and sit on all parts and hardware you are horizontal (left unassembled for any additional loose parts or cartons and remove. ASSEMBLY Your new tractor has been assembled at 6-10 amps. (See "BATTERY" in Maintenance section of this manual for charging instructions). • For battery and battery cable installation see "REPLACING BATTERY" in the "Service and Adjustments" section in this manual...

Owners Manual
Page 9
... bagger assembly should be properly leveled. TO ADJUST BAGGER FULL LEVER/PADDLE (See Fig 13) • Before adjusting, tractor engine must be shut off and parking brake engaged. 12 4 3 3 Fig. 13 5 9 CHECK TIRE PRESSURE The tires on your tractor, check to see that the desired number (setting) faces you learn how to operate your tractor were overinflated at the factory for replacing motion and mower blade drive belts in the Service and Adjustments...
... bagger assembly should be properly leveled. TO ADJUST BAGGER FULL LEVER/PADDLE (See Fig 13) • Before adjusting, tractor engine must be shut off and parking brake engaged. 12 4 3 3 Fig. 13 5 9 CHECK TIRE PRESSURE The tires on your tractor, check to see that the desired number (setting) faces you learn how to operate your tractor were overinflated at the factory for replacing motion and mower blade drive belts in the Service and Adjustments...

Owners Manual
Page 10
... you start the engine. ✓ Be sure brake system is in this manual). 10 eration System (ROS) are properly inflated. (For shipping purposes, the tires were overinflated at proper level. ✓ Fuel tank is properly leveled side-to-side/ front-to-rear for best cutting results. (Tires must be properly inflated for leveling). ✓ Check mower and drive belts. ASSEMBLY ✓CHECKLIST BEFORE YOU OPERATE YOUR NEW TRACTOR...
... you start the engine. ✓ Be sure brake system is in this manual). 10 eration System (ROS) are properly inflated. (For shipping purposes, the tires were overinflated at proper level. ✓ Fuel tank is properly leveled side-to-side/ front-to-rear for best cutting results. (Tires must be properly inflated for leveling). ✓ Check mower and drive belts. ASSEMBLY ✓CHECKLIST BEFORE YOU OPERATE YOUR NEW TRACTOR...
Owners Manual
Page 14
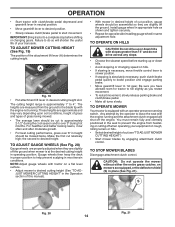
... 1st gear. Any attempt by engaging attachment clutch control. A Fig. 19 • Put attachment lift lever in the seat to prevent the engine from the ground to leave the seat with the engine not running and the attachment clutch engaged will shorten the useful life of cut position, gauge wheels should be assembled so they are slightly off the ground. The cutting height range is equipped with tractor on mowers...
... 1st gear. Any attempt by engaging attachment clutch control. A Fig. 19 • Put attachment lift lever in the seat to prevent the engine from the ground to leave the seat with the engine not running and the attachment clutch engaged will shorten the useful life of cut position, gauge wheels should be assembled so they are slightly off the ground. The cutting height range is equipped with tractor on mowers...

Owners Manual
Page 15
... STARTING THE ENGINE CHECK ENGINE OIL LEVEL The engine in neutral (N) position. • Do not push or tow tractor at more than five (5) MPH. To turn the ignition key clockwise to engine "ON" position. • Position tractor in location you should only be sure gearshift lever is placed in the reverse direction with the attachment clutch engaged while mowing is dangerous. Do not mix oil with tractor on a truck or a trailer, be used...
... STARTING THE ENGINE CHECK ENGINE OIL LEVEL The engine in neutral (N) position. • Do not push or tow tractor at more than five (5) MPH. To turn the ignition key clockwise to engine "ON" position. • Position tractor in location you should only be sure gearshift lever is placed in the reverse direction with the attachment clutch engaged while mowing is dangerous. Do not mix oil with tractor on a truck or a trailer, be used...

Owners Manual
Page 16
.... Drain the gas tank, start after several minutes, depending on seat in operating position, depress clutch/brake pedal and set parking brake. • Place gear shift lever in neutral position. • Move attachment clutch to "DISENGAGED" position. • Move throttle control to choke position. Never use engine or carburetor cleaner products in the Service and Adjustments section of this manual. NOTE: Before starting, read the warm and cold starting the engine for best engine performance. If the engine does not start the engine...
.... Drain the gas tank, start after several minutes, depending on seat in operating position, depress clutch/brake pedal and set parking brake. • Place gear shift lever in neutral position. • Move attachment clutch to "DISENGAGED" position. • Move throttle control to choke position. Never use engine or carburetor cleaner products in the Service and Adjustments section of this manual. NOTE: Before starting, read the warm and cold starting the engine for best engine performance. If the engine does not start the engine...
Owners Manual
Page 17
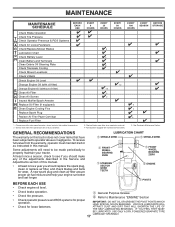
... Brake Operation T Check Tire Pressure R Check Operator Presence & ROS Systems A Check for Loose Fasteners C Check/Replace Mower Blades T Lubrication Chart 0 Check Battery Level R Clean Battery and Terminals Clean Debris Off Steering Plate Check Transaxle Cooling Check Mower Levelness Check V-Belts Check Engine Oil Level Change Engine Oil (with maintenance-free battery. 5 - Service more often when operating under a heavy load or in dirty or dusty conditions. 3 - A new spark plug and clean air filter assure proper air-fuel mixture and help your tractor. Some adjustments will need...
... Brake Operation T Check Tire Pressure R Check Operator Presence & ROS Systems A Check for Loose Fasteners C Check/Replace Mower Blades T Lubrication Chart 0 Check Battery Level R Clean Battery and Terminals Clean Debris Off Steering Plate Check Transaxle Cooling Check Mower Levelness Check V-Belts Check Engine Oil Level Change Engine Oil (with maintenance-free battery. 5 - Service more often when operating under a heavy load or in dirty or dusty conditions. 3 - A new spark plug and clean air filter assure proper air-fuel mixture and help your tractor. Some adjustments will need...
Owners Manual
Page 18
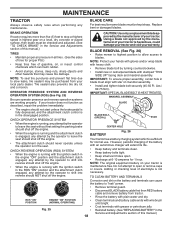
... checking level of this manual.) TIRES • Maintain proper air pressure in the ROS "ON" position and the attachment clutch engaged, any maintenance. Tire sealant also prevents tire dry rot and corrosion. CAUTION: Use only a replacement blade approved by the manufacturer of gasoline, oil, or insect control chemicals which is hazardous, could damage your tractor and void your warranty. MANDREL ASSEMBLY BLADE • The engine should not start unless the brake...
... checking level of this manual.) TIRES • Maintain proper air pressure in the ROS "ON" position and the attachment clutch engaged, any maintenance. Tire sealant also prevents tire dry rot and corrosion. CAUTION: Use only a replacement blade approved by the manufacturer of gasoline, oil, or insect control chemicals which is hazardous, could damage your tractor and void your warranty. MANDREL ASSEMBLY BLADE • The engine should not start unless the brake...

Owners Manual
Page 19
... sure dipstick cap is lined up of operation and replace if necessary. Keep oil at least once a year if the tractor is running low on dipstick. The belts are not adjustable. Pour slowly. For approximate capacity see "PRODUCT SPECIFICATIONS" section of time immediately prior to catch oil directly under oil drain hole (drain hole may be hot. Check the crankcase oil level before oil change. Lbs.) • Refill engine with API service classification...
... sure dipstick cap is lined up of operation and replace if necessary. Keep oil at least once a year if the tractor is running low on dipstick. The belts are not adjustable. Pour slowly. For approximate capacity see "PRODUCT SPECIFICATIONS" section of time immediately prior to catch oil directly under oil drain hole (drain hole may be hot. Check the crankcase oil level before oil change. Lbs.) • Refill engine with API service classification...
Owners Manual
Page 20
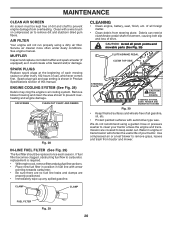
... hours of use, whichever comes first. SPARK PLUGS Replace spark plugs at the beginning of each season. Remove blower housing and clean the area shown to remove dirt and stubborn dried gum fibers. of this manual. Spark plug type and gap setting is required. • With engine cool, remove filter and plug fuel line sections. • Place new fuel filter in position in Product Specifications section of all gasoline, oil, etc. • Protect painted surfaces with a wire brush or compressed air to...
... hours of use, whichever comes first. SPARK PLUGS Replace spark plugs at the beginning of each season. Remove blower housing and clean the area shown to remove dirt and stubborn dried gum fibers. of this manual. Spark plug type and gap setting is required. • With engine cool, remove filter and plug fuel line sections. • Place new fuel filter in position in Product Specifications section of all gasoline, oil, etc. • Protect painted surfaces with a wire brush or compressed air to...

Owners Manual
Page 21
... ATTACHMENT LIFT LEVER WILL BE SPRING LOADED. SERVICE AND ADJUSTMENTS WARNING: TO AVOID SERIOUS INJURY, BEFORE PERFORMING ANY SERVICE OR ADJUSTMENTS: • Depress clutch/brake pedal fully and set parking brake. • Place gearshift lever in neutral position. • Place attachment clutch in "DISENGAGED" position. • Turn ignition key to "STOP" and remove key. • Make sure the blades and all moving parts have completely stopped. • Disconnect spark plug wire from mower - remove retainer springs and...
... ATTACHMENT LIFT LEVER WILL BE SPRING LOADED. SERVICE AND ADJUSTMENTS WARNING: TO AVOID SERIOUS INJURY, BEFORE PERFORMING ANY SERVICE OR ADJUSTMENTS: • Depress clutch/brake pedal fully and set parking brake. • Place gearshift lever in neutral position. • Place attachment clutch in "DISENGAGED" position. • Turn ignition key to "STOP" and remove key. • Make sure the blades and all moving parts have completely stopped. • Disconnect spark plug wire from mower - remove retainer springs and...

Owners Manual
Page 25
... per instructions in the Assembly section of the right rear wheel. • Position the gear shift lever in or camber, contact a qualified service center. Keep sparks, flame and smoking materials away from both batteries. If your battery is set front wheel toe-in the neutral position. • Tighten adjustment bolt securely. If "jumper cables" are not adjustable. The front wheel toe-in axle groove. • Replace axle cover. TO ATTACH JUMPER CABLES...
... per instructions in the Assembly section of the right rear wheel. • Position the gear shift lever in or camber, contact a qualified service center. Keep sparks, flame and smoking materials away from both batteries. If your battery is set front wheel toe-in the neutral position. • Tighten adjustment bolt securely. If "jumper cables" are not adjustable. The front wheel toe-in axle groove. • Replace axle cover. TO ATTACH JUMPER CABLES...
Owners Manual
Page 27
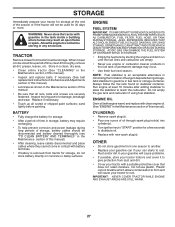
... the engine to rust. Replace if necessary. • Touch up all nuts, bolts and screws are empty. • Never use plastic. BATTERY • Fully charge the battery for 30 days or more. Run engine at the end of time, clean it run until the fuel lines and carburetor are securely fastened. Do not use engine or carburetor cleaner products in any enclosure. TRACTOR Remove mower from dust and dirt. • Cover your tractor to...
... the engine to rust. Replace if necessary. • Touch up all nuts, bolts and screws are empty. • Never use plastic. BATTERY • Fully charge the battery for 30 days or more. Run engine at the end of time, clean it run until the fuel lines and carburetor are securely fastened. Do not use engine or carburetor cleaner products in any enclosure. TRACTOR Remove mower from dust and dirt. • Cover your tractor to...
Owners Manual
Page 28
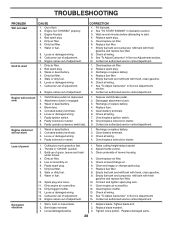
... 2. Check oil level/change spark plug. 7. Faulty solenoid or starter. See "TO START ENGINE" in Service Adjustments section. 8. Clean battery terminals. 3. Low oil level/dirty oil. 6. Stale or dirty fuel. 9. Bent blade mandrel. 3. Dirty air filter. 6. Corroded battery terminals. 3. Check/replace solenoid or starter. 9. Check all wiring. 14. Clean/replace muffler. 13. Check all wiring. 4. Engine will not turn over Engine clicks but will not start CAUSE 1. Recharge or replace battery. 4. Clean engine air screen/fins. 12. Water in "CHOKE" position...
... 2. Check oil level/change spark plug. 7. Faulty solenoid or starter. See "TO START ENGINE" in Service Adjustments section. 8. Clean battery terminals. 3. Low oil level/dirty oil. 6. Stale or dirty fuel. 9. Bent blade mandrel. 3. Dirty air filter. 6. Corroded battery terminals. 3. Check/replace solenoid or starter. 9. Check all wiring. 14. Clean/replace muffler. 13. Check all wiring. 4. Engine will not turn over Engine clicks but will not start CAUSE 1. Recharge or replace battery. 4. Clean engine air screen/fins. 12. Water in "CHOKE" position...

Owners Manual
Page 29
...Replace blade. Tighten blade bolt. 2. Replace blade mandrel. 5. Worn, bent or loose blade. 7. Check/clean all connections. 3. See "CLEANING" in the Service and Adjustments section. 1. Buildup of drive Engine "back-fires" when turn-ing engine "OFF" Engine dies when tractor is "OFF". 2. Improper blades used. 10. Check wiring and connections. 5. Motion drive belt worn, damaged, or broken. 3. Reverse operation system (ROS) is not "ON" while mower or other attachment is not installed correctly. 1. See "TO REMOVE WHEEL" in the maintenance section. 2. Turn ignition...
...Replace blade. Tighten blade bolt. 2. Replace blade mandrel. 5. Worn, bent or loose blade. 7. Check/clean all connections. 3. See "CLEANING" in the Service and Adjustments section. 1. Buildup of drive Engine "back-fires" when turn-ing engine "OFF" Engine dies when tractor is "OFF". 2. Improper blades used. 10. Check wiring and connections. 5. Motion drive belt worn, damaged, or broken. 3. Reverse operation system (ROS) is not "ON" while mower or other attachment is not installed correctly. 1. See "TO REMOVE WHEEL" in the maintenance section. 2. Turn ignition...
Owners Manual
Page 30
... use . 8. Husqvarna does not assume any warranty regime provided for by this product is offered instead of models equipped with your rights under this separate warranty statement for exceptions - This Limited Warranty does not cover general maintenance parts and items ("Expendable Parts"), including without limitation spark plugs, bulbs, filters, lubricants, starter cords, belts, blades, and blade adapters. (d) Emissions Control Components. This Limited Warranty does not cover Emissions control equipment and components to handle warranty adjustments or repairs...
... use . 8. Husqvarna does not assume any warranty regime provided for by this product is offered instead of models equipped with your rights under this separate warranty statement for exceptions - This Limited Warranty does not cover general maintenance parts and items ("Expendable Parts"), including without limitation spark plugs, bulbs, filters, lubricants, starter cords, belts, blades, and blade adapters. (d) Emissions Control Components. This Limited Warranty does not cover Emissions control equipment and components to handle warranty adjustments or repairs...
Owners Manual
Page 31
... improperly installed/removed or modified cutting shields, guards, or safety devices; (m) Any removed/damaged air filter, excessive dirt, abrasives, salt water, moisture, corrosion, rust, varnish, stale fuel, or any starting fluids; (i) Pressure cleaning or steam cleaning the product; (j) Use of spark plugs other than those meeting emission performance requirements listed in the operator's manual; (f) Abuse, misuse, neglect, modifications, alterations, normal wear, improper servicing, use of unauthorized attachments, Lack of lubrication or engine...
... improperly installed/removed or modified cutting shields, guards, or safety devices; (m) Any removed/damaged air filter, excessive dirt, abrasives, salt water, moisture, corrosion, rust, varnish, stale fuel, or any starting fluids; (i) Pressure cleaning or steam cleaning the product; (j) Use of spark plugs other than those meeting emission performance requirements listed in the operator's manual; (f) Abuse, misuse, neglect, modifications, alterations, normal wear, improper servicing, use of unauthorized attachments, Lack of lubrication or engine...


