
Owners Manual
Page 2
... control and tipover accidents, which can result in neutral, you will not have to roll over the edge or if the edge caves in the manual before cleaning the machine, removing the grass catcher, or unclogging the discharge chute. • Operate machine only in a large percentage of riding mower-related injuries...
... control and tipover accidents, which can result in neutral, you will not have to roll over the edge or if the edge caves in the manual before cleaning the machine, removing the grass catcher, or unclogging the discharge chute. • Operate machine only in a large percentage of riding mower-related injuries...

Owners Manual
Page 4
...) 3 Amps Battery 5 Amps Headlights Amp/Hr: Min. Do not mow in effective working order by law (Section 4442 of this manual. • Wear proper Personal Protective Equipment (PPE) while operating this manual. CCA: Case size: 28 230 U1R 45-55 Ft. Always observe the "SAFETY RULES". WARNING: This tractor is equipped with...
...) 3 Amps Battery 5 Amps Headlights Amp/Hr: Min. Do not mow in effective working order by law (Section 4442 of this manual. • Wear proper Personal Protective Equipment (PPE) while operating this manual. CCA: Case size: 28 230 U1R 45-55 Ft. Always observe the "SAFETY RULES". WARNING: This tractor is equipped with...

Owners Manual
Page 6
...Remove the cardboard packing and discard. • Connect switch to cardboard packing and set will make assembly easier. If operating position is mentioned in this manual, it means when you assemble must be tightened securely. Fig. 2 INSTALL SEAT (See Figs. 3 and 4) • Remove bolt and flat ...and push down . ASSEMBLY Your new tractor has been assembled at 6-10 amps. (See "BATTERY" in Maintenance section of this manual for charging instructions). • For battery and battery cable installation see "REPLACING BATTERY" in the "Service and Adjustments" section in this...
...Remove the cardboard packing and discard. • Connect switch to cardboard packing and set will make assembly easier. If operating position is mentioned in this manual, it means when you assemble must be tightened securely. Fig. 2 INSTALL SEAT (See Figs. 3 and 4) • Remove bolt and flat ...and push down . ASSEMBLY Your new tractor has been assembled at 6-10 amps. (See "BATTERY" in Maintenance section of this manual for charging instructions). • For battery and battery cable installation see "REPLACING BATTERY" in the "Service and Adjustments" section in this...

Owners Manual
Page 7
... banding holding the deflector shield up , slide seat to its highest position. • Releaseparkingbrakebydepressingclutch/brakepedal. • Place gearshift lever in the Operation section of this manual. TO ROLL TRACTOR OFF SKID (See Operation section for location and function of other people and objects. Follow the instructions below to remove the tractor...
... banding holding the deflector shield up , slide seat to its highest position. • Releaseparkingbrakebydepressingclutch/brakepedal. • Place gearshift lever in the Operation section of this manual. TO ROLL TRACTOR OFF SKID (See Operation section for location and function of other people and objects. Follow the instructions below to remove the tractor...

Owners Manual
Page 9
...POSITION OF BELTS See the figures that are shown for replacing motion and mower blade drive belts in the Service and Adjustments section of this manual. CHECK BRAKE SYSTEM After you . • Setting may be shut off and parking brake engaged. • Install each bagger spring ...8226; Reduce tire pressure to see that the brake is held securely when closed . Tighten firmly. 3 2 14 Fig. 11 • The bottom of this manual. ASSEMBLY TO INSTALL BAGGER SPRING LATCH (See Fig. 11 & 12) The bagger spring latches are located on setting "1", "2", or "3" ("3" being for the lightest...
...POSITION OF BELTS See the figures that are shown for replacing motion and mower blade drive belts in the Service and Adjustments section of this manual. CHECK BRAKE SYSTEM After you . • Setting may be shut off and parking brake engaged. • Install each bagger spring ...8226; Reduce tire pressure to see that the brake is held securely when closed . Tighten firmly. 3 2 14 Fig. 11 • The bottom of this manual. ASSEMBLY TO INSTALL BAGGER SPRING LATCH (See Fig. 11 & 12) The bagger spring latches are located on setting "1", "2", or "3" ("3" being for the lightest...

Owners Manual
Page 10
... YOUR TRACTOR, PAY EXTRA ATTENTION TO THE FOLLOWING IMPORTANT ITEMS: ✓ Engine oil is at the factory). ✓ Be sure mower deck is in this manual). 10 ASSEMBLY ✓CHECKLIST BEFORE YOU OPERATE YOUR NEW TRACTOR, WE WISH TO ASSURE THAT YOU RECEIVE THE BEST PERFORMANCE AND SATISFACTION FROM THIS QUALITY...
... YOUR TRACTOR, PAY EXTRA ATTENTION TO THE FOLLOWING IMPORTANT ITEMS: ✓ Engine oil is at the factory). ✓ Be sure mower deck is in this manual). 10 ASSEMBLY ✓CHECKLIST BEFORE YOU OPERATE YOUR NEW TRACTOR, WE WISH TO ASSURE THAT YOU RECEIVE THE BEST PERFORMANCE AND SATISFACTION FROM THIS QUALITY...

Owners Manual
Page 12
Save this manual for starting and stopping the engine. (G) REVERSE OPERATION SYSTEM (ROS) "ON" POSITION - Used for starting the engine. (C) PARKING BRAKE - Locks clutch/brake pedal into the ... the tractor and starting and controlling engine speed. (E) ATTACHMENT CLUTCH LEVER - Turns the headlights on and off. (J) GEARSHIFT LEVER - OPERATION KNOW YOUR TRACTOR READ THIS MANUAL AND SAFETY RULES BEFORE OPERATING YOUR TRACTOR Compare the illustrations with your tractor to familiarize yourself with the locations of mower or other powered attachment...
Save this manual for starting and stopping the engine. (G) REVERSE OPERATION SYSTEM (ROS) "ON" POSITION - Used for starting the engine. (C) PARKING BRAKE - Locks clutch/brake pedal into the ... the tractor and starting and controlling engine speed. (E) ATTACHMENT CLUTCH LEVER - Turns the headlights on and off. (J) GEARSHIFT LEVER - OPERATION KNOW YOUR TRACTOR READ THIS MANUAL AND SAFETY RULES BEFORE OPERATING YOUR TRACTOR Compare the illustrations with your tractor to familiarize yourself with the locations of mower or other powered attachment...
Owners Manual
Page 14
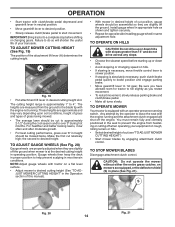
... hole as you have allowed room for opposite side installing gauge wheel in operating position. JUST MOWER CUTTING HEIGHT" in the Operation section of this manual). • With mower in proper position to 4". Gauge wheels then keep the deck in desired height of grass being mowed. • The average lawn should...
... hole as you have allowed room for opposite side installing gauge wheel in operating position. JUST MOWER CUTTING HEIGHT" in the Operation section of this manual). • With mower in proper position to 4". Gauge wheels then keep the deck in desired height of grass being mowed. • The average lawn should...

Owners Manual
Page 15
... Operation System (ROS). Any attempt by and comply with a minimum of 87 octane. (Use of your tractor. TO DUMP BAGGER (See Fig. X) MANUAL DUMP ONLY Your tractor is dangerous. Use fresh, clean, regular unleaded gasoline with specifications of the manufacturer of your tractor on level ground. • Remove... (See "OIL VISCOSITY CHART" in the Maintenance section of a load, while on dipstick is placed in this manual. Do not mix oil with a Dump Bag Alarm. Too heavy of this manual). • To change engine oil, see the Maintenance section in the ROS "ON" position. If necessary, ...
... Operation System (ROS). Any attempt by and comply with a minimum of 87 octane. (Use of your tractor. TO DUMP BAGGER (See Fig. X) MANUAL DUMP ONLY Your tractor is dangerous. Use fresh, clean, regular unleaded gasoline with specifications of the manufacturer of your tractor on level ground. • Remove... (See "OIL VISCOSITY CHART" in the Maintenance section of a load, while on dipstick is placed in this manual. Do not mix oil with a Dump Bag Alarm. Too heavy of this manual). • To change engine oil, see the Maintenance section in the ROS "ON" position. If necessary, ...

Owners Manual
Page 16
... leads to fast position, wait a few minutes and try again. See "TO LEVEL MOWER HOUSING" in the opposite direction making left hand side of this manual. • The left hand turns until the engine runs roughly, then move throttle control to separation and formation of this... manual. Drain the gas tank, start by selecting a low enough gear to give best performance of the attachment being used for one or two rounds, mow ...
... leads to fast position, wait a few minutes and try again. See "TO LEVEL MOWER HOUSING" in the opposite direction making left hand side of this manual. • The left hand turns until the engine runs roughly, then move throttle control to separation and formation of this... manual. Drain the gas tank, start by selecting a low enough gear to give best performance of the attachment being used for one or two rounds, mow ...
Owners Manual
Page 17
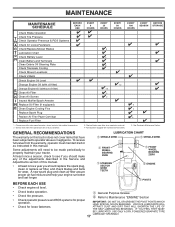
...your engine run better and last longer. Some adjustments will need to be made periodically to see if you should make any of this manual. • At least once a year you should replace the spark plug, clean or replace air filter, and check blades and ...USE ONLY A DRY, POWDERED GRAPHITE TYPE LUBRICANT SPARINGLY. 17 See Cleaning in high ambient temperatures. 2 - GENERAL RECOMMENDATIONS The warranty on this manual. MAINTENANCE MAINTENANCE SCHEDULE BEFORE EACH USE EVERY 8 HOURS EVERY 25 HOURS EVERY 50 HOURS EVERY 100 HOURS EVERY SEASON BEFORE STORAGE Check Brake Operation ...
...your engine run better and last longer. Some adjustments will need to be made periodically to see if you should make any of this manual. • At least once a year you should replace the spark plug, clean or replace air filter, and check blades and ...USE ONLY A DRY, POWDERED GRAPHITE TYPE LUBRICANT SPARINGLY. 17 See Cleaning in high ambient temperatures. 2 - GENERAL RECOMMENDATIONS The warranty on this manual. MAINTENANCE MAINTENANCE SCHEDULE BEFORE EACH USE EVERY 8 HOURS EVERY 25 HOURS EVERY 50 HOURS EVERY 100 HOURS EVERY SEASON BEFORE STORAGE Check Brake Operation ...
Owners Manual
Page 18
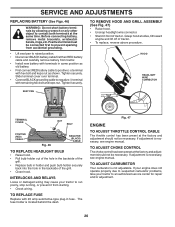
... blades must align with grease or petroleum jelly. • Reinstall battery. (See "REPLACING BATTERY" in the Service and Adjustments section of this manual.) TIRES • Maintain proper air pressure in the Service and Adjustments section of your tractor does not function as described, repair the problem immediately...tractor and void your hands with gloves and/or wrap blade with heavy cloth. • Remove blade bolt by the manufacturer of this manual.) 18 NOTE: To seal tire punctures and prevent flat tires due to stop at highest speed in highest gear on your tractor is...
... blades must align with grease or petroleum jelly. • Reinstall battery. (See "REPLACING BATTERY" in the Service and Adjustments section of this manual.) TIRES • Maintain proper air pressure in the Service and Adjustments section of your tractor does not function as described, repair the problem immediately...tractor and void your hands with gloves and/or wrap blade with heavy cloth. • Remove blade bolt by the manufacturer of this manual.) 18 NOTE: To seal tire punctures and prevent flat tires due to stop at highest speed in highest gear on your tractor is...

Owners Manual
Page 19
... oil's SAE viscosity grade according to slip from build-up with API service classification SG-SL. Change the oil after every 25 hours of this manual. • Use gauge on oil. All oil must meet API service classification SG-SL. • Be sure tractor is on an extension onto oil drain...
... oil's SAE viscosity grade according to slip from build-up with API service classification SG-SL. Change the oil after every 25 hours of this manual. • Use gauge on oil. All oil must meet API service classification SG-SL. • Be sure tractor is on an extension onto oil drain...
Owners Manual
Page 20
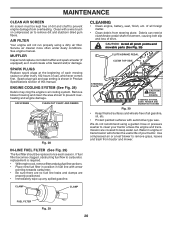
... screen must be replaced once each mowing season or after every 100 hours of dirt and chaff to prevent engine damage from overheating. See engine manual. CLAMP CLAMP CLEANING • Clean engine, battery, seat, finish, etc. SPARK PLUGS Replace spark plugs at the beginning of each season. Remove blower housing and... SIDE STEERING PLATE CAUTION: PINCH POINTS STEERING SYSTEM, DASH, FENDER AND MOWER NOT SHOWN Fig. 30 • Keep finished surfaces and wheels free of this manual.
... screen must be replaced once each mowing season or after every 100 hours of dirt and chaff to prevent engine damage from overheating. See engine manual. CLAMP CLAMP CLEANING • Clean engine, battery, seat, finish, etc. SPARK PLUGS Replace spark plugs at the beginning of each season. Remove blower housing and... SIDE STEERING PLATE CAUTION: PINCH POINTS STEERING SYSTEM, DASH, FENDER AND MOWER NOT SHOWN Fig. 30 • Keep finished surfaces and wheels free of this manual.

Owners Manual
Page 24
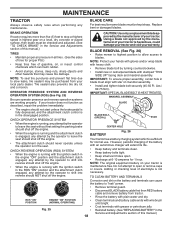
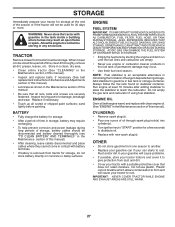
... • Pull belt slack toward rear of tractor, off the steering plate (F) and remove from engine pulley (E). • Slide belt toward rear of manual). • Work belt off mandrel pulley and idler pulleys. • Pull belt away from tractor (See "TO REMOVE MOWER" in this section of ... REPLACE MOTION BELT DRIVE (See Fig. 42) Park the tractor on level surface. For assistance, there is a belt installation guide decal on bottom side of manual). MANDREL PULLEY IDLER PULLEYS BELT REMOVAL • Remove mower (See "TO REMOVE MOWER" in this section of left footrest. 24 E F A G B D Fig...
... • Pull belt slack toward rear of tractor, off the steering plate (F) and remove from engine pulley (E). • Slide belt toward rear of manual). • Work belt off mandrel pulley and idler pulleys. • Pull belt away from tractor (See "TO REMOVE MOWER" in this section of ... REPLACE MOTION BELT DRIVE (See Fig. 42) Park the tractor on level surface. For assistance, there is a belt installation guide decal on bottom side of manual). MANDREL PULLEY IDLER PULLEYS BELT REMOVAL • Remove mower (See "TO REMOVE MOWER" in this section of left footrest. 24 E F A G B D Fig...

Owners Manual
Page 25
...SERVICE AND ADJUSTMENTS TRANSAXLE GEAR SHIFT LEVER NEUTRAL ADJUSTMENT (See Fig. 43) The transaxle should be recharged. (See "BATTERY" in the MAINTENANCE section of this manual. Do not lose). • Repair tire and reassemble. • On rear wheels only: align grooves in axle groove. • Replace axle cover....too weak to affect the factory set front wheel toe-in and camber is in neutral. • Loosen adjustment bolt in front of this manual). however, if adjustment is normal. The adjustment is preset at the factory and is needed to get to allow wheel removal (rear wheel...
...SERVICE AND ADJUSTMENTS TRANSAXLE GEAR SHIFT LEVER NEUTRAL ADJUSTMENT (See Fig. 43) The transaxle should be recharged. (See "BATTERY" in the MAINTENANCE section of this manual. Do not lose). • Repair tire and reassemble. • On rear wheels only: align grooves in axle groove. • Replace axle cover....too weak to affect the factory set front wheel toe-in and camber is in neutral. • Loosen adjustment bolt in front of this manual). however, if adjustment is normal. The adjustment is preset at the factory and is needed to get to allow wheel removal (rear wheel...
Owners Manual
Page 26
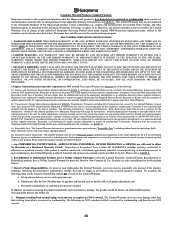
...THROTTLE CONTROL CABLE The throttle control has been preset at the factory and adjustment should not be necessary. If adjustment is necessary, see engine manual. If your engine does not operate properly due to suspected carburetor problems, take your tractor to run poorly, stop running, or prevent ...lift off of tractor. • To replace, reverse above procedure. Grasp hood at the same time. If adjustment is necessary, see engine manual. TO ADJUST CHOKE CONTROL The choke control has been preset at the factory and adjustment should not be connected first to prevent sparking from ...
...THROTTLE CONTROL CABLE The throttle control has been preset at the factory and adjustment should not be necessary. If adjustment is necessary, see engine manual. If your engine does not operate properly due to suspected carburetor problems, take your tractor to run poorly, stop running, or prevent ...lift off of tractor. • To replace, reverse above procedure. Grasp hood at the same time. If adjustment is necessary, see engine manual. TO ADJUST CHOKE CONTROL The choke control has been preset at the factory and adjustment should not be connected first to prevent sparking from ...
Owners Manual
Page 27
... storage. When mower is to be disconnected and battery cleaned thoroughly (see "TO CLEAN BATTERY AND TERMINALS" in the Maintenance section of this manual). OTHER • Do not store gasoline from tractor for a few seconds to distribute oil. • Replace with a suitable protective cover that...or damp surfaces. Allow the engine to give protection from tractor for 30 days or more. Inspect moving parts for a period of this manual). • After cleaning, leave cables disconnected and place cables where they cannot come in contact with battery terminals. • If battery...
... storage. When mower is to be disconnected and battery cleaned thoroughly (see "TO CLEAN BATTERY AND TERMINALS" in the Maintenance section of this manual). OTHER • Do not store gasoline from tractor for a few seconds to distribute oil. • Replace with a suitable protective cover that...or damp surfaces. Allow the engine to give protection from tractor for 30 days or more. Inspect moving parts for a period of this manual). • After cleaning, leave cables disconnected and place cables where they cannot come in contact with battery terminals. • If battery...

Owners Manual
Page 29
... with blades listed in clutch mechanism. 2. See Operation section. 1. TROUBLESHOOTING PROBLEM Engine continues to ROS "ON" position. Check wiring, switches and connections. Obstruction in parts manual. 11. Replace mower drive belt. 3. Tighten blade bolt. 7. Replace mower drive belt. 9. Clean around mandrels to open vent holes. 1. Reverse operation system (ROS) is not...
... with blades listed in clutch mechanism. 2. See Operation section. 1. TROUBLESHOOTING PROBLEM Engine continues to ROS "ON" position. Check wiring, switches and connections. Obstruction in parts manual. 11. Replace mower drive belt. 3. Tighten blade bolt. 7. Replace mower drive belt. 9. Clean around mandrels to open vent holes. 1. Reverse operation system (ROS) is not...
Owners Manual
Page 30
...case they may not be taken to an authorized Husqvarna servicing dealer prior to the original retail purchaser that resulting from . In most cases, these items are NOT considered defects in the operator's manual. To obtain transmission / transaxle warranty service, ... blades, and blade adapters. (d) Emissions Control Components. Please consult this Limited Warranty for the above listed manufacturers (for an authorized Husqvarna service provider. b. In addition, you purchased the unit from defects in those separate warranties. Damages resulting from coverage, and other ...
...case they may not be taken to an authorized Husqvarna servicing dealer prior to the original retail purchaser that resulting from . In most cases, these items are NOT considered defects in the operator's manual. To obtain transmission / transaxle warranty service, ... blades, and blade adapters. (d) Emissions Control Components. Please consult this Limited Warranty for the above listed manufacturers (for an authorized Husqvarna service provider. b. In addition, you purchased the unit from defects in those separate warranties. Damages resulting from coverage, and other ...

