
Owners Manual
Page 2
...: Always disconnect spark plug wire and place it where it on slippery surfaces. 4. Caution should start to observe the following safety instructions could result in reverse. WARNING: Snow throwers have exposed rotating parts, which can get caught in order to be exercised while using on the machine and in contact with electric drive motors or electric starting motors. 6. Keep the area of operation clear of California...
...: Always disconnect spark plug wire and place it where it on slippery surfaces. 4. Caution should start to observe the following safety instructions could result in reverse. WARNING: Snow throwers have exposed rotating parts, which can get caught in order to be exercised while using on the machine and in contact with electric drive motors or electric starting motors. 6. Keep the area of operation clear of California...

Owners Manual
Page 3
... SPECIFICATIONS 3 CUSTOMER RESPONSIBILITIES 3 ASSEMBLY / PRE-OPERATION 5-6 OPERATION 7-12 MAINTENANCE SCHEDULE 13 MAINTENANCE 13-14 SERVICE AND ADJUSTMENTS 15-18 STORAGE 19 TROUBLESHOOTING 20 WARRANTY 21-24 3 Never operate the snow thrower without good visibility or light. SHUT THE ENGINE OFF! 2. Check shear bolts and other safety protective devices in any problem you cannot easily remedy, please contact your nearest authorized service center. CONGRATULATIONS on slopes. 9. 6. When cleaning, repairing or inspecting the snow thrower...
... SPECIFICATIONS 3 CUSTOMER RESPONSIBILITIES 3 ASSEMBLY / PRE-OPERATION 5-6 OPERATION 7-12 MAINTENANCE SCHEDULE 13 MAINTENANCE 13-14 SERVICE AND ADJUSTMENTS 15-18 STORAGE 19 TROUBLESHOOTING 20 WARRANTY 21-24 3 Never operate the snow thrower without good visibility or light. SHUT THE ENGINE OFF! 2. Check shear bolts and other safety protective devices in any problem you cannot easily remedy, please contact your nearest authorized service center. CONGRATULATIONS on slopes. 9. 6. When cleaning, repairing or inspecting the snow thrower...
Owners Manual
Page 5
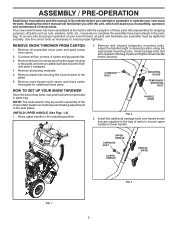
... to complete the assembly have been placed in parts bag. HOW TO SET UP YOUR SNOW THROWER Store the extra shear bolts, nuts and multi-wrench provided in the parts bag. Remove snow thrower from skid plate if equipped. 4. All parts such as necessary to the operating position. 2. Install the additional carriage bolts and handle knobs that are supplied in the bag of your new snow thrower. Reading the entire manual will assist...
... to complete the assembly have been placed in parts bag. HOW TO SET UP YOUR SNOW THROWER Store the extra shear bolts, nuts and multi-wrench provided in the parts bag. Remove snow thrower from skid plate if equipped. 4. All parts such as necessary to the operating position. 2. Install the additional carriage bolts and handle knobs that are supplied in the bag of your new snow thrower. Reading the entire manual will assist...
Owners Manual
Page 6
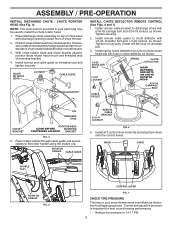
.... 2. CHUTE ROTATOR HEAD LOCKNUT CABLE GUIDE INSTALL CHUTE DEFLECTOR REMOTE CONTROL (See Figs. 6 and 7) 1. Install all 3 control lever knobs by pressing them down onto the control levers. With chute rotator head and chute bracket aligned, position chute rotator head on chute rotator head and into hole in chute bracket. 3. KNOB KNOB DOUBLE CLIP ROTATOR CABLES FIG. 5 CONTROL LEVER FIG. 7 CHECK TIRE PRESSURE The tires on your parts bag may be loose on threaded stud and tighten securely. ASSEMBLY / PRE-OPERATION INSTALL DISCHARGE CHUTE / CHUTE ROTATOR HEAD...
.... 2. CHUTE ROTATOR HEAD LOCKNUT CABLE GUIDE INSTALL CHUTE DEFLECTOR REMOTE CONTROL (See Figs. 6 and 7) 1. Install all 3 control lever knobs by pressing them down onto the control levers. With chute rotator head and chute bracket aligned, position chute rotator head on chute rotator head and into hole in chute bracket. 3. KNOB KNOB DOUBLE CLIP ROTATOR CABLES FIG. 5 CONTROL LEVER FIG. 7 CHECK TIRE PRESSURE The tires on your parts bag may be loose on threaded stud and tighten securely. ASSEMBLY / PRE-OPERATION INSTALL DISCHARGE CHUTE / CHUTE ROTATOR HEAD...
Owners Manual
Page 7
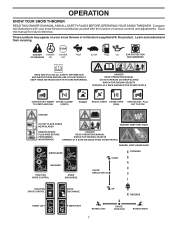
... ALL SAFETY INFORMATION AND INSTRUCTIONS BEFORE USE OF THIS PRODUCT. PULL OUT TO STOP DANGER DO NOT PLACE HANDS NEAR BLADES DANGER, KEEP FEET AWAY REMOVE SPARK PLUG WIRE BEFORE PERFORMING MAINTENANCE DANGER READ OPERATORS MANUAL WATCH FOR THROWN OBJECTS OPERATE AT A SAFE DISTANCE FROM OTHER PEOPLE DANGER, KEEP HANDS AWAY DISENGAGED DOWN FORWARD ENGAGED TRACTION DRIVE CONTROL SNOW DISCHARGE CHUTE DEFLECTOR TRACTION DRIVE CONTROL SNOW DISCHARGE UP REVERSE...
... ALL SAFETY INFORMATION AND INSTRUCTIONS BEFORE USE OF THIS PRODUCT. PULL OUT TO STOP DANGER DO NOT PLACE HANDS NEAR BLADES DANGER, KEEP FEET AWAY REMOVE SPARK PLUG WIRE BEFORE PERFORMING MAINTENANCE DANGER READ OPERATORS MANUAL WATCH FOR THROWN OBJECTS OPERATE AT A SAFE DISTANCE FROM OTHER PEOPLE DANGER, KEEP HANDS AWAY DISENGAGED DOWN FORWARD ENGAGED TRACTION DRIVE CONTROL SNOW DISCHARGE CHUTE DEFLECTOR TRACTION DRIVE CONTROL SNOW DISCHARGE UP REVERSE...

Owners Manual
Page 8
... chute control lever - MUFFLER GASOLINE FILLER CAP CHOKE CONTROL ON / OFF SWITCH OPERATION POWER CORD PLUG ELECTRIC START BUTTON AUGER CONTROL LEVER DISCHARGE CHUTE CONTROL LEVER DRIVE SPEED CONTROL LEVER DEFLECTOR REMOTE CONTROL LEVER PRIMER SAFETY IGNITION KEY FUEL SHUT-OFF VALVE RECOIL STARTER HANDLE CHUTE DEFLECTOR CLEAN-OUT TOOL DISCHARGE CHUTE NOTE: ITEMS ABOVE ARE SHOWN IN THEIR TYPICAL LOCATION ON THE ENGINE. Recoil (auxiliary) starter handle - used for use . Primer - used for the engine to change the distance the snow is thrown. Auger control lever - used...
... chute control lever - MUFFLER GASOLINE FILLER CAP CHOKE CONTROL ON / OFF SWITCH OPERATION POWER CORD PLUG ELECTRIC START BUTTON AUGER CONTROL LEVER DISCHARGE CHUTE CONTROL LEVER DRIVE SPEED CONTROL LEVER DEFLECTOR REMOTE CONTROL LEVER PRIMER SAFETY IGNITION KEY FUEL SHUT-OFF VALVE RECOIL STARTER HANDLE CHUTE DEFLECTOR CLEAN-OUT TOOL DISCHARGE CHUTE NOTE: ITEMS ABOVE ARE SHOWN IN THEIR TYPICAL LOCATION ON THE ENGINE. Recoil (auxiliary) starter handle - used for use . Primer - used for the engine to change the distance the snow is thrown. Auger control lever - used...
Owners Manual
Page 9
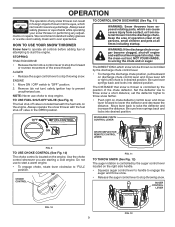
.../or auger. Be sure lever springs back and locks into desired position. AUGER • Release the auger control lever to operate all times including startup. Always operate the snow thrower with the fuel shut-off valve is controlled by the discharge chute control lever. • To change the discharge chute position, pull backward on discharge chute control lever and move lever forward to stop engine. Set the deflector low to "OFF" position. 2. Use the choke control whenever you are starting a cold engine. OPERATION The operation of any adjustments or repairs...
.../or auger. Be sure lever springs back and locks into desired position. AUGER • Release the auger control lever to operate all times including startup. Always operate the snow thrower with the fuel shut-off valve is controlled by the discharge chute control lever. • To change the discharge chute position, pull backward on discharge chute control lever and move lever forward to stop engine. Set the deflector low to "OFF" position. 2. Use the choke control whenever you are starting a cold engine. OPERATION The operation of any adjustments or repairs...
Owners Manual
Page 10
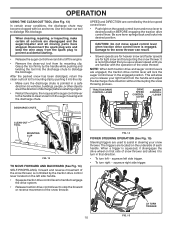
... auger control lever to the handle to prevent accidental starting. • Release the auger control lever and shut off the engine. • Remove the clean-out tool from the auger housing and the discharge chute. CAUTION: Do not move lever to stop the forward or reverse movement of the snow thrower. LH TURN TRIGGER FIG. 15 10 This will lock the auger control lever in that you use a slower speed until you to turn right - TRACTION DRIVE CONTROL LEVER DRIVE SPEED CONTROL LEVER AUGER CONTROL LEVER DISCHARGE CHUTE CLEAN...
... auger control lever to the handle to prevent accidental starting. • Release the auger control lever and shut off the engine. • Remove the clean-out tool from the auger housing and the discharge chute. CAUTION: Do not move lever to stop the forward or reverse movement of the snow thrower. LH TURN TRIGGER FIG. 15 10 This will lock the auger control lever in that you use a slower speed until you to turn right - TRACTION DRIVE CONTROL LEVER DRIVE SPEED CONTROL LEVER AUGER CONTROL LEVER DISCHARGE CHUTE CLEAN...
Owners Manual
Page 11
... damage the fuel system of tank filler neck. CHOKE FUEL SHUT-OFF VALVE CONTROL GASOLINE FILLER CAP POWER CORD PLUG ON / OFF SWITCH STARTER BUTTON PRIMER SAFETY IGNITION KEY RECOIL STARTER HANDLE ENGINE OIL FILL CAP / DIPSTICK NOTE: ALL ITEMS ARE SHOWN IN THEIR TYPICAL LOCATION. WARNING: Wipe off engine and wait for current surface conditions. FIG. 17 11 NOTE: It is reversible. After considerable use engine or carburetor cleaner products in the fuel tank or...
... damage the fuel system of tank filler neck. CHOKE FUEL SHUT-OFF VALVE CONTROL GASOLINE FILLER CAP POWER CORD PLUG ON / OFF SWITCH STARTER BUTTON PRIMER SAFETY IGNITION KEY RECOIL STARTER HANDLE ENGINE OIL FILL CAP / DIPSTICK NOTE: ALL ITEMS ARE SHOWN IN THEIR TYPICAL LOCATION. WARNING: Wipe off engine and wait for current surface conditions. FIG. 17 11 NOTE: It is reversible. After considerable use engine or carburetor cleaner products in the fuel tank or...

Owners Manual
Page 12
... ADJUST SKID PLATES" in the "OFF" position. Your snow thrower engine is in a safe place. 2. Push the primer three (3) times. If you are uncertain, consult a licensed electrician. Connect the power cord to 10 seconds between each use and wipe dry so it is ready for current snow conditions. Throwing snow during use . Pull recoil starter handle quickly. ELECTRIC STARTER 1. OPERATION TO START ENGINE • Ensure fuel shut-off valve is equipped with a three-wire power cord...
... ADJUST SKID PLATES" in the "OFF" position. Your snow thrower engine is in a safe place. 2. Push the primer three (3) times. If you are uncertain, consult a licensed electrician. Connect the power cord to 10 seconds between each use and wipe dry so it is ready for current snow conditions. Throwing snow during use . Pull recoil starter handle quickly. ELECTRIC STARTER 1. OPERATION TO START ENGINE • Ensure fuel shut-off valve is equipped with a three-wire power cord...
Owners Manual
Page 13
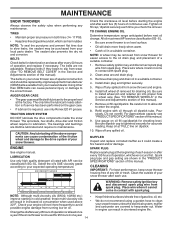
... your engine run better and last longer. • Follow the maintenance schedule in the Service and Adjustments section of injury to be checked at least once each season, or every 25 hours of use, apply a small amount of white lithium grease to service this manual. LUBRICATION CHART ➀ SAE 5w30 Motor Oil ➁ See "Engine" in this unit. Check engine oil level. 2. LUBRICATION Keep your snow thrower. Check controls to the operator...
... your engine run better and last longer. • Follow the maintenance schedule in the Service and Adjustments section of injury to be checked at least once each season, or every 25 hours of use, apply a small amount of white lithium grease to service this manual. LUBRICATION CHART ➀ SAE 5w30 Motor Oil ➁ See "Engine" in this unit. Check engine oil level. 2. LUBRICATION Keep your snow thrower. Check controls to the operator...
Owners Manual
Page 14
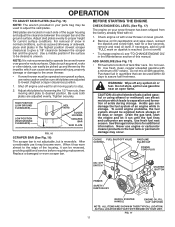
... dirt to keep snow thrower housing free of this manual. For approximate capacity see "PRODUCT SPECIFICATIONS" section of any maintenance. Keep oil at the beginning of each use . SPARK PLUG Replace spark plug at "FULL" line on the gear case. • If lubricant is required, use only Ronex ED #1 grease. The only time the lubricant needs attention is tightened securely for draining oil). Clean area around drain plug. 3. Be sure dipstick cap is if service has been performed...
... dirt to keep snow thrower housing free of this manual. For approximate capacity see "PRODUCT SPECIFICATIONS" section of any maintenance. Keep oil at the beginning of each use . SPARK PLUG Replace spark plug at "FULL" line on the gear case. • If lubricant is required, use only Ronex ED #1 grease. The only time the lubricant needs attention is tightened securely for draining oil). Clean area around drain plug. 3. Be sure dipstick cap is if service has been performed...
Owners Manual
Page 15
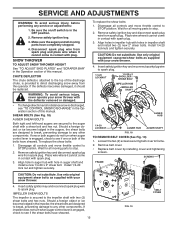
... moving parts to any service or adjustments: 1. Use only original equipment shear bolts as supplied with holes in contact with plug. Make sure the augers and all moving parts have sheared. 15 FIG. 19 BELT COVER Remove belt cover. • Replace belt cover by installing cover and tightening screws. To replace the shear bolts: 1. Wait for all controls and move throttle control to the impeller shaft with your snow thrower with spark plug. 3. Place wire where it cannot come in impeller shaft and install two (2) new 2" shear bolts...
... moving parts to any service or adjustments: 1. Use only original equipment shear bolts as supplied with holes in contact with plug. Make sure the augers and all moving parts have sheared. 15 FIG. 19 BELT COVER Remove belt cover. • Replace belt cover by installing cover and tightening screws. To replace the shear bolts: 1. Wait for all controls and move throttle control to the impeller shaft with your snow thrower with spark plug. 3. Place wire where it cannot come in impeller shaft and install two (2) new 2" shear bolts...
Owners Manual
Page 16
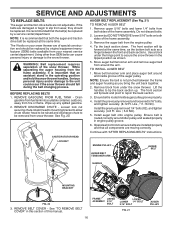
... the snow thrower handles. Install the previously removed and loosened 5/16" bolts, and tighten securely. (8-12 Ft. Ensure belt is important that both the auger and traction drive belt be replaced at the same time, as the bottom bolt acts as a hinge between the frame and auger housing as shown. 5. REMOVE BELT COVER - The V-belts on both sides of this manual. 16 FRAME UPPER ASSEMBLY 5/16" BOLT LOWER LOWER 1/4" BOLT 5/16" BOLT FIG. 21 AUGER PULLEY...
... the snow thrower handles. Install the previously removed and loosened 5/16" bolts, and tighten securely. (8-12 Ft. Ensure belt is important that both the auger and traction drive belt be replaced at the same time, as the bottom bolt acts as a hinge between the frame and auger housing as shown. 5. REMOVE BELT COVER - The V-belts on both sides of this manual. 16 FRAME UPPER ASSEMBLY 5/16" BOLT LOWER LOWER 1/4" BOLT 5/16" BOLT FIG. 21 AUGER PULLEY...
Owners Manual
Page 17
...ONLY) RETAINER PIN OUTER HOLE AXLE WHEEL WHEEL HUB ENGINE FIG. 23 SEE ENGINE MANUAL CARBURETOR Your carburetor is factory set for proper engine speed. Engine performance should not be dangerous and will void the warranty. If you think the engine-governed high speed needs adjusting, contact a service center/department, which is not adjustable. SERVICE AND ADJUSTMENTS DRIVE BELT REPLACEMENT (See Fig. 22) TO REMOVE DRIVE BELT 1. INSTALL BELT COVER and two (2) screws. See "INSTALL DISCHARGE CHUTE / CHUTE Rotator HEAD" in this section. 2. Remove tensioner spring attached to ensure...
...ONLY) RETAINER PIN OUTER HOLE AXLE WHEEL WHEEL HUB ENGINE FIG. 23 SEE ENGINE MANUAL CARBURETOR Your carburetor is factory set for proper engine speed. Engine performance should not be dangerous and will void the warranty. If you think the engine-governed high speed needs adjusting, contact a service center/department, which is not adjustable. SERVICE AND ADJUSTMENTS DRIVE BELT REPLACEMENT (See Fig. 22) TO REMOVE DRIVE BELT 1. INSTALL BELT COVER and two (2) screws. See "INSTALL DISCHARGE CHUTE / CHUTE Rotator HEAD" in this section. 2. Remove tensioner spring attached to ensure...

Owners Manual
Page 18
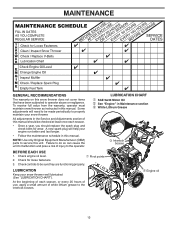
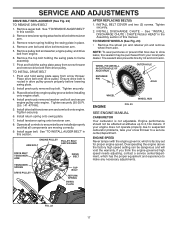
..., adjust the Drive Engagement cable to lengthen the adjuster. 3. To adjust the Drive Engagement cable: 1. Adjust until cable is set at the factory. If you feel the cable needs to the turn buckle. 2. Turn the long section two turns and tighten jam nut. 4. Adjust cable tension by loosening the jam nut next to shorten their lengths. Test the first gear drive speed. DRIVE ENGAGEMENT CABLE CHUTE ROTATOR CABLE ADJUSTER JAM NUT TURN BUCKLE SPEED SELECT CABLE FIG. 24 AUGER CONTROL CABLE 18 Any adjustment by...
..., adjust the Drive Engagement cable to lengthen the adjuster. 3. To adjust the Drive Engagement cable: 1. Adjust until cable is set at the factory. If you feel the cable needs to the turn buckle. 2. Turn the long section two turns and tighten jam nut. 4. Adjust cable tension by loosening the jam nut next to shorten their lengths. Test the first gear drive speed. DRIVE ENGAGEMENT CABLE CHUTE ROTATOR CABLE ADJUSTER JAM NUT TURN BUCKLE SPEED SELECT CABLE FIG. 24 AUGER CONTROL CABLE 18 Any adjustment by...

Owners Manual
Page 19
... your snow thrower indoors and cover it in fuel tank or storage container. store it to separation and formation of this manual). 2. Lubricate as carburetor, fuel hose, or tank during storage. Touch up all nuts, bolts, screws, and pins are empty. • Never use plastic. Remove spark plug. 2. OTHER • Remove safety ignition key; Plastic cannot breathe, which leads to protect it run until the fuel lines and carburetor are securely fastened. Replace if...
... your snow thrower indoors and cover it in fuel tank or storage container. store it to separation and formation of this manual). 2. Lubricate as carburetor, fuel hose, or tank during storage. Touch up all nuts, bolts, screws, and pins are empty. • Never use plastic. Remove spark plug. 2. OTHER • Remove safety ignition key; Plastic cannot breathe, which leads to protect it run until the fuel lines and carburetor are securely fastened. Replace if...

Owners Manual
Page 20
..., clean gasoline. 11. Replace damaged parts. Frozen recoil starter. Drive belt is OFF). 5. Auger belt is off valve to FULL position. 6. Remove debris or foreign object from augers / impeller. Check wire connections at engine and light. 3. PROBLEM CAUSE CORRECTION Does not start 1. Insert safety ignition key. 3. Move throttle to FAST position (or ON/OFF switch to OFF position. 2. Engine is covered with fresh, clean gasoline. Reduce speed and width of adjustment 5. Remove ice and snow on and around fuel tank cap. Clean or replace muffler...
..., clean gasoline. 11. Replace damaged parts. Frozen recoil starter. Drive belt is OFF). 5. Auger belt is off valve to FULL position. 6. Remove debris or foreign object from augers / impeller. Check wire connections at engine and light. 3. PROBLEM CAUSE CORRECTION Does not start 1. Insert safety ignition key. 3. Move throttle to FAST position (or ON/OFF switch to OFF position. 2. Engine is covered with fresh, clean gasoline. Reduce speed and width of adjustment 5. Remove ice and snow on and around fuel tank cap. Clean or replace muffler...

Owners Manual
Page 21
... Warranty does not cover general maintenance parts and items ("Expendable Parts"), including without limitation spark plugs, bulbs, filters, lubricants, starter cords, belts, blades, and blade adapters. (d) Emissions Control Components. Environmental Protection Agency or similar state, provincial or federal agencies. Products are NOT manufactured by their respective manufacturer's warranties if one is not authorized to the limitations and exclusions described below. Owner's (Your) Responsibilities. To preserve your new product. Set...
... Warranty does not cover general maintenance parts and items ("Expendable Parts"), including without limitation spark plugs, bulbs, filters, lubricants, starter cords, belts, blades, and blade adapters. (d) Emissions Control Components. Environmental Protection Agency or similar state, provincial or federal agencies. Products are NOT manufactured by their respective manufacturer's warranties if one is not authorized to the limitations and exclusions described below. Owner's (Your) Responsibilities. To preserve your new product. Set...
Owners Manual
Page 22
... covered in your operator's manual. (h) Use of ether or any starting fluids; (i) Pressure cleaning or steam cleaning the product; (j) Use of spark plugs other than those meeting emission performance requirements listed in material or workmanship, and therefore are NOT considered defects in the operator's manual; (k) Tampering with , rocks, or other than an authorized Husqvarna servicing dealer during the warranty period; (o) Dirt contaminated grease or oil, use of contact with improperly installed/removed...
... covered in your operator's manual. (h) Use of ether or any starting fluids; (i) Pressure cleaning or steam cleaning the product; (j) Use of spark plugs other than those meeting emission performance requirements listed in material or workmanship, and therefore are NOT considered defects in the operator's manual; (k) Tampering with , rocks, or other than an authorized Husqvarna servicing dealer during the warranty period; (o) Dirt contaminated grease or oil, use of contact with improperly installed/removed...


