
Owner Manual
Page 3
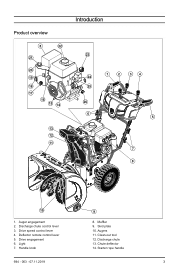
Deflector remote control lever 5. Handle knob 9 8. Muffler 9. Discharge chute 13. Light 7. Chute deflector 14. Starter rope handle 694 - 003 - 07.11.2019 3 Auger engagement 2. Clean-out tool 12. Product overview 8 22 21 20 19 18 17 16 15 14 13 12 11 Introduction 23 24 25 26 6 1 2 34 5 7 8 10 1. Drive engagement 6. Skid plate 10. Drive speed control lever 4. Discharge chute control lever 3. Augers 11.
Deflector remote control lever 5. Handle knob 9 8. Muffler 9. Discharge chute 13. Light 7. Chute deflector 14. Starter rope handle 694 - 003 - 07.11.2019 3 Auger engagement 2. Clean-out tool 12. Product overview 8 22 21 20 19 18 17 16 15 14 13 12 11 Introduction 23 24 25 26 6 1 2 34 5 7 8 10 1. Drive engagement 6. Skid plate 10. Drive speed control lever 4. Discharge chute control lever 3. Augers 11.
Owner Manual
Page 4
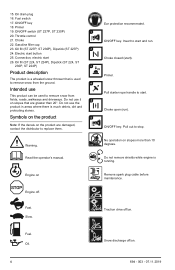
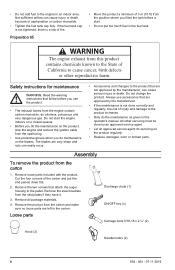
... Primer. Pull starter rope handle to remove snow from fields, roads, walkways and driveways. ON/OFF key. Fuel switch 17. Throttle control 21. Do not use This product can be used to start button 25. Slow. Fuel. Choke open (run . No operation on Engine off. Traction drive off /on slopes that is much debris, dirt and protruding stones. Snow discharge off /on the product are greater than 10 degrees. Oil drain plug 16. Primer 19. Pull...
... Primer. Pull starter rope handle to remove snow from fields, roads, walkways and driveways. ON/OFF key. Fuel switch 17. Throttle control 21. Do not use This product can be used to start button 25. Slow. Fuel. Choke open (run . No operation on Engine off. Traction drive off /on slopes that is much debris, dirt and protruding stones. Snow discharge off /on the product are greater than 10 degrees. Oil drain plug 16. Primer 19. Pull...
Owner Manual
Page 5
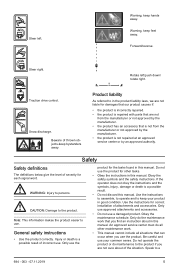
... sure about in good condition. Do not operate the product or do the maintenance work . • This manual cannot include all situations that you find an instruction about of attachments and accessories. Traction drive control. Product liability As referred to use the product. Safety Safety definitions The definitions below give the level of thrown objects-keep your common sense...
... sure about in good condition. Do not operate the product or do the maintenance work . • This manual cannot include all situations that you find an instruction about of attachments and accessories. Traction drive control. Product liability As referred to use the product. Safety Safety definitions The definitions below give the level of thrown objects-keep your common sense...

Owner Manual
Page 6
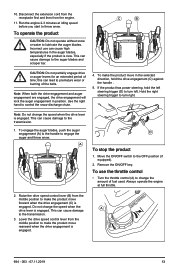
... from the manufacturer. Do not change a part of trouble. • Stop the engine (motor) whenever you leave the operating position, before unclogging the auger housing or chute deflector, and when making any damage, and repair the damage before restarting and operating the product. • If the product starts to your physician and medical implant manufacturer before you use the product if it is a possible...
... from the manufacturer. Do not change a part of trouble. • Stop the engine (motor) whenever you leave the operating position, before unclogging the auger housing or chute deflector, and when making any damage, and repair the damage before restarting and operating the product. • If the product starts to your physician and medical implant manufacturer before you use the product if it is a possible...
Owner Manual
Page 7
... the ground. Noise for leaks regularly. • Be careful with damaged protective equipment. CAUTION: The muffler becomes very hot during operation or while performing an adjustment or repair to a running engine or hot engine. • Fill fuel tank outdoors with electric drive motors or electric starting motors. • Adjust the auger housing height to clear gravel or crushed rock surface. • Never attempt to make sure that follow...
... the ground. Noise for leaks regularly. • Be careful with damaged protective equipment. CAUTION: The muffler becomes very hot during operation or while performing an adjustment or repair to a running engine or hot engine. • Fill fuel tank outdoors with electric drive motors or electric starting motors. • Adjust the auger housing height to clear gravel or crushed rock surface. • Never attempt to make sure that follow...
Owner Manual
Page 8
.... 3. Assembly To remove the product from the position where you filled the tank before you do the maintenance on the product, stop the engine and remove the ignition cable from the spark plug. • Use protective gloves when you use accessories that are approved by the manufacturer. • If the maintenance is a risk of asphyxiation or carbon monoxide. • Tighten the fuel tank cap fully. Loose parts Discharge chute...
.... 3. Assembly To remove the product from the position where you filled the tank before you do the maintenance on the product, stop the engine and remove the ignition cable from the spark plug. • Use protective gloves when you use accessories that are approved by the manufacturer. • If the maintenance is a risk of asphyxiation or carbon monoxide. • Tighten the fuel tank cap fully. Loose parts Discharge chute...
Owner Manual
Page 10
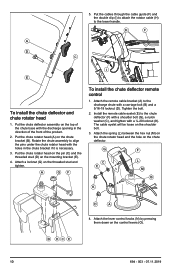
.... Attach a locknut (G) on the chute bracket (B). Tighten the bolt. 2. Attach the spring (L) between the hex nut (M) on the chute rotator head and the hole on the control levers (O). 10 694 - 003 - 07.11.2019 G F C E L M B K B DC E D A 4. Attach the lever control knobs (N) by pressing them down on the chute deflector. Put the cables through the cable guide (F) and the double clip (I E To install the chute deflector and chute rotator head 1. Put the chute deflector assembly on...
.... Attach a locknut (G) on the chute bracket (B). Tighten the bolt. 2. Attach the spring (L) between the hex nut (M) on the chute rotator head and the hole on the control levers (O). 10 694 - 003 - 07.11.2019 G F C E L M B K B DC E D A 4. Attach the lever control knobs (N) by pressing them down on the chute deflector. Put the cables through the cable guide (F) and the double clip (I E To install the chute deflector and chute rotator head 1. Put the chute deflector assembly on...
Owner Manual
Page 11
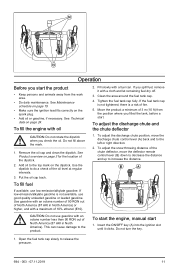
... not turn the key. 1. Clean the area around the fuel tank cap. 4. To adjust the discharge chute and the chute deflector 1. To adjust the discharge chute position, move the deflector remote control lever (B) down to decrease the distance and up to do a check of the dipstick. 2. See Maintenance schedule on page 15. • Make sure the ignition lead fits correctly on page 24. Use gasoline with a fuel can...
... not turn the key. 1. Clean the area around the fuel tank cap. 4. To adjust the discharge chute and the chute deflector 1. To adjust the discharge chute position, move the deflector remote control lever (B) down to decrease the distance and up to do a check of the dipstick. 2. See Maintenance schedule on page 15. • Make sure the ignition lead fits correctly on page 24. Use gasoline with a fuel can...
Owner Manual
Page 12
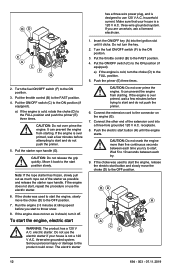
... or use the electric starter. 6. household current. If the engine is a 120 V A.C. Push the electric start and do not push the primer. 5. Put the throttle control (B) to the product could occur. It can prevent the engine from starting . electric starter. Push the primer (E) three times. Serious personal injury or damage to the FAST position. 4. Turn the fuel ON/OFF switch (F) to the connector on the engine (G). 7. Connect the extension cord to...
... or use the electric starter. 6. household current. If the engine is a 120 V A.C. Push the electric start and do not push the primer. 5. Put the throttle control (B) to the product could occur. It can prevent the engine from starting . electric starter. Push the primer (E) three times. Serious personal injury or damage to the FAST position. 4. Turn the fuel ON/OFF switch (F) to the connector on the engine (G). 7. Connect the extension cord to...
Owner Manual
Page 13
... auger blades, push the auger engagement (A) to the handle to control the snow discharge chute. 4. Remove the ON/OFF key. Do not change the amount of fuel used. To use can cause high temperatures in position. To make the product move in the selected direction, hold the left . This can lead to throw snow. Always operate the engine at idling speed before you start to premature wear or burning of time; Run...
... auger blades, push the auger engagement (A) to the handle to control the snow discharge chute. 4. Remove the ON/OFF key. Do not change the amount of fuel used. To use can cause high temperatures in position. To make the product move in the selected direction, hold the left . This can lead to throw snow. Always operate the engine at idling speed before you start to premature wear or burning of time; Run...
Owner Manual
Page 14
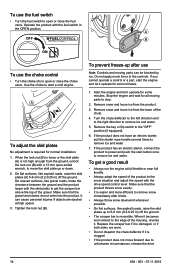
... left direction and to the right direction to the "OFF" position (if equipped). 6. A OFF FUELCONTROL INSTRUCTIONS B ON To use the choke control • Turn the choke (A) to power and push the start a cold engine. Remove snow and loose ice from the product. 3. Start the engine and let it operate for some minutes. 1. If the product has an electric starter, connect the product to open or close the fuel valve.
... left direction and to the right direction to the "OFF" position (if equipped). 6. A OFF FUELCONTROL INSTRUCTIONS B ON To use the choke control • Turn the choke (A) to power and push the start a cold engine. Remove snow and loose ice from the product. 3. Start the engine and let it operate for some minutes. 1. If the product has an electric starter, connect the product to open or close the fuel valve.
Owner Manual
Page 15
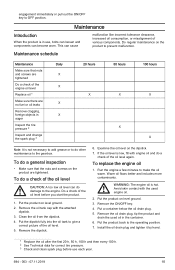
... that nuts and screws are tightened Do a check of the engine oil level Replace oil 1 Make sure there are tightened. Remove the oil tank cap with the used oil in auger Inspect the tire pressure 2 Inspect and change the spark plug 3 Daily X X X X 20 hours 50 hours 100 hours X X X X X Note: It is hot. Put the dipstick fully into the oil tank to the operating position. 7. Examine the oil level on level ground. 3. Avoid skin contact with the attached...
... that nuts and screws are tightened Do a check of the engine oil level Replace oil 1 Make sure there are tightened. Remove the oil tank cap with the used oil in auger Inspect the tire pressure 2 Inspect and change the spark plug 3 Daily X X X X 20 hours 50 hours 100 hours X X X X X Note: It is hot. Put the dipstick fully into the oil tank to the operating position. 7. Examine the oil level on level ground. 3. Avoid skin contact with the attached...
Owner Manual
Page 16
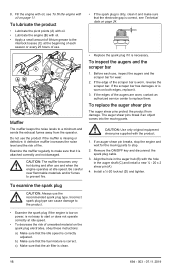
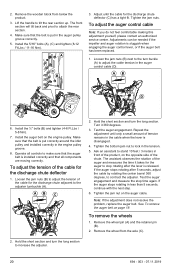
... air filter is clean. • If the spark plug is dirty, clean it and make sure that the electrode gap is correct, see To fill the engine with oil on the spark plug electrodes, obey these instructions: a) Make sure that the fuel mixture is worn, reverse the scraper bar. CAUTION: Use only original equipment shear pins supplied with the hole in the auger shaft (C) and install a new ¼ - 20 x 2 shear pin (A) 4. Fill the engine with oil...
... air filter is clean. • If the spark plug is dirty, clean it and make sure that the electrode gap is correct, see To fill the engine with oil on the spark plug electrodes, obey these instructions: a) Make sure that the fuel mixture is worn, reverse the scraper bar. CAUTION: Use only original equipment shear pins supplied with the hole in the auger shaft (C) and install a new ¼ - 20 x 2 shear pin (A) 4. Fill the engine with oil...
Owner Manual
Page 17
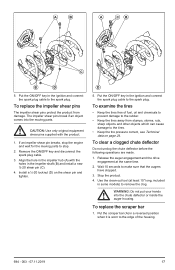
... make sure that the augers have stopped. 3. Remove the ON/OFF key and disconnect the spark plug cable. 3. To examine the tires • Keep the tires free of the housing. 694 - 003 - 07.11.2019 17 Use the clean-out tool (at the same time. 2. To replace the scraper bar 1. Install a ¼-20 locknut (D) on page 24. To clear a clogged chute deflector Do not unclog...
... make sure that the augers have stopped. 3. Remove the ON/OFF key and disconnect the spark plug cable. 3. To examine the tires • Keep the tires free of the housing. 694 - 003 - 07.11.2019 17 Use the clean-out tool (at the same time. 2. To replace the scraper bar 1. Install a ¼-20 locknut (D) on page 24. To clear a clogged chute deflector Do not unclog...

Owner Manual
Page 18
... remove the belt cover. E G F B H A I C J D 3. A C 3. Remove the tensioner spring (A) attached to the product. Drive belts WARNING: The v-belts on page 19. 2. To prepare for replacement of the product. See To remove the auger belt on your nearest service center. While separating the auger housing from the fuel tank. 2. Serious personal injury and/or damage to remove the discharge chute. Remove the return spring (C) holding the swing plate (D) in the operating position and holds the product handles. A B 2. Replace...
... remove the belt cover. E G F B H A I C J D 3. A C 3. Remove the tensioner spring (A) attached to the product. Drive belts WARNING: The v-belts on page 19. 2. To prepare for replacement of the product. See To remove the auger belt on your nearest service center. While separating the auger housing from the fuel tank. 2. Serious personal injury and/or damage to remove the discharge chute. Remove the return spring (C) holding the swing plate (D) in the operating position and holds the product handles. A B 2. Replace...
Owner Manual
Page 20
... of the cable for the discharge chute deflector (C) has a tight fit. Tighten the jam nuts. Adjustments can be needed if the impeller and auger rotation is disengaged. 4. Loosen the jam nuts (B) next to the turn the long section to adjust the cable tension in the cable when the lever is sluggish when engaging the auger control lever, or if the auger belt has been replaced. 1. AB D 6. Operate all components...
... of the cable for the discharge chute deflector (C) has a tight fit. Tighten the jam nuts. Adjustments can be needed if the impeller and auger rotation is disengaged. 4. Loosen the jam nuts (B) next to the turn the long section to adjust the cable tension in the cable when the lever is sluggish when engaging the auger control lever, or if the auger belt has been replaced. 1. AB D 6. Operate all components...

Owner Manual
Page 21
... fuel switch (if equipped) is not depressed. Replace the spark plug. The fuel line should run continuously down from fuel tank to ON position. Turn the fuel switch to remove leaves, grass and dirt. C • Do not flush water directly on the motor. • Use a brush to OPEN (ON) position. The engine is too old. Fill the fuel tank with fresh, clean gasoline. Restart the engine while full throttle and the choke in this manual. Inspect the starting procedures...
... fuel switch (if equipped) is not depressed. Replace the spark plug. The fuel line should run continuously down from fuel tank to ON position. Turn the fuel switch to remove leaves, grass and dirt. C • Do not flush water directly on the motor. • Use a brush to OPEN (ON) position. The engine is too old. Fill the fuel tank with fresh, clean gasoline. Restart the engine while full throttle and the choke in this manual. Inspect the starting procedures...

Owner Manual
Page 22
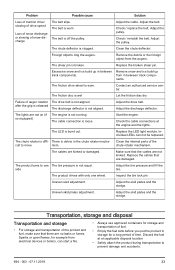
... the snow on and around the fuel tank cap. The engine idles or runs The choke is in the fuel or the fuel is covered with fresh, clean gasoline. Clean the fuel line. The carburetor needs to the spark plug. The augers are locked into position. Tighten all fasteners. If vibration remains, contact an authorized service center. Make sure that the handles are damaged. If the engine does not start, repeat the procedure or use the electrical starter. The...
... the snow on and around the fuel tank cap. The engine idles or runs The choke is in the fuel or the fuel is covered with fresh, clean gasoline. Clean the fuel line. The carburetor needs to the spark plug. The augers are locked into position. Tighten all fasteners. If vibration remains, contact an authorized service center. Make sure that the handles are damaged. If the engine does not start, repeat the procedure or use the electrical starter. The...
Owner Manual
Page 23
... a long period of snow discharge The belt slips. Clean the internal parts of auger rotation The drive belt is debris in between track compo- Problem Possible cause Solution Loss of traction drive/ slowing of drive speed Loss of snow discharge or slowing of time. Adjust the pulley. Excessive snow and ice build up track components. Check the cable connections at an applicable disposal location • Safely attach the product during...
... a long period of snow discharge The belt slips. Clean the internal parts of auger rotation The drive belt is debris in between track compo- Problem Possible cause Solution Loss of traction drive/ slowing of drive speed Loss of snow discharge or slowing of time. Adjust the pulley. Excessive snow and ice build up track components. Check the cable connections at an applicable disposal location • Safely attach the product during...
Owner Manual
Page 24
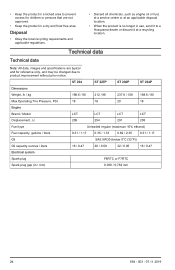
... 20 18 Engine Brand / Model LCT LCT LCT LCT Displacement, cc 208 254 291 208 Fuel type Unleaded regular (maximum 10% ethanol) Fuel capacity, gallons / liters 0.31 / 1.17 0.35 / 1.33 0.62 / 2.35 0.31 / 1.17 Oil SAE 5W30 (below 0°C (32°F)) Oil capacity ounces / liters 16 / 0.47 20 / 0.59 32 / 0.95 16 / 0.47 Electrical system Spark plug F6RTC or F7RTC Spark plug gap (in / mm...
... 20 18 Engine Brand / Model LCT LCT LCT LCT Displacement, cc 208 254 291 208 Fuel type Unleaded regular (maximum 10% ethanol) Fuel capacity, gallons / liters 0.31 / 1.17 0.35 / 1.33 0.62 / 2.35 0.31 / 1.17 Oil SAE 5W30 (below 0°C (32°F)) Oil capacity ounces / liters 16 / 0.47 20 / 0.59 32 / 0.95 16 / 0.47 Electrical system Spark plug F6RTC or F7RTC Spark plug gap (in / mm...


