

Owners Manual
Page 2
...gasoline cap securely and wipe up , transporting, adjusting or making repairs. It means CAUTION!!! WARNING: This snow thrower is for Walk-Behind Snow Throwers IMPORTANT: This snow thrower is spilled on clothing, change clothing immediately. 5. Caution should be used and remove all times, until refueling... parts, which can get caught in the manual(s) before filling. (e) When practical, remove gas-powered equipment from your snow thrower properly. Read, understand and follow all instructions on the machine and in moving parts. Handle fuel with extreme care. ...
...gasoline cap securely and wipe up , transporting, adjusting or making repairs. It means CAUTION!!! WARNING: This snow thrower is for Walk-Behind Snow Throwers IMPORTANT: This snow thrower is spilled on clothing, change clothing immediately. 5. Caution should be used and remove all times, until refueling... parts, which can get caught in the manual(s) before filling. (e) When practical, remove gas-powered equipment from your snow thrower properly. Read, understand and follow all instructions on the machine and in moving parts. Handle fuel with extreme care. ...
Owners Manual
Page 3
.... Never direct the discharge toward people or areas where property damage can occur. Disengage power to operator's manual for transporting the snow thrower in use your footing, and keep a firm hold on slippery surfaces. never run the engine indoors, except when starting the...SERVICE 1-800-448-7543 ASSEMBLED IN U.S.A. After striking a foreign object, stop the engine (motor) and check immediately for and using your snow thrower. • Follow the instructions under rotating parts. Stop the engine (motor) whenever you leave the operating position, before storing in maintaining,...
.... Never direct the discharge toward people or areas where property damage can occur. Disengage power to operator's manual for transporting the snow thrower in use your footing, and keep a firm hold on slippery surfaces. never run the engine indoors, except when starting the...SERVICE 1-800-448-7543 ASSEMBLED IN U.S.A. After striking a foreign object, stop the engine (motor) and check immediately for and using your snow thrower. • Follow the instructions under rotating parts. Stop the engine (motor) whenever you leave the operating position, before storing in maintaining,...
Owners Manual
Page 4
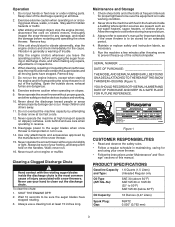
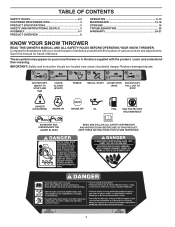
...THESE INSTRUCTIONS FOR FUTURE REFERENCE. 4 Compare the illustrations with your snow thrower or in literature supplied with the location of potential danger. Replace damaged decals. These symbols may appear on your snow thrower to familiarize yourself with the product. IGNITION KEY. TABLE OF...OVERVIEW 8 OPERATION 9-13 MAINTENANCE 14-18 STORAGE 19 TROUBLESHOOTING 20 WARRANTY 24-27 KNOW YOUR SNOW THROWER READ THIS OWNER'S MANUAL AND ALL SAFETY RULES BEFORE OPERATING YOUR SNOW THROWER. Save this manual for future reference. INSERT TO START AND RUN CHOKE CLOSED (START)...
...THESE INSTRUCTIONS FOR FUTURE REFERENCE. 4 Compare the illustrations with your snow thrower or in literature supplied with the location of potential danger. Replace damaged decals. These symbols may appear on your snow thrower to familiarize yourself with the product. IGNITION KEY. TABLE OF...OVERVIEW 8 OPERATION 9-13 MAINTENANCE 14-18 STORAGE 19 TROUBLESHOOTING 20 WARRANTY 24-27 KNOW YOUR SNOW THROWER READ THIS OWNER'S MANUAL AND ALL SAFETY RULES BEFORE OPERATING YOUR SNOW THROWER. Save this manual for future reference. INSERT TO START AND RUN CHOKE CLOSED (START)...

Owners Manual
Page 7
... engine oil level more frequently to start. Tighten oil fill cap / dipstick securely each five (5) hours of operation or at least once a year if the snow thrower is below "Add" on the GLSVWLFN Fill if oil is not used above 32°F. Remove either side mounted filler cap dipstick or high oil...
... engine oil level more frequently to start. Tighten oil fill cap / dipstick securely each five (5) hours of operation or at least once a year if the snow thrower is below "Add" on the GLSVWLFN Fill if oil is not used above 32°F. Remove either side mounted filler cap dipstick or high oil...

Owners Manual
Page 9
..., and may add fuel stabilizer to newly purchased gasoline to use E85 blended fuels. Always wear safety glasses or eye shields while operating your snow thrower or performing any snow thrower can result in foreign objects thrown into the filler neck and turn clockwise until fully seated. NOTE: Dipstick location may cause engine damage...
..., and may add fuel stabilizer to newly purchased gasoline to use E85 blended fuels. Always wear safety glasses or eye shields while operating your snow thrower or performing any snow thrower can result in foreign objects thrown into the filler neck and turn clockwise until fully seated. NOTE: Dipstick location may cause engine damage...
Owners Manual
Page 10
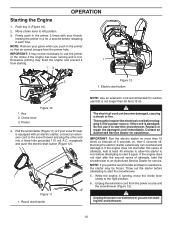
Pull the recoil starter (Figure 11) or if your snow thrower is damaged, do not use it each time. If the cord is equipped with your glove when you pull the recoil handle and feel no ... of attempts, take the snowthrower to start button (Figure 12). 1 Figure 11 1. Primer Figure 10 4. Thoroughly inspect the electrical cord before releasing it to the snow thrower and plug the other end into a power source. Running the electric starter extensively can become damaged, causing a shock or fire. Push key in the primer...
Pull the recoil starter (Figure 11) or if your snow thrower is damaged, do not use it each time. If the cord is equipped with your glove when you pull the recoil handle and feel no ... of attempts, take the snowthrower to start button (Figure 12). 1 Figure 11 1. Primer Figure 10 4. Thoroughly inspect the electrical cord before releasing it to the snow thrower and plug the other end into a power source. Running the electric starter extensively can become damaged, causing a shock or fire. Push key in the primer...
Owners Manual
Page 12
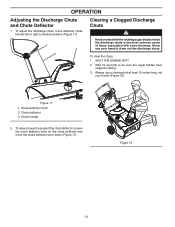
... ENGINE OFF! 2. OPERATION Adjusting the Discharge Chute and Chute Deflector 1. Wait 10 seconds to desired position (Figure 17). 1 3 2 Clearing a Clogged Discharge Chute Hand contact with snow throwers. Always use your hands (Figure 18). Never use a clearing tool at least 15 inches long, not your hand to clean out the discharge chute. Figure...
... ENGINE OFF! 2. OPERATION Adjusting the Discharge Chute and Chute Deflector 1. Wait 10 seconds to desired position (Figure 17). 1 3 2 Clearing a Clogged Discharge Chute Hand contact with snow throwers. Always use your hands (Figure 18). Never use a clearing tool at least 15 inches long, not your hand to clean out the discharge chute. Figure...
Owners Manual
Page 13
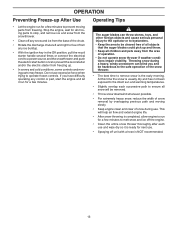
... chute. • Rotate the discharge chute left and right to free it is ready for next use. • Spraying off any snow and ice from the base of the snow thrower. • The best time to prevent the recoil starter and/or the electric starter from freezing up. • In snowy and...and has not been exposed to the direct sun and warming temperatures. • Slightly overlap each successive path to melt snow and ice off the engine. • Clean the entire snow thrower thoroughly after each use and wipe dry so it from freezing. The auger blades can blind you have difficulty operating ...
... chute. • Rotate the discharge chute left and right to free it is ready for next use. • Spraying off any snow and ice from the base of the snow thrower. • The best time to prevent the recoil starter and/or the electric starter from freezing up. • In snowy and...and has not been exposed to the direct sun and warming temperatures. • Slightly overlap each successive path to melt snow and ice off the engine. • Clean the entire snow thrower thoroughly after each use and wipe dry so it from freezing. The auger blades can blind you have difficulty operating ...

Owners Manual
Page 14
...: Determine the left and right sides of the machine from position 1 (default) to position 2 if you disengage the control bar for Loose Fasteners Clean / Inspect Snow Thrower Clean / Replace V-Belts Check / Replace Auger Blades and Scraper Bar Check Fuel Lines and Electrical Wires Check Engine Oil Level Change Engine Oil Inspect Muffler...
...: Determine the left and right sides of the machine from position 1 (default) to position 2 if you disengage the control bar for Loose Fasteners Clean / Inspect Snow Thrower Clean / Replace V-Belts Check / Replace Auger Blades and Scraper Bar Check Fuel Lines and Electrical Wires Check Engine Oil Level Change Engine Oil Inspect Muffler...
Owners Manual
Page 16
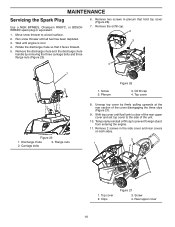
Move snow thrower to prevent foreign object from entering the engine. 11. Rotate the discharge chute so that hold top cover (Figure 26). 7. Screw 2. Top cover 2 2 Figure 25 1. ... 2 screws in plenum that it faces forward. 5. MAINTENANCE Servicing the Spark Plug Use a NGK BPR6ES, Champion RN9YC, or BOSCH WR6DC spark plug or equivalent. 1. Run snow thrower until engine is clear of the rear upper cover and set top cover to the side of the cover disengaging the three clips (Figure 27...
Move snow thrower to prevent foreign object from entering the engine. 11. Rotate the discharge chute so that hold top cover (Figure 26). 7. Screw 2. Top cover 2 2 Figure 25 1. ... 2 screws in plenum that it faces forward. 5. MAINTENANCE Servicing the Spark Plug Use a NGK BPR6ES, Champion RN9YC, or BOSCH WR6DC spark plug or equivalent. 1. Run snow thrower until engine is clear of the rear upper cover and set top cover to the side of the cover disengaging the three clips (Figure 27...
Owners Manual
Page 19
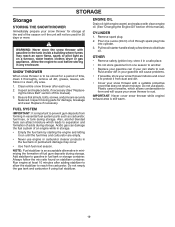
... fresh fuel next season. OTHER • Remove safety ignition key; Do not use plastic. SNOW THROWER When snow thrower is an acceptable alternative in fuel tank or storage container. Clean entire snow thrower after adding stabilizer to allow the stabilizer to be used for 30 days or more. FUEL...times to separation and formation of oil through spark plug hole into cylinder. 3. Rust and/or dirt in your gasoline will cause your snow thrower with a suitable protective cover that all dirt, grease, leaves, etc. Be sure that does not retain moisture. Allow the engine ...
... fresh fuel next season. OTHER • Remove safety ignition key; Do not use plastic. SNOW THROWER When snow thrower is an acceptable alternative in fuel tank or storage container. Clean entire snow thrower after adding stabilizer to allow the stabilizer to be used for 30 days or more. FUEL...times to separation and formation of oil through spark plug hole into cylinder. 3. Rust and/or dirt in your gasoline will cause your snow thrower with a suitable protective cover that all dirt, grease, leaves, etc. Be sure that does not retain moisture. Allow the engine ...
Owners Manual
Page 26
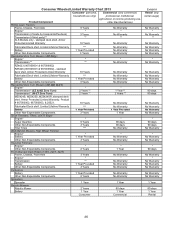
... Deck shell. Limited Lifetime Warranty Battery Other Non-Expendable Components *** 1 Year Pro-rated 3 Years No Warranty 1 Year Pro-rated 1 Year Snow Throwers, Tillers, LE475 Edger Engine* Auger Gearbox Other Non-Expendable Components Tiller Tines * 5 Years 3 Years *** * 90 days 90 days No Warranty... Front Axle Engine* 5 Years * agricultural, or income producing use, other than Rental Use) No Warranty * Transmission (if made by Husqvarna/Peerless) Transmission (if third party)** XLS Models only - Limited Lifetime Warranty Battery Other Non-Expendable Components *** 1 Year Pro-rated 3 ...
... Deck shell. Limited Lifetime Warranty Battery Other Non-Expendable Components *** 1 Year Pro-rated 3 Years No Warranty 1 Year Pro-rated 1 Year Snow Throwers, Tillers, LE475 Edger Engine* Auger Gearbox Other Non-Expendable Components Tiller Tines * 5 Years 3 Years *** * 90 days 90 days No Warranty... Front Axle Engine* 5 Years * agricultural, or income producing use, other than Rental Use) No Warranty * Transmission (if made by Husqvarna/Peerless) Transmission (if third party)** XLS Models only - Limited Lifetime Warranty Battery Other Non-Expendable Components *** 1 Year Pro-rated 3 ...

Owners Manual
Page 27
...Year Commercial warranty, parts & labor, with Hydro-Gear Distributor network. Two (2) Year Consumer warranty, parts & labor, with Husqvarna. Consumer Wheeled Limited Warranty Chart 2013 Exhibit A Consumer (personal, Commercial (any commercial, Rental (any household use only) professional,...) Two (2) Year warranty, parts & labor, with Hydro-Gear Distributor network. *** "Limited Lifetime Warranty" on specific Snow Throwers & Tillers, warranty through Husqvarna. ** See reference 4 (b) of the complete unit's final production, whichever comes first. See to left See to ...
...Year Commercial warranty, parts & labor, with Hydro-Gear Distributor network. Two (2) Year Consumer warranty, parts & labor, with Husqvarna. Consumer Wheeled Limited Warranty Chart 2013 Exhibit A Consumer (personal, Commercial (any commercial, Rental (any household use only) professional,...) Two (2) Year warranty, parts & labor, with Hydro-Gear Distributor network. *** "Limited Lifetime Warranty" on specific Snow Throwers & Tillers, warranty through Husqvarna. ** See reference 4 (b) of the complete unit's final production, whichever comes first. See to left See to ...


