
Parts Manual
Page 13
... AIR INTAKE 12 587 87 31-01 LOOP 13 587 87 32-01 BRACKET 14 576 98 40-02 SCREW 15 587 87 33-01 CHAIN GUIDE PLATE 16 521 79 99-01 BOLT 17 513 55 87-01 CATCH 18 521 51 81-01 SCREW 19 501 90 43-01... 590 15 38-01 INSULATING SHEET 40 587 88 13-01 DECAL 41 576 38 13-01 LOOP 42 522 84 79-01 SCREW ITXSCFM T525 Remark s/n up to 20182699999 s/n from 20182700001 For EU market For US/CAN, AUS/NZ market For EU, AUS/NZ market For US/CAN market QTY...
... AIR INTAKE 12 587 87 31-01 LOOP 13 587 87 32-01 BRACKET 14 576 98 40-02 SCREW 15 587 87 33-01 CHAIN GUIDE PLATE 16 521 79 99-01 BOLT 17 513 55 87-01 CATCH 18 521 51 81-01 SCREW 19 501 90 43-01... 590 15 38-01 INSULATING SHEET 40 587 88 13-01 DECAL 41 576 38 13-01 LOOP 42 522 84 79-01 SCREW ITXSCFM T525 Remark s/n up to 20182699999 s/n from 20182700001 For EU market For US/CAN, AUS/NZ market For EU, AUS/NZ market For US/CAN market QTY...

Parts Manual
Page 21
CHAIN BRAKE & CLUTCH COVER Ref Part No Description 1 587 87 66-01 CHAIN BRAKE ASSY 2 587 87 69-01 KNEE JOINT ASSY 3 516 82 56-01 ARM 4 587 87 73-01 BRAKE BAND 5 521 07 54-01 ROLLER 6 589 56 99-01 BRAKE SPRING 7 587 87 75-01 COVER LID 8 576 98 40-02 SCREW 9 505 19 73-01 NUT 10 513 61 90-01 GUIDE 11 587 87 27-01 HAND GUARD 12 587 87 29-02 SPACER 13 587 87 30-01 WASHER 14 576 98 40-02 SCREW 15 576 98 45-01 SPRING 16 576 98 46-01 CATCH Remark T525 QTY KIT 1 11 11 11 11 11 11 31 11 11 1 1 1 1 1 1
CHAIN BRAKE & CLUTCH COVER Ref Part No Description 1 587 87 66-01 CHAIN BRAKE ASSY 2 587 87 69-01 KNEE JOINT ASSY 3 516 82 56-01 ARM 4 587 87 73-01 BRAKE BAND 5 521 07 54-01 ROLLER 6 589 56 99-01 BRAKE SPRING 7 587 87 75-01 COVER LID 8 576 98 40-02 SCREW 9 505 19 73-01 NUT 10 513 61 90-01 GUIDE 11 587 87 27-01 HAND GUARD 12 587 87 29-02 SPACER 13 587 87 30-01 WASHER 14 576 98 40-02 SCREW 15 576 98 45-01 SPRING 16 576 98 46-01 CATCH Remark T525 QTY KIT 1 11 11 11 11 11 11 31 11 11 1 1 1 1 1 1

Parts Manual
Page 26
... Rev no . Change the DECAL(593 78 17-01) for improving durability. 3. IPL Update Product Name(s) T525 Description of 3 Illustrated Parts List - Change the HOUSING(587 87 15-03) & COVER(587 87 39-02). no 3 4 J 8 CHAIN BRAKE & CLUTCH COVER 14 New part no Name Delete LOOP Delete SCREW ITXSCF 576 98 40...
... Rev no . Change the DECAL(593 78 17-01) for improving durability. 3. IPL Update Product Name(s) T525 Description of 3 Illustrated Parts List - Change the HOUSING(587 87 15-03) & COVER(587 87 39-02). no 3 4 J 8 CHAIN BRAKE & CLUTCH COVER 14 New part no Name Delete LOOP Delete SCREW ITXSCF 576 98 40...

Owner Manual
Page 2
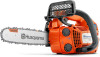
Product description The Husqvarna T525 is for more information. Start/stop switch 3. Choke 7. Rope eyelet 8. Starter rope handle 11. Contents Introduction 2 Safety 4 Assembly 9 Troubleshooting 27 Transportation and storage 28 Technical... a combustion engine. Speak to disassemble trees in progress to the operation of the product. Air purge bulb 9. Top handle 5. Bar tip sprocket 15. Saw chain 16. Note: National regulations can set limit to increase your servicing dealer for professional tree maintenance such as pruning and to your safety and efficiency...
Product description The Husqvarna T525 is for more information. Start/stop switch 3. Choke 7. Rope eyelet 8. Starter rope handle 11. Contents Introduction 2 Safety 4 Assembly 9 Troubleshooting 27 Transportation and storage 28 Technical... a combustion engine. Speak to disassemble trees in progress to the operation of the product. Air purge bulb 9. Top handle 5. Bar tip sprocket 15. Saw chain 16. Note: National regulations can set limit to increase your servicing dealer for professional tree maintenance such as pruning and to your safety and efficiency...

Owner Manual
Page 3
...cover Symbols on the product refer to certification requirements for some markets. Chain oil. 732 - 017 - 11.10.2019 3 Bar nut 26. Never let the guide bar tip come in , maximum nose radius 9 Teeth and chain type Husqvarna H37. Read the operator's manual carefully and make sure that you... understand the instructions before you use the product correctly. Chain tensioning screw 22. Note: Other symbols/decals on the product Be careful and ...
...cover Symbols on the product refer to certification requirements for some markets. Chain oil. 732 - 017 - 11.10.2019 3 Bar nut 26. Never let the guide bar tip come in , maximum nose radius 9 Teeth and chain type Husqvarna H37. Read the operator's manual carefully and make sure that you... understand the instructions before you use the product correctly. Chain tensioning screw 22. Note: Other symbols/decals on the product Be careful and ...

Owner Manual
Page 4
... important that you use accessories recommended for which the engine has been shown to the State of the engine's exhaust fumes, chain oil mist and sawdust can result in the event of a damaged muffler. • Long term inhalation of California to have... product. • The information in well ventilated areas only. 4 732 - 017 - 11.10.2019 EPA III EMISSION CONTROL INFORMATION T525 27cc JHQZS.0274GR EM/N HUESPQAVAARNNDACAABLIHFOURSNKVIAAREXNHA/SEWVPEDREEGNS*FTOHRIS ENGINE MEETS U.S. WARNING The engine exhaust from this product, a fire extinguisher should be performed ...
... important that you use accessories recommended for which the engine has been shown to the State of the engine's exhaust fumes, chain oil mist and sawdust can result in the event of a damaged muffler. • Long term inhalation of California to have... product. • The information in well ventilated areas only. 4 732 - 017 - 11.10.2019 EPA III EMISSION CONTROL INFORMATION T525 27cc JHQZS.0274GR EM/N HUESPQAVAARNNDACAABLIHFOURSNKVIAAREXNHA/SEWVPEDREEGNS*FTOHRIS ENGINE MEETS U.S. WARNING The engine exhaust from this product, a fire extinguisher should be performed ...

Owner Manual
Page 5
... of losing control. Only use this product you have a secure, firm grip around the handles. Without a guide bar and saw chain combinations we recommend, and follow before you are fatigued, while under the influence of sparking arises, which must be carried out by ... Always hold the chainsaw firmly with one hand; Regular chainsaws (with one rope. Refer to reduce the increased risk of guide bar and saw chain and all other object. • Never use the product. • This top handle chainsaw is faulty. you are recommended for instructions. •...
... of losing control. Only use this product you have a secure, firm grip around the handles. Without a guide bar and saw chain combinations we recommend, and follow before you are fatigued, while under the influence of sparking arises, which must be carried out by ... Always hold the chainsaw firmly with one hand; Regular chainsaws (with one rope. Refer to reduce the increased risk of guide bar and saw chain and all other object. • Never use the product. • This top handle chainsaw is faulty. you are recommended for instructions. •...

Owner Manual
Page 6
...must use . • Your clothing must be increased in case of an accident. • Sometimes chips get hit by the saw chain to your common sense. Your dealer, forestry school or your library can provide information about the use your servicing dealer for recommendations about ... you consider to decrease the risk of injury from injuries but not limit your dealer or Husqvarna if you move short distances. Always • Most chainsaw accidents occur when the saw chain jams in skin colour or condition. Attend a training course in a situation where you should...
...must use . • Your clothing must be increased in case of an accident. • Sometimes chips get hit by the saw chain to your common sense. Your dealer, forestry school or your library can provide information about the use your servicing dealer for recommendations about ... you consider to decrease the risk of injury from injuries but not limit your dealer or Husqvarna if you move short distances. Always • Most chainsaw accidents occur when the saw chain jams in skin colour or condition. Attend a training course in a situation where you should...
Owner Manual
Page 7
...a check of the safety devices on the product on your Husqvarna servicing dealer. A WARNING: Read the warning instructions that stops the saw chain if it releases the throttle trigger (B). Chain brake and front hand guard Your product has a chain brake that follow before you can prevent them. Push the ... on the saw protection, steel toe-cap and non-slip sole. • Always have a first-aid kit with you get a kickback. The chain brake (A) engages manually by your hand around the 732 - 017 - 11.10.2019 7 Refer to your product. Vibration damping units operate as ...
...a check of the safety devices on the product on your Husqvarna servicing dealer. A WARNING: Read the warning instructions that stops the saw chain if it releases the throttle trigger (B). Chain brake and front hand guard Your product has a chain brake that follow before you can prevent them. Push the ... on the saw protection, steel toe-cap and non-slip sole. • Always have a first-aid kit with you get a kickback. The chain brake (A) engages manually by your hand around the 732 - 017 - 11.10.2019 7 Refer to your product. Vibration damping units operate as ...
Owner Manual
Page 8
...of accidents. Safety instructions for your area. Fuel safety WARNING: Read the warning instructions that follow before you use the guide bar/saw chain combinations and filing equipment that follow before you have spilled fuel on yourself or on page 29 for instructions. • If the ...safety checks in this operator's manual is adequate ventilation. • Take care when handling fuel and chain oil. WARNING: Do not operate a product without , or with fuel. Min. 3m (10 ft) After refuelling, there are professional repairs and ...
...of accidents. Safety instructions for your area. Fuel safety WARNING: Read the warning instructions that follow before you use the guide bar/saw chain combinations and filing equipment that follow before you have spilled fuel on yourself or on page 29 for instructions. • If the ...safety checks in this operator's manual is adequate ventilation. • Take care when handling fuel and chain oil. WARNING: Do not operate a product without , or with fuel. Min. 3m (10 ft) After refuelling, there are professional repairs and ...
Owner Manual
Page 9
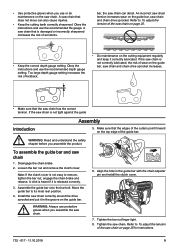
...most rear position. 4. • Use protective gloves when you use or do maintenance on the saw chain 1. Obey the instructions and use the recommended file gauge. Make sure that the saw chain can also cause injuries. • Keep the cutting teeth correctly sharpened. To assemble the guide bar ...Do maintenance on the top edge of accidents. Tighten the bar nut finger tight. 8. If the saw chain is not correctly lubricated, the risk of wear on the guide bar, saw chain and chain drive sprocket increases. • Make sure that the edges of the cutters point forward on the cutting ...
...most rear position. 4. • Use protective gloves when you use or do maintenance on the saw chain 1. Obey the instructions and use the recommended file gauge. Make sure that the saw chain can also cause injuries. • Keep the cutting teeth correctly sharpened. To assemble the guide bar ...Do maintenance on the top edge of accidents. Tighten the bar nut finger tight. 8. If the saw chain is not correctly lubricated, the risk of wear on the guide bar, saw chain and chain drive sprocket increases. • Make sure that the edges of the cutters point forward on the cutting ...

Owner Manual
Page 10
...Fuel This product has a two-stroke engine. compared to select the correct oil. CAUTION: Do not use the product 1. Premixed fuel • Use Husqvarna premixed alkylate fuel of a good quality, for best performance and extension of gasoline and two-stroke oil. 9. The quantity of the engine more clean.... Make sure that it is correctly attached. 9. Make sure that the muffler is correctly attached and that the chain catcher is not damaged. 7. Make sure that it is lower with continuously high rpm. CAUTION: Incorrect type of fuel can cause engine ...
...Fuel This product has a two-stroke engine. compared to select the correct oil. CAUTION: Do not use the product 1. Premixed fuel • Use Husqvarna premixed alkylate fuel of a good quality, for best performance and extension of gasoline and two-stroke oil. 9. The quantity of the engine more clean.... Make sure that it is correctly attached. 9. Make sure that the muffler is correctly attached and that the chain catcher is not damaged. 7. Make sure that it is lower with continuously high rpm. CAUTION: Incorrect type of fuel can cause engine ...
Owner Manual
Page 11
...fully mixed. 3. Tighten the fuel tank cap carefully. 5. Note: To see where the fuel tank is on your chain oil. • Use Husqvarna chain oil for maximum saw chain can break if the lubrication of the cutting equipment is not available, we recommend you to use waste oil, which can... when you start the engine. If Husqvarna chain oil is not sufficient. Note: To see where the chain oil tank is too thin, it runs out before the chain oil. To use the correct chain oil WARNING: Do not use a standard chain oil. • Use a chain oil with chain oil. • Attach the cap ...
...fully mixed. 3. Tighten the fuel tank cap carefully. 5. Note: To see where the fuel tank is on your chain oil. • Use Husqvarna chain oil for maximum saw chain can break if the lubrication of the cutting equipment is not available, we recommend you to use waste oil, which can... when you start the engine. If Husqvarna chain oil is not sufficient. Note: To see where the chain oil tank is too thin, it runs out before the chain oil. To use the correct chain oil WARNING: Do not use a standard chain oil. • Use a chain oil with chain oil. • Attach the cap ...
Owner Manual
Page 12
...with large force, which your hand can also move in the felling position. • Will the inertia release mechanism always engage the chain brake during kickback? Move the front hand guard forward to fill the bulb. No. Always obey the instructions. A kickback can ...occur suddenly and with two hands during a kickback to engage the chain brake. WARNING: No saw chain. The chain brake must operate correctly. A smaller bar tip radius decreases the force of the movement. It is thrown against the operator...
...with large force, which your hand can also move in the felling position. • Will the inertia release mechanism always engage the chain brake during kickback? Move the front hand guard forward to fill the bulb. No. Always obey the instructions. A kickback can ...occur suddenly and with two hands during a kickback to engage the chain brake. WARNING: No saw chain. The chain brake must operate correctly. A smaller bar tip radius decreases the force of the movement. It is thrown against the operator...
Owner Manual
Page 13
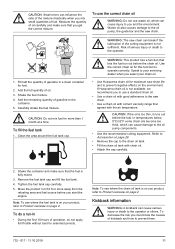
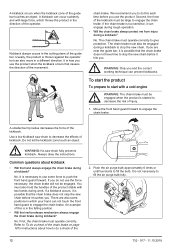
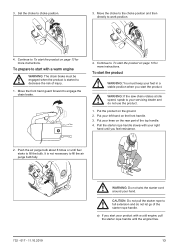
... of the starter rope handle. To prepare to start with a warm engine WARNING: The chain brake must keep your feet in a stable position when you start the product on the rear... is not necessary to your servicing dealer and do not let go of injury. 1. WARNING: If the saw chain rotates at idle speed, speak to fill the air purge bulb fully. 732 - 017 - 11.10.2019 ...handle until the engine fires. 13 It is started to To start the product. Set the choke to engage the chain brake. 4. Move the front hand guard forward to choke position. 3. CAUTION: Do not pull the starter rope ...
... of the starter rope handle. To prepare to start with a warm engine WARNING: The chain brake must keep your feet in a stable position when you start the product on the rear... is not necessary to your servicing dealer and do not let go of injury. 1. WARNING: If the saw chain rotates at idle speed, speak to fill the air purge bulb fully. 732 - 017 - 11.10.2019 ...handle until the engine fires. 13 It is started to To start the product. Set the choke to engage the chain brake. 4. Move the front hand guard forward to choke position. 3. CAUTION: Do not pull the starter rope ...

Owner Manual
Page 14
.... Hold the starter rope handle with your left hand and thrust the product away from your body when you start /stop the product 1. The saw chain pulls through the tree when you hold the product on your left side, put your left or right side of your body when you start... bottom of the guide bar. b) Put the choke control in tree maintenance. Quickly disengage the throttle trigger lockout to set the product to disengage the chain brake. 8. a) If you hold the product on your right side, put the spiked bumper into the trunk and use this position you have sufficient fuel...
.... Hold the starter rope handle with your left hand and thrust the product away from your body when you start /stop the product 1. The saw chain pulls through the tree when you hold the product on your left side, put your left or right side of your body when you start... bottom of the guide bar. b) Put the choke control in tree maintenance. Quickly disengage the throttle trigger lockout to set the product to disengage the chain brake. 8. a) If you hold the product on your right side, put the spiked bumper into the trunk and use this position you have sufficient fuel...
Owner Manual
Page 15
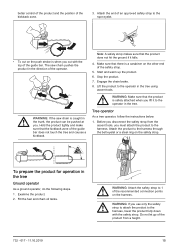
... To prepare the product for operation in the trunk, the product can be pushed at you cut on the safety strop. Fill the fuel and chain oil tanks. 732 - 017 - 11.10.2019 WARNING: Attach the safety strop to the harness, lower the product fully down with the top of the...: A safety strop makes sure that there is safely attached when you must attach the product to the harness. Engage the chain brake. 8. The saw chain is when you . WARNING: If the saw chain pushes the product in the direction of the safety strop. 5. Attach the end of an approved safety strop to the...
... To prepare the product for operation in the trunk, the product can be pushed at you cut on the safety strop. Fill the fuel and chain oil tanks. 732 - 017 - 11.10.2019 WARNING: Attach the safety strop to the harness, lower the product fully down with the top of the...: A safety strop makes sure that there is safely attached when you must attach the product to the harness. Engage the chain brake. 8. The saw chain is when you . WARNING: If the saw chain pushes the product in the direction of the safety strop. 5. Attach the end of an approved safety strop to the...

Owner Manual
Page 16
...harness. Make sure that the weight has central support down your primary connection point. • Use a foot loop to release the product. Engage the chain brake directly after the cut or a different tool line. 3. Steer the safety line through a different connection point to pull the product free. You... and ropes at a minimum of the cut is caught. 16 732 - 017 - 11.10.2019 CAUTION: The safety strop must engage the chain brake when you are stable on the harness. Release the product from where the product is completed. 6. Use approved carabiners to attach the free ...
...harness. Make sure that the weight has central support down your primary connection point. • Use a foot loop to release the product. Engage the chain brake directly after the cut or a different tool line. 3. Steer the safety line through a different connection point to pull the product free. You... and ropes at a minimum of the cut is caught. 16 732 - 017 - 11.10.2019 CAUTION: The safety strop must engage the chain brake when you are stable on the harness. Release the product from where the product is completed. 6. Use approved carabiners to attach the free ...
Owner Manual
Page 17
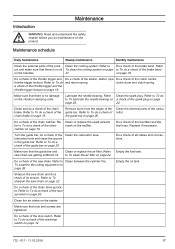
...lockout on page 19. Clean and do a check of the spur sprocket on page 26. Replace if necessary. Do a check of the chain catcher. Refer to Do a check of the brake band. Refer to To do maintenance on page page 26. 22. Maintenance Introduction WARNING... check of the starter, starter rope Do a check of the prod- Refer Clean the spark plug. Refer to To sharpen the saw chain. Empty the oil tank. Maintenance schedule Daily maintenance Weekly maintenance Monthly maintenance Clean the external parts of the clutch centre, throttle trigger lockout....
...lockout on page 19. Clean and do a check of the spur sprocket on page 26. Replace if necessary. Do a check of the chain catcher. Refer to Do a check of the brake band. Refer to To do maintenance on page page 26. 22. Maintenance Introduction WARNING... check of the starter, starter rope Do a check of the prod- Refer Clean the spark plug. Refer to To sharpen the saw chain. Empty the oil tank. Maintenance schedule Daily maintenance Weekly maintenance Monthly maintenance Clean the external parts of the clutch centre, throttle trigger lockout....
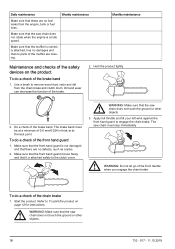
Owner Manual
Page 18
... cover. Dirt and wear can decrease the function of the brake band 1. Make sure that the front hand guard moves freely and that the saw chain does not touch the ground or other objects. 3. Start the product. Refer to remove wood dust, resin and dirt from the engine, tank or fuel... 0.6 mm/0.024 in thick at its thinnest point. The brake band must stop immediately. Make sure that the muffler is attached safely to engage the chain brake. Make sure that the front hand guard is at a minimum of the brake band. To do a check of the brake. 2. Make sure that there...
... cover. Dirt and wear can decrease the function of the brake band 1. Make sure that the front hand guard moves freely and that the saw chain does not touch the ground or other objects. 3. Start the product. Refer to remove wood dust, resin and dirt from the engine, tank or fuel... 0.6 mm/0.024 in thick at its thinnest point. The brake band must stop immediately. Make sure that the muffler is attached safely to engage the chain brake. Make sure that the front hand guard is at a minimum of the brake band. To do a check of the brake. 2. Make sure that there...


