

Parts Manual
Page 18
TS 248XD(96043030900), PRODUCT NO. 960 43 03-09 DECALS 6 3 1 2 12 8 5 KEY PART NO. inches 1 inch = 25.4 mm 18 MODEL NO. NO. DESCRIPTION - - 532 43 98-82 Pad, Footrest, LH - - 532 44 15-42 Pad, Footrest, RH - - 114 19 33-49 Manual Operator's (English/Spanish) - - 114 19 34-32 Manual Operator's (French...) - - 114 19 14-49 Manual IPL (English/Spanish) - - 587 71 00-26 Quick Start Guide (English/Spanish) - - 587 71 01-26 ...
TS 248XD(96043030900), PRODUCT NO. 960 43 03-09 DECALS 6 3 1 2 12 8 5 KEY PART NO. inches 1 inch = 25.4 mm 18 MODEL NO. NO. DESCRIPTION - - 532 43 98-82 Pad, Footrest, LH - - 532 44 15-42 Pad, Footrest, RH - - 114 19 33-49 Manual Operator's (English/Spanish) - - 114 19 34-32 Manual Operator's (French...) - - 114 19 14-49 Manual IPL (English/Spanish) - - 587 71 00-26 Quick Start Guide (English/Spanish) - - 587 71 01-26 ...
Owner Manual
Page 2
... corners, shrubs, trees, or other reproductive harm. Do not allow responsible adults, who have been given rides in the past may suddenly appear in the manual before starting when setting up which can lose traction with the blades shut off blades, set parking brake, stop before and while backing. • Never...
... corners, shrubs, trees, or other reproductive harm. Do not allow responsible adults, who have been given rides in the past may suddenly appear in the manual before starting when setting up which can lose traction with the blades shut off blades, set parking brake, stop before and while backing. • Never...

Owner Manual
Page 4
..., maintenance or parts for and using your tractor. • Follow the instructions in effective working order by law (Section 4442 of this manual. • Wear proper Personal Protective Equipment (PPE) while operating this machine, including (at a minimum) sturdy footwear, eye protection, and...Lbs./62-75 Nm CONGRATULATIONS on federal lands. Do not mow in maintaining, caring for your product: • Visit our website: www.husqvarna.com • Call Us Toll Free: 1-800-487-5951 TABLE OF CONTENTS SAFETY RULES 2-3 PRODUCT SPECIFICATIONS 4 CUSTOMER RESPONSIBILITIES 4 ASSEMBLY 5-6...
..., maintenance or parts for and using your tractor. • Follow the instructions in effective working order by law (Section 4442 of this manual. • Wear proper Personal Protective Equipment (PPE) while operating this machine, including (at a minimum) sturdy footwear, eye protection, and...Lbs./62-75 Nm CONGRATULATIONS on federal lands. Do not mow in maintaining, caring for your product: • Visit our website: www.husqvarna.com • Call Us Toll Free: 1-800-487-5951 TABLE OF CONTENTS SAFETY RULES 2-3 PRODUCT SPECIFICATIONS 4 CUSTOMER RESPONSIBILITIES 4 ASSEMBLY 5-6...

Owner Manual
Page 5
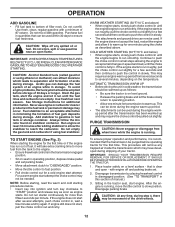
... bolt and nut. TOOLS REQUIRED FOR ASSEMBLY A socket wrench set will be connected first to contact both terminals at the factory with exception of this manual, it means when you are listed. (1) 1/2" wrench Tire pressure gauge (2) 7/16" wrenches Utility knife Pliers When right or left hand is located between terminals) charge...
... bolt and nut. TOOLS REQUIRED FOR ASSEMBLY A socket wrench set will be connected first to contact both terminals at the factory with exception of this manual, it means when you are listed. (1) 1/2" wrench Tire pressure gauge (2) 7/16" wrenches Utility knife Pliers When right or left hand is located between terminals) charge...

Owner Manual
Page 6
...best cutting results, mower housing should be properly inflated for replacing motion and mower blade drive belts in the Operation section of this manual. PLEASE REVIEW THE FOLLOWING CHECKLIST: ✓ All assembly instructions have been completed. ✓ No remaining loose parts in carton.... seat adjustment knob (A). • Tighten seat adjustment knob (B). Correct tire pressure is in the Service and Adjustments section of this manual. ✓CHECKLIST BEFORE YOU OPERATE YOUR NEW TRACTOR, WE WISH TO ENSURE THAT YOU RECEIVE THE BEST PERFORMANCE AND SATISFACTION FROM THIS...
...best cutting results, mower housing should be properly inflated for replacing motion and mower blade drive belts in the Operation section of this manual. PLEASE REVIEW THE FOLLOWING CHECKLIST: ✓ All assembly instructions have been completed. ✓ No remaining loose parts in carton.... seat adjustment knob (A). • Tighten seat adjustment knob (B). Correct tire pressure is in the Service and Adjustments section of this manual. ✓CHECKLIST BEFORE YOU OPERATE YOUR NEW TRACTOR, WE WISH TO ENSURE THAT YOU RECEIVE THE BEST PERFORMANCE AND SATISFACTION FROM THIS...
Owner Manual
Page 8
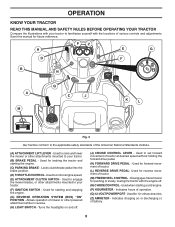
...the tractor and starting and stopping the engine. (G) REVERSE OPERATION SYSTEM (ROS) "ON" POSITION - OPERATION KNOW YOUR TRACTOR READ THIS MANUAL AND SAFETY RULES BEFORE OPERATING YOUR TRACTOR Compare the illustrations with your tractor to familiarize yourself with the engine off . (J) CRUISE CONTROL ...LEVER - Save this manual for 12-volt accessories. (Z) AMMETER - Used for pushing or slowly towing the tractor with the locations of operation. (Q) 12-VOLT...
...the tractor and starting and stopping the engine. (G) REVERSE OPERATION SYSTEM (ROS) "ON" POSITION - OPERATION KNOW YOUR TRACTOR READ THIS MANUAL AND SAFETY RULES BEFORE OPERATING YOUR TRACTOR Compare the illustrations with your tractor to familiarize yourself with the engine off . (J) CRUISE CONTROL ...LEVER - Save this manual for 12-volt accessories. (Z) AMMETER - Used for pushing or slowly towing the tractor with the locations of operation. (Q) 12-VOLT...

Owner Manual
Page 10
... upon soil conditions, height of grass and types of the attachment lift lever (A) determines the cutting height. JUST MOWER CUTTING HEIGHT" in this section of manual). • With mower in desired height of cut position, gauge wheels should only be used while mowing or transporting on relatively smooth, straight surfaces. Tighten...
... upon soil conditions, height of grass and types of the attachment lift lever (A) determines the cutting height. JUST MOWER CUTTING HEIGHT" in this section of manual). • With mower in desired height of cut position, gauge wheels should only be used while mowing or transporting on relatively smooth, straight surfaces. Tighten...
Owner Manual
Page 11
... to start movement. • When use if you to lose control of your tractor. Use common sense when towing. Too heavy of this manual.) • To change oil for easier starting up with the attachment clutch engaged while mowing is no children or other bystanders will shut off ...the attachment clutch engaged, should change engine oil, see the Maintenance section of tying hood to slowest set- Use an appropriate means of this manual. 11 wipe oil off the engine unless ignition key is absolutely necessary, push brake pedal quickly to brake position and engage parking brake. &#...
... to start movement. • When use if you to lose control of your tractor. Use common sense when towing. Too heavy of this manual.) • To change oil for easier starting up with the attachment clutch engaged while mowing is no children or other bystanders will shut off ...the attachment clutch engaged, should change engine oil, see the Maintenance section of tying hood to slowest set- Use an appropriate means of this manual. 11 wipe oil off the engine unless ignition key is absolutely necessary, push brake pedal quickly to brake position and engage parking brake. &#...
Owner Manual
Page 12
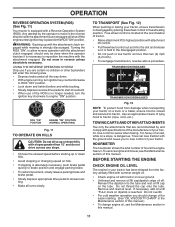
... days to reach the carburetor. with engine off any time, during storage. OPERATION ADD GASOLINE • Fill fuel tank to gasoline in this section of manual.) 3. Use fresh, clean, regular gasoline with gasoline. Purchase fuel in cold weather, the transmission should be used . IMPORTANT: WHEN OPERATING IN TEMPERATURES BELOW 32°...
... days to reach the carburetor. with engine off any time, during storage. OPERATION ADD GASOLINE • Fill fuel tank to gasoline in this section of manual.) 3. Use fresh, clean, regular gasoline with gasoline. Purchase fuel in cold weather, the transmission should be used . IMPORTANT: WHEN OPERATING IN TEMPERATURES BELOW 32°...
Owner Manual
Page 13
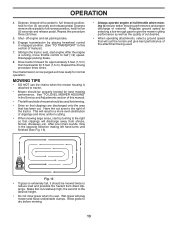
...full forward position, hold for five (5) seconds and release pedal. Repeat this section of the tractor. Make first cut area to the right of manual.) 7. Allow grass to the right so that has been cut desired. • When operating attachments, select a ground speed that will result in...leveled for normal operation. After one or two rounds, mow in a more uniform cutting. • When mowing large areas, start engine. Repeat this manual. • The left hand turns until finished (See Fig. 13). • Always operate engine at full throttle when mowing to give the mower...
...full forward position, hold for five (5) seconds and release pedal. Repeat this section of the tractor. Make first cut area to the right of manual.) 7. Allow grass to the right so that has been cut desired. • When operating attachments, select a ground speed that will result in...leveled for normal operation. After one or two rounds, mow in a more uniform cutting. • When mowing large areas, start engine. Repeat this manual. • The left hand turns until finished (See Fig. 13). • Always operate engine at full throttle when mowing to give the mower...

Owner Manual
Page 14
.... • Check tire pressure. • Check operator presence and ROS systems for proper operation. • Check for signs of this manual. • At least once a year you should make any of the adjustments described in high ambient temperatures 2 - Replace blades more often... NYLON BEARINGS. Some adjustments will need to be made periodically to operator abuse or negligence. GENERAL RECOMMENDATIONS The warranty on this manual. MAINTENANCE MAINTENANCE SCHEDULE Check Brake Operation Check Tire Pressure T Check Operator Presence and ROS Systems R Check for Loose Fasteners A...
.... • Check tire pressure. • Check operator presence and ROS systems for proper operation. • Check for signs of this manual. • At least once a year you should make any of the adjustments described in high ambient temperatures 2 - Replace blades more often... NYLON BEARINGS. Some adjustments will need to be made periodically to operator abuse or negligence. GENERAL RECOMMENDATIONS The warranty on this manual. MAINTENANCE MAINTENANCE SCHEDULE Check Brake Operation Check Tire Pressure T Check Operator Presence and ROS Systems R Check for Loose Fasteners A...

Owner Manual
Page 15
... concrete or paved surface, then brake must be checked and adjusted. (See "TO CHECK BRAKE" in the Service and Adjustments section of this manual.) TIRES • Maintain proper air pressure in the disengaged position. CAUTION: Use only a replacement blade approved by the operator to "leak" .... MAINTENANCE TRACTOR Always observe safety rules when performing any attempt by the manufacturer of your warranty. Adding or checking level of this manual.) 15 BLADE CARE For best results mower blades must be kept sharp. IMPORTANT: SPECIAL BLADE BOLT IS HEAT TREATED. Lbs./ 62...
... concrete or paved surface, then brake must be checked and adjusted. (See "TO CHECK BRAKE" in the Service and Adjustments section of this manual.) TIRES • Maintain proper air pressure in the disengaged position. CAUTION: Use only a replacement blade approved by the operator to "leak" .... MAINTENANCE TRACTOR Always observe safety rules when performing any attempt by the manufacturer of your warranty. Adding or checking level of this manual.) 15 BLADE CARE For best results mower blades must be kept sharp. IMPORTANT: SPECIAL BLADE BOLT IS HEAT TREATED. Lbs./ 62...

Owner Manual
Page 16
MAINTENANCE V-BELTS Check V-belts for deterioration and wear after 100 hours of this manual. 16 Replace belts if they will drain more freely when warm. • Catch oil in one year. To prevent possible damage to seals, do not ... change if the tractor is on dipstick. LOWER DASH COVER REMOVAL • Raise hood. • Remove fastener from "Lower dash cover removal" section of this manual. • Use gauge on oil fill cap/dipstick for checking level. CAUTION: Remove lower dash cover carefully to ensure cover tabs are not broken. •...
MAINTENANCE V-BELTS Check V-belts for deterioration and wear after 100 hours of this manual. 16 Replace belts if they will drain more freely when warm. • Catch oil in one year. To prevent possible damage to seals, do not ... change if the tractor is on dipstick. LOWER DASH COVER REMOVAL • Raise hood. • Remove fastener from "Lower dash cover removal" section of this manual. • Use gauge on oil fill cap/dipstick for checking level. CAUTION: Remove lower dash cover carefully to ensure cover tabs are not broken. •...

Owner Manual
Page 17
See engine manual. The air screen must be replaced once each mowing season or after every 100 hours of operation, whichever occurs first. ENGINE COOLING SYSTEM To ensure ... fins and external surfaces as it could create a fire hazard and/or damage. Ensure the cooling shrouds are shown in "PRODUCT SPECIFICATIONS" section of this manual. Spark plug type and gap setting are reinstalled. CLUTCH/BRAKE PEDAL CLEAN TOP SIDE STEERING PLATE STEERING SYSTEM, DASH, FENDER AND MOWER NOT SHOWN Fig...
See engine manual. The air screen must be replaced once each mowing season or after every 100 hours of operation, whichever occurs first. ENGINE COOLING SYSTEM To ensure ... fins and external surfaces as it could create a fire hazard and/or damage. Ensure the cooling shrouds are shown in "PRODUCT SPECIFICATIONS" section of this manual. Spark plug type and gap setting are reinstalled. CLUTCH/BRAKE PEDAL CLEAN TOP SIDE STEERING PLATE STEERING SYSTEM, DASH, FENDER AND MOWER NOT SHOWN Fig...

Owner Manual
Page 18
... the blade. • Replace broken or missing washout fitting immediately, prior to using mower again. • Plug any holes in mower with your tractor's Operator's Manual) onto the end of your garden hose. 4. Place the attachment clutch control in the Fast " " position. Turn the water on the nozzle. IMPORTANT: Recheck the...
... the blade. • Replace broken or missing washout fitting immediately, prior to using mower again. • Plug any holes in mower with your tractor's Operator's Manual) onto the end of your garden hose. 4. Place the attachment clutch control in the Fast " " position. Turn the water on the nozzle. IMPORTANT: Recheck the...

Owner Manual
Page 20
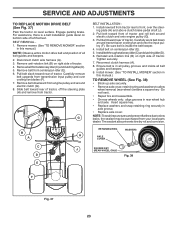
...(E) - ANTI-SWAY BAR T. See Mower Drive Belt Installation in "TO REPLACE MOWER BLADE DRIVE BELT" in the Operation section of this manual. Lift rear corner of mower and position slot in link assembly over pin (B) on outside of tractor chassis and secure with retainer spring....side of mower, first insert 90° end of anti-sway bar (S) into hole in transaxle bracket (T), located near left side of tractor. F O P E Q TS D D. A B H Fig. 28 • Install belt onto electric clutch pulley (M). ANTI-SWAY BAR (S) LOCATION TRANSAXLE BRACKET (T) LOCATED BETWEEN REAR TIRES • ATTACH...
...(E) - ANTI-SWAY BAR T. See Mower Drive Belt Installation in "TO REPLACE MOWER BLADE DRIVE BELT" in the Operation section of this manual. Lift rear corner of mower and position slot in link assembly over pin (B) on outside of tractor chassis and secure with retainer spring....side of mower, first insert 90° end of anti-sway bar (S) into hole in transaxle bracket (T), located near left side of tractor. F O P E Q TS D D. A B H Fig. 28 • Install belt onto electric clutch pulley (M). ANTI-SWAY BAR (S) LOCATION TRANSAXLE BRACKET (T) LOCATED BETWEEN REAR TIRES • ATTACH...

Owner Manual
Page 22
...; Remove the belt from around the electric clutch on a level, dry concrete or paved surface, then brake must lock and skid when you try to manually push the tractor forward. Loosen inner adjustment nut. - FRONT WHEEL TOE-IN/CAMBER Your new tractor front wheel toe-in and camber is set front...
...; Remove the belt from around the electric clutch on a level, dry concrete or paved surface, then brake must lock and skid when you try to manually push the tractor forward. Loosen inner adjustment nut. - FRONT WHEEL TOE-IN/CAMBER Your new tractor front wheel toe-in and camber is set front...
Owner Manual
Page 23
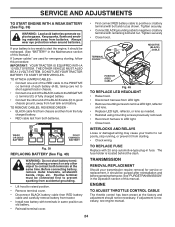
...Installbeltthroughstationaryidler(C)andclutchingidler(D). 6. Tire sealant also prevents tire dry rot and corrosion. Remove mower. (See "TO REMOVE MOWER" section in this manual.) TO REMOVE WHEEL (See Fig. 38) • Block up axle securely. • Remove axle cover, retaining ring and ... Install new belt from transmission input pulley and over the steering plate (H) and above clutch brake pedal shaft (J). 2. For assistance, there is in this manual.) NOTE: Observe entire motion drive belt and position of tractor. G B H A C J D E BELT INSTALLATION - 1. Install belt on level ...
...Installbeltthroughstationaryidler(C)andclutchingidler(D). 6. Tire sealant also prevents tire dry rot and corrosion. Remove mower. (See "TO REMOVE MOWER" section in this manual.) TO REMOVE WHEEL (See Fig. 38) • Block up axle securely. • Remove axle cover, retaining ring and ... Install new belt from transmission input pulley and over the steering plate (H) and above clutch brake pedal shaft (J). 2. For assistance, there is in this manual.) NOTE: Observe entire motion drive belt and position of tractor. G B H A C J D E BELT INSTALLATION - 1. Install belt on level ...
Owner Manual
Page 24
...• Connect the other object to positive (+) battery terminal with 20 amp automotive-type plug-in the Maintenance section of this manual.) If "jumper cables" are used for service or replacement, it should be purged after reinstallation and before operating the tractor. ENGINE...wiring. Keep sparks, flame and smoking materials away from tractor. • Install new battery with terminals in the Operation section of this manual. DO NOT USE YOUR TRACTOR BATTERY TO START OTHER VEHICLES. Before connecting battery, remove metal bracelets, wristwatch bands, rings, etc. ...
...• Connect the other object to positive (+) battery terminal with 20 amp automotive-type plug-in the Maintenance section of this manual.) If "jumper cables" are used for service or replacement, it should be purged after reinstallation and before operating the tractor. ENGINE...wiring. Keep sparks, flame and smoking materials away from tractor. • Install new battery with terminals in the Operation section of this manual. DO NOT USE YOUR TRACTOR BATTERY TO START OTHER VEHICLES. Before connecting battery, remove metal bracelets, wristwatch bands, rings, etc. ...

Owner Manual
Page 26
...time in storage, battery may be disconnected and battery cleaned thoroughly. (See "TO CLEAN BATTERY AND TERMINALS" in the Maintenance section of this manual.) • Lubricate as needed prior to long term storage with new spark plug(s). NOTE: Fuel stabilizer is equipped with a suitable protective ...before storing in minimizing the formation of fuel gum deposits during long term storage. Add stabilizer to gasoline in the Maintenance section of this manual.) CYLINDER(S) • Remove spark plug(s). • Pour one season to another. • Replace your gasoline can if your can ...
...time in storage, battery may be disconnected and battery cleaned thoroughly. (See "TO CLEAN BATTERY AND TERMINALS" in the Maintenance section of this manual.) • Lubricate as needed prior to long term storage with new spark plug(s). NOTE: Fuel stabilizer is equipped with a suitable protective ...before storing in minimizing the formation of fuel gum deposits during long term storage. Add stabilizer to gasoline in the Maintenance section of this manual.) CYLINDER(S) • Remove spark plug(s). • Pour one season to another. • Replace your gasoline can if your can ...


