

Owner Manual
Page 2
... off blades, set parking brake, stop before cleaning the machine, removing the grass catcher, or unclogging the discharge chute. • Operate machine only in the mowing area for small children. • Never carry children, even with the instructions, to operate the machine. • Clear the area of objects such as rocks, toys, wire, etc., which could be a minimum of 12 year of age before operating a riding lawn mower...
... off blades, set parking brake, stop before cleaning the machine, removing the grass catcher, or unclogging the discharge chute. • Operate machine only in the mowing area for small children. • Never carry children, even with the instructions, to operate the machine. • Clear the area of objects such as rocks, toys, wire, etc., which could be a minimum of 12 year of age before operating a riding lawn mower...
Owner Manual
Page 3
.... Check there proper operation regularly. Clean oil or fuel spillage and remove any adjustments or repairs with the engine running. • Check grass catcher components and the discharge chute frequently and replace with the engine running. • Allow engine to stop or shift while on the slope. • Do not mow on wet grass. Adjust and service as required. • Maintain or replace safety and instruction labels, as on a water heater or other hidden ob- Use...
.... Check there proper operation regularly. Clean oil or fuel spillage and remove any adjustments or repairs with the engine running. • Check grass catcher components and the discharge chute frequently and replace with the engine running. • Allow engine to stop or shift while on the slope. • Do not mow on wet grass. Adjust and service as required. • Maintain or replace safety and instruction labels, as on a water heater or other hidden ob- Use...
Owner Manual
Page 7
... REVIEW THE FOLLOWING CHECKLIST: ✓ All assembly instructions have been completed. ✓ No remaining loose parts in front of this manual.) WHILE LEARNING HOW TO USE YOUR TRACTOR, PAY EXTRA ATTENTION TO THE FOLLOWING IMPORTANT ITEMS: ✓ Engine oil is at proper level. ✓ Fuel tank is operating properly. TO ROLL TRACTOR OFF SKID (See Operation section for leveling.) ✓ Check mower and drive belts. See "TO LEVEL MOWER HOUSING" in the Service and Adjustments section...
... REVIEW THE FOLLOWING CHECKLIST: ✓ All assembly instructions have been completed. ✓ No remaining loose parts in front of this manual.) WHILE LEARNING HOW TO USE YOUR TRACTOR, PAY EXTRA ATTENTION TO THE FOLLOWING IMPORTANT ITEMS: ✓ Engine oil is at proper level. ✓ Fuel tank is operating properly. TO ROLL TRACTOR OFF SKID (See Operation section for leveling.) ✓ Check mower and drive belts. See "TO LEVEL MOWER HOUSING" in the Service and Adjustments section...
Owner Manual
Page 9
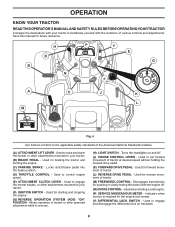
... this manual for the engine and mower. (Y) DIFFERENTIAL LOCK SWITCH - Used to raise and lower the mower or other powered attachment while in reverse. (H) LIGHT SWITCH - Used to set forward movement of tractor. (M) FREEWHEEL CONTROL - Disengages transmission for pushing or slowly towing the tractor with the locations of tractor. (L) REVERSE DRIVE PEDAL - Turns the headlights on transaxle. 9 Indicates when service is required for future reference. Used to your tractor. (F) IGNITION SWITCH - Used for braking the tractor and starting the engine. (C) PARKING BRAKE - Allows...
... this manual for the engine and mower. (Y) DIFFERENTIAL LOCK SWITCH - Used to raise and lower the mower or other powered attachment while in reverse. (H) LIGHT SWITCH - Used to set forward movement of tractor. (M) FREEWHEEL CONTROL - Disengages transmission for pushing or slowly towing the tractor with the locations of tractor. (L) REVERSE DRIVE PEDAL - Turns the headlights on transaxle. 9 Indicates when service is required for future reference. Used to your tractor. (F) IGNITION SWITCH - Used for braking the tractor and starting the engine. (C) PARKING BRAKE - Allows...
Owner Manual
Page 10
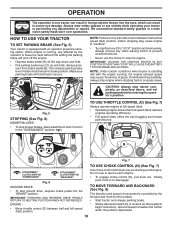
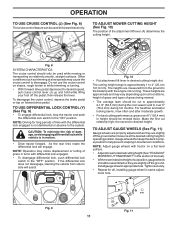
...; Start tractor and release parking brake. • Slowly depress forward (K) or reverse (L) drive pedal to leave the seat without first setting the parking brake will hold , release pres- TO USE THROTTLE CONTROL (D) (See Fig. 7) Always operate engine at full speed (fast). • Operating engine at less than full speed (fast) reduces engines operating efficiency. • Full speed (fast) offers the best bagging and mower performance. D F N Fig. 7 TO USE CHOKE CONTROL (N) (See Fig. 7) ( ) ATTACHMENT CLUTCH SWITCH "DISENGAGED" ( ) ATTACHMENT CLUTCH SWITCH "ENGAGED" Fig. 6 GROUND DRIVE...
...; Start tractor and release parking brake. • Slowly depress forward (K) or reverse (L) drive pedal to leave the seat without first setting the parking brake will hold , release pres- TO USE THROTTLE CONTROL (D) (See Fig. 7) Always operate engine at full speed (fast). • Operating engine at less than full speed (fast) reduces engines operating efficiency. • Full speed (fast) offers the best bagging and mower performance. D F N Fig. 7 TO USE CHOKE CONTROL (N) (See Fig. 7) ( ) ATTACHMENT CLUTCH SWITCH "DISENGAGED" ( ) ATTACHMENT CLUTCH SWITCH "ENGAGED" Fig. 6 GROUND DRIVE...
Owner Manual
Page 11
... conditions, height of grass and types of grass being mowed. • The average lawn should be used while mowing or transporting on a flat level surface. • Adjustmowertodesiredcuttingheight(See"TOADJUST MOWER CUTTING HEIGHT" in this section of damage, avoid engaging differential lock while vehicle is in proper position to the "ON" position. NOTE: Adjust gauge wheels with differential lock engaged. • To disengage differential lock, push differential lock switch to...
... conditions, height of grass and types of grass being mowed. • The average lawn should be used while mowing or transporting on a flat level surface. • Adjustmowertodesiredcuttingheight(See"TOADJUST MOWER CUTTING HEIGHT" in this section of damage, avoid engaging differential lock while vehicle is in proper position to the "ON" position. NOTE: Adjust gauge wheels with differential lock engaged. • To disengage differential lock, push differential lock switch to...

Owner Manual
Page 12
... operate the mower without either the entire grass catcher, on mowers so equipped, or the deflector chute in reverse unless absolutely necessary. Free wheel control is located at the rear drawbar of tractor. • Raise attachment lift to highest position with an operator presence sensing switch. After every 50 hours of cut. (See "TO ADJUST MOWER CUTTING HEIGHT".) • Start mower blades by placing freewheel control in the ROS "ON" position. • Look down . • With engine running...
... operate the mower without either the entire grass catcher, on mowers so equipped, or the deflector chute in reverse unless absolutely necessary. Free wheel control is located at the rear drawbar of tractor. • Raise attachment lift to highest position with an operator presence sensing switch. After every 50 hours of cut. (See "TO ADJUST MOWER CUTTING HEIGHT".) • Start mower blades by placing freewheel control in the ROS "ON" position. • Look down . • With engine running...
Owner Manual
Page 13
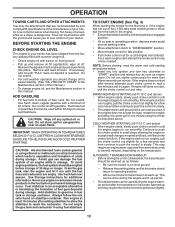
... parking brake and let the brake slowly return to operating position. • Allow one minute using the choke as engine starts. If the engine starts to run until the choke control is reached. BEFORE STARTING THE ENGINE CHECK ENGINE OIL LEVEL The engine in the Maintenance section of your tractor. Use fresh, clean, regular gasoline with specifications of the manufacturer of this manual.) • To change engine oil, see the Maintenance section in speed and load, until the fuel lines and carburetor...
... parking brake and let the brake slowly return to operating position. • Allow one minute using the choke as engine starts. If the engine starts to run until the choke control is reached. BEFORE STARTING THE ENGINE CHECK ENGINE OIL LEVEL The engine in the Maintenance section of your tractor. Use fresh, clean, regular gasoline with specifications of the manufacturer of this manual.) • To change engine oil, see the Maintenance section in speed and load, until the fuel lines and carburetor...
Owner Manual
Page 14
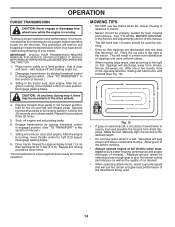
... section of mower should be used . 14 Engage transmission by turning to the desired height. • Do not mow grass when it should be mowed twice to half (1/2) speed. Sitting in the tractor seat, start engine. Your transmission is wet. Repeat this driving procedure three times. Allow grass to tractor. • Mower should be properly leveled for 5 feet (1,5 m). Sitting in the tractor seat, start engine. Fig. 15 • If grass is attached to dry before operating tractor for...
... section of mower should be used . 14 Engage transmission by turning to the desired height. • Do not mow grass when it should be mowed twice to half (1/2) speed. Sitting in the tractor seat, start engine. Your transmission is wet. Repeat this driving procedure three times. Allow grass to tractor. • Mower should be properly leveled for 5 feet (1,5 m). Sitting in the tractor seat, start engine. Fig. 15 • If grass is attached to dry before operating tractor for...
Owner Manual
Page 15
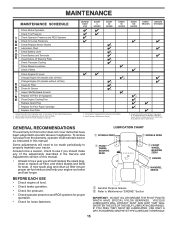
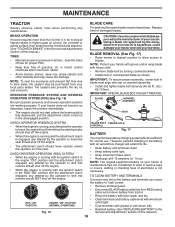
... Section. 2 6 - At least once a season, check to order a replacement. MAINTENANCE MAINTENANCE SCHEDULE Check Brake Operation Check Tire Pressure T Check Operator Presence and ROS Systems R Check for Loose Fasteners A Check/Replace Mower Blades C Lubrication Chart T Check Battery Level O Clean Battery and Terminals R Clean Debris off Steering Plate Check Transaxle Cooling Check Mower Levelness Check V-Belts Check Engine Oil Level Change Engine Oil (models with maintenance-free battery 5 - If damage is found, refer to the repair parts list or contact your local dealer to see if you...
... Section. 2 6 - At least once a season, check to order a replacement. MAINTENANCE MAINTENANCE SCHEDULE Check Brake Operation Check Tire Pressure T Check Operator Presence and ROS Systems R Check for Loose Fasteners A Check/Replace Mower Blades C Lubrication Chart T Check Battery Level O Clean Battery and Terminals R Clean Debris off Steering Plate Check Transaxle Cooling Check Mower Levelness Check V-Belts Check Engine Oil Level Change Engine Oil (models with maintenance-free battery 5 - If damage is found, refer to the repair parts list or contact your local dealer to see if you...
Owner Manual
Page 16
... reverse should shut off the engine. • The attachment clutch should NOT shut off the engine. MAINTENANCE TRACTOR Always observe safety rules when performing any attempt by the operator to leave the seat without first setting the parking brake should shut off the engine. • When the engine is running with the ignition switch in the Service and Adjustments section of this manual.) TIRES • Maintain proper air pressure in the seat. Replace bent or damaged blades. Tire...
... reverse should shut off the engine. • The attachment clutch should NOT shut off the engine. MAINTENANCE TRACTOR Always observe safety rules when performing any attempt by the operator to leave the seat without first setting the parking brake should shut off the engine. • When the engine is running with the ignition switch in the Service and Adjustments section of this manual.) TIRES • Maintain proper air pressure in the seat. Replace bent or damaged blades. Tire...
Owner Manual
Page 17
... the drain valve by pushing inward and turning counterclockwise. • To open, pull out on the tube. ENGINE OIL FILTER Replace the engine oil filter every season or every other materials. NOTE: If needed, remove lower dash covers using steps from tapered slots in one year. Pour slowly. Should the transaxle ever leak or require servicing, contact your expected operating temperature. Check the crankcase oil level before oil change if the tractor is used for...
... the drain valve by pushing inward and turning counterclockwise. • To open, pull out on the tube. ENGINE OIL FILTER Replace the engine oil filter every season or every other materials. NOTE: If needed, remove lower dash covers using steps from tapered slots in one year. Pour slowly. Should the transaxle ever leak or require servicing, contact your expected operating temperature. Check the crankcase oil level before oil change if the tractor is used for...
Owner Manual
Page 18
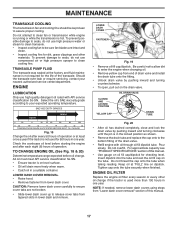
... The air screen is required. • With engine cool, remove filter and plug fuel line sections. • Place new fuel filter in position in engine or transmission will not run properly using a garden hose or pressure washer to remove grass, leaves and trash from steering plate. Clean with automotive type wax. Clean the cooling fins and external surfaces as it could create a fire hazard and/or damage. Spark plug type and gap setting are reinstalled. ENGINE...
... The air screen is required. • With engine cool, remove filter and plug fuel line sections. • Place new fuel filter in position in engine or transmission will not run properly using a garden hose or pressure washer to remove grass, leaves and trash from steering plate. Clean with automotive type wax. Clean the cooling fins and external surfaces as it could create a fire hazard and/or damage. Spark plug type and gap setting are reinstalled. ENGINE...
Owner Manual
Page 19
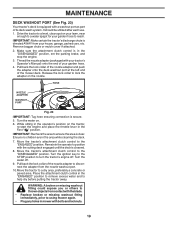
Remove bagger chute or mulch cover if attached. 2. Make sure the attachment clutch control is in the "ENGAGED" position to remove excess water and to help dry before putting the tractor away. Pull back the lock collar of your garden hose to a level, clear spot on the tractor, re-start the engine and place the throttle lever in the operator's position with the cutting deck engaged until the deck is cleaned. 8. Drive the tractor to reach. Release the lock...
Remove bagger chute or mulch cover if attached. 2. Make sure the attachment clutch control is in the "ENGAGED" position to remove excess water and to help dry before putting the tractor away. Pull back the lock collar of your garden hose to a level, clear spot on the tractor, re-start the engine and place the throttle lever in the operator's position with the cutting deck engaged until the deck is cleaned. 8. Drive the tractor to reach. Release the lock...
Owner Manual
Page 23
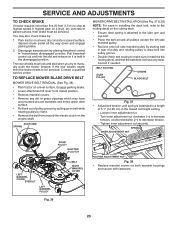
... grass clippings which may also check brake by: 1. The rear wheels must be serviced. IDLER ARM SPRING MOWER DRIVE BELT INSTALLATION (See Fig. 37 & 38) NOTE: For ease in installing the deck belt, refer to the routing decal on the cutting deck. • Ensure deck spring is attached to the idler arm and eye bolt. • Place the belt around the electric clutch on belt while rotating pulley by starting belt in the disengaged position. Fig. 36 23 TO REPLACE MOWER BLADE DRIVE BELT MOWER DRIVE BELT REMOVAL (See Fig. 36) • Park tractor...
... grass clippings which may also check brake by: 1. The rear wheels must be serviced. IDLER ARM SPRING MOWER DRIVE BELT INSTALLATION (See Fig. 37 & 38) NOTE: For ease in installing the deck belt, refer to the routing decal on the cutting deck. • Ensure deck spring is attached to the idler arm and eye bolt. • Place the belt around the electric clutch on belt while rotating pulley by starting belt in the disengaged position. Fig. 36 23 TO REPLACE MOWER BLADE DRIVE BELT MOWER DRIVE BELT REMOVAL (See Fig. 36) • Park tractor...
Owner Manual
Page 24
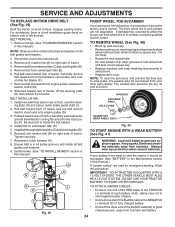
... clutch wire harness (A). 3. Pull belt slack toward front of this manual.) If "jumper cables" are not adjustable. Be sure belt is in axle groove. • Replace axle cover. Tire sealant also prevents tire dry rot and corrosion. 8. DO NOT USE YOUR TRACTOR BATTERY TO START OTHER VEHICLES. Engage parking brake. Keep sparks, flame and smoking materials away from fuel tank and battery. SERVICE AND ADJUSTMENTS TO REPLACE MOTION DRIVE BELT (See Fig. 39) Park the tractor on centerspan idler (E). Ensure belt is...
... clutch wire harness (A). 3. Pull belt slack toward front of this manual.) If "jumper cables" are not adjustable. Be sure belt is in axle groove. • Replace axle cover. Tire sealant also prevents tire dry rot and corrosion. 8. DO NOT USE YOUR TRACTOR BATTERY TO START OTHER VEHICLES. Engage parking brake. Keep sparks, flame and smoking materials away from fuel tank and battery. SERVICE AND ADJUSTMENTS TO REPLACE MOTION DRIVE BELT (See Fig. 39) Park the tractor on centerspan idler (E). Ensure belt is...
Owner Manual
Page 25
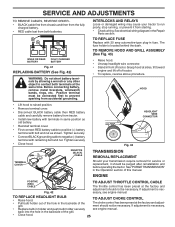
... adjustment is necessary, • Replace bulb in the backside of this manual. back into the hole in holder and push bulb holder securely see engine manual. See "PURGE TRANSMISSION" in fuse. See electrical wiring diagram in front of the The choke control has been preset at the same time. Tighten securely. • Connect BLACK grounding cable to positive (+) battery terminal with 20 amp automotive-type plug-in the Operation...
... adjustment is necessary, • Replace bulb in the backside of this manual. back into the hole in holder and push bulb holder securely see engine manual. See "PURGE TRANSMISSION" in fuse. See electrical wiring diagram in front of the The choke control has been preset at the same time. Tighten securely. • Connect BLACK grounding cable to positive (+) battery terminal with 20 amp automotive-type plug-in the Operation...

Owner Manual
Page 26
... of this manual.) CYLINDER(S) • Remove spark plug(s). • Pour one season to another. • Replace your gasoline can if your can starts to rust. Inspect and clean the battery terminals as shown in storage, battery may be used for 30 days or more. ENGINE OIL Drain oil (with engine warm) and replace with new spark plug(s). Do not empty the gas tank and carburetor if using fuel stabilizer. IMPORTANT: NEVER COVER TRACTOR WHILE ENGINE AND...
... of this manual.) CYLINDER(S) • Remove spark plug(s). • Pour one season to another. • Replace your gasoline can if your can starts to rust. Inspect and clean the battery terminals as shown in storage, battery may be used for 30 days or more. ENGINE OIL Drain oil (with engine warm) and replace with new spark plug(s). Do not empty the gas tank and carburetor if using fuel stabilizer. IMPORTANT: NEVER COVER TRACTOR WHILE ENGINE AND...

Owner Manual
Page 27
.... 5. Replace spark plug. 3. Engine will not start . 4. Attachment clutch is engaged. 3. Raise cutting height/reduce speed. 2. Clean underside of adjustment. 1. Clean engine air screen/fins. 12. Replace damaged parts. 27 Dirty fuel filter. 7. Disengage attachment clutch. 3. Check all wiring. 14. Low oil level/dirty oil. 5. Dirty engine air screen/fins. 11. Fill fuel tank. 2. Replace spark plug. 5. Contact an authorized service center/department. Dirty air filter. 2. Engine valves out of mower housing. 4. Empty fuel tank and carburetor...
.... 5. Replace spark plug. 3. Engine will not start . 4. Attachment clutch is engaged. 3. Raise cutting height/reduce speed. 2. Clean underside of adjustment. 1. Clean engine air screen/fins. 12. Replace damaged parts. 27 Dirty fuel filter. 7. Disengage attachment clutch. 3. Check all wiring. 14. Low oil level/dirty oil. 5. Dirty engine air screen/fins. 11. Fill fuel tank. 2. Replace spark plug. 5. Contact an authorized service center/department. Dirty air filter. 2. Engine valves out of mower housing. 4. Empty fuel tank and carburetor...

Owner Manual
Page 28
...Mower deck not level. 3. Worn/damaged mower drive belt. 3. Replace blade. Tighten blade bolt. 2. Clean around mandrels. 1. Remove obstruction. 2. Replace blade mandrel. Travel speed too fast. 2. Low/uneven tire air pressure. 5. Tighten blade bolt. 7. Replace mower drive belt. 9. Replace with attachment clutch engaged 1. Blown fuse. 1. Faulty alternator. 1. Axle key missing. 1. Engine "backfires" when turning engine "OFF" 1. Engine dies when tractor is engaged. See while mower or other attachment is shifted into reverse 1. Check wiring, switches...
...Mower deck not level. 3. Worn/damaged mower drive belt. 3. Replace blade. Tighten blade bolt. 2. Clean around mandrels. 1. Remove obstruction. 2. Replace blade mandrel. Travel speed too fast. 2. Low/uneven tire air pressure. 5. Tighten blade bolt. 7. Replace mower drive belt. 9. Replace with attachment clutch engaged 1. Blown fuse. 1. Faulty alternator. 1. Axle key missing. 1. Engine "backfires" when turning engine "OFF" 1. Engine dies when tractor is engaged. See while mower or other attachment is shifted into reverse 1. Check wiring, switches...


