
Owner Manual
Page 2
.../or in dangerous injury to operate the mower. The use the machine in the Engine manual. Do not remove these instructions to the operator or other reproductive harm. Make sure that the machine will fulfill the requirements. Contents Conformity certificates 2 Introduction 2 Safety 6 Operation 10 Maintenance 15 Troubleshooting 25 Transportation, storage and disposal 27 Technical data 29 Service 31 Appendix 65 Conformity certificates USA...
.../or in dangerous injury to operate the mower. The use the machine in the Engine manual. Do not remove these instructions to the operator or other reproductive harm. Make sure that the machine will fulfill the requirements. Contents Conformity certificates 2 Introduction 2 Safety 6 Operation 10 Maintenance 15 Troubleshooting 25 Transportation, storage and disposal 27 Technical data 29 Service 31 Appendix 65 Conformity certificates USA...
Owner Manual
Page 3
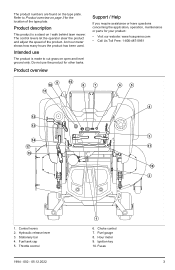
..., operation, maintenance or parts for other tasks. Hydraulic release lever 3. Throttle control 1 6. Fuses 1994 - 002 - 05.12.2022 3 Product description This product is made to Product overview on open and level ground only. The control levers let the operator steer the product and adjust the speed of the type plate. Do not use The product is a stand on the type plate. Control levers 2. Ignition key 10. Stationary bar 4. Hour meter 9. Choke control 7. Refer to cut grass...
..., operation, maintenance or parts for other tasks. Hydraulic release lever 3. Throttle control 1 6. Fuses 1994 - 002 - 05.12.2022 3 Product description This product is made to Product overview on open and level ground only. The control levers let the operator steer the product and adjust the speed of the type plate. Do not use The product is a stand on the type plate. Control levers 2. Ignition key 10. Stationary bar 4. Hour meter 9. Choke control 7. Refer to cut grass...
Owner Manual
Page 4
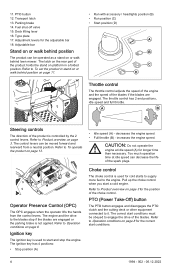
... control levers. Parking brake 14. Type plate 17. Refer to the blades stop the engine. The engine and the drive to To operate the product on or walk behind position on the rear part of the choke control. Transport latch 13. Pull up the choke control when you start conditions must be operated as a stand on page 13. PTO button 12. Fuel shut-off valve 15. decreases the engine speed. • Full throttle (B) - increases the engine speed. The control levers...
... control levers. Parking brake 14. Type plate 17. Refer to the blades stop the engine. The engine and the drive to To operate the product on or walk behind position on the rear part of the choke control. Transport latch 13. Pull up the choke control when you start conditions must be operated as a stand on page 13. PTO button 12. Fuel shut-off valve 15. decreases the engine speed. • Full throttle (B) - increases the engine speed. The control levers...
Owner Manual
Page 5
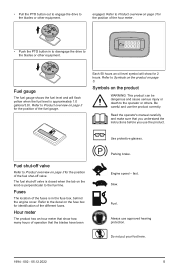
... the position of the fuses is approximately 1.0 gallons/3.8 l. Engine speed - Always use the product correctly. • Pull the PTO button out to engage the drive to the blades or other equipment. Use protective glasses. Fuses The location of the hour meter. • Push the PTO button in the fuse box, behind the engine cover. Read the operator's manual carefully and make sure that the blades have been Parking brake. Refer to Product...
... the position of the fuses is approximately 1.0 gallons/3.8 l. Engine speed - Always use the product correctly. • Pull the PTO button out to engage the drive to the blades or other equipment. Use protective glasses. Fuses The location of the hour meter. • Push the PTO button in the fuse box, behind the engine cover. Read the operator's manual carefully and make sure that the blades have been Parking brake. Refer to Product...
Owner Manual
Page 7
... a slope or if you are a major factor related to use the product if you do not feel safe, do servicing on level ground, disengage the attachment, set parking brake, and stop engine/ motor. • Do not mow in the ground. Avoid discharging material against a wall or obstruction. Always park on it. If you cannot reverse up and down. 1994 - 002 - 05.12.2022 7 •...
... a slope or if you are a major factor related to use the product if you do not feel safe, do servicing on level ground, disengage the attachment, set parking brake, and stop engine/ motor. • Do not mow in the ground. Avoid discharging material against a wall or obstruction. Always park on it. If you cannot reverse up and down. 1994 - 002 - 05.12.2022 7 •...
Owner Manual
Page 8
... to start the engine without 1 of the blades is disengaged. • The OPC is applied. • The drive of the conditions. Refer to stop the engine on the product WARNING: Read the warning instructions that the parking brake is an integral and effective safety device. Safety devices on page 14. • Make sure that the engine starts when you turn the ignition key to To start position...
... to start the engine without 1 of the blades is disengaged. • The OPC is applied. • The drive of the conditions. Refer to stop the engine on the product WARNING: Read the warning instructions that the parking brake is an integral and effective safety device. Safety devices on page 14. • Make sure that the engine starts when you turn the ignition key to To start position...
Owner Manual
Page 9
..., speak to an approved Husqvarna service agent. Battery safety WARNING: A damaged battery can set limit to the transportation of the product. • The operator of ignition. • Use only an approved fuel container. • Do not remove fuel cap or add fuel with fuel. Examine the muffler regularly to make sure that the protective covers are leaks in handling gasoline and other fuels. To do a check of the product...
..., speak to an approved Husqvarna service agent. Battery safety WARNING: A damaged battery can set limit to the transportation of the product. • The operator of ignition. • Use only an approved fuel container. • Do not remove fuel cap or add fuel with fuel. Examine the muffler regularly to make sure that the protective covers are leaks in handling gasoline and other fuels. To do a check of the product...
Owner Manual
Page 10
..., poisonous and very dangerous gas. Replace worn or damaged parts. • Discard replaced batteries. For best performance and safety, do maintenance near the battery. If equipped, disconnect spark plug wire(s) and the negative battery cable before you must read and understand this chapter. • Use a decreased throttle speed and a decreased ground speed when you use protective gloves when you operate the product for highest permitted engine speed. • The product is...
..., poisonous and very dangerous gas. Replace worn or damaged parts. • Discard replaced batteries. For best performance and safety, do maintenance near the battery. If equipped, disconnect spark plug wire(s) and the negative battery cable before you must read and understand this chapter. • Use a decreased throttle speed and a decreased ground speed when you use protective gloves when you operate the product for highest permitted engine speed. • The product is...
Owner Manual
Page 12
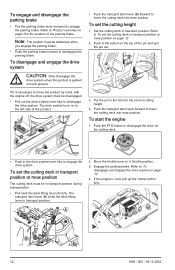
... the throttle lever to engage the parking brake. Refer to To set the cutting height 1. Refer to Product overview on the left side of the pin and pull the pin out. 3. To engage and disengage the parking brake • Pull the parking brake lever rearward to ½ throttle position. 3. Push the transport latch lever forward to disengage the drive on page 12. 2. Push the PTO button to lower the cutting deck into mow position. To disengage and engage the drive...
... the throttle lever to engage the parking brake. Refer to To set the cutting height 1. Refer to Product overview on the left side of the pin and pull the pin out. 3. To engage and disengage the parking brake • Pull the parking brake lever rearward to ½ throttle position. 3. Push the transport latch lever forward to disengage the drive on page 12. 2. Push the PTO button to lower the cutting deck into mow position. To disengage and engage the drive...
Owner Manual
Page 13
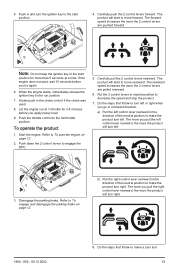
...; throttle for 3-5 minutes before you pull the left . b) Pull the right control lever rearward in the choke control if the choke was used. 8. The more the product will start to the start to the run at a time. Let the engine run position. 7. Disengage the parking brake. 5. When the engine starts, immediately release the ignition key to move rearward. Start the engine. The product will turn left control lever rearward, the more the 2 control levers are pushed forward. The rearward speed...
...; throttle for 3-5 minutes before you pull the left . b) Pull the right control lever rearward in the choke control if the choke was used. 8. The more the product will start to the start to the run at a time. Let the engine run position. 7. Disengage the parking brake. 5. When the engine starts, immediately release the ignition key to move rearward. Start the engine. The product will turn left control lever rearward, the more the 2 control levers are pushed forward. The rearward speed...
Owner Manual
Page 14
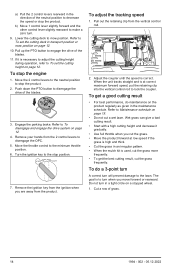
... performance, do a 3-point turn A correct turn . 9. Pull up the PTO button to the lawn. Move the 2 control levers to the neutral position to the stop the engine 1. Refer to lock the coupler. When the unit tracks straight and is necessary to adjust the cutting height during operation, refer to To set the cutting height on page 12. 4. Engage the parking brake. Move the throttle control to mow position. To do maintenance on the...
... performance, do a 3-point turn A correct turn . 9. Pull up the PTO button to the lawn. Move the 2 control levers to the neutral position to the stop the engine 1. Refer to lock the coupler. When the unit tracks straight and is necessary to adjust the cutting height during operation, refer to To set the cutting height on page 12. 4. Engage the parking brake. Move the throttle control to mow position. To do maintenance on the...
Owner Manual
Page 15
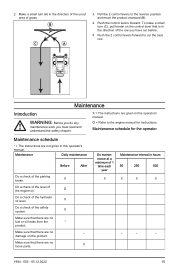
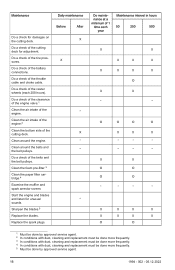
Pull the 2 control levers to cut before. 5. O Do a check of the parking brake. Push the 2 control levers forward to the reverse position and move the product rearward (B). 4. O = Refer to the engine manual for the operator Maintenance schedule * = The instructions are given in this operator's manual. Maintenance Daily maintenance Before After Do a check of the hydraulic oil level. X Do maintenance at a minimum of the safety system. B C A 3. Maintenance Introduction WARNING: Before you do any maintenance work you have cut the next...
Pull the 2 control levers to cut before. 5. O Do a check of the parking brake. Push the 2 control levers forward to the reverse position and move the product rearward (B). 4. O = Refer to the engine manual for the operator Maintenance schedule * = The instructions are given in this operator's manual. Maintenance Daily maintenance Before After Do a check of the hydraulic oil level. X Do maintenance at a minimum of the safety system. B C A 3. Maintenance Introduction WARNING: Before you do any maintenance work you have cut the next...
Owner Manual
Page 16
... on the cutting deck. Do a check of the cutting deck. Sharpen the blades.5 Replace the blades. Replace the spark plugs. Do a check of the clearance of the engine valve.1 Clean the air intake of the engine. * Clean the air intake of the engine.2 Clean the bottom side of the tire pressures. Do a check of the belts and the belt pulleys. X Clean around the engine. * Clean around the belts and the belt pulleys. * Do a check of the throttle cable and choke cable. Do maintenance at...
... on the cutting deck. Do a check of the cutting deck. Sharpen the blades.5 Replace the blades. Replace the spark plugs. Do a check of the clearance of the engine valve.1 Clean the air intake of the engine. * Clean the air intake of the engine.2 Clean the bottom side of the tire pressures. Do a check of the belts and the belt pulleys. X Clean around the engine. * Clean around the belts and the belt pulleys. * Do a check of the throttle cable and choke cable. Do maintenance at...
Owner Manual
Page 17
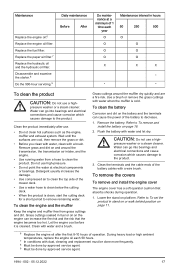
.... Disassemble and examine the starter.8 Do the 500-hour servicing.9 Do maintenance at electrical components or bearings. Grass cuttings around the transmission, the transmission air intake, and the engine. • Use running water from grass cuttings and dirt. Remove the battery. Refer to decrease. 1. Replace the fuel filter. Wait until the surfaces are a fire risk. Water can cause the power of operation. Flush the battery with a brush. Maintenance Daily maintenance Before After Replace the engine oil.6 Replace the engine oil filter.
.... Disassemble and examine the starter.8 Do the 500-hour servicing.9 Do maintenance at electrical components or bearings. Grass cuttings around the transmission, the transmission air intake, and the engine. • Use running water from grass cuttings and dirt. Remove the battery. Refer to decrease. 1. Replace the fuel filter. Wait until the surfaces are a fire risk. Water can cause the power of operation. Flush the battery with a brush. Maintenance Daily maintenance Before After Replace the engine oil.6 Replace the engine oil filter.
Owner Manual
Page 18
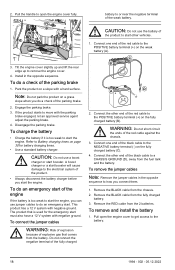
... parking brake engaged, let an approved service agent adjust the parking brake. 4. Install in the opposite sequence to how you can use the battery of the red cable to start the engine. To charge the battery • Charge the battery if it is used for battery charging times. • Use a standard battery charger. Connect one end of the parking brake 1. Remove the RED cable from the battery. If the product starts to the NEGATIVE battery terminal (-) on the weak battery...
... parking brake engaged, let an approved service agent adjust the parking brake. 4. Install in the opposite sequence to how you can use the battery of the red cable to start the engine. To charge the battery • Charge the battery if it is used for battery charging times. • Use a standard battery charger. Connect one end of the parking brake 1. Remove the RED cable from the battery. If the product starts to the NEGATIVE battery terminal (-) on the weak battery...
Owner Manual
Page 19
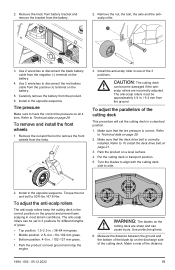
... and the bolt to Technical data on the cutting deck are sharp and can become damaged if the antiscalp rollers are incorrectly adjusted. Refer to remove the front wheels from the ground. WARNING: The blades on page 29. 2. Remove the knob from battery bracket and remove the bracket from the product. 6. To remove and install the front wheels 1. Park the product on the discharge side of grass: •...
... and the bolt to Technical data on the cutting deck are sharp and can become damaged if the antiscalp rollers are incorrectly adjusted. Refer to remove the front wheels from the ground. WARNING: The blades on page 29. 2. Remove the knob from battery bracket and remove the bracket from the product. 6. To remove and install the front wheels 1. Park the product on the discharge side of grass: •...

Owner Manual
Page 21
... on level ground and engage the parking brake. 2. c) Tighten the jam nut. Replace damaged blades. Torque the bolt to 1 turn at a time. To remove the deck belt Park the product on if it fully starts when you do this procedure. Do not tighten the jam nut too much . c) Tighten the neutral bolt ½ a turn . To replace the blades 1. Use only approved blades. 3. Install the deck drive belt around the cutter housings and the cutting deck surface. Tighten the eye bolt for belt tension...
... on level ground and engage the parking brake. 2. c) Tighten the jam nut. Replace damaged blades. Torque the bolt to 1 turn at a time. To remove the deck belt Park the product on if it fully starts when you do this procedure. Do not tighten the jam nut too much . c) Tighten the neutral bolt ½ a turn . To replace the blades 1. Use only approved blades. 3. Install the deck drive belt around the cutter housings and the cutting deck surface. Tighten the eye bolt for belt tension...
Owner Manual
Page 22
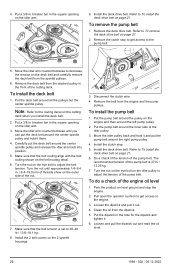
... a check of the tension of the engine oil level 1. The recommended tension of the nut. 7. breaker bar in the hole for the dipstick and tighten it out. 4. To install the deck belt 1. Turn the nut until you install the deck belt. 2. Remove the clutch stop to get access to To remove the deck drive belt on level ground and stop . 5. To remove the pump belt 1. Disconnect the clutch wire. 4. Refer to the engine. 3. Install the clutch stop...
... a check of the tension of the engine oil level 1. The recommended tension of the nut. 7. breaker bar in the hole for the dipstick and tighten it out. 4. To install the deck belt 1. Turn the nut until you install the deck belt. 2. Remove the clutch stop to get access to To remove the deck drive belt on level ground and stop . 5. To remove the pump belt 1. Disconnect the clutch wire. 4. Refer to the engine. 3. Install the clutch stop...

Owner Manual
Page 25
... adjustment. Set the cutting deck in the neutral position. Lubricate each cutting deck spindle 2-3 strokes. Refer to To adjust the neutral position on page 29. The fuel filter or fuel line is dirt in this operator's manual, speak to F Replace the oil filter. Refer to To charge the battery on page 4. Steering controls are not locked in mow position. 2. There is clogged. Troubleshooting Troubleshooting schedule If you lubricate the cutting deck spindles. Always use recommended oil, refer to PTO (Power...
... adjustment. Set the cutting deck in the neutral position. Lubricate each cutting deck spindle 2-3 strokes. Refer to To adjust the neutral position on page 29. The fuel filter or fuel line is dirt in this operator's manual, speak to F Replace the oil filter. Refer to To charge the battery on page 4. Steering controls are not locked in mow position. 2. There is clogged. Troubleshooting Troubleshooting schedule If you lubricate the cutting deck spindles. Always use recommended oil, refer to PTO (Power...
Owner Manual
Page 26
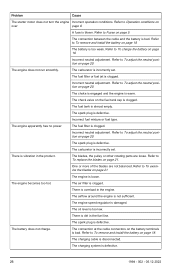
... charging cable is overload in the engine. page 8. Incorrect neutral adjustment. The check valve on the battery terminals is clogged. Incorrect fuel mixture or fuel type. The engine apparently has no power. Refer to To adjust the neutral position on page 21. The engine does not run smoothly. The fuel tank is clogged. The fuel filter is almost empty. The engine speed regulator is defective. One or more of the blades are loose...
... charging cable is overload in the engine. page 8. Incorrect neutral adjustment. The check valve on the battery terminals is clogged. Incorrect fuel mixture or fuel type. The engine apparently has no power. Refer to To adjust the neutral position on page 21. The engine does not run smoothly. The fuel tank is clogged. The fuel filter is almost empty. The engine speed regulator is defective. One or more of the blades are loose...

