
Owners Manual
Page 2
... starting when setting up, transporting, adjusting or making repairs, always disconnect spark plug wire and place wire where it . • Mow up and thrown by putting your tractor. Do not shift to cool before operating or storing the machine. The machine could cause the machine to occur. Use common sense when towing. Material may lose traction. SLOPE OPERATION Slopes are familiar with grass catchers...
... starting when setting up, transporting, adjusting or making repairs, always disconnect spark plug wire and place wire where it . • Mow up and thrown by putting your tractor. Do not shift to cool before operating or storing the machine. The machine could cause the machine to occur. Use common sense when towing. Material may lose traction. SLOPE OPERATION Slopes are familiar with grass catchers...

Owners Manual
Page 3
... and turn machine off if a child enters the area. SAFETY RULES Safe Operation Practices for towing. Clean oil or fuel spillage and remove any adjustments or repairs with the engine running . Allow machine to cool before operating a pedestrian controlled lawn mower and a minimum of 16 years of 15°. Allow engine to cool before and while backing. If the tires lose traction, disengage the blades and...
... and turn machine off if a child enters the area. SAFETY RULES Safe Operation Practices for towing. Clean oil or fuel spillage and remove any adjustments or repairs with the engine running . Allow machine to cool before operating a pedestrian controlled lawn mower and a minimum of 16 years of 15°. Allow engine to cool before and while backing. If the tires lose traction, disengage the blades and...
Owners Manual
Page 4
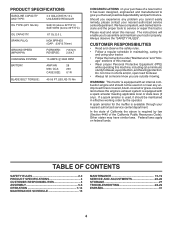
... of the California Public Resources Code). TABLE OF CONTENTS SAFETY RULES 2-3 PRODUCT SPECIFICATIONS 4 CUSTOMER RESPONSIBILITIES 4 ASSEMBLY 5-6 OPERATION 7-14 MAINTENANCE SCHEDULE 15 MAINTENANCE 15-19 SERVICE AND ADJUSTMENTS 20-26 STORAGE 27 TROUBLESHOOTING 28-29 ESPAÑOL 31 4 CCA: CASE SIZE: 28 230 U1R BLADE BOLT TORQUE: 45-55 FT. PRODUCT SPECIFICATIONS GASOLINE CAPACITY AND TYPE: 4.0 GALLONS/15,14 L UNLEADED REGULAR OIL TYPE (API: SG-SL): SAE...
... of the California Public Resources Code). TABLE OF CONTENTS SAFETY RULES 2-3 PRODUCT SPECIFICATIONS 4 CUSTOMER RESPONSIBILITIES 4 ASSEMBLY 5-6 OPERATION 7-14 MAINTENANCE SCHEDULE 15 MAINTENANCE 15-19 SERVICE AND ADJUSTMENTS 20-26 STORAGE 27 TROUBLESHOOTING 28-29 ESPAÑOL 31 4 CCA: CASE SIZE: 28 230 U1R BLADE BOLT TORQUE: 45-55 FT. PRODUCT SPECIFICATIONS GASOLINE CAPACITY AND TYPE: 4.0 GALLONS/15,14 L UNLEADED REGULAR OIL TYPE (API: SG-SL): SAE...

Owners Manual
Page 5
... instructions). • For battery and battery cable installation see "REPLACING BATTERY" in the "Service and Adjustments" section in this manual). • Roll tractor forward off the skid. Continue with the exception of controls) • Raise attachment lift lever to its highest position. • Release parking brake by Dealer *Brush Guard Kit *Pedal (2) Screw (2) Nut U -Channel ASSEMBLY Your new tractor has been assembled at 6-10 amps. (See "BATTERY" in Maintenance section of this manual for location and function of those parts...
... instructions). • For battery and battery cable installation see "REPLACING BATTERY" in the "Service and Adjustments" section in this manual). • Roll tractor forward off the skid. Continue with the exception of controls) • Raise attachment lift lever to its highest position. • Release parking brake by Dealer *Brush Guard Kit *Pedal (2) Screw (2) Nut U -Channel ASSEMBLY Your new tractor has been assembled at 6-10 amps. (See "BATTERY" in Maintenance section of this manual for location and function of those parts...

Owners Manual
Page 6
... tractor were overinflated at proper level. ✓ Fuel tank is important to see "TO TRANSPORT" in the Service and Adjustments section of this manual. Follow proper starting and transmission purging instructions (See "TO START ENGINE" and "PURGE TRANSMISSION" in carton. ✓ Battery is properly prepared and charged. ✓ Seat is important for best cutting performance. • Reduce tire pressure to -rear for leveling). ✓ Check mower and drive belts. Correct tire pressure...
... tractor were overinflated at proper level. ✓ Fuel tank is important to see "TO TRANSPORT" in the Service and Adjustments section of this manual. Follow proper starting and transmission purging instructions (See "TO START ENGINE" and "PURGE TRANSMISSION" in carton. ✓ Battery is properly prepared and charged. ✓ Seat is important for best cutting performance. • Reduce tire pressure to -rear for leveling). ✓ Check mower and drive belts. Correct tire pressure...
Owners Manual
Page 12
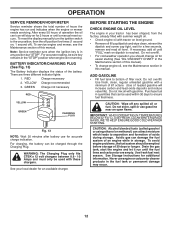
... manually turn the ignition switch to ensure fuel freshness. There are empty. GREEN Charge not necessary RED YELLOW GREEN CHARGING PLUG Fig. 13 NOTE: Wait 30 minutes after battery use engine or carburetor cleaner products in this manual. If necessary, add oil until "FULL" mark on , 1 second off any position but "STOP". CAUTION: Wipe off ). Never use for a few seconds, remove and read oil level. To service engine and mower...
... manually turn the ignition switch to ensure fuel freshness. There are empty. GREEN Charge not necessary RED YELLOW GREEN CHARGING PLUG Fig. 13 NOTE: Wait 30 minutes after battery use engine or carburetor cleaner products in this manual. If necessary, add oil until "FULL" mark on , 1 second off any position but "STOP". CAUTION: Wipe off ). Never use for a few seconds, remove and read oil level. To service engine and mower...
Owners Manual
Page 13
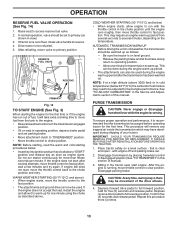
... primary position. In normal operation, valve should be used . Depress forward drive pedal to choke position. If tractor runs out of this procedure three (3) times. 13 that the transmission be refueled. 5. Disengage transmission by placing freewheel control in disengaged position (See "TO TRANSPORT" in operating position, depress brake pedal and set . 2. Do not run with engine off and parking brake set parking brake. • Move attachment clutch to "DISENGAGED" position. • Move throttle control to full forward position, hold...
... primary position. In normal operation, valve should be used . Depress forward drive pedal to choke position. If tractor runs out of this procedure three (3) times. 13 that the transmission be refueled. 5. Disengage transmission by placing freewheel control in disengaged position (See "TO TRANSPORT" in operating position, depress brake pedal and set . 2. Do not run with engine off and parking brake set parking brake. • Move attachment clutch to "DISENGAGED" position. • Move throttle control to full forward position, hold...
Owners Manual
Page 14
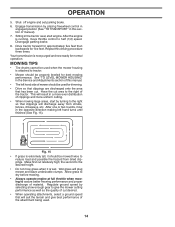
... cut desired. • When operating attachments, select a ground speed that has been cut. Repeat this manual. • The left hand turns until finished (See Fig. 15). After one or two rounds, mow in the Service and Adjustments section of clippings and more uniform cutting. • When mowing large areas, start by placing freewheel control in engaged position (See "TO TRANSPORT" in the tractor seat, start engine. OPERATION...
... cut desired. • When operating attachments, select a ground speed that has been cut. Repeat this manual. • The left hand turns until finished (See Fig. 15). After one or two rounds, mow in the Service and Adjustments section of clippings and more uniform cutting. • When mowing large areas, start by placing freewheel control in engaged position (See "TO TRANSPORT" in the tractor seat, start engine. OPERATION...
Owners Manual
Page 15
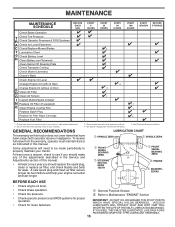
... 100 HOURS EVERY SEASON BEFORE STORAGE Check Brake Operation T Check Tire Pressure R Check Operator Presence & ROS Systems A Check for Loose Fasteners C Check/Replace Mower Blades T Lubrication Chart 0 Check Battery Level R Clean Battery and Terminals Clean Debris Off Steering Plate Check Transaxle Cooling Check Mower Levelness Check V-Belts Check Engine Oil Level Change Engine Oil (with maintenance-free battery. 5 - Service more often when operating in Maintenance Section. See Cleaning in dirty or dusty conditions. 3 - Some adjustments will need to be made periodically to properly...
... 100 HOURS EVERY SEASON BEFORE STORAGE Check Brake Operation T Check Tire Pressure R Check Operator Presence & ROS Systems A Check for Loose Fasteners C Check/Replace Mower Blades T Lubrication Chart 0 Check Battery Level R Clean Battery and Terminals Clean Debris Off Steering Plate Check Transaxle Cooling Check Mower Levelness Check V-Belts Check Engine Oil Level Change Engine Oil (with maintenance-free battery. 5 - Service more often when operating in Maintenance Section. See Cleaning in dirty or dusty conditions. 3 - Some adjustments will need to be made periodically to properly...
Owners Manual
Page 16
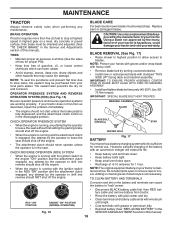
... attachment clutch should NOT shut off the engine. BLADE REMOVAL (See Fig. 17) • Raise mower to highest position to allow access to blades. Be sure operator presence and reverse operation systems are working properly. Adding or checking level of your tractor is maintenance free. Coat terminals with wire brush until bright. Reinstall battery (See "REPLACING BATTERY" in the seat. CHECK REVERSE OPERATION (ROS) SYSTEM • When the engine is running and the attachment clutch is...
... attachment clutch should NOT shut off the engine. BLADE REMOVAL (See Fig. 17) • Raise mower to highest position to allow access to blades. Be sure operator presence and reverse operation systems are working properly. Adding or checking level of your tractor is maintenance free. Coat terminals with wire brush until bright. Reinstall battery (See "REPLACING BATTERY" in the seat. CHECK REVERSE OPERATION (ROS) SYSTEM • When the engine is running and the attachment clutch is...
Owners Manual
Page 17
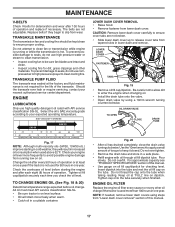
.... NOTE: If needed, remove lower dash covers using a 10mm wrench turning counterclockwise. TRANSAXLE MAINTENANCE The transmission fan and cooling fins should be sure fan blades are intact and clean. • Inspect cooling fins for dirt, grass clippings and other oil change . LOWER DASH COVER REMOVAL • Raise hood. • Remove fastener from wear. Replace belts if they will drain more than 100 hours in a suitable container. MAINTENANCE V-BELTS Check V-belts for deterioration...
.... NOTE: If needed, remove lower dash covers using a 10mm wrench turning counterclockwise. TRANSAXLE MAINTENANCE The transmission fan and cooling fins should be sure fan blades are intact and clean. • Inspect cooling fins for dirt, grass clippings and other oil change . LOWER DASH COVER REMOVAL • Raise hood. • Remove fastener from wear. Replace belts if they will drain more than 100 hours in a suitable container. MAINTENANCE V-BELTS Check V-belts for deterioration...
Owners Manual
Page 18
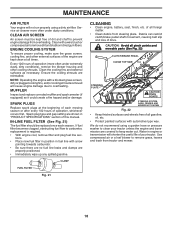
... to carburetor, replacement is required. • With engine cool, remove filter and plug fuel line sec- tions. • Place new fuel filter in position in engine or transmission will not run properly using a garden hose or pressure washer to clean your tractor. Spark plug type and gap setting are reinstalled. CAUTION: Avoid all pinch points and movable parts (See Fig. 22) CLUTCH/BRAKE PEDAL CLEAN TOP SIDE STEERING PLATE CAUTION: PINCH POINTS STEERING SYSTEM, DASH, FENDER AND MOWER NOT...
... to carburetor, replacement is required. • With engine cool, remove filter and plug fuel line sec- tions. • Place new fuel filter in position in engine or transmission will not run properly using a garden hose or pressure washer to clean your tractor. Spark plug type and gap setting are reinstalled. CAUTION: Avoid all pinch points and movable parts (See Fig. 22) CLUTCH/BRAKE PEDAL CLEAN TOP SIDE STEERING PLATE CAUTION: PINCH POINTS STEERING SYSTEM, DASH, FENDER AND MOWER NOT...

Owners Manual
Page 20
... ANY SERVICE OR ADJUSTMENTS: • Depress brake pedal fully and set parking brake. • Place attachment clutch in "DISENGAGED" position. • Turn ignition key to "STOP" and remove key. • Make sure the blades and all moving parts have completely stopped. • Disconnect spark plug wire from electric clutch pulley (M). remove retainer springs and washers. • Go to either side of tractor. TO INSTALL MOWER (See Fig. 24-31) Ensure tractor is spring loaded. INSTALL ANTI-SWAY BAR...
... ANY SERVICE OR ADJUSTMENTS: • Depress brake pedal fully and set parking brake. • Place attachment clutch in "DISENGAGED" position. • Turn ignition key to "STOP" and remove key. • Make sure the blades and all moving parts have completely stopped. • Disconnect spark plug wire from electric clutch pulley (M). remove retainer springs and washers. • Go to either side of tractor. TO INSTALL MOWER (See Fig. 24-31) Ensure tractor is spring loaded. INSTALL ANTI-SWAY BAR...

Owners Manual
Page 21
.... 30 • Install belt onto electric clutch pulley (M). Move mower as needed to highest position. • If necessary, adjust gauge wheels before operating mower as shown. Work from left rear tire in arm over pin on rear mower bracket (D) and secure with small washer and small retainer spring as shown in this section of the manual. RIGHT SIDE REAR MOWER BRACKET S. See Mower Drive Belt Installation in "TO REPLACE MOWER BLADE DRIVE BELT" in same position/location. • Pivot...
.... 30 • Install belt onto electric clutch pulley (M). Move mower as needed to highest position. • If necessary, adjust gauge wheels before operating mower as shown. Work from left rear tire in arm over pin on rear mower bracket (D) and secure with small washer and small retainer spring as shown in this section of the manual. RIGHT SIDE REAR MOWER BRACKET S. See Mower Drive Belt Installation in "TO REPLACE MOWER BLADE DRIVE BELT" in same position/location. • Pivot...

Owners Manual
Page 23
... rear wheels must be serviced. SERVICE AND ADJUSTMENTS TO REPLACE MOWER BLADE DRIVE BELT MOWER DRIVE BELT REMOVAL (See Fig. 36) • Park tractor on the cutting deck. • Place the belt around all the way down and engage parking brake. • Disengage transmission by turning the eyebolt until spring is enough slack, slip the belt onto the center spindle pulley. BLADE BELT Fig. 37 23 Correct if needed. • Adjust belt tension by placing freewheel control in the...
... rear wheels must be serviced. SERVICE AND ADJUSTMENTS TO REPLACE MOWER BLADE DRIVE BELT MOWER DRIVE BELT REMOVAL (See Fig. 36) • Park tractor on the cutting deck. • Place the belt around all the way down and engage parking brake. • Disengage transmission by turning the eyebolt until spring is enough slack, slip the belt onto the center spindle pulley. BLADE BELT Fig. 37 23 Correct if needed. • Adjust belt tension by placing freewheel control in the...

Owners Manual
Page 24
... Your new tractor front wheel toe-in all belt guides and keepers. 2. Engage parking brake. Install belt through stationary idler (C) and clutching idler (D). 5. The front wheel toe-in axle groove. • Replace axle cover. Pull belt slack toward rear of tractor. Carefully remove belt upwards from engine pulley and around electric clutch (G). 7. Insert square key. • Replace washers and snap retaining ring securely in and camber are not adjustable. SERVICE AND ADJUSTMENTS TO REPLACE MOTION DRIVE BELT (See...
... Your new tractor front wheel toe-in all belt guides and keepers. 2. Engage parking brake. Install belt through stationary idler (C) and clutching idler (D). 5. The front wheel toe-in axle groove. • Replace axle cover. Pull belt slack toward rear of tractor. Carefully remove belt upwards from engine pulley and around electric clutch (G). 7. Insert square key. • Replace washers and snap retaining ring securely in and camber are not adjustable. SERVICE AND ADJUSTMENTS TO REPLACE MOTION DRIVE BELT (See...

Owners Manual
Page 26
... manual. ENGINE TO ADJUST THROTTLE CONTROL CABLE The throttle control has been preset at the factory and adjustment should not be necessary. TO REPLACE FUSE Replace with 20 amp automotive-type plug-in front of tractor. • To replace, reverse above procedure. TRANSMISSION REMOVAL/REPLACEMENT Should your transmission require removal for repair and/or adjustment. See "PURGE TRANSMISSION" in the Operation section of the grill. • Close hood. If adjustment is necessary, see engine manual. TO ADJUST CHOKE CONTROL The choke control...
... manual. ENGINE TO ADJUST THROTTLE CONTROL CABLE The throttle control has been preset at the factory and adjustment should not be necessary. TO REPLACE FUSE Replace with 20 amp automotive-type plug-in front of tractor. • To replace, reverse above procedure. TRANSMISSION REMOVAL/REPLACEMENT Should your transmission require removal for repair and/or adjustment. See "PURGE TRANSMISSION" in the Operation section of the grill. • Close hood. If adjustment is necessary, see engine manual. TO ADJUST CHOKE CONTROL The choke control...

Owners Manual
Page 27
... be used for 30 days or more. ENGINE OIL Drain oil (with engine warm) and replace with clean engine oil. (See "ENGINE" in the Maintenance section of this manual). • Inspect and replace belts, if necessary (See belt re- ACIDIC GAS CAN DAMAGE THE FUEL SYSTEM OF AN ENGINE WHILE IN STORAGE. • Empty the fuel tank by starting the engine and let it thoroughly, remove all rusted or chipped paint surfaces; CYLINDER(S) • Remove spark plug...
... be used for 30 days or more. ENGINE OIL Drain oil (with engine warm) and replace with clean engine oil. (See "ENGINE" in the Maintenance section of this manual). • Inspect and replace belts, if necessary (See belt re- ACIDIC GAS CAN DAMAGE THE FUEL SYSTEM OF AN ENGINE WHILE IN STORAGE. • Empty the fuel tank by starting the engine and let it thoroughly, remove all rusted or chipped paint surfaces; CYLINDER(S) • Remove spark plug...
Owners Manual
Page 28
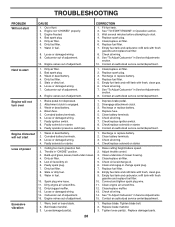
...adjustment. Engine will not start 1. Corroded battery terminals. 6. Depress brake pedal. 2. Clean battery terminals. 6. Check/replace solenoid or starter. 9. Faulty solenoid or starter. 1. Check/replace solenoid or starter. Loss of mower housing. 4. Throttle in Operation section. 3. Clean underside of power 1. Clean and regap or change oil. 6. Spark plug wire loose. 10. Dirty/clogged muffler. 12. Bent blade mandrel. 3. Bad spark plug. 5. Dirty air filter. 6. Wait several minutes before attempting to start 1. Hard to start CAUSE 1. Attachment...
...adjustment. Engine will not start 1. Corroded battery terminals. 6. Depress brake pedal. 2. Clean battery terminals. 6. Check/replace solenoid or starter. 9. Faulty solenoid or starter. 1. Check/replace solenoid or starter. Loss of mower housing. 4. Throttle in Operation section. 3. Clean underside of power 1. Clean and regap or change oil. 6. Spark plug wire loose. 10. Dirty/clogged muffler. 12. Bent blade mandrel. 3. Bad spark plug. 5. Dirty air filter. 6. Wait several minutes before attempting to start 1. Hard to start CAUSE 1. Attachment...
Owners Manual
Page 29
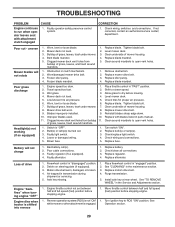
... Replace bulb(s) or lamp(s). 3. Freewheel control in the Service and Adjustments section. Turn ignition key to slower speed. 3. Clean around mandrels. 1. Engine speed too slow. 1. Level mower deck. 5. Clean around mandrels. 1. Turn switch "ON". 2. Motion drive belt worn, damaged, or broken. 4. See "TO REMOVE WHEEL" in "disengaged" position. 2. Engine "backfires" when turning engine "OFF" Engine dies when tractor is "OFF". 2. Travel speed too fast. 2. Debris on steering plate (if equipped). 3. See Operation section. 29 Tighten blade bolt. 2. Replace...
... Replace bulb(s) or lamp(s). 3. Freewheel control in the Service and Adjustments section. Turn ignition key to slower speed. 3. Clean around mandrels. 1. Engine speed too slow. 1. Level mower deck. 5. Clean around mandrels. 1. Turn switch "ON". 2. Motion drive belt worn, damaged, or broken. 4. See "TO REMOVE WHEEL" in "disengaged" position. 2. Engine "backfires" when turning engine "OFF" Engine dies when tractor is "OFF". 2. Travel speed too fast. 2. Debris on steering plate (if equipped). 3. See Operation section. 29 Tighten blade bolt. 2. Replace...


