
Owners Manual
Page 2
... in neutral, you to lose control of riding mower-related injuries. Use common sense when towing. Operate only at all slopes requires extra caution. WARNING Battery posts, terminals and related accessories contain lead and lead compounds, chemicals known to cause cancer and birth defects or other debris build-up and down...
... in neutral, you to lose control of riding mower-related injuries. Use common sense when towing. Operate only at all slopes requires extra caution. WARNING Battery posts, terminals and related accessories contain lead and lead compounds, chemicals known to cause cancer and birth defects or other debris build-up and down...
Owners Manual
Page 4
...;F/0°C) OIL CAPACITY: 67 Oz./2.0 L SPARK PLUG: GROUND SPEED (MPH/KPH): NGK BPR4ES (GAP: .030"/0.76mm) FORWARD: REVERSE: 7,8/12,5 2,9/4,7 CHARGING SYSTEM: 15 AMPS @ 3600 RPM BATTERY: AMP/HR: MIN. PRODUCT SPECIFICATIONS GASOLINE CAPACITY AND TYPE: 4.0 GALLONS/15,14 L UNLEADED REGULAR OIL TYPE (API: SG-SL): SAE 30 (above is required by...
...;F/0°C) OIL CAPACITY: 67 Oz./2.0 L SPARK PLUG: GROUND SPEED (MPH/KPH): NGK BPR4ES (GAP: .030"/0.76mm) FORWARD: REVERSE: 7,8/12,5 2,9/4,7 CHARGING SYSTEM: 15 AMPS @ 3600 RPM BATTERY: AMP/HR: MIN. PRODUCT SPECIFICATIONS GASOLINE CAPACITY AND TYPE: 4.0 GALLONS/15,14 L UNLEADED REGULAR OIL TYPE (API: SG-SL): SAE 30 (above is required by...

Owners Manual
Page 5
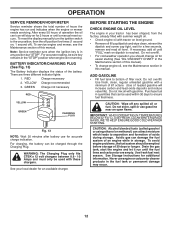
...from carton. • Remove end panels and lay side panels flat. • Check for charging instructions). • For battery and battery cable installation see "REPLACING BATTERY" in the "Service and Adjustments" section in this manual. WARNING: Before starting, read, understand and follow . Continue with... Quick Connect Slope Sheet *Installed by depressing brake pedal. • Place freewheel control in disengaged position to dis- NOTE: If this battery is clear of this manual, it means when you to press clutch/brake pedal all instructions in seat. • Lift up adjustment ...
...from carton. • Remove end panels and lay side panels flat. • Check for charging instructions). • For battery and battery cable installation see "REPLACING BATTERY" in the "Service and Adjustments" section in this manual. WARNING: Before starting, read, understand and follow . Continue with... Quick Connect Slope Sheet *Installed by depressing brake pedal. • Place freewheel control in disengaged position to dis- NOTE: If this battery is clear of this manual, it means when you to press clutch/brake pedal all instructions in seat. • Lift up adjustment ...

Owners Manual
Page 6
... Operation section of this manual). 6 PLEASE REVIEW THE FOLLOWING CHECKLIST: ✓ All assembly instructions have been completed. ✓ No remaining loose parts in carton. ✓ Battery is properly prepared and charged. ✓ Seat is adjusted comfortably and tightened securely. ✓ All tires are properly clamped. ✓ Before driving tractor, be sure...
... Operation section of this manual). 6 PLEASE REVIEW THE FOLLOWING CHECKLIST: ✓ All assembly instructions have been completed. ✓ No remaining loose parts in carton. ✓ Battery is properly prepared and charged. ✓ Seat is adjusted comfortably and tightened securely. ✓ All tires are properly clamped. ✓ Before driving tractor, be sure...

Owners Manual
Page 7
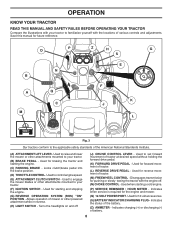
... LOW CHOKE FAST SLOW IGNITION SWITCH ENGINE OFF REVERSE OPERATION SYSTEM (ROS) ENGINE ON ENGINE START PARKING BRAKE MOWER HEIGHT MOWER LIFT LIGHTS ON FUEL BATTERY REVERSE FORWARD CRUISE CONTROL CLUTCH/BRAKE PEDAL 15 15 ATTACHMENT ATTACHMENT CLUTCH DISENGAGED CLUTCH ENGAGED DANGER, KEEP HANDS AND FEET AWAY KEEP AREA CLEAR SLOPE...
... LOW CHOKE FAST SLOW IGNITION SWITCH ENGINE OFF REVERSE OPERATION SYSTEM (ROS) ENGINE ON ENGINE START PARKING BRAKE MOWER HEIGHT MOWER LIFT LIGHTS ON FUEL BATTERY REVERSE FORWARD CRUISE CONTROL CLUTCH/BRAKE PEDAL 15 15 ATTACHMENT ATTACHMENT CLUTCH DISENGAGED CLUTCH ENGAGED DANGER, KEEP HANDS AND FEET AWAY KEEP AREA CLEAR SLOPE...
Owners Manual
Page 8
...H G S E F K J L Fig. 3 Our tractors conform to familiarize yourself with the locations of various controls and adjustments. Allows operation of the battery. (Z) AMMETER - Used for future reference. Used for pushing or slowly towing the tractor with the engine off . (J) CRUISE CONTROL LEVER - Used when starting... Used for the engine and mower. (Q) 12-VOLT POWER PORT - Indicates when service is required for forward movement of battery. 8 Indicates the status of mower or other attachments mounted to control engine speed. (E) ATTACHMENT CLUTCH SWITCH - Indicates charging...
...H G S E F K J L Fig. 3 Our tractors conform to familiarize yourself with the locations of various controls and adjustments. Allows operation of the battery. (Z) AMMETER - Used for future reference. Used for pushing or slowly towing the tractor with the engine off . (J) CRUISE CONTROL LEVER - Used when starting... Used for the engine and mower. (Q) 12-VOLT POWER PORT - Indicates when service is required for forward movement of battery. 8 Indicates the status of mower or other attachments mounted to control engine speed. (E) ATTACHMENT CLUTCH SWITCH - Indicates charging...

Owners Manual
Page 9
... AND REVERSE DRIVE PEDALS RETURN TO NEUTRAL POSITION WHEN NOT DEPRESSED. IMPORTANT: LEAVING THE IGNITION SWITCH IN ANY POSITION OTHER THAN "STOP" WILL CAUSE THE BATTERY TO DISCHARGE AND GO DEAD. N F Fig. 6 TO USE CHOKE CONTROL (N) (See Fig. 6) Use choke control whenever you are starting a cold engine. To eliminate this possibility...
... AND REVERSE DRIVE PEDALS RETURN TO NEUTRAL POSITION WHEN NOT DEPRESSED. IMPORTANT: LEAVING THE IGNITION SWITCH IN ANY POSITION OTHER THAN "STOP" WILL CAUSE THE BATTERY TO DISCHARGE AND GO DEAD. N F Fig. 6 TO USE CHOKE CONTROL (N) (See Fig. 6) Use choke control whenever you are starting a cold engine. To eliminate this possibility...
Owners Manual
Page 12
...or carburetor cleaner products in storage. There are empty. GREEN Charge not necessary RED YELLOW GREEN CHARGING PLUG Fig. 13 NOTE: Wait 30 minutes after battery use gasoline near an open flame. Do not overfill. CAUTION: Wipe off ). Drain the gas tank, start the engine and let it run ...increase carbon and lead oxide deposits and reduce valve life). After every 50 hours of 30 days or longer. RED Charge necessary 2. For charging, the battery can damage the fuel system of filler neck. Do not store, spill or use for a few seconds, remove and read oil level. IMPORTANT: ...
...or carburetor cleaner products in storage. There are empty. GREEN Charge not necessary RED YELLOW GREEN CHARGING PLUG Fig. 13 NOTE: Wait 30 minutes after battery use gasoline near an open flame. Do not overfill. CAUTION: Wipe off ). Drain the gas tank, start the engine and let it run ...increase carbon and lead oxide deposits and reduce valve life). After every 50 hours of 30 days or longer. RED Charge necessary 2. For charging, the battery can damage the fuel system of filler neck. Do not store, spill or use for a few seconds, remove and read oil level. IMPORTANT: ...
Owners Manual
Page 15
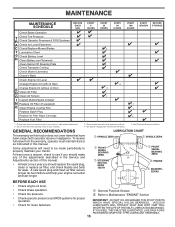
... Pressure R Check Operator Presence & ROS Systems A Check for Loose Fasteners C Check/Replace Mower Blades T Lubrication Chart 0 Check Battery Level R Clean Battery and Terminals Clean Debris Off Steering Plate Check Transaxle Cooling Check Mower Levelness Check V-Belts Check Engine Oil Level Change Engine Oil (...with maintenance-free battery. 5 - IMPORTANT: DO NOT OIL OR GREASE THE PIVOT POINTS WHICH HAVE SPECIAL NYLON BEARINGS....
... Pressure R Check Operator Presence & ROS Systems A Check for Loose Fasteners C Check/Replace Mower Blades T Lubrication Chart 0 Check Battery Level R Clean Battery and Terminals Clean Debris Off Steering Plate Check Transaxle Cooling Check Mower Levelness Check V-Belts Check Engine Oil Level Change Engine Oil (...with maintenance-free battery. 5 - IMPORTANT: DO NOT OIL OR GREASE THE PIVOT POINTS WHICH HAVE SPECIAL NYLON BEARINGS....
Owners Manual
Page 16
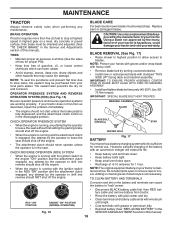
... highest gear on a level, dry concrete or paved surface, then brake must be purchased from tractor. NOTE: The original equipment battery on the battery and terminals can harm rubber. • Avoid stumps, stones, deep ruts, sharp objects and other hazards that may be kept ...: Use only a replacement blade approved by turning counterclockwise. • Install new or resharpened blade with wire brush until bright. Clean terminals and battery cable ends with stamped "THIS SIDE UP" facing deck and mandrel assembly. IMPORTANT: SPECIAL BLADE BOLT HEAT TREATED. ROS "ON" POSITION 02828...
... highest gear on a level, dry concrete or paved surface, then brake must be purchased from tractor. NOTE: The original equipment battery on the battery and terminals can harm rubber. • Avoid stumps, stones, deep ruts, sharp objects and other hazards that may be kept ...: Use only a replacement blade approved by turning counterclockwise. • Install new or resharpened blade with wire brush until bright. Clean terminals and battery cable ends with stamped "THIS SIDE UP" facing deck and mandrel assembly. IMPORTANT: SPECIAL BLADE BOLT HEAT TREATED. ROS "ON" POSITION 02828...
Owners Manual
Page 18
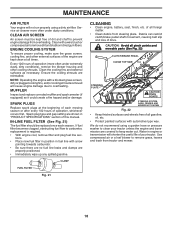
... SYSTEM To ensure proper cooling, make sure the grass screen, cooling fins, and other cooling shrouds. CLAMP FUEL FILTER Fig. 21 CLEANING • Clean engine, battery, seat, finish, etc. We do not recommend using a dirty air filter. Clean with arrow pointing towards carburetor. • Be sure there are no fuel line...
... SYSTEM To ensure proper cooling, make sure the grass screen, cooling fins, and other cooling shrouds. CLAMP FUEL FILTER Fig. 21 CLEANING • Clean engine, battery, seat, finish, etc. We do not recommend using a dirty air filter. Clean with arrow pointing towards carburetor. • Be sure there are no fuel line...

Owners Manual
Page 25
...(-) terminal (C) of this procedure: IMPORTANT: YOUR TRACTOR IS EQUIPPED WITH A 12 VOLT SYSTEM. NEGATIVE (BLACK) CABLE TERMINAL COVER WEAK OR DEAD BATTERY FULLY CHARGED BATTERY Fig. 41 POSITIVE (RED) CABLE Fig. 42 25 TO ATTACH JUMPER CABLES • Connect one end of the RED cable to the POSITIVE (+)... terminal of each battery(A-B), taking care not to short against tractor chassis. • Connect one end of the BLACK cable to raised position. • Remove terminal cover....
...(-) terminal (C) of this procedure: IMPORTANT: YOUR TRACTOR IS EQUIPPED WITH A 12 VOLT SYSTEM. NEGATIVE (BLACK) CABLE TERMINAL COVER WEAK OR DEAD BATTERY FULLY CHARGED BATTERY Fig. 41 POSITIVE (RED) CABLE Fig. 42 25 TO ATTACH JUMPER CABLES • Connect one end of the RED cable to the POSITIVE (+)... terminal of each battery(A-B), taking care not to short against tractor chassis. • Connect one end of the BLACK cable to raised position. • Remove terminal cover....

Owners Manual
Page 27
...or carburetor cleaner products in fuel tank or storage container. Allow the engine to distribute oil. • Replace with gasoline in storage, battery may require recharging. • To help prevent corrosion and power leakage during storage. sand lightly before storing in the Mainte- placement ...section of this manual). • After cleaning, leave cables disconnected and place cables where they cannot come in contact with battery terminals. • If battery is to gasoline in the fuel tank or permanent damage may reach an open flame or spark. NOTE: Fuel stabilizer ...
...or carburetor cleaner products in fuel tank or storage container. Allow the engine to distribute oil. • Replace with gasoline in storage, battery may require recharging. • To help prevent corrosion and power leakage during storage. sand lightly before storing in the Mainte- placement ...section of this manual). • After cleaning, leave cables disconnected and place cables where they cannot come in contact with battery terminals. • If battery is to gasoline in the fuel tank or permanent damage may reach an open flame or spark. NOTE: Fuel stabilizer ...
Owners Manual
Page 28
...Stale or dirty fuel. 6. Clean/replace air filter. 2. Check all wiring. 14. Attachment clutch is engaged. 3. Depress brake pedal. 2. Clean battery terminals. 6. Loose or damaged wiring. 4. Cutting too much grass/too fast. 1. Check oil level/change spark plug. 7. Replace fuel filter.... Adjustments section. 8. Worn, bent or loose blade. 2. Replace damaged parts. 28 Replace fuel filter. 7. Recharge or replace battery. 4. Weak or dead battery. 4. Faulty solenoid or starter. 9. Loss of fuel. 2. Connect and tighten spark plug wire. 11. Loose or damaged wiring...
...Stale or dirty fuel. 6. Clean/replace air filter. 2. Check all wiring. 14. Attachment clutch is engaged. 3. Depress brake pedal. 2. Clean battery terminals. 6. Loose or damaged wiring. 4. Cutting too much grass/too fast. 1. Check oil level/change spark plug. 7. Replace fuel filter.... Adjustments section. 8. Worn, bent or loose blade. 2. Replace damaged parts. 28 Replace fuel filter. 7. Recharge or replace battery. 4. Weak or dead battery. 4. Faulty solenoid or starter. 9. Loss of fuel. 2. Connect and tighten spark plug wire. 11. Loose or damaged wiring...
Owners Manual
Page 29
... 3. Poor grass discharge Headlight(s) not working (if so equipped) 1. Low/uneven tire air pressure. 5. Reinstall blades sharp edge down. 10. Battery will not rotate 1. Loss of mower housing. 4. Motion drive belt worn, damaged, or broken. 4. Place freewheel control in "FAST" position. ...underside of mower housing. 8. Mower drive belt worn. 8. Clean around mandrels to open vent holes. 1. Bad battery cell(s). 2. Replace alternator. See "CLEANING" in "disengaged" position. 2. Loose or damaged wiring. 5. Engine speed too slow. 1. Blown fuse. 1. ...
... 3. Poor grass discharge Headlight(s) not working (if so equipped) 1. Low/uneven tire air pressure. 5. Reinstall blades sharp edge down. 10. Battery will not rotate 1. Loss of mower housing. 4. Motion drive belt worn, damaged, or broken. 4. Place freewheel control in "FAST" position. ...underside of mower housing. 8. Mower drive belt worn. 8. Clean around mandrels to open vent holes. 1. Bad battery cell(s). 2. Replace alternator. See "CLEANING" in "disengaged" position. 2. Loose or damaged wiring. 5. Engine speed too slow. 1. Blown fuse. 1. ...

