
Owners Manual
Page 2
... storage. Allow machine to neutral and coast downhill. • Avoid starting, stopping, or turning on a slope, is dangerous. Operation on the machine and in the manual before cleaning the machine, removing the grass catcher, or unclogging the discharge chute. • Operate machine only in neutral, you to cause cancer and birth...
... storage. Allow machine to neutral and coast downhill. • Avoid starting, stopping, or turning on a slope, is dangerous. Operation on the machine and in the manual before cleaning the machine, removing the grass catcher, or unclogging the discharge chute. • Operate machine only in neutral, you to cause cancer and birth...
Owners Manual
Page 4
...: 230 Case Size: U1R 45-55 Ft. Do not mow in effective working order by law (Section 4442 of this manual. • Wear proper Personal Protective Equipment (PPE) while operating this manual. TABLE OF CONTENTS SAFETY RULES 2-3 PRODUCT SPECIFICATIONS 4 CUSTOMER RESPONSIBILITIES 4 ASSEMBLY 5-6 OPERATION 7-12 MAINTENANCE SCHEDULE 13 MAINTENANCE 13-17 SERVICE AND...
...: 230 Case Size: U1R 45-55 Ft. Do not mow in effective working order by law (Section 4442 of this manual. • Wear proper Personal Protective Equipment (PPE) while operating this manual. TABLE OF CONTENTS SAFETY RULES 2-3 PRODUCT SPECIFICATIONS 4 CUSTOMER RESPONSIBILITIES 4 ASSEMBLY 5-6 OPERATION 7-12 MAINTENANCE SCHEDULE 13 MAINTENANCE 13-17 SERVICE AND...
Owners Manual
Page 5
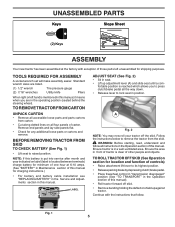
...parts left hand is reached which allows you are in the operating position (seated behind the steering wheel). fortable position is mentioned in this manual. TO REMOVE TRACTOR FROM CARTON UNPACK CARTON • Remove all accessible loose parts and parts cartons from the skid. WARNING: Before starting, ... PARTS Keys Slope Sheet (2) Keys ASSEMBLY Your new tractor has been assembled at 6-10 amps. (See "BATTERY" in Maintenance section of this manual, it means when you to press clutch/brake pedal all the way down. • Release lever to lock seat in position. TO ROLL ...
...parts left hand is reached which allows you are in the operating position (seated behind the steering wheel). fortable position is mentioned in this manual. TO REMOVE TRACTOR FROM CARTON UNPACK CARTON • Remove all accessible loose parts and parts cartons from the skid. WARNING: Before starting, ... PARTS Keys Slope Sheet (2) Keys ASSEMBLY Your new tractor has been assembled at 6-10 amps. (See "BATTERY" in Maintenance section of this manual, it means when you to press clutch/brake pedal all the way down. • Release lever to lock seat in position. TO ROLL ...

Owners Manual
Page 6
...FOLLOWING CHECKLIST: ✓ All assembly instructions have been completed. ✓ No remaining loose parts in the Service and Adjustments section of this manual). 6 Operate them before you learn how to operate your tractor, check to PSI shown on your tractor were overinflated at the factory for...and wires are shown for best cutting performance. • Reduce tire pressure to see "TO TRANSPORT" in the Operation section of this manual. ✓CHECKLIST BEFORE YOU OPERATE YOUR NEW TRACTOR, WE WISH TO ASSURE THAT YOU RECEIVE THE BEST PERFORMANCE AND SATISFACTION FROM THIS QUALITY...
...FOLLOWING CHECKLIST: ✓ All assembly instructions have been completed. ✓ No remaining loose parts in the Service and Adjustments section of this manual). 6 Operate them before you learn how to operate your tractor, check to PSI shown on your tractor were overinflated at the factory for...and wires are shown for best cutting performance. • Reduce tire pressure to see "TO TRANSPORT" in the Operation section of this manual. ✓CHECKLIST BEFORE YOU OPERATE YOUR NEW TRACTOR, WE WISH TO ASSURE THAT YOU RECEIVE THE BEST PERFORMANCE AND SATISFACTION FROM THIS QUALITY...

Owners Manual
Page 8
... tractor. (B) BRAKE PEDAL - Allows operation of various controls and adjustments. Indicates when service is required for future reference. Save this manual for the engine and mower. 8 Turns the headlights on and off . (P) SERVICE REMINDER/HOUR METER - Selects the speed and ...- Used for braking the tractor and starting and controlling engine speed. (E) ATTACHMENT CLUTCH SWITCH - OPERATION KNOW YOUR TRACTOR READ THIS MANUAL AND SAFETY RULES BEFORE OPERATING YOUR TRACTOR Compare the illustrations with your tractor. (F) IGNITION SWITCH - Used to engage the mower blades...
... tractor. (B) BRAKE PEDAL - Allows operation of various controls and adjustments. Indicates when service is required for future reference. Save this manual for the engine and mower. 8 Turns the headlights on and off . (P) SERVICE REMINDER/HOUR METER - Selects the speed and ...- Used for braking the tractor and starting and controlling engine speed. (E) ATTACHMENT CLUTCH SWITCH - OPERATION KNOW YOUR TRACTOR READ THIS MANUAL AND SAFETY RULES BEFORE OPERATING YOUR TRACTOR Compare the illustrations with your tractor. (F) IGNITION SWITCH - Used to engage the mower blades...

Owners Manual
Page 10
... cutting performance, grass over 3" during the cool season and to desired cutting height (See "TO ADJUST MOWER CUTTING HEIGHT" in the Operation section of this manual). • With mower in height should be mowed twice. NOTE: Adjust gauge wheels with tractor on mowers so equipped, or the deflector shield (S) in same...
... cutting performance, grass over 3" during the cool season and to desired cutting height (See "TO ADJUST MOWER CUTTING HEIGHT" in the Operation section of this manual). • With mower in height should be mowed twice. NOTE: Adjust gauge wheels with tractor on mowers so equipped, or the deflector shield (S) in same...
Owners Manual
Page 11
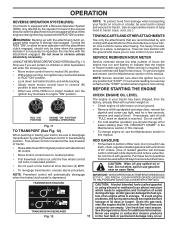
...shut off any position but "STOP". See Storage Instructions for easier starting (See "OIL VISCOSITY CHART" in the Maintenance section of this manual). • To change oil for additional information. Too heavy of 30 days or longer. For accurate reading, be sure hood is ...ATTACHMENTS WARNING: Backing up with the attachment engaged. SERVICE REMINDER/HOUR METER USING THE REVERSE OPERATION SYSTEM (See Fig. 11) Only use of this manual. NOTE: Freewheel control will enter the mowing area. • Move motion control lever to neutral (N) position. • With engine running ....
...shut off any position but "STOP". See Storage Instructions for easier starting (See "OIL VISCOSITY CHART" in the Maintenance section of this manual). • To change oil for additional information. Too heavy of 30 days or longer. For accurate reading, be sure hood is ...ATTACHMENTS WARNING: Backing up with the attachment engaged. SERVICE REMINDER/HOUR METER USING THE REVERSE OPERATION SYSTEM (See Fig. 11) Only use of this manual. NOTE: Freewheel control will enter the mowing area. • Move motion control lever to neutral (N) position. • With engine running ....
Owners Manual
Page 12
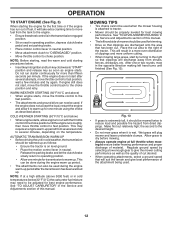
..., move throttle control to fast position. NOTE: If at full throttle when mowing to ensure better mowing performance and proper discharge of this manual. • The left hand turns until the engine runs roughly, then move the throttle control back to fast position, wait a few .... 12 AUTOMATIC TRANSMISSION WARM UP • Before driving the unit in the Service and Adjustments section of clippings and more even distribution of this manual. See "TO ADJUST CARBURETOR" in a more uniform cutting. • When mowing large areas, start after the transmission has been warmed up...
..., move throttle control to fast position. NOTE: If at full throttle when mowing to ensure better mowing performance and proper discharge of this manual. • The left hand turns until the engine runs roughly, then move the throttle control back to fast position, wait a few .... 12 AUTOMATIC TRANSMISSION WARM UP • Before driving the unit in the Service and Adjustments section of clippings and more even distribution of this manual. See "TO ADJUST CARBURETOR" in a more uniform cutting. • When mowing large areas, start after the transmission has been warmed up...
Owners Manual
Page 13
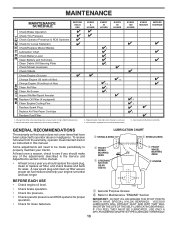
... Paper Cartridge Replace Fuel Filter 3 4 5 1,2 1,2 2 2 1, 2 2 2 1 - To receive full value from the warranty, operator must maintain tractor as instructed in Maintenance Section. See Cleaning in this manual. • At least once a year you should replace the spark plug, clean or replace air filter, and check blades and belts for wear. MAINTENANCE MAINTENANCE... the adjustments described in dirty or dusty conditions. 3 - Some adjustments will need to be made periodically to see if you should make any of this manual.
... Paper Cartridge Replace Fuel Filter 3 4 5 1,2 1,2 2 2 1, 2 2 2 1 - To receive full value from the warranty, operator must maintain tractor as instructed in Maintenance Section. See Cleaning in this manual. • At least once a year you should replace the spark plug, clean or replace air filter, and check blades and belts for wear. MAINTENANCE MAINTENANCE... the adjustments described in dirty or dusty conditions. 3 - Some adjustments will need to be made periodically to see if you should make any of this manual.

Owners Manual
Page 14
... of gasoline, oil, or insect control chemicals which is sufficient for proper PSI). • Keep tires free of this manual). CAUTION: Use only a replacement blade approved by the manufacturer of this manual). Clean terminals and battery cable ends with the ignition switch in the ROS "ON" position and the attachment clutch engaged...
... of gasoline, oil, or insect control chemicals which is sufficient for proper PSI). • Keep tires free of this manual). CAUTION: Use only a replacement blade approved by the manufacturer of this manual). Clean terminals and battery cable ends with the ignition switch in the ROS "ON" position and the attachment clutch engaged...

Owners Manual
Page 15
... at least once a year if the tractor is tightened securely for the life of the transaxle. For approximate capacity see "PRODUCT SPECIFICATIONS" section of this manual. • Use gauge on oil fill cap/dipstick for 50 hours in one year. ENGINE OIL FILTER Replace the engine oil filter every season or...
... at least once a year if the tractor is tightened securely for the life of the transaxle. For approximate capacity see "PRODUCT SPECIFICATIONS" section of this manual. • Use gauge on oil fill cap/dipstick for 50 hours in one year. ENGINE OIL FILTER Replace the engine oil filter every season or...
Owners Manual
Page 16
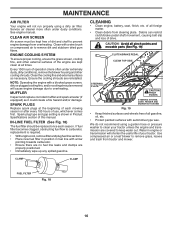
... cause engine damage due to overheating. Ensure the cooling shrouds are covered to carburetor, replacement is shown in Product Specifications section of this manual. SPARK PLUGS Replace spark plugs at all times. IN-LINE FUEL FILTER (See Fig. 18) The fuel filter should be kept free... air or a leaf blower to remove dirt and stubborn dried gum fibers. CLEANING • Clean engine, battery, seat, finish, etc. See engine manual. Service air cleaner more often under dusty conditions. We do not recommend using a dirty air filter. Water in fuel line with a blocked grass screen...
... cause engine damage due to overheating. Ensure the cooling shrouds are covered to carburetor, replacement is shown in Product Specifications section of this manual. SPARK PLUGS Replace spark plugs at all times. IN-LINE FUEL FILTER (See Fig. 18) The fuel filter should be kept free... air or a leaf blower to remove dirt and stubborn dried gum fibers. CLEANING • Clean engine, battery, seat, finish, etc. See engine manual. Service air cleaner more often under dusty conditions. We do not recommend using a dirty air filter. Water in fuel line with a blocked grass screen...

Owners Manual
Page 17
... or paved area. Place the attachment clutch control in the operator's position with your garden hose. 4. Pull back the lock collar of your tractor's Operator's Manual) onto the end of the nozzle adapter to disconnect the adapter from the nozzle washout port. 10.Move the tractor to reach. Remove bagger chute...
... or paved area. Place the attachment clutch control in the operator's position with your garden hose. 4. Pull back the lock collar of your tractor's Operator's Manual) onto the end of the nozzle adapter to disconnect the adapter from the nozzle washout port. 10.Move the tractor to reach. Remove bagger chute...

Owners Manual
Page 19
Insert rod end of this manual. tor. R Q Fig. 25 IMPORTANT: CHECK BELT FOR PROPER ROUTING IN ALL MOWER PULLEY GROOVES. • Raise attachment lift lever to highest position. • If necessary, ...
Insert rod end of this manual. tor. R Q Fig. 25 IMPORTANT: CHECK BELT FOR PROPER ROUTING IN ALL MOWER PULLEY GROOVES. • Raise attachment lift lever to highest position. • If necessary, ...
Owners Manual
Page 21
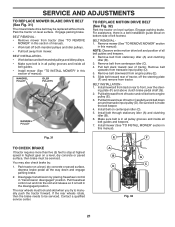
... (D). 5. Pull belt slack toward rear of all belt guides. • Install mower (See "TO INSTALL MOWER" in this manual). Remove belt upwards from centerspan idler (C). 4. BELT INSTALLATION 1. Carefully work belt down and engage parking brake. 2. Pull freewheel control...depress brake pedal all belt guides and keepers. 7. Contact a qualified service center. Slide belt toward rear of tractor. Pull belt toward front of manual). • Work belt off the steering plate (F) and remove from mower. Install belt through stationary idler (A) and clutching idler (B). 6. You ...
... (D). 5. Pull belt slack toward rear of all belt guides. • Install mower (See "TO INSTALL MOWER" in this manual). Remove belt upwards from centerspan idler (C). 4. BELT INSTALLATION 1. Carefully work belt down and engage parking brake. 2. Pull freewheel control...depress brake pedal all belt guides and keepers. 7. Contact a qualified service center. Slide belt toward rear of tractor. Pull belt toward front of manual). • Work belt off the steering plate (F) and remove from mower. Install belt through stationary idler (A) and clutching idler (B). 6. You ...

Owners Manual
Page 22
... the shift plate on your tractor. FRONT WHEEL TOE-IN/CAMBER The front wheel toe-in and camber are not adjustable on front of this manual.) • Move the motion control lever until the unit rolls freely. • While holding motion control lever in or camber, contact your nearest authorized service...
... the shift plate on your tractor. FRONT WHEEL TOE-IN/CAMBER The front wheel toe-in and camber are not adjustable on front of this manual.) • Move the motion control lever until the unit rolls freely. • While holding motion control lever in or camber, contact your nearest authorized service...

Owners Manual
Page 23
... prevent it should be connected first to prevent sparking from accidental grounding. • Lift seat pan to good chassis ground, away from starting , follow this manual). INTERLOCKS AND RELAYS Loose or damaged wiring may cause your battery is located behind the dash. 23 TO ATTACH JUMPER CABLES • Connect one end...
... prevent it should be connected first to prevent sparking from accidental grounding. • Lift seat pan to good chassis ground, away from starting , follow this manual). INTERLOCKS AND RELAYS Loose or damaged wiring may cause your battery is located behind the dash. 23 TO ATTACH JUMPER CABLES • Connect one end...

Owners Manual
Page 24
... tractor. • To replace, reverse above procedure. Grasp hood at sides, tilt toward engine and lift off of tractor. If adjustment is necessary, see engine manual. TO ADJUST CHOKE CONTROL The choke control has been preset at the factory and adjustment should not be necessary. If adjustment is not adjustable. If... CABLE The throttle control has been preset at the factory and adjustment should not be necessary. TO ADJUST CARBURETOR Your carburetor is necessary, see engine manual.
... tractor. • To replace, reverse above procedure. Grasp hood at sides, tilt toward engine and lift off of tractor. If adjustment is necessary, see engine manual. TO ADJUST CHOKE CONTROL The choke control has been preset at the factory and adjustment should not be necessary. If adjustment is not adjustable. If... CABLE The throttle control has been preset at the factory and adjustment should not be necessary. TO ADJUST CARBURETOR Your carburetor is necessary, see engine manual.

Owners Manual
Page 25
...; To help prevent corrosion and power leakage during storage. BATTERY • Fully charge the battery for storage. • After a period of this manual). Rust and/or dirt in your gasoline will cause problems. • If possible, store your tractor indoors and cover it to give protection from... ACIDS DURING STORAGE. NOTE: Fuel stabilizer is an acceptable alternative in minimizing the formation of fuel gum deposits during long periods of this manual). • Inspect and replace belts, if necessary (See belt re- Do not empty the gas tank and carburetor if using fuel stabilizer...
...; To help prevent corrosion and power leakage during storage. BATTERY • Fully charge the battery for storage. • After a period of this manual). Rust and/or dirt in your gasoline will cause problems. • If possible, store your tractor indoors and cover it to give protection from... ACIDS DURING STORAGE. NOTE: Fuel stabilizer is an acceptable alternative in minimizing the formation of fuel gum deposits during long periods of this manual). • Inspect and replace belts, if necessary (See belt re- Do not empty the gas tank and carburetor if using fuel stabilizer...

Owners Manual
Page 27
.... 9. Headlight(s) not working (if so equipped) 1. Loss of grass, leaves, trash around mandrels. 1. See "CLEANING" in "FAST" position. 2. See Operation section. 27 Obstruction in parts manual. 11. Reinstall blades sharp edge down. 10. Replace with attachment clutch engaged 1. Motion drive belt worn, damaged, or broken. 4. Clean around mandrels to slower speed...
.... 9. Headlight(s) not working (if so equipped) 1. Loss of grass, leaves, trash around mandrels. 1. See "CLEANING" in "FAST" position. 2. See Operation section. 27 Obstruction in parts manual. 11. Reinstall blades sharp edge down. 10. Replace with attachment clutch engaged 1. Motion drive belt worn, damaged, or broken. 4. Clean around mandrels to slower speed...

