

Owners Manual
Page 2
... harm. Clean any oil or fuel spillage before storage. Operation on all instructions on it, do not mow it cannot contact spark plug. Uneven terrain could cause the machine to roll over if a wheel is clear of objects such as rocks, toys, wire, etc., which can hide obstacles. • Choose a low ground speed so that you may lose traction. Use common...
... harm. Clean any oil or fuel spillage before storage. Operation on all instructions on it, do not mow it cannot contact spark plug. Uneven terrain could cause the machine to roll over if a wheel is clear of objects such as rocks, toys, wire, etc., which can hide obstacles. • Choose a low ground speed so that you may lose traction. Use common...
Owners Manual
Page 3
...operator. • Be alert and turn machine off . Do not attach towed equipment except at all times until fueling is not possible, then refuel such equipment with the blades shut off if a child enters the area. • Before and while backing, look behind before operating. GENERAL SERVICE • Never operate... your view of ignition. • Use only approved gasoline container. • Never remove gas cap or add fuel with the engine running . • Check grass catcher components and the discharge chute frequently and replace with the rim of the fuel tank or container opening ...
...operator. • Be alert and turn machine off . Do not attach towed equipment except at all times until fueling is not possible, then refuel such equipment with the blades shut off if a child enters the area. • Before and while backing, look behind before operating. GENERAL SERVICE • Never operate... your view of ignition. • Use only approved gasoline container. • Never remove gas cap or add fuel with the engine running . • Check grass catcher components and the discharge chute frequently and replace with the rim of the fuel tank or container opening ...
Owners Manual
Page 4
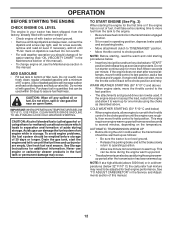
... you to service or repair this tractor. age" sections of a new tractor. TABLE OF CONTENTS SAFETY RULES 2-3 MAINTENANCE SCHEDULE 14 PRODUCT SPECIFICATIONS 4 MAINTENANCE 14-17 CUSTOMER RESPONSIBILITIES 4 SERVICE AND ADJUSTMENTS 18-23 ASSEMBLY 5-6 STORAGE 24 OPERATION 7-13 TROUBLESHOOTING 25-26 REPAIR PARTS 27-42 4 CONGRATULATIONS on your nearest authorized service center/department. Federal laws apply on or near any unimproved forest-covered, brush-covered or grass-covered land unless the engine's exhaust...
... you to service or repair this tractor. age" sections of a new tractor. TABLE OF CONTENTS SAFETY RULES 2-3 MAINTENANCE SCHEDULE 14 PRODUCT SPECIFICATIONS 4 MAINTENANCE 14-17 CUSTOMER RESPONSIBILITIES 4 SERVICE AND ADJUSTMENTS 18-23 ASSEMBLY 5-6 STORAGE 24 OPERATION 7-13 TROUBLESHOOTING 25-26 REPAIR PARTS 27-42 4 CONGRATULATIONS on your nearest authorized service center/department. Federal laws apply on or near any unimproved forest-covered, brush-covered or grass-covered land unless the engine's exhaust...

Owners Manual
Page 5
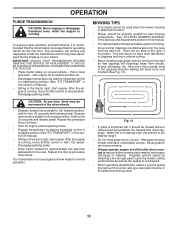
... CHECK BATTERY (See Fig. 1) • Lift hood to lock seat in this manual. BEFORE REMOVING TRACTOR FROM SKID LABEL Fig. 1 ADJUST SEAT (See Fig. 2) • Sit in the operating position (seated behind the steering wheel). A Fig. 2 5 Remove end panels and lay side panels flat. • Check for charging instructions). • For battery and battery cable installation see "REPLACING BATTERY" in the "Service and Adjustments" section in position. Standard wrench sizes are listed. (1) 1/2" wrench Tire pressure gauge...
... CHECK BATTERY (See Fig. 1) • Lift hood to lock seat in this manual. BEFORE REMOVING TRACTOR FROM SKID LABEL Fig. 1 ADJUST SEAT (See Fig. 2) • Sit in the operating position (seated behind the steering wheel). A Fig. 2 5 Remove end panels and lay side panels flat. • Check for charging instructions). • For battery and battery cable installation see "REPLACING BATTERY" in the "Service and Adjustments" section in position. Standard wrench sizes are listed. (1) 1/2" wrench Tire pressure gauge...

Owners Manual
Page 6
WARNING: Before starting and transmission purging instructions (See "TO START ENGINE" and "PURGE TRANSMISSION" in disengaged position to -rear for best cutting results. (Tires must be properly inflated for leveling). ✓ Check mower and drive belts. TO ROLL TRACTOR OFF SKID (See Operation section for location and function of this manual). 6 CHECK DECK LEVELNESS For best cutting results, mower housing should be sure freewheel control is clear of this manual. CHECK FOR PROPER POSITION OF ALL BELTS See the...
WARNING: Before starting and transmission purging instructions (See "TO START ENGINE" and "PURGE TRANSMISSION" in disengaged position to -rear for best cutting results. (Tires must be properly inflated for leveling). ✓ Check mower and drive belts. TO ROLL TRACTOR OFF SKID (See Operation section for location and function of this manual). 6 CHECK DECK LEVELNESS For best cutting results, mower housing should be sure freewheel control is clear of this manual. CHECK FOR PROPER POSITION OF ALL BELTS See the...

Owners Manual
Page 10
... off the engine. TO STOP MOWER BLADES Disengage attachment clutch control. Make the first cut relatively high; Fig. 8 • Put attachment lift lever in appropriate hole. Do not use the cruise control on slopes, rough terrian or while trimmimg or turning. • With forward drive pedal depressed to desired speed, pull cruise control lever (J) up and hold while lifting your foot off when operating your equipment on a flat level surface...
... off the engine. TO STOP MOWER BLADES Disengage attachment clutch control. Make the first cut relatively high; Fig. 8 • Put attachment lift lever in appropriate hole. Do not use the cruise control on slopes, rough terrian or while trimmimg or turning. • With forward drive pedal depressed to desired speed, pull cruise control lever (J) up and hold while lifting your foot off when operating your equipment on a flat level surface...
Owners Manual
Page 12
... this manual). • To change engine oil, see the Maintenance section in operating position, depress brake pedal and set parking brake. • Move attachment clutch to "DISENGAGED" position. • Move throttle control to choke position. AUTOMATIC TRANSMISSION WARM UP • Before driving the unit in your tractor has been shipped, from the factory, already filled with summer weight oil. • Check engine oil with gasoline. This can be adjusted for best engine performance. OPERATION BEFORE STARTING THE ENGINE CHECK ENGINE OIL LEVEL The engine...
... this manual). • To change engine oil, see the Maintenance section in operating position, depress brake pedal and set parking brake. • Move attachment clutch to "DISENGAGED" position. • Move throttle control to choke position. AUTOMATIC TRANSMISSION WARM UP • Before driving the unit in your tractor has been shipped, from the factory, already filled with summer weight oil. • Check engine oil with gasoline. This can be adjusted for best engine performance. OPERATION BEFORE STARTING THE ENGINE CHECK ENGINE OIL LEVEL The engine...
Owners Manual
Page 13
... hand turns until finished (See Fig. 13). See "TO LEVEL MOWER HOUSING" in the opposite direction making left hand side of cut relatively high; Fig. 13 • If grass is running, move throttle control to the right of this procedure three (3) times. • Shut off and parking brake set parking brake. • Engage transmission by selecting a low enough gear to half (1/2) speed. Allow grass to dry before operating tractor for...
... hand turns until finished (See Fig. 13). See "TO LEVEL MOWER HOUSING" in the opposite direction making left hand side of cut relatively high; Fig. 13 • If grass is running, move throttle control to the right of this procedure three (3) times. • Shut off and parking brake set parking brake. • Engage transmission by selecting a low enough gear to half (1/2) speed. Allow grass to dry before operating tractor for...
Owners Manual
Page 14
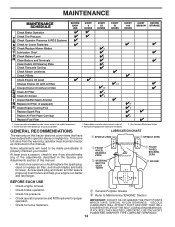
... Pressure R Check Operator Presence & ROS Systems A Check for Loose Fasteners C Check/Replace Mower Blades T Lubrication Chart 0 Check Battery Level R Clean Battery and Terminals Clean Debris Off Steering Plate Check Transaxle Cooling Check Mower Levelness Check V-Belts Check Engine Oil Level Change Engine Oil (with maintenance-free battery. 5 - Replace blades more often when operating in sandy soil. 4 - To receive full value from the warranty, operator must maintain tractor as instructed in the Service and Adjustments section of this manual. A new spark plug and clean air...
... Pressure R Check Operator Presence & ROS Systems A Check for Loose Fasteners C Check/Replace Mower Blades T Lubrication Chart 0 Check Battery Level R Clean Battery and Terminals Clean Debris Off Steering Plate Check Transaxle Cooling Check Mower Levelness Check V-Belts Check Engine Oil Level Change Engine Oil (with maintenance-free battery. 5 - Replace blades more often when operating in sandy soil. 4 - To receive full value from the warranty, operator must maintain tractor as instructed in the Service and Adjustments section of this manual. A new spark plug and clean air...
Owners Manual
Page 15
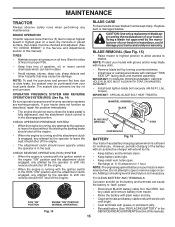
..." POSITION 02828 ENGINE "ON" POSITION (NORMAL OPERATING) Fig. 14 • Disconnect BLACK battery cable first then RED battery cable and remove battery from tractor. • Rinse the battery with plain water and dry. • Clean terminals and battery cable ends with wire brush until bright. • Coat terminals with grease or petroleum jelly. • Reinstall battery (See "REPLACING BATTERY" in the Service and Adjustments section of gasoline, oil, or insect control chemicals which is maintenance free. Tire...
..." POSITION 02828 ENGINE "ON" POSITION (NORMAL OPERATING) Fig. 14 • Disconnect BLACK battery cable first then RED battery cable and remove battery from tractor. • Rinse the battery with plain water and dry. • Clean terminals and battery cable ends with wire brush until bright. • Coat terminals with grease or petroleum jelly. • Reinstall battery (See "REPLACING BATTERY" in the Service and Adjustments section of gasoline, oil, or insect control chemicals which is maintenance free. Tire...
Owners Manual
Page 16
... clean to assure proper cooling. Check the crankcase oil level before starting the engine and after 100 hours of operation and replace if necessary. All oil must be kept free of dirt and chaff to the bottom fitting of the drain valve. • Refill engine with a blocked grass screen, dirty or plugged cooling fins, and/or cooling shrouds removed will not run properly using a dirty air filter. OIL DRAIN VALVE CLOSED AND LOCKED POSITION YELLOW CAP 02463 DRAIN...
... clean to assure proper cooling. Check the crankcase oil level before starting the engine and after 100 hours of operation and replace if necessary. All oil must be kept free of dirt and chaff to the bottom fitting of the drain valve. • Refill engine with a blocked grass screen, dirty or plugged cooling fins, and/or cooling shrouds removed will not run properly using a dirty air filter. OIL DRAIN VALVE CLOSED AND LOCKED POSITION YELLOW CAP 02463 DRAIN...

Owners Manual
Page 17
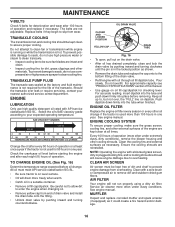
... tractor and mower. mission are shown in the transmission will shorten the useful life of your house, garage, parked cars, etc. Spark plug type and gap setting are covered to lock the adapter on the tractor, re-start the engine and place the throttle lever in "PRODUCT SPECIFICATIONS" section of this manual. Move the tractor's attachment clutch control to remove grass, leaves and trash from your tractor. IMPORTANT: Make certain the tractor's discharge chute is equipped with your tractor's Operator's Manual...
... tractor and mower. mission are shown in the transmission will shorten the useful life of your house, garage, parked cars, etc. Spark plug type and gap setting are covered to lock the adapter on the tractor, re-start the engine and place the throttle lever in "PRODUCT SPECIFICATIONS" section of this manual. Move the tractor's attachment clutch control to remove grass, leaves and trash from your tractor. IMPORTANT: Make certain the tractor's discharge chute is equipped with your tractor's Operator's Manual...

Owners Manual
Page 18
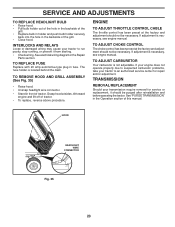
...; Turn ignition key to "STOP" and remove key. • Make sure the blades and all moving parts have completely stopped. • Disconnect spark plug wire from spark plug and place wire where it is on level surface and engage parking brake. • Lower attachment lift lever to its lowest position. • Roll belt off engine pulley (M) and belt keepers (G). • Remove retainer spring (K), slide collar (L) off and push housing guide (P) out of bracket. • Remove clutch cable spring...
...; Turn ignition key to "STOP" and remove key. • Make sure the blades and all moving parts have completely stopped. • Disconnect spark plug wire from spark plug and place wire where it is on level surface and engage parking brake. • Lower attachment lift lever to its lowest position. • Roll belt off engine pulley (M) and belt keepers (G). • Remove retainer spring (K), slide collar (L) off and push housing guide (P) out of bracket. • Remove clutch cable spring...

Owners Manual
Page 19
... trac- tor. R Q Fig. 24 IMPORTANT: CHECK BELT FOR PROPER ROUTING IN ALL MOWER PULLEY GROOVES. • Raise attachment lift lever to highest position. • If necessary, adjust gauge wheels before operating mower as shown in the Operation section of link assembly through front hole in link assembly over pin (B) on outside of tractor chassis and secure with retainer spring. • Repeat on rear mower bracket and secure with washer...
... trac- tor. R Q Fig. 24 IMPORTANT: CHECK BELT FOR PROPER ROUTING IN ALL MOWER PULLEY GROOVES. • Raise attachment lift lever to highest position. • If necessary, adjust gauge wheels before operating mower as shown in the Operation section of link assembly through front hole in link assembly over pin (B) on outside of tractor chassis and secure with retainer spring. • Repeat on rear mower bracket and secure with washer...

Owners Manual
Page 21
... clutch brake pedal shaft (G). 2. Install belt on a level, dry concrete or paved surface, then brake must lock and skid when you try to stop at highest speed in highest gear on centerspan idler (C). 5. The rear wheels must be serviced. Engage parking brake. Remove belt from engine pulley (E). 6. Remove belt upwards from tractor rear to be replaced without tools. Slide belt toward rear of tractor. Pull belt toward rear of tractor. Be sure belt is held in the disengaged position. Install mower...
... clutch brake pedal shaft (G). 2. Install belt on a level, dry concrete or paved surface, then brake must lock and skid when you try to stop at highest speed in highest gear on centerspan idler (C). 5. The rear wheels must be serviced. Engage parking brake. Remove belt from engine pulley (E). 6. Remove belt upwards from tractor rear to be replaced without tools. Slide belt toward rear of tractor. Pull belt toward rear of tractor. Be sure belt is held in the disengaged position. Install mower...
Owners Manual
Page 23
... before operating the tractor. The fuse holder is not adjustable. If adjustment is necessary, see engne manual. HOOD HEADLIGHT WIRE CONNECTOR 07002 Fig. 35 23 TO REPLACE FUSE Replace with 20 amp automotive-type plug-in the Repair Parts section. Grasp hood at sides, tilt toward engine and lift off of tractor. TRANSMISSION REMOVAL/REPLACEMENT Should your tractor to an authorized service center for service or replacement, it from starting. • Check wiring. TO REMOVE...
... before operating the tractor. The fuse holder is not adjustable. If adjustment is necessary, see engne manual. HOOD HEADLIGHT WIRE CONNECTOR 07002 Fig. 35 23 TO REPLACE FUSE Replace with 20 amp automotive-type plug-in the Repair Parts section. Grasp hood at sides, tilt toward engine and lift off of tractor. TRANSMISSION REMOVAL/REPLACEMENT Should your tractor to an authorized service center for service or replacement, it from starting. • Check wiring. TO REMOVE...

Owners Manual
Page 24
... FORMING IN ESSENTIAL FUEL SYSTEM PARTS SUCH AS CARBURETOR, FUEL FILTER, FUEL HOSE, OR TANK DURING STORAGE. WARNING: Never store the tractor with clean engine oil. (See "ENGINE" in the Maintenance section of oil through spark plug hole(s) into cylinder(s). • Turn ignition key to "START" position for storage. • After a period of time in the fuel tank or permanent damage may occur. • Use fresh fuel next season. ENGINE OIL Drain oil (with engine warm) and replace with gasoline in...
... FORMING IN ESSENTIAL FUEL SYSTEM PARTS SUCH AS CARBURETOR, FUEL FILTER, FUEL HOSE, OR TANK DURING STORAGE. WARNING: Never store the tractor with clean engine oil. (See "ENGINE" in the Maintenance section of oil through spark plug hole(s) into cylinder(s). • Turn ignition key to "START" position for storage. • After a period of time in the fuel tank or permanent damage may occur. • Use fresh fuel next season. ENGINE OIL Drain oil (with engine warm) and replace with gasoline in...
Owners Manual
Page 25
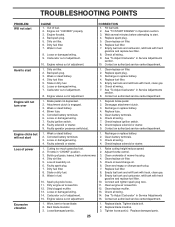
... or replace battery. 4. Check all wiring. 7. Faulty solenoid or starter. 1. Check all wiring. 9. Loss of grass, leaves, trash under mower. 3. Raise cutting height/reduce speed. 2. Build-up of power 1. Check oil level/change spark plug. 7. Dirty/clogged muffler. 12. Worn, bent or loose blade. 2. Bent blade mandrel. 3. Replace blade. Engine not "CHOKED" properly. 3. Fill fuel tank. 2. Replace spark plug. 5. Check all wiring. 4. Contact an authorized service center/department. Hard to start 1. Weak or dead battery. 4. Carburetor out of adjustment...
... or replace battery. 4. Check all wiring. 7. Faulty solenoid or starter. 1. Check all wiring. 9. Loss of grass, leaves, trash under mower. 3. Raise cutting height/reduce speed. 2. Build-up of power 1. Check oil level/change spark plug. 7. Dirty/clogged muffler. 12. Worn, bent or loose blade. 2. Bent blade mandrel. 3. Replace blade. Engine not "CHOKED" properly. 3. Fill fuel tank. 2. Replace spark plug. 5. Check all wiring. 4. Contact an authorized service center/department. Hard to start 1. Weak or dead battery. 4. Carburetor out of adjustment...

Owners Manual
Page 26
...tire air pressure. 5. Tighten blade bolt. 7. Clogged mower deck vent holes from buildup of drive 1. Clean around mandrels. 1. Loose or damaged wiring. 5. Check/replace light switch. 4. Check/clean all connections. 3. Motion drive belt worn, damaged, or broken. 4. Purge transmission. 5. See "TO REMOVE WHEEL" in parts manual. 11. Engine throttle control not set between half and full speed (fast) position before stopping engine. 1. Turn ignition key to slower speed. 3. Frozen blade mandrel. 1. Replace blade. Mower deck not level. 4. Level mower deck...
...tire air pressure. 5. Tighten blade bolt. 7. Clogged mower deck vent holes from buildup of drive 1. Clean around mandrels. 1. Loose or damaged wiring. 5. Check/replace light switch. 4. Check/clean all connections. 3. Motion drive belt worn, damaged, or broken. 4. Purge transmission. 5. See "TO REMOVE WHEEL" in parts manual. 11. Engine throttle control not set between half and full speed (fast) position before stopping engine. 1. Turn ignition key to slower speed. 3. Frozen blade mandrel. 1. Replace blade. Mower deck not level. 4. Level mower deck...
Owners Manual
Page 35
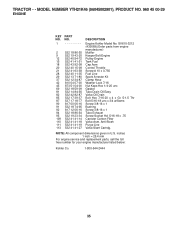
... parts from engine manufacturer) Muffler Keeper Belt Engine Pulley Engine Tank Fuel Cap Asm Control Throttle Screw # 10 x 0.750 Fuel Line Spark Arrester Kit Clamp Hose Washer Lock 7/16 Nut Keps Hex 1/4-20 unc Gasket Tube Drain Oil Easy Valve Oil Drain Bolt Hex 7/16-20 x 4 x Gr. 5-1.5 Thr Bolt 5/16-18 unc x 3/4 w/Sems Screw 3/8-16 x 1 Bushing Screw 3/8-16 x 1 Tube Exhaust Screw Socket Hd. 5/16-18 x .75 Canister Carbon Filter Valve Asm. inches 1 inch = 25.4 mm For engine service and replacement parts, call the toll free number for your engine manufacturer listed...
... parts from engine manufacturer) Muffler Keeper Belt Engine Pulley Engine Tank Fuel Cap Asm Control Throttle Screw # 10 x 0.750 Fuel Line Spark Arrester Kit Clamp Hose Washer Lock 7/16 Nut Keps Hex 1/4-20 unc Gasket Tube Drain Oil Easy Valve Oil Drain Bolt Hex 7/16-20 x 4 x Gr. 5-1.5 Thr Bolt 5/16-18 unc x 3/4 w/Sems Screw 3/8-16 x 1 Bushing Screw 3/8-16 x 1 Tube Exhaust Screw Socket Hd. 5/16-18 x .75 Canister Carbon Filter Valve Asm. inches 1 inch = 25.4 mm For engine service and replacement parts, call the toll free number for your engine manufacturer listed...


