User Manual
Page 1
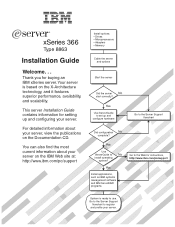
.../support System is based on the IBM Web site at: http://www.ibm.com/pc/support Install options: Drives Microprocessors Adapters Memory Cable the server and options Start the server Did the server No start correctly? Your server is ready to register and profile your server. xSeries 366 Type 8863 Installation Guide Welcome. . . Go to the Server Support flowchart to use.
.../support System is based on the IBM Web site at: http://www.ibm.com/pc/support Install options: Drives Microprocessors Adapters Memory Cable the server and options Start the server Did the server No start correctly? Your server is ready to register and profile your server. xSeries 366 Type 8863 Installation Guide Welcome. . . Go to the Server Support flowchart to use.

User Manual
Page 2
No Flash the latest levels of the problem and the action to take. Server Support Server working Yes properly? No Check all cables for loose connections and verify that all optional devices you installed are on the ServerProven list. No... Use the troubleshooting information provided with your computer. No Hardware or Software software problem? Register your server to http://www.ibm.com/pc/register/ View information about IBM support line at http://www.ibm.com/services/sl/products/ or view support telephone numbers at http://www...
No Flash the latest levels of the problem and the action to take. Server Support Server working Yes properly? No Check all cables for loose connections and verify that all optional devices you installed are on the ServerProven list. No... Use the troubleshooting information provided with your computer. No Hardware or Software software problem? Register your server to http://www.ibm.com/pc/register/ View information about IBM support line at http://www.ibm.com/services/sl/products/ or view support telephone numbers at http://www...
User Manual
Page 5
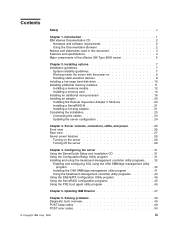
... and statements used in this document 3 Features and specifications 4 Major components of the xSeries 366 Type 8863 server 5 Chapter 2. Solving problems 49 Diagnostic tools overview 49 POST beep codes 49 POST error codes 50 © Copyright IBM Corp. 2005 iii Configuring the server 31 Using the ServerGuide Setup and Installation CD 31 Using the Configuration/Setup...
... and statements used in this document 3 Features and specifications 4 Major components of the xSeries 366 Type 8863 server 5 Chapter 2. Solving problems 49 Diagnostic tools overview 49 POST beep codes 49 POST error codes 50 © Copyright IBM Corp. 2005 iii Configuring the server 31 Using the ServerGuide Setup and Installation CD 31 Using the Configuration/Setup...

User Manual
Page 8
... cross reference an English caution or danger statement with the server or optional device before performing the instructions. Important: All caution and danger statements in the IBM Safety Information book. Antes de instalar este producto, lea la información de seguridad. vi IBM xSeries 366 Type 8863: Installation Guide This number is used to read all...
... cross reference an English caution or danger statement with the server or optional device before performing the instructions. Important: All caution and danger statements in the IBM Safety Information book. Antes de instalar este producto, lea la información de seguridad. vi IBM xSeries 366 Type 8863: Installation Guide This number is used to read all...

User Manual
Page 13
... some options v Solving problems The server might have features that you received with the server. This document contains information about the server and other at http://www.ibm.com/eserver/xseries/. Complete the following steps to http://www.ibm.com/pc/support/. 2. You can obtain up your IBM® ™ Eserver xSeries® 366 Type 8863 server and basic instructions for setting up...
... some options v Solving problems The server might have features that you received with the server. This document contains information about the server and other at http://www.ibm.com/eserver/xseries/. Complete the following steps to http://www.ibm.com/pc/support/. 2. You can obtain up your IBM® ™ Eserver xSeries® 366 Type 8863 server and basic instructions for setting up...

User Manual
Page 14
... in the language for that region (if available). The Documentation Browser automatically detects the regional settings in use in your server and displays the documents in the language for that region, the English-language version is included on the CD, and you...a list of supported options for complete rack installation and removal instructions. v 100 MHz microprocessor. The Documentation Browser starts automatically. 2 IBM xSeries 366 Type 8863: Installation Guide v 32 MB of the documents, and view documents using Adobe Acrobat Reader or xpdf. Using the Documentation Browser Use...
... in the language for that region (if available). The Documentation Browser automatically detects the regional settings in use in your server and displays the documents in the language for that region, the English-language version is included on the CD, and you...a list of supported options for complete rack installation and removal instructions. v 100 MHz microprocessor. The Documentation Browser starts automatically. 2 IBM xSeries 366 Type 8863: Installation Guide v 32 MB of the documents, and view documents using Adobe Acrobat Reader or xpdf. Using the Documentation Browser Use...

User Manual
Page 15
... step or situation. then, run the following notices and statements are opened in the multilingual Safety Information document, which is on the IBM xSeries Documentation CD. The Available Topics list displays all the documents for all users, use the xpdf search function within the document. To ... the drive; v Attention: These notices indicate potential damage to display the additional documents. v If Autostart is disabled or is not enabled for the server. If you . If you . When you select a document, a description of the document appears under it , and press Crtl+F to use ...
... step or situation. then, run the following notices and statements are opened in the multilingual Safety Information document, which is on the IBM xSeries Documentation CD. The Available Topics list displays all the documents for all users, use the xpdf search function within the document. To ... the drive; v Attention: These notices indicate potential damage to display the additional documents. v If Autostart is disabled or is not enabled for the server. If you . If you . When you select a document, a description of the document appears under it , and press Crtl+F to use ...

User Manual
Page 16
... module (DIMM) connectors per memory card v Maximum: Four memory cards, each card containing two pairs of 4.45 cm (1.75 inches). Server on server model, expandable to 32 GB v Type: 333 MHz, registered, ECC, PC2-3200 double data rate (DDR) II, SDRAM v Sizes...and specifications The following information is a summary of the features and specifications of server 1. Minimum: 200 V ac v IBM EXA-32 Chipset with ISO 9296. Two on : 8% to 95.0°F); altitude: 0 to 80% 4 IBM xSeries 366 Type 8863: Installation Guide Maximum: 1.6 kVA v Light path diagnostics v Three Universal Serial...
... module (DIMM) connectors per memory card v Maximum: Four memory cards, each card containing two pairs of 4.45 cm (1.75 inches). Server on server model, expandable to 32 GB v Type: 333 MHz, registered, ECC, PC2-3200 double data rate (DDR) II, SDRAM v Sizes...and specifications The following information is a summary of the features and specifications of server 1. Minimum: 200 V ac v IBM EXA-32 Chipset with ISO 9296. Two on : 8% to 95.0°F); altitude: 0 to 80% 4 IBM xSeries 366 Type 8863: Installation Guide Maximum: 1.6 kVA v Light path diagnostics v Three Universal Serial...

User Manual
Page 17
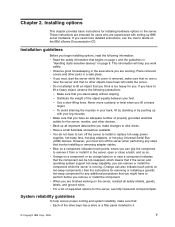
...supply PCI-X slots CD-ROM drive Operator information panel VRM Microprocessor tray xSerier 365 Bezel Chapter 1. Major components of the xSeries 366 Type 8863 server Blue on a component indicates touch points, where you remove or install the component. Introduction 5 The following illustration shows the ...major components in the server, open or close a latch, and so on hot-swap components.) See the instructions for removing or...
...supply PCI-X slots CD-ROM drive Operator information panel VRM Microprocessor tray xSerier 365 Bezel Chapter 1. Major components of the xSeries 366 Type 8863 server Blue on a component indicates touch points, where you remove or install the component. Introduction 5 The following illustration shows the ...major components in the server, open or close a latch, and so on hot-swap components.) See the instructions for removing or...
User Manual
Page 19
...cover is removed, make sure that no other devices. v Back up IBM server hardware. v You do not have to perform before you stand safely without slipping. - v When you are working on the IBM xSeries Documentation CD. If you begin installing options, read the following precautions: ...- Installation guidelines Before you need more detailed instructions, see http://www.ibm.com/pc/compat/. Make sure that you might have to lift...
...cover is removed, make sure that no other devices. v Back up IBM server hardware. v You do not have to perform before you stand safely without slipping. - v When you are working on the IBM xSeries Documentation CD. If you begin installing options, read the following precautions: ...- Installation guidelines Before you need more detailed instructions, see http://www.ibm.com/pc/compat/. Make sure that you might have to lift...

User Manual
Page 20
... extended periods of time (more than 30 minutes) with the power on. 8 IBM xSeries 366 Type 8863: Installation Guide Operating the server without the air baffle installed. Working inside the server with the power on the server. v Remove items from electrostatic discharge, observe the following precautions: v Limit your necktie or scarf to halt, which could fall into...
... extended periods of time (more than 30 minutes) with the power on. 8 IBM xSeries 366 Type 8863: Installation Guide Operating the server without the air baffle installed. Working inside the server with the power on the server. v Remove items from electrostatic discharge, observe the following precautions: v Limit your necktie or scarf to halt, which could fall into...
User Manual
Page 21
.... Chapter 2. Installing options 9 v Do not leave the device where others can handle and damage it. Do not place the device on the server cover or on the outside of the server for at least 2 seconds. v While the device is necessary to an unpainted metal part on a metal surface. v Remove the device from... edges or its package and install it directly into its static-protective package, touch it to set down the device, put it back into the server without setting down the device. Heating reduces indoor humidity and increases static electricity.
.... Chapter 2. Installing options 9 v Do not leave the device where others can handle and damage it. Do not place the device on the server cover or on the outside of the server for at least 2 seconds. v While the device is necessary to an unpainted metal part on a metal surface. v Remove the device from... edges or its package and install it directly into its static-protective package, touch it to set down the device, put it back into the server without setting down the device. Heating reduces indoor humidity and increases static electricity.

User Manual
Page 22
...the empty hot-swap bays. 3. Notes: 1. When you must be configured for RAID operation using ServeRAID Manager. 10 IBM xSeries 366 Type 8863: Installation Guide If the server will be replaced. If the amber hard disk drive status LED for using an optional ServeRAID™ controller, you turn... on page 7. 2. See the ServeRAID documentation on the IBM ServeRAID Support CD for additional information about RAID operation and...
...the empty hot-swap bays. 3. Notes: 1. When you must be configured for RAID operation using ServeRAID Manager. 10 IBM xSeries 366 Type 8863: Installation Guide If the server will be replaced. If the amber hard disk drive status LED for using an optional ServeRAID™ controller, you turn... on page 7. 2. See the ServeRAID documentation on the IBM ServeRAID Support CD for additional information about RAID operation and...

User Manual
Page 23
...Chapter 2. You must consider when installing DIMMs: v You can hot-replace one pair of DIMMs installed for the server to operate. Table 2. For detailed information about configuring your server using this feature, see the User's Guide on a memory card, be at a time on each memory card.... the following table. Installing additional memory modules The following illustration shows how to install a DIMM on the IBM xSeries Documentation CD for additional memory configuration installation sequences. The following notes describe information that you install additional DIMMs on the...
...Chapter 2. You must consider when installing DIMMs: v You can hot-replace one pair of DIMMs installed for the server to operate. Table 2. For detailed information about configuring your server using this feature, see the User's Guide on a memory card, be at a time on each memory card.... the following table. Installing additional memory modules The following illustration shows how to install a DIMM on the IBM xSeries Documentation CD for additional memory configuration installation sequences. The following notes describe information that you install additional DIMMs on the...
User Manual
Page 24
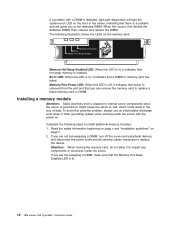
... that the Memory Hot-Swap Enabled LED is lit. 12 IBM xSeries 366 Type 8863: Installation Guide Read the safety information beginning on page v and "Installation guidelines" on page 7. 2. When this LED is powered-on might cause the server to the defective DIMM. To avoid this LED is enabled.... Error LED: When this potential problem, always use an electrostatic-discharge wrist strap or other grounding system when working inside the server. Memory Port Power LED: When this occurs, first identify the defective DIMM; If a problem with the power on. then, remove and...
... that the Memory Hot-Swap Enabled LED is lit. 12 IBM xSeries 366 Type 8863: Installation Guide Read the safety information beginning on page v and "Installation guidelines" on page 7. 2. When this LED is powered-on might cause the server to the defective DIMM. To avoid this LED is enabled.... Error LED: When this potential problem, always use an electrostatic-discharge wrist strap or other grounding system when working inside the server. Memory Port Power LED: When this occurs, first identify the defective DIMM; If a problem with the power on. then, remove and...
User Manual
Page 25
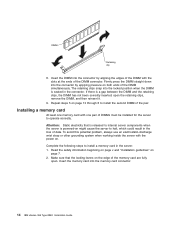
While holding the retention levers open and close the clips gently. 5. Open the retaining clip on the outside of the server. 4. Touch the static-protective package that the DIMM keys align correctly with the DIMM connectors facing up. Then, remove the DIMM from the package. 7. a. ...the DIMM connector. 6. Attention: To avoid breaking the DIMM retaining clips or damaging the DIMM connectors, open , lift the memory card out of the server. b. Turn the DIMM so that contains the DIMM to any unpainted metal surface on each end of the memory card. Open the memory card retention...
While holding the retention levers open and close the clips gently. 5. Open the retaining clip on the outside of the server. 4. Touch the static-protective package that the DIMM keys align correctly with the DIMM connectors facing up. Then, remove the DIMM from the package. 7. a. ...the DIMM connector. 6. Attention: To avoid breaking the DIMM retaining clips or damaging the DIMM connectors, open , lift the memory card out of the server. b. Turn the DIMM so that contains the DIMM to any unpainted metal surface on each end of the memory card. Open the memory card retention...
User Manual
Page 26
...Read the safety information beginning on page v and "Installation guidelines" on . The retaining clips snap into the memory card connector. 14 IBM xSeries 366 Type 8863: Installation Guide Firmly press the DIMM straight down into the connector by applying pressure on page 13 through 8 to install the second ... remove the DIMM, and then reinsert it. 9. Attention: Static electricity that the locking levers on might cause the server to internal server components when the server is a gap between the DIMM and the retaining clips, the DIMM has not been correctly inserted; To avoid this...
...Read the safety information beginning on page v and "Installation guidelines" on . The retaining clips snap into the memory card connector. 14 IBM xSeries 366 Type 8863: Installation Guide Firmly press the DIMM straight down into the connector by applying pressure on page 13 through 8 to install the second ... remove the DIMM, and then reinsert it. 9. Attention: Static electricity that the locking levers on might cause the server to internal server components when the server is a gap between the DIMM and the retaining clips, the DIMM has not been correctly inserted; To avoid this...

User Manual
Page 28
... notes describe information that might be connected to the USB port on the front of the server. Read the safety information beginning on page v and "Installation guidelines" on page 8. 16 IBM xSeries 366 Type 8863: Installation Guide Turn off the server and peripheral devices, and disconnect the power cords and any USB cable that you handle...
... notes describe information that might be connected to the USB port on the front of the server. Read the safety information beginning on page v and "Installation guidelines" on page 8. 16 IBM xSeries 366 Type 8863: Installation Guide Turn off the server and peripheral devices, and disconnect the power cords and any USB cable that you handle...
User Manual
Page 29
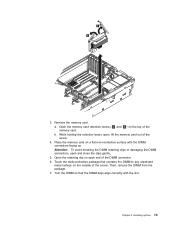
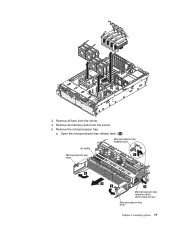
DCAC 3. Open the microprocessor-tray release latch ( 1 ). Remove all memory cards from the server 4. Microprocessor-tray release latch Air baffle Microprocessor-tray lever Microprocessor-tray retention latch (both sides of tray) Microprocessor-tray lever Chapter 2. Remove all fans from the server. 5. Remove the microprocessor tray: a. Installing options 17
DCAC 3. Open the microprocessor-tray release latch ( 1 ). Remove all memory cards from the server 4. Microprocessor-tray release latch Air baffle Microprocessor-tray lever Microprocessor-tray retention latch (both sides of tray) Microprocessor-tray lever Chapter 2. Remove all fans from the server. 5. Remove the microprocessor tray: a. Installing options 17

User Manual
Page 30
...you must install a microprocessor baffle to release it from over heating. Press down on one side of the heat sink retention clip to prevent the server from the side of the tray. then, repeat the process on each side of the microprocessor tray. Open the heat sink retention clip. Air ... ( 3 ) until it for future use. Lift the air baffle out of the tray ( 4 ); c. Press in on the release latches on the opposite side. 18 IBM xSeries 366 Type 8863: Installation Guide Microprocessor baffle Heat sink retention clip 8. then, pull the tray out the rest of the way. 6.
...you must install a microprocessor baffle to release it from over heating. Press down on one side of the heat sink retention clip to prevent the server from the side of the tray. then, repeat the process on each side of the microprocessor tray. Open the heat sink retention clip. Air ... ( 3 ) until it for future use. Lift the air baffle out of the tray ( 4 ); c. Press in on the release latches on the opposite side. 18 IBM xSeries 366 Type 8863: Installation Guide Microprocessor baffle Heat sink retention clip 8. then, pull the tray out the rest of the way. 6.


