
Product Datasheet
Page 1
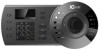
... controller has full switching and programming capabilities to Smart ICRSS via USB Control IC Realtime Analog PTZ, IP PTZ, and DVR's/NVR's Network Video Server Revision 1.1; 11/2015 The KB300 gives full control of PTZ Functions Preset Position, Auto Scan, Auto Pan, Auto Tour & Pattern Control Auxiliary Functions On-Screen Menu & User Operation Procedure Tips Connect to control...
... controller has full switching and programming capabilities to Smart ICRSS via USB Control IC Realtime Analog PTZ, IP PTZ, and DVR's/NVR's Network Video Server Revision 1.1; 11/2015 The KB300 gives full control of PTZ Functions Preset Position, Auto Scan, Auto Pan, Auto Tour & Pattern Control Auxiliary Functions On-Screen Menu & User Operation Procedure Tips Connect to control...
Product Datasheet
Page 2
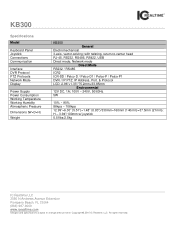
All rights reserved. KB300 Specifications Model Keyboard Panel Joystick Connections Communication Interface DVR Protocol PTZ Protocols Network Mode Display Power Supply Power Consumption Working Temperature Working Humidity Atmospheric Pressure Dimensions (W×D×H) Weight KB300 General Electromechanical 3-axis, vector-solving; H - 3.94"/100mm w/ joystick 5.51lbs/2.5kg IC Realtime LLC 3050 N Andrews Avenue Extension Pompano Beach, FL 33064 (866) 997-9009 www.icrealtime.com Designs and specifications subject to -center head...
All rights reserved. KB300 Specifications Model Keyboard Panel Joystick Connections Communication Interface DVR Protocol PTZ Protocols Network Mode Display Power Supply Power Consumption Working Temperature Working Humidity Atmospheric Pressure Dimensions (W×D×H) Weight KB300 General Electromechanical 3-axis, vector-solving; H - 3.94"/100mm w/ joystick 5.51lbs/2.5kg IC Realtime LLC 3050 N Andrews Avenue Extension Pompano Beach, FL 33064 (866) 997-9009 www.icrealtime.com Designs and specifications subject to -center head...

Product Manual
Page 2
Table of Contents 1 Features and Specifications 1 1.1 Features ...1 1.2 Front Panel...1 1.3 Rear Panel ...2 1.4 Port Features ...3 1.5 Power...3 2 Menu Operation ...4 2.1 Boot up and Shut down 4 2.1.1 Boot up ...4 2.1.2 Shut Down 4 2.2 Main Menu List 4 2.3 Menu Operation 5 2.3.1 System...5 2.3.2 Control point 7 2.3.3 Account...8 2.3.4 Version ...9 2.3.5 Model ...9 2.4 Zones ...10 3 Keyboard Control DVR 11 3.1 Connection ...11 3.1.1 RS232 Serial Port Connection 11 3.1.2 Via RS485 Connection 11 3.1.3 Multi-keyboard link via RS485 11 3.2 Network Connection (For network keyboard only 12...
Table of Contents 1 Features and Specifications 1 1.1 Features ...1 1.2 Front Panel...1 1.3 Rear Panel ...2 1.4 Port Features ...3 1.5 Power...3 2 Menu Operation ...4 2.1 Boot up and Shut down 4 2.1.1 Boot up ...4 2.1.2 Shut Down 4 2.2 Main Menu List 4 2.3 Menu Operation 5 2.3.1 System...5 2.3.2 Control point 7 2.3.3 Account...8 2.3.4 Version ...9 2.3.5 Model ...9 2.4 Zones ...10 3 Keyboard Control DVR 11 3.1 Connection ...11 3.1.1 RS232 Serial Port Connection 11 3.1.2 Via RS485 Connection 11 3.1.3 Multi-keyboard link via RS485 11 3.2 Network Connection (For network keyboard only 12...

Product Manual
Page 6
... be used in a cool, dry place away from direct sunlight, inflammable, explosive substances and etc. 6. We assume no liability or responsibility for any problems caused by the qualified service engineers. Accessories Be sure to your local electrical safety codes. Handle with care. Do not place objects on the network keyboard 4.Qualified engineers needed All the examination and repair work...
... be used in a cool, dry place away from direct sunlight, inflammable, explosive substances and etc. 6. We assume no liability or responsibility for any problems caused by the qualified service engineers. Accessories Be sure to your local electrical safety codes. Handle with care. Do not place objects on the network keyboard 4.Qualified engineers needed All the examination and repair work...
Product Manual
Page 7
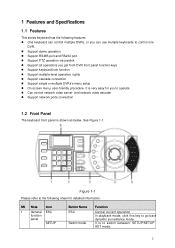
...; Support network ports connection 1.2 Front Panel The keyboard front panel is to dynamic surveillance mode. It is shown as below. 1 Features and Specifications 1.1 Features This series keyboard has the following sheet for you get from DVR front panel function keys Support keyboard lock function Support multiple-level operation rights Support cascade connection Support single or multiple DVRs's menu setup On-screen menu, user...
...; Support network ports connection 1.2 Front Panel The keyboard front panel is to dynamic surveillance mode. It is shown as below. 1 Features and Specifications 1.1 Features This series keyboard has the following sheet for you get from DVR front panel function keys Support keyboard lock function Support multiple-level operation rights Support cascade connection Support single or multiple DVRs's menu setup On-screen menu, user...

Product Manual
Page 8
... switch. Shortcut key to go to the USB device. Go to the network. The light is flashing when there is 485 data transmission. The light is on when the keyboard is properly connected to speed dome menu. Button Name Function In SETUP mode, system supports 【 MULT 】 , 【 CAM 】 , 【 PTZ 】 combination operation. Go to the network. Power indicator light...
... switch. Shortcut key to go to the USB device. Go to the network. The light is flashing when there is 485 data transmission. The light is on when the keyboard is properly connected to speed dome menu. Button Name Function In SETUP mode, system supports 【 MULT 】 , 【 CAM 】 , 【 PTZ 】 combination operation. Go to the network. Power indicator light...

Product Manual
Page 10
... 2-2. 4 Figure 2-1 Input user name and password, system goes to turn off the device. 2.2 Main Menu List The main menu list is on. The password is: 888888. Note Factory default user names are no other rights. 2.1.2 Shut Down After you exit the system, unplug the power cable to the main menu. You can only operate control points. The default can not add/delete user, modify user rights or...
... 2-2. 4 Figure 2-1 Input user name and password, system goes to turn off the device. 2.2 Main Menu List The main menu list is on. The password is: 888888. Note Factory default user names are no other rights. 2.1.2 Shut Down After you exit the system, unplug the power cable to the main menu. You can only operate control points. The default can not add/delete user, modify user rights or...

Product Manual
Page 11
See Figure 2-3. Figure 2-2 2.3 Menu Operation Use the joystick on keyboard to move up/down/left/right to select items. Use keyboard to input number or character to exit. 2.3.1 System The system manager includes time setup, network setup, address setup, aux setup, system update and logo update. Figure 2-3 5 Click【ESC】 to set parameters. Click 【ENTER】 to confirm current operation.
See Figure 2-3. Figure 2-2 2.3 Menu Operation Use the joystick on keyboard to move up/down/left/right to select items. Use keyboard to input number or character to exit. 2.3.1 System The system manager includes time setup, network setup, address setup, aux setup, system update and logo update. Figure 2-3 5 Click【ESC】 to set parameters. Click 【ENTER】 to confirm current operation.

Product Manual
Page 12
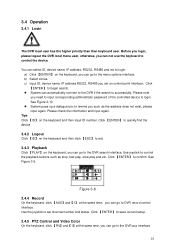
... auto logout when there is cascade connection, the 0 has the highest priority and the 255 has the lowest priority. See Figure 2-5. See Figure 2-6. See Figure 2-4. When there is no operation for specified time. 6 Figure 2-6 2.3.1.4 Aux It is to set screen backlight. Please set according to set keyboard system time. The default setup is to your actual situation. See Figure 2-7. ...
... auto logout when there is cascade connection, the 0 has the highest priority and the 255 has the lowest priority. See Figure 2-5. See Figure 2-6. See Figure 2-4. When there is no operation for specified time. 6 Figure 2-6 2.3.1.4 Aux It is to set screen backlight. Please set according to set keyboard system time. The default setup is to your actual situation. See Figure 2-7. ...

Product Manual
Page 13
... information you can recognize device quickly. Name: Customized device name. Type: Device type. Please select the type and set control point information. See Figure 2-8. Otherwise, system can use the ID, device name, COM address or the IP address to set the corresponding parameters. The interface is device ID number so that you input here shall be set. All the items listed...
... information you can recognize device quickly. Name: Customized device name. Type: Device type. Please select the type and set control point information. See Figure 2-8. Otherwise, system can use the ID, device name, COM address or the IP address to set the corresponding parameters. The interface is device ID number so that you input here shall be set. All the items listed...

Product Manual
Page 14
... link mode is admin. Input password again to save. Figure 2-9 PLEASE MAKE SURE THE COM TYPE AND THEN PARAMETERS YOU SET HERE IS THE SAME AS THE ACTUAL SITUATIONS. See Figure 2-11. Figure 2-11 2.3.3.1 Change password Select a user and then input new password. See Figure 2-12. 2.3.3.2 Add Users Figure 2-12 8 See Figure 2-10. You can change password, add user, and delete user and its rights. The default user name...
... link mode is admin. Input password again to save. Figure 2-9 PLEASE MAKE SURE THE COM TYPE AND THEN PARAMETERS YOU SET HERE IS THE SAME AS THE ACTUAL SITUATIONS. See Figure 2-11. Figure 2-11 2.3.3.1 Change password Select a user and then input new password. See Figure 2-12. 2.3.3.2 Add Users Figure 2-12 8 See Figure 2-10. You can change password, add user, and delete user and its rights. The default user name...

Product Manual
Page 15
... and then use the joystick to move the left/right to turn to to control device. The keyboard can only operate control point operation. User: The user has the PTZ control, system setup, backup, advanced setup and etc. See Figure 2-15. Figure 2-15 2.3.5 Model It is for you to view current keyboard model. Please input user name (max 8-digit) and then set corresponding password. See...
... and then use the joystick to move the left/right to turn to to control device. The keyboard can only operate control point operation. User: The user has the PTZ control, system setup, backup, advanced setup and etc. See Figure 2-15. Figure 2-15 2.3.5 Model It is for you to view current keyboard model. Please input user name (max 8-digit) and then set corresponding password. See...
Product Manual
Page 17
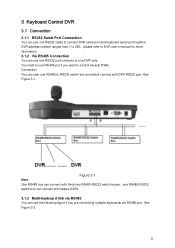
... bus can connect with thirty-two RS485-RS232 switch boxes,one RS485 to RS232 switch box (provided) connect with twelve DVRs. 3.1.3 Multi-keyboard link via RS485 You can use the following figure if you want to control several DVRs. DVR address number ranges from 1 to 255,please refer to DVR user's manual for more information. 3.1.2 Via RS485 Connection You can use...
... bus can connect with thirty-two RS485-RS232 switch boxes,one RS485 to RS232 switch box (provided) connect with twelve DVRs. 3.1.3 Multi-keyboard link via RS485 You can use the following figure if you want to control several DVRs. DVR address number ranges from 1 to 255,please refer to DVR user's manual for more information. 3.1.2 Via RS485 Connection You can use...

Product Manual
Page 19
... and Keyboard Setup 3.3.1 DVR Setup a) Before operation, please make sure cable connection is the network keyboard and the 2nd control keyboard protocol. It is proper. Please input DVR IP address, the control point port is DH-2. b) In DVR menu, from Setting->RS232. Please note keyboard setup should conform to exit control point control interface. Please note, on the zones interface, the link type shall be...
... and Keyboard Setup 3.3.1 DVR Setup a) Before operation, please make sure cable connection is the network keyboard and the 2nd control keyboard protocol. It is proper. Please input DVR IP address, the control point port is DH-2. b) In DVR menu, from Setting->RS232. Please note keyboard setup should conform to exit control point control interface. Please note, on the zones interface, the link type shall be...
Product Manual
Page 20
...; to begin search. System can go to exit. 3.4.3 Playback Click 【PLAY】 on the keyboard and then input ID number. c) Input ID, device name, IP address.RS232, RS485 you can go to control the device. b) Select zones. Please check the information and input again. Click 【ENTER】 to quickly find the device. 3.4.2 Logout Click...
...; to begin search. System can go to exit. 3.4.3 Playback Click 【PLAY】 on the keyboard and then input ID number. c) Input ID, device name, IP address.RS232, RS485 you can go to control the device. b) Select zones. Please check the information and input again. Click 【ENTER】 to quickly find the device. 3.4.2 Logout Click...
Product Manual
Page 21
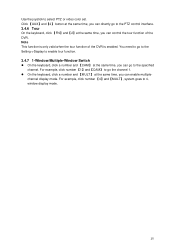
...;MULT】,system goes to select PTZ or video color set. For example, click number 【1】and【CAM】 to enable tour function. 3.4.7 1-Window/Multiple-Window Switch On the keyboard, click a number and 【CAM】 at the same time, you can control the tour function of the DVR is enabled. Use the joystick to 4window display mode. 15...
...;MULT】,system goes to select PTZ or video color set. For example, click number 【1】and【CAM】 to enable tour function. 3.4.7 1-Window/Multiple-Window Switch On the keyboard, click a number and 【CAM】 at the same time, you can control the tour function of the DVR is enabled. Use the joystick to 4window display mode. 15...

Product Manual
Page 22
... A/B line connection is right. 4.2 Keyboard Setup a) Please make sure keyboard A/B line and speed dome A/B line connection is shown as below . Figure 4-1 Step: The move speed. The step 1 is shown as below . The interface is faster than step 8. The lens movement supports 8 directions. b) Set speed dome address so that the speed dome address and the keyboard RS485 address are the same. Please use...
... A/B line connection is right. 4.2 Keyboard Setup a) Please make sure keyboard A/B line and speed dome A/B line connection is shown as below . Figure 4-1 Step: The move speed. The step 1 is shown as below . The interface is faster than step 8. The lens movement supports 8 directions. b) Set speed dome address so that the speed dome address and the keyboard RS485 address are the same. Please use...
Product Manual
Page 26
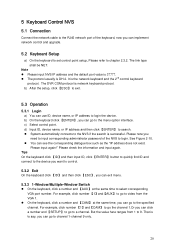
... is DH-2. Please note you need to input corresponding administrator password of the keyboard, now you can implement network control and upgrade. 5.2 Keyboard Setup a) On the keyboard to set control point setup, Please refer to channel 1-channel 9 only. 20 b) After the setup, click 【ESC】 to exit. 5.3 Operation 5.3.1 Login a) You can use ID, device name, or IP address to login. Tips On...
... is DH-2. Please note you need to input corresponding administrator password of the keyboard, now you can implement network control and upgrade. 5.2 Keyboard Setup a) On the keyboard to set control point setup, Please refer to channel 1-channel 9 only. 20 b) After the setup, click 【ESC】 to exit. 5.3 Operation 5.3.1 Login a) You can use ID, device name, or IP address to login. Tips On...

Product Manual
Page 28
... then release. Please download upgrade file to begin upgrade. System pops up alert information if it to the "open to add current file to select upgrade file. Tips: Use you can see the file path and current file is open files button to the address column. 6 Keyboard Upgrade 6.1 Control Keyboard Upgrade Control keyboard does not support remote upgrade. drag it is well connected. System pops up upgrade process bar for your...
... then release. Please download upgrade file to begin upgrade. System pops up alert information if it to the "open to add current file to select upgrade file. Tips: Use you can see the file path and current file is open files button to the address column. 6 Keyboard Upgrade 6.1 Control Keyboard Upgrade Control keyboard does not support remote upgrade. drag it is well connected. System pops up upgrade process bar for your...

Product Manual
Page 29
... one power sourcing.) 7.1 Make RS232 COM Cable Please refer to the following sheet if you are connecting 485 switch box to DVR See Figure 7-3. 23 See Figure 7-1. Switch is just for sending not for RS232 port information. So you can refer to Figure 7-2 if you are connecting the keyboard with DVR RS232 port. (25-pin outlet supports maximum...
... one power sourcing.) 7.1 Make RS232 COM Cable Please refer to the following sheet if you are connecting 485 switch box to DVR See Figure 7-3. 23 See Figure 7-1. Switch is just for sending not for RS232 port information. So you can refer to Figure 7-2 if you are connecting the keyboard with DVR RS232 port. (25-pin outlet supports maximum...
