
Instruction Manual
Page 4
... The volume knob is easy to read LCD With the generous dimensions of 22.5(H) × 31.5(W) mm; 7⁄8(H) × 11⁄4(W) inch, the IC-M72's function display is on top of the radio, while the channel buttons are on the front panel. FOREWORD Thank you for details....and shows operating conditions at a glance. The IC-M72 VHF MARINE TRANSCEIVER is designed and built with a water self-draining function is helpful for the IC-M72. SAVE THIS INSTRUCTION MANUAL-This in- In addition, the new speaker grill structure with Icom's state of trouble-free operation. This allows for...
... The volume knob is easy to read LCD With the generous dimensions of 22.5(H) × 31.5(W) mm; 7⁄8(H) × 11⁄4(W) inch, the IC-M72's function display is on top of the radio, while the channel buttons are on the front panel. FOREWORD Thank you for details....and shows operating conditions at a glance. The IC-M72 VHF MARINE TRANSCEIVER is designed and built with a water self-draining function is helpful for the IC-M72. SAVE THIS INSTRUCTION MANUAL-This in- In addition, the new speaker grill structure with Icom's state of trouble-free operation. This allows for...

Instruction Manual
Page 6
...BASIC OPERATION 7-13 Channel selection 7 Receiving and transmitting 9 Call channel programming 10 Lock function 10 Monitor function 10 Adjusting the squelch level 11 Backlighting function 11 Voice scrambler operation 11 VOX function 12 AquaQuake water draining function 12 Channel naming 12 v 5 SCAN OPERATION 14-15 Scan types 14 Setting TAG channels 15... 26 9 OPTIONAL SWIVEL BELT CLIP 28 Attachment 28 Detachment 28 10 OPTIONAL SPEAKER-MICROPHONE 29 HM-125 descriptions 29 Attachment 29 11 TROUBLESHOOTING 30 12 VHF MARINE CHANNEL LIST 31 13 SPECIFICATIONS 32 14 OPTIONS 33
...BASIC OPERATION 7-13 Channel selection 7 Receiving and transmitting 9 Call channel programming 10 Lock function 10 Monitor function 10 Adjusting the squelch level 11 Backlighting function 11 Voice scrambler operation 11 VOX function 12 AquaQuake water draining function 12 Channel naming 12 v 5 SCAN OPERATION 14-15 Scan types 14 Setting TAG channels 15... 26 9 OPTIONAL SWIVEL BELT CLIP 28 Attachment 28 Detachment 28 10 OPTIONAL SPEAKER-MICROPHONE 29 HM-125 descriptions 29 Attachment 29 11 TROUBLESHOOTING 30 12 VHF MARINE CHANNEL LIST 31 13 SPECIFICATIONS 32 14 OPTIONS 33
Instruction Manual
Page 10
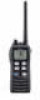
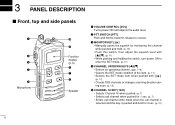
... KEY [ ] • Manually opens the squelch for monitoring the channel while pushed and held. (p. 10) • Push this switch, then adjust the squelch level with [Y]/[Z]. (p. 11) • While pushing and holding this switch, turn power ON to transmit; 3 PANEL DESCRIPTION Front, top and side panels q w e r t Microphone !0 o Function display (p. 5) i u y Speaker q VOLUME CONTROL...
... KEY [ ] • Manually opens the squelch for monitoring the channel while pushed and held. (p. 10) • Push this switch, then adjust the squelch level with [Y]/[Z]. (p. 11) • While pushing and holding this switch, turn power ON to transmit; 3 PANEL DESCRIPTION Front, top and side panels q w e r t Microphone !0 o Function display (p. 5) i u y Speaker q VOLUME CONTROL...

Instruction Manual
Page 12
t DUALWATCH/TRI-WATCH INDICATORS (p. 16) "DUAL" blinks during triwatch. u SCRAMBLER INDICATOR (pgs. 11, 22) Appears when the voice scrambler is activated. *The voice scrambler function is open. "CAN*" appears when Canadian channel group is selected. *Available with the ...
t DUALWATCH/TRI-WATCH INDICATORS (p. 16) "DUAL" blinks during triwatch. u SCRAMBLER INDICATOR (pgs. 11, 22) Appears when the voice scrambler is activated. *The voice scrambler function is open. "CAN*" appears when Canadian channel group is selected. *Available with the ...

Instruction Manual
Page 17
...backlighting is convenient for programming. In order to understand each other, all transceivers in the SET mode. "SQL" and the squelch level are 11 squelch levels to normal condition. See p. 22 for 5 sec., the transceiver returns to choose from: OP is completely open; 10 is ...tight squelch; 1 is pushed for "Scrambler code" setting details. 11 In order to normal operating mode. of inactivity. q Push [ ], then adjust the squelch level with some versions only) D Activating the scrambler The...
...backlighting is convenient for programming. In order to understand each other, all transceivers in the SET mode. "SQL" and the squelch level are 11 squelch levels to normal condition. See p. 22 for 5 sec., the transceiver returns to choose from: OP is completely open; 10 is ...tight squelch; 1 is pushed for "Scrambler code" setting details. 11 In order to normal operating mode. of inactivity. q Push [ ], then adjust the squelch level with some versions only) D Activating the scrambler The...

Instruction Manual
Page 31
w Insert the battery pack with/without the transceiver into the charger. • The charge indicator lights orange. e Charge the battery pack approx. 11 hours, depending on the remaining power condition. • The charge indicator lights green when charging is complete. BATTERY CHARGING 8 D Charging q Connect the AC adapter as ...
w Insert the battery pack with/without the transceiver into the charger. • The charge indicator lights orange. e Charge the battery pack approx. 11 hours, depending on the remaining power condition. • The charge indicator lights green when charging is complete. BATTERY CHARGING 8 D Charging q Connect the AC adapter as ...

Instruction Manual
Page 36
...using VOX function. • Push [ ] and [H/L•LOCK] to deactivate the VOX function. • Set the VOX gain to cancel the function. p. 11 p. 9 p. 12 - Turn the power ON to check if the internal temperature has returned to ON (Fix Beep/User Beep) in p. 18 the SET mode... depleted. Transmitting is set a suitable level. • Push and hold both [16•9] and [H/L•LOCK] to the transceiver. cannot be only. 11 TROUBLESHOOTING PROBLEM POSSIBLE CAUSE SOLUTION REF. p. 15 No beeps. • Beep tones are turned OFF. • Set the beep tones to normal. turn ...
...using VOX function. • Push [ ] and [H/L•LOCK] to deactivate the VOX function. • Set the VOX gain to cancel the function. p. 11 p. 9 p. 12 - Turn the power ON to check if the internal temperature has returned to ON (Fix Beep/User Beep) in p. 18 the SET mode... depleted. Transmitting is set a suitable level. • Push and hold both [16•9] and [H/L•LOCK] to the transceiver. cannot be only. 11 TROUBLESHOOTING PROBLEM POSSIBLE CAUSE SOLUTION REF. p. 15 No beeps. • Beep tones are turned OFF. • Set the beep tones to normal. turn ...
Instruction Manual
Page 37
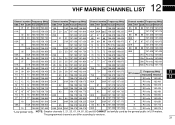
... 09 156.450 156.450 28 28 28 157.400 162.000 79 156.975 161.575 Frequency (MHz) WX channel 11 10 10 10 156.500 156.500 11 11 11 156.550 156.550 60 60 156.025 160.625 61 156.075 160.675 79A 79A 156.975 156.975 80...
... 09 156.450 156.450 28 28 28 157.400 162.000 79 156.975 161.575 Frequency (MHz) WX channel 11 10 10 10 156.500 156.500 11 11 11 156.550 156.550 60 60 156.025 160.625 61 156.075 160.675 79A 79A 156.975 156.975 80...

Instruction Manual
Page 39
... HS-94: Ear-piece type HS-95: Neck-arm type HS-97: Throat microphone *These headsets and headset adapter are required) simultaneously. Charging time: approx. 11 to 12 hours D BELT CLIPS • MB-103 BELT CLIP The same as supplied with the transceiver. 14 Available or applicable options may differ according...
... HS-94: Ear-piece type HS-95: Neck-arm type HS-97: Throat microphone *These headsets and headset adapter are required) simultaneously. Charging time: approx. 11 to 12 hours D BELT CLIPS • MB-103 BELT CLIP The same as supplied with the transceiver. 14 Available or applicable options may differ according...
