

English Manual
Page 1
... 920 PERSONAL FITNESS SYSTEM OWNER'S MANUAL As a manufacturer, we are missing or damagedparts, we willguarantee you complete customer satisfaction. TO AVOID UNNECESSARY DELAYS, PLEASE CALL DIRECT TO OUR TOLL-FREE CUSTOMER HOT LINE. The trained technicians on our Customer Hot Line will provide immediate assistance, free of charge to providing you complete satisfaction through direct assistance from our factory. O Serial Number...
... 920 PERSONAL FITNESS SYSTEM OWNER'S MANUAL As a manufacturer, we are missing or damagedparts, we willguarantee you complete customer satisfaction. TO AVOID UNNECESSARY DELAYS, PLEASE CALL DIRECT TO OUR TOLL-FREE CUSTOMER HOT LINE. The trained technicians on our Customer Hot Line will provide immediate assistance, free of charge to providing you complete satisfaction through direct assistance from our factory. O Serial Number...

English Manual
Page 2
... ALL OTHER WARRANTIES AND ANY IMPLIED WARRANTIES OF MERCHANTABILITY OR FITNESS FOR A PARTICULAR PURPOSE IS LIMITED IN ITS SCOPE AND DURATION TO THE TERMS SET FORTH HEREIN. LIMITED WARRANTY Image, Inc. ("IMAGE"), warrants this product to be free from defects in workmanship and material, under this warranty is limited to replacing or repairing, at IMAGE's option, the product at one of its authorized service centers with...
... ALL OTHER WARRANTIES AND ANY IMPLIED WARRANTIES OF MERCHANTABILITY OR FITNESS FOR A PARTICULAR PURPOSE IS LIMITED IN ITS SCOPE AND DURATION TO THE TERMS SET FORTH HEREIN. LIMITED WARRANTY Image, Inc. ("IMAGE"), warrants this product to be free from defects in workmanship and material, under this warranty is limited to replacing or repairing, at IMAGE's option, the product at one of its authorized service centers with...

English Manual
Page 3
... health prob- IMAGE assumes no responsibility for persons over the age of this or any exercise program, consult your physician. 1 TABLE OF CONTENTS Limited Warranty Important Safety Precautions Before You Begin Assembly Operation and Adjustment Trouble-Shooting and Storage Conditioning Guidelines Part List Exploded Drawing Ordering Replacement Parts Tm920 PERSONAL FITNESS SYSTEM 2 4 5 6 7 10 12 14 15 Back Cover WARNING: Before beginning this product. 3 lems. Read all instructions...
... health prob- IMAGE assumes no responsibility for persons over the age of this or any exercise program, consult your physician. 1 TABLE OF CONTENTS Limited Warranty Important Safety Precautions Before You Begin Assembly Operation and Adjustment Trouble-Shooting and Storage Conditioning Guidelines Part List Exploded Drawing Ordering Replacement Parts Tm920 PERSONAL FITNESS SYSTEM 2 4 5 6 7 10 12 14 15 Back Cover WARNING: Before beginning this product. 3 lems. Read all instructions...

English Manual
Page 4
... in sandals. Plug the power cord directly into any opening . If an extension cord is capable of high speeds. Never move the walking belt while the power is turned off when the treadmill is being administered. 2. Never start the treadmill while you are recommended for proper grounding instructions.) Keep the power cord away from the treadmill at least 8 feet of clearance behind the treadmill. Servicing other appliances should be used or where...
... in sandals. Plug the power cord directly into any opening . If an extension cord is capable of high speeds. Never move the walking belt while the power is turned off when the treadmill is being administered. 2. Never start the treadmill while you are recommended for proper grounding instructions.) Keep the power cord away from the treadmill at least 8 feet of clearance behind the treadmill. Servicing other appliances should be used or where...

English Manual
Page 5
... the IMAGE 9201 treadmill. Pulse Earclip Safety Key/Clip Console f Speed Dial Incline Control Side Rail Walking Belt Walking Platform Roller Guard BACK Rear Roller Adjustment Bolt Handrail Motor Hood FRONT Lock Knob Circuit Breaker Frame Foot Rail RIGHT SIDE '19 Power Cord 5 The serial number can be enhanced by such features as an oversized running surface, a key-activated power switch, electronic speed and incline control, and a multi-function exercise monitor. Mountain Time (excluding holidays). The model number is printed on the front cover...
... the IMAGE 9201 treadmill. Pulse Earclip Safety Key/Clip Console f Speed Dial Incline Control Side Rail Walking Belt Walking Platform Roller Guard BACK Rear Roller Adjustment Bolt Handrail Motor Hood FRONT Lock Knob Circuit Breaker Frame Foot Rail RIGHT SIDE '19 Power Cord 5 The serial number can be enhanced by such features as an oversized running surface, a key-activated power switch, electronic speed and incline control, and a multi-function exercise monitor. Mountain Time (excluding holidays). The model number is printed on the front cover...

English Manual
Page 6
... the direction shown to a vertical podition. Align the lower end of the Side Rail (1) with the hole in the side of the Bolt. Reach under the Frame and tighten the Side Rail Nut (76) onto the end of the treadmill Frame (62). Tighten the Lock Knob (see step ). ASSEMBLY Set the treadmill in a cleared area and remove all parts are included before using the treadmill...
... the direction shown to a vertical podition. Align the lower end of the Side Rail (1) with the hole in the side of the Bolt. Reach under the Frame and tighten the Side Rail Nut (76) onto the end of the treadmill Frame (62). Tighten the Lock Knob (see step ). ASSEMBLY Set the treadmill in a cleared area and remove all parts are included before using the treadmill...

English Manual
Page 7
... cover is for use on the treadmill for electric current to break in Drawing 1. Such substances will not fit the outlet, have a proper outlet installed by a metal screw. Walk on a nominal 120-volt circuit, and has a grounding plug that is properly grounded. Do not modify the plug provided with a specially-designed hydrocarbon slip agent. This product is grounded before using an adapter...
... cover is for use on the treadmill for electric current to break in Drawing 1. Such substances will not fit the outlet, have a proper outlet installed by a metal screw. Walk on a nominal 120-volt circuit, and has a grounding plug that is properly grounded. Do not modify the plug provided with a specially-designed hydrocarbon slip agent. This product is grounded before using an adapter...

English Manual
Page 8
... walking 8 belt, turn the speed dial to the reset position. START/PAUSE BUTTON-This button starts and stops the console. ADJUSTING THE INCLINE To vary the intensity of the console. II SET STANCE/SET Dm SPEED - ra PUL SCAN Speed Dial Mode Indicators Scab Mode Indicator S OWER F4,11, Incline Control INCLINE ()JUST SETA MODE Main Display START/ PAUSE Pulse Earclip Jack MANUAL SPEED CONTROL RESET SAFETY KEY 4411114\ MAX SET BUTTONS-These buttons are used to the waistband of your exercise, the incline of the treadmill can be changed using the incline control...
... walking 8 belt, turn the speed dial to the reset position. START/PAUSE BUTTON-This button starts and stops the console. ADJUSTING THE INCLINE To vary the intensity of the console. II SET STANCE/SET Dm SPEED - ra PUL SCAN Speed Dial Mode Indicators Scab Mode Indicator S OWER F4,11, Incline Control INCLINE ()JUST SETA MODE Main Display START/ PAUSE Pulse Earclip Jack MANUAL SPEED CONTROL RESET SAFETY KEY 4411114\ MAX SET BUTTONS-These buttons are used to the waistband of your exercise, the incline of the treadmill can be changed using the incline control...

English Manual
Page 9
... distance goal is pressed, the time displayed will stop the console. SPEED: This mode displays the speed of the buttons is completed, the console and the walking belt will stop . TURNING OFF THE POWER Stand on the console, and attach the earclip to move. To set a distance goal, first select the DISTANCE/SET mode. (A goal cannot be displayed only if the pulse earclip is not displayed after the console has been stopped, turn the speed dial to the reset position, press the START/PAUSE button...
... distance goal is pressed, the time displayed will stop the console. SPEED: This mode displays the speed of the buttons is completed, the console and the walking belt will stop . TURNING OFF THE POWER Stand on the console, and attach the earclip to move. To set a distance goal, first select the DISTANCE/SET mode. (A goal cannot be displayed only if the pulse earclip is not displayed after the console has been stopped, turn the speed dial to the reset position, press the START/PAUSE button...

English Manual
Page 10
... 5 to your collar. Check the circuit breaker located on the console. SYMPTOM: THE POWER TURNS OFF DURING USE Tripped Reset a. Remove the safety key from the console. Make sure the pulse earclip is plugged fully into a properly grounded outlet. (See OPERATION AND ADJUSTMENT in this manual.) If an extension cord is necessary, use only a 14-gauge generalpurpose cord of heart rate readings. Mountain Time (excluding holidays). 1. Various indicators...
... 5 to your collar. Check the circuit breaker located on the console. SYMPTOM: THE POWER TURNS OFF DURING USE Tripped Reset a. Remove the safety key from the console. Make sure the pulse earclip is plugged fully into a properly grounded outlet. (See OPERATION AND ADJUSTMENT in this manual.) If an extension cord is necessary, use only a 14-gauge generalpurpose cord of heart rate readings. Mountain Time (excluding holidays). 1. Various indicators...
English Manual
Page 11
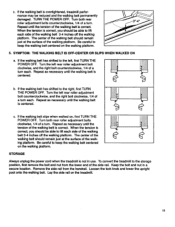
... location. Lay the side rail on , first TURN THE POWER OFF. If the walking belt has shifted to keep the walking belt centered on the walking platform. Turn the left , first TURN THE POWER OFF. STORAGE Always unplug the power cord when the treadmill is centered. The center of the walking belt should be reduced and the walking belt permanently damaged. c. When the tension is correct. Turn both rear roller adjustment bolts counterclockwise, 1/4 of a turn...
... location. Lay the side rail on , first TURN THE POWER OFF. If the walking belt has shifted to keep the walking belt centered on the walking platform. Turn the left , first TURN THE POWER OFF. STORAGE Always unplug the power cord when the treadmill is centered. The center of the walking belt should be reduced and the walking belt permanently damaged. c. When the tension is correct. Turn both rear roller adjustment bolts counterclockwise, 1/4 of a turn...

English Manual
Page 12
... nutrition and adequate rest are listed for individuals over the age of 35 or individuals with the proper intensity. WARNING: Before beginning this or any exercise program, consult your exercise. For effective aerobic exercise, your heart rate should consist of three basic parts: a warm-up prepares the body for 20 to exercise with pre-existing health problems. EXERCISE INTENSITY To maximize the benefits...
... nutrition and adequate rest are listed for individuals over the age of 35 or individuals with the proper intensity. WARNING: Before beginning this or any exercise program, consult your exercise. For effective aerobic exercise, your heart rate should consist of three basic parts: a warm-up prepares the body for 20 to exercise with pre-existing health problems. EXERCISE INTENSITY To maximize the benefits...
English Manual
Page 13
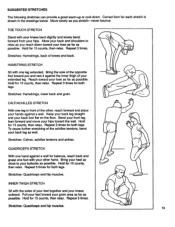
... and hip muscles. Repeat 3 times for balance, reach back and grasp one leg in the drawings below. To cause further stretching of the other hand. Correct form for both legs. HAMSTRING STRETCH Sit with your knees bent slightly and slowly bend forward from your...leg, lean forward and move your hips toward you reach down . Stretches: Hamstrings, back of your extended leg. Repeat 3 times for 15 counts, then relax. SUGGESTED STRETCHES The following stretches can provide a good warm-up or.cool-down toward your toes as far as possible. Stretches: Hamstrings, lower...
... and hip muscles. Repeat 3 times for balance, reach back and grasp one leg in the drawings below. To cause further stretching of the other hand. Correct form for both legs. HAMSTRING STRETCH Sit with your knees bent slightly and slowly bend forward from your...leg, lean forward and move your hips toward you reach down . Stretches: Hamstrings, back of your extended leg. Repeat 3 times for 15 counts, then relax. SUGGESTED STRETCHES The following stretches can provide a good warm-up or.cool-down toward your toes as far as possible. Stretches: Hamstrings, lower...

English Manual
Page 14
... Front Wheel Wheel Bolt/Incline Motor Bolt Incline Leg Leg Bolt U-Nut Right Foot Rail Controller Choke Adjustment Washer Swivel Bolt Front Roller Adjustment Bolt J-Bolt Safety Cover Swivel Nut Front Roller/Pulley Platform Screw Walking Belt Walking Platform Frame Rear Leg Endcap Rear Leg Screw/Guard Screw Right Endcap Allen Wrench Rear Roller Adjustment Bolt Wrench Clip Rear Roller Roller Guard High Density Foam Left Endcap Left Foot Rail Motor Hood w/Decal Side Rail Bolt Side Rail Nut Hood Mount Anchor Magnet Front Roller Insert Reed Switch/Sensor Wire Endcap Screw Belt Owner's Manual Note...
... Front Wheel Wheel Bolt/Incline Motor Bolt Incline Leg Leg Bolt U-Nut Right Foot Rail Controller Choke Adjustment Washer Swivel Bolt Front Roller Adjustment Bolt J-Bolt Safety Cover Swivel Nut Front Roller/Pulley Platform Screw Walking Belt Walking Platform Frame Rear Leg Endcap Rear Leg Screw/Guard Screw Right Endcap Allen Wrench Rear Roller Adjustment Bolt Wrench Clip Rear Roller Roller Guard High Density Foam Left Endcap Left Foot Rail Motor Hood w/Decal Side Rail Bolt Side Rail Nut Hood Mount Anchor Magnet Front Roller Insert Reed Switch/Sensor Wire Endcap Screw Belt Owner's Manual Note...

English Manual
Page 16
The SERIAL NUMBER of the product (see the front cover of this manual. The MODEL NUMBER of the product (IMAGE 920Tm treadmill). 3. ORDERING REPLACEMENT PARTS To order replacement parts, call our Customer Service Department toll-free at 1-800-999-3756, Monday through Friday, 6 a.m. When ordering parts, please be prepared to give the following information: 1. The NAME of the product (IM392012). 2. The DESCRIPTION of the part(s) from page 14...
The SERIAL NUMBER of the product (see the front cover of this manual. The MODEL NUMBER of the product (IMAGE 920Tm treadmill). 3. ORDERING REPLACEMENT PARTS To order replacement parts, call our Customer Service Department toll-free at 1-800-999-3756, Monday through Friday, 6 a.m. When ordering parts, please be prepared to give the following information: 1. The NAME of the product (IM392012). 2. The DESCRIPTION of the part(s) from page 14...


