
User Manual (English)
Page 1
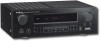
IS-HC040918 AM/FM STEREO RECEIVER STEREO RECEIVER AMPLIFIER IS-HC040918 VCR AUX POWER CD DVD TUNER A 1 2 B 3 4 C 5 6 D SLEEP 7 8 AM/FM MEMORY BALANCE MUTE AUTO BASS VOL SCAN TREBLE IS-HC040918 User's Manual
IS-HC040918 AM/FM STEREO RECEIVER STEREO RECEIVER AMPLIFIER IS-HC040918 VCR AUX POWER CD DVD TUNER A 1 2 B 3 4 C 5 6 D SLEEP 7 8 AM/FM MEMORY BALANCE MUTE AUTO BASS VOL SCAN TREBLE IS-HC040918 User's Manual

User Manual (English)
Page 2
... plug has two blades with Canadian ICES-003. The wide blade or the third prong is operated. 2. Only use this device must accept any interference received, including interference that produce heat. 9. Only refer servicing to qualified service personnel. This device complies with the manufacturer's instructions. 8. All warnings on or pinched. 11...
... plug has two blades with Canadian ICES-003. The wide blade or the third prong is operated. 2. Only use this device must accept any interference received, including interference that produce heat. 9. Only refer servicing to qualified service personnel. This device complies with the manufacturer's instructions. 8. All warnings on or pinched. 11...

User Manual (English)
Page 3
... the cable ground shall be connected as close to the point of cable entry as indicated: 10cm/ 4" STEREO RECEIVER AMPLIFIER IS-HC040918 15cm/6" 10cm/ 4" 3.Do not use your receiver in particular, specifies that air can circulate freely. 2.Do not stack the receiver and other components directly on top of condensation. 4.Do not expose your...
... the cable ground shall be connected as close to the point of cable entry as indicated: 10cm/ 4" STEREO RECEIVER AMPLIFIER IS-HC040918 15cm/6" 10cm/ 4" 3.Do not use your receiver in particular, specifies that air can circulate freely. 2.Do not stack the receiver and other components directly on top of condensation. 4.Do not expose your...

User Manual (English)
Page 4
...THE SPEAKERS 5 CONNECTING THE WIRES 5 CONNECTING THE MAIN SPEAKERS 5 CONNECTING THE ANTENNAS 5 CONNECTING FOR POWER 6 USING HEADPHONES 6 RECEIVER CONTROLS & OPERATIONS 7 PANEL INTRODUCTION 7 DISPLAY MESSAGES 8 TUNING THE RECEIVER 8 SELECT THE AM/FM BAND 8 MANUAL TUNING 8 AUTO TUNING 8 STORING STATIONS IN MEMORY 9 TO STORE STATION 9 MANUAL...A COMPACT DISC PLAYER 11 REMOTE CONTROL 12 CARE AND MAINTENANCE 13 TROUBLESHOOTING TIPS 13 RECEIVER/TUNER OPERATION 13 REMOTE CONTROL OPERATION 13 GENERAL 13 CLEANING THE EXTERIOR 13 EQUIPMENT SPECIFICATIONS 14 1
...THE SPEAKERS 5 CONNECTING THE WIRES 5 CONNECTING THE MAIN SPEAKERS 5 CONNECTING THE ANTENNAS 5 CONNECTING FOR POWER 6 USING HEADPHONES 6 RECEIVER CONTROLS & OPERATIONS 7 PANEL INTRODUCTION 7 DISPLAY MESSAGES 8 TUNING THE RECEIVER 8 SELECT THE AM/FM BAND 8 MANUAL TUNING 8 AUTO TUNING 8 STORING STATIONS IN MEMORY 9 TO STORE STATION 9 MANUAL...A COMPACT DISC PLAYER 11 REMOTE CONTROL 12 CARE AND MAINTENANCE 13 TROUBLESHOOTING TIPS 13 RECEIVER/TUNER OPERATION 13 REMOTE CONTROL OPERATION 13 GENERAL 13 CLEANING THE EXTERIOR 13 EQUIPMENT SPECIFICATIONS 14 1

User Manual (English)
Page 5
... AUX POWER CD DVD TUNER A 1 2 B 3 4 C 5 6 D SLEEP 7 8 AM/FM MEMORY BALANCE MUTE AUTO BASS VOL SCAN TREBLE IS-HC040918 AAA,R3,UM-4 batteries Warranty Card One instruction book IS-HC040918 AM/FM STEREO RECEIVER STEREO RECEIVER AMPLIFIER IS-HC040918 VCR AUX POWER CD DVD TUNER A 1 2 B 3 4 C 5 6 D SLEEP 7 8 AM/FM MEMORY BALANCE MUTE AUTO BASS VOL SCAN TREBLE...
... AUX POWER CD DVD TUNER A 1 2 B 3 4 C 5 6 D SLEEP 7 8 AM/FM MEMORY BALANCE MUTE AUTO BASS VOL SCAN TREBLE IS-HC040918 AAA,R3,UM-4 batteries Warranty Card One instruction book IS-HC040918 AM/FM STEREO RECEIVER STEREO RECEIVER AMPLIFIER IS-HC040918 VCR AUX POWER CD DVD TUNER A 1 2 B 3 4 C 5 6 D SLEEP 7 8 AM/FM MEMORY BALANCE MUTE AUTO BASS VOL SCAN TREBLE...
User Manual (English)
Page 6
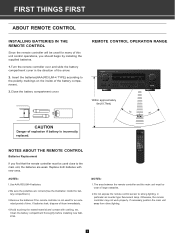
...clothing, etc. VCR AUX POWER CD DVD TUNER A 1 2 B 3 4 C 5 6 D SLEEP 7 AM/FM 8 MEMORY BALANCE MUTE AUTO BASS VOL SCAN TREBLE IS-HC040918 NOTES: 1.The area between the remote controller and the main unit must be used for many of this unit control operations, you find that the... and contact with new ones. If necessary, position the main unit away from direct lighting. 3 REMOTE CONTROL OPERATION RANGE STEREO RECEIVER AMPLIFIER IS-HC040918 Within approximately 6m(19.7feet) 30 30 CAUTION Danger of explosion if battery is not used close to strong lighting, in the...
...clothing, etc. VCR AUX POWER CD DVD TUNER A 1 2 B 3 4 C 5 6 D SLEEP 7 AM/FM 8 MEMORY BALANCE MUTE AUTO BASS VOL SCAN TREBLE IS-HC040918 NOTES: 1.The area between the remote controller and the main unit must be used for many of this unit control operations, you find that the... and contact with new ones. If necessary, position the main unit away from direct lighting. 3 REMOTE CONTROL OPERATION RANGE STEREO RECEIVER AMPLIFIER IS-HC040918 Within approximately 6m(19.7feet) 30 30 CAUTION Danger of explosion if battery is not used close to strong lighting, in the...

User Manual (English)
Page 7
... multiple video jacks on which to the VIDEO IN or VIDEO INPUT on the back of your TV, use VIDEO 1 . DVD 199 TV AUDIO RECEIVER STEREO RECEIVER AMPLIFIER IS-HC040918 VIDEO R IN OUT L IN FROM ANT Ch3 Ch4 OUT TO TV VIDEO INPUT RIGHT OUT AUDIO IN S-VIDEO L/ MONO CABLE/ ANTENNA 4 FIRST THINGS... the audio OUT jack on the back of your stereo DVD to the audio IN jack under the DVD heading on the back of the receiver. 2.Using the video cable with yellow connectors, connect the video OUT jack on the back of your DVD to find the connection description that best...
... multiple video jacks on which to the VIDEO IN or VIDEO INPUT on the back of your TV, use VIDEO 1 . DVD 199 TV AUDIO RECEIVER STEREO RECEIVER AMPLIFIER IS-HC040918 VIDEO R IN OUT L IN FROM ANT Ch3 Ch4 OUT TO TV VIDEO INPUT RIGHT OUT AUDIO IN S-VIDEO L/ MONO CABLE/ ANTENNA 4 FIRST THINGS... the audio OUT jack on the back of your stereo DVD to the audio IN jack under the DVD heading on the back of the receiver. 2.Using the video cable with yellow connectors, connect the video OUT jack on the back of your DVD to find the connection description that best...

User Manual (English)
Page 8
... speaker wires]. 3.Tighten the knob and secure the wire. Press down on the tab to the AM and FM terminals on the receiver) of listening enjoyment. After connecting the antennas, extend them to their full length and adjust their positioning for you also may result...central listening point in distorted sound. Snap the tab closed. Speaker Polarity When connecting the speakers, make sure the polarities ("+" speaker wire to receive clear reception. FIRST THINGS FIRST CONNECTING THE SPEAKERS CONNECTING THE WIRES 1.Loosen the knob. 2.Insert the bare wire.[Remove approx.5mm(1/4 ) insulation...
... speaker wires]. 3.Tighten the knob and secure the wire. Press down on the tab to the AM and FM terminals on the receiver) of listening enjoyment. After connecting the antennas, extend them to their full length and adjust their positioning for you also may result...central listening point in distorted sound. Snap the tab closed. Speaker Polarity When connecting the speakers, make sure the polarities ("+" speaker wire to receive clear reception. FIRST THINGS FIRST CONNECTING THE SPEAKERS CONNECTING THE WIRES 1.Loosen the knob. 2.Insert the bare wire.[Remove approx.5mm(1/4 ) insulation...

User Manual (English)
Page 9
... or discontinue use the HEADPHONES jack on the headphones. Plug the power cord into the outlet. USING HEADPHONES To listen privately through your receiver into the wall outlet, matching the wide blade of the plug with the wide slot in place. Be sure to the desired level after... headphones are in the outlet. Hearing Comfort & Well-Being 1.Do not play . 2.If you put on the receiver. FIRST THINGS FIRST CONNECTING FOR POWER Make sure you connect all your other electronic components and the speakers before you experience a ringing in your headset...
... or discontinue use the HEADPHONES jack on the headphones. Plug the power cord into the outlet. USING HEADPHONES To listen privately through your receiver into the wall outlet, matching the wide blade of the plug with the wide slot in place. Be sure to the desired level after... headphones are in the outlet. Hearing Comfort & Well-Being 1.Do not play . 2.If you put on the receiver. FIRST THINGS FIRST CONNECTING FOR POWER Make sure you connect all your other electronic components and the speakers before you experience a ringing in your headset...

User Manual (English)
Page 10
...in standby mode. 3.Number 1-8 button Press these buttons to a higher Frequency. Main volume source and parameter etc.) 5.Remote control sensor Receives signals from the remote controller. 6.Master volume Controls the output level of information. (e.g. Press the SCAN- When you connect headphones, ...adjust brightness of this unit. 9.MUTE Mute the sound. Press again turn on the power of the display(VFD). 7 RECEIVER CONTROLS & OPERATIONS PANEL INTRODUCTION 1 2 STEREO RECEIVER AMPLIFIER IS-HC040918 3 4 5 6 7 8 9 10 11 12 13 14 15 16 17 18 19 20 1.INPUT selector Turn the...
...in standby mode. 3.Number 1-8 button Press these buttons to a higher Frequency. Main volume source and parameter etc.) 5.Remote control sensor Receives signals from the remote controller. 6.Master volume Controls the output level of information. (e.g. Press the SCAN- When you connect headphones, ...adjust brightness of this unit. 9.MUTE Mute the sound. Press again turn on the power of the display(VFD). 7 RECEIVER CONTROLS & OPERATIONS PANEL INTRODUCTION 1 2 STEREO RECEIVER AMPLIFIER IS-HC040918 3 4 5 6 7 8 9 10 11 12 13 14 15 16 17 18 19 20 1.INPUT selector Turn the...

User Manual (English)
Page 11
... Radio frequencies will stop. Adjust the antenna for the best reception for 3 seconds on the remote) to select the FM or AM band. RECEIVER CONTROLS & OPERATIONS DISPLAY MESSAGES The following is heard. Specific messages re referenced within the section(s) they apply. buttons 3 seconds to automatically search ...encounter while using the remote you must press the AM/FM button on the remote again to activate the tuner. 2.When using your receiver. TUNING THE RECEIVER STEREO TUNED L R SLEEP Unit in Sleep mode KHz MHz Tuner frequency unit KHz MHz SELECT THE AM/FM BAND 1.Push the...
... Radio frequencies will stop. Adjust the antenna for the best reception for 3 seconds on the remote) to select the FM or AM band. RECEIVER CONTROLS & OPERATIONS DISPLAY MESSAGES The following is heard. Specific messages re referenced within the section(s) they apply. buttons 3 seconds to automatically search ...encounter while using the remote you must press the AM/FM button on the remote again to activate the tuner. 2.When using your receiver. TUNING THE RECEIVER STEREO TUNED L R SLEEP Unit in Sleep mode KHz MHz Tuner frequency unit KHz MHz SELECT THE AM/FM BAND 1.Push the...

User Manual (English)
Page 12
... desire. 3.Press number (1-8) buttons on the remote control to select the number of preset stations that you want to store in place of preset stations. RECEIVER CONTROLS & OPERATIONS STORING STATIONS IN MEMORY You can store up to 32 AM and FM stations, these stations can select other stations. TO STORE A STATION...
... desire. 3.Press number (1-8) buttons on the remote control to select the number of preset stations that you want to store in place of preset stations. RECEIVER CONTROLS & OPERATIONS STORING STATIONS IN MEMORY You can store up to 32 AM and FM stations, these stations can select other stations. TO STORE A STATION...

User Manual (English)
Page 14
... cables are color-coded as shown to the Safety Tips sheet packed with connection plugs that are inserted. - Refer to the right. AUDIO RECEIVER STEREO RECEIVER AMPLIFIER IS-HC040918 11 CONNECTING AUXILIARY COMPONENTS BEFORE YOU CONNECT..... Always make sure the color-coded plugs match the color of straight down the middle after you...
... cables are color-coded as shown to the Safety Tips sheet packed with connection plugs that are inserted. - Refer to the right. AUDIO RECEIVER STEREO RECEIVER AMPLIFIER IS-HC040918 11 CONNECTING AUXILIARY COMPONENTS BEFORE YOU CONNECT..... Always make sure the color-coded plugs match the color of straight down the middle after you...

User Manual (English)
Page 16
...soft dust cloth. 13 Noise when the TV is too far from the main unit. Replace all batteries. - CARE AND MAINTENANCE TROUBLESHOOTING TIPS RECEIVER/TUNER OPERATION STEREO indicator is too weak. The signal is off . - Make sure the MUTE indicator on the remote. Check the connections..... CLEANING THE EXTERIOR CLEANING THE EXTERIOR - Press the correct function button. - Connect an external antenna. Check the connection between the receiver and the speaker. Another function is selected on the front panel is inserted. - Disconnect the system from one channel. -
...soft dust cloth. 13 Noise when the TV is too far from the main unit. Replace all batteries. - CARE AND MAINTENANCE TROUBLESHOOTING TIPS RECEIVER/TUNER OPERATION STEREO indicator is too weak. The signal is off . - Make sure the MUTE indicator on the remote. Check the connections..... CLEANING THE EXTERIOR CLEANING THE EXTERIOR - Press the correct function button. - Connect an external antenna. Check the connection between the receiver and the speaker. Another function is selected on the front panel is inserted. - Disconnect the system from one channel. -

User Manual (English)
Page 18
IS-HC040918 Manufactured for Insignia Products 7601 Penn Ave S. Richfield, MN 55423 USA STEREO RECEIVER AMPLIFIER
IS-HC040918 Manufactured for Insignia Products 7601 Penn Ave S. Richfield, MN 55423 USA STEREO RECEIVER AMPLIFIER
