Insignia NS-HWD1761 Support and Manuals
Get Help and Manuals for this Insignia item
View All Support Options Below
Free Insignia NS-HWD1761 manuals!
Problems with Insignia NS-HWD1761?
Ask a Question
Free Insignia NS-HWD1761 manuals!
Problems with Insignia NS-HWD1761?
Ask a Question
Popular Insignia NS-HWD1761 Manual Pages
Warranty (English) - Page 1

...parts.
This warranty does not cover:
• Customer instruction/education • Installation • Set up adjustments • Cosmetic damage • Damage due to be defective by an authorized Insignia repair center or store personnel, Insignia... listed on the receipt you own your Insignia Product during the Warranty Period. If service of protection as the original packaging.
Make...
Warranty (English) - Page 2
...SET FORTH ABOVE AND NO WARRANTIES, WHETHER EXPRESS OR IMPLIED, WILL APPLY AFTER THE WARRANTY PERIOD. All rights reserved. AA, AAA, C etc.) • Products where the factory applied serial number has been altered or removed • Loss or Theft of this product or any part... SPECIFIC ...REPAIR OR REPLACEMENT AS PROVIDED UNDER THIS WARRANTY IS YOUR EXCLUSIVE REMEDY FOR BREACH OF WARRANTY. INSIGNIA...
User Manual English - Page 3

... diagonal Overall dimensions (W × H × D): 59.1 x 18.5 x 18.1 in injury.
Model #: NS-HWD1761
Maximum Supported Weights: - Tools needed:
Phillips screwdriver
www.insigniaproducts.com
3 Use with products that weigh more than a...having a width that permits it to 65"
ENGLISH
SAFETY INFORMATION AND SPECIFICATIONS
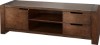
CAUTION: The top surface of the shelf. Espresso Wood Finish TV ...
User Manual English - Page 4

... assemble your new TV stand. Use this part identification to help distinguish similar parts from each other. NS-HWD1761
PACKAGE CONTENTS: PARTS
Make sure that you have all parts are labeled, some of the parts will have a label or an inked letter on the edge to help identify similar parts.
#
Part Description
#
Part Description
1 Top
9 Door
2 Left side
10 Legs...
User Manual English - Page 6
NS-HWD1761
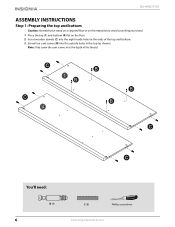
ASSEMBLY INSTRUCTIONS
Step 1: Preparing the top and bottom
Caution: Assemble your stand on a carpeted floor or on the empty box to the depth of the top and ...
User Manual English - Page 8
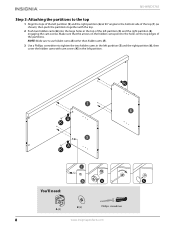
... hidden cams with the top.
2 Push two hidden cams (A) into the large holes in the left partition (5) and the right partition (6) engaging the cam screws. NS-HWD1761
Step 3: Attaching the partitions to the top
1 Align the tops of the left partition (5) and the right partition (6) at 90° angles to the bottom...
User Manual English - Page 10

Turn until snug.
10
www.insigniaproducts.com NS-HWD1761
Step 5: Installing the legs
• Attach the two legs (10) to the center holes in the bottom (4) using the pre-attached screws.
User Manual English - Page 12

You'll need:
Phillips screwdriver A (4)
12
www.insigniaproducts.com Make sure that you just installed in the top and bottom. NS-HWD1761
Step 7: Attaching the left side panel
1 Align the left side panel (2) with the top and bottom (as shown), making sure the the open side of ...
User Manual English - Page 14
NS-HWD1761
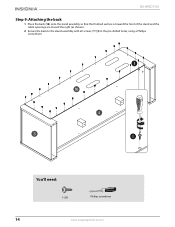
Step 9: Attaching the back
1 Place the back (16) onto the stand assembly so that the finished surface is toward the front of the stand and the cable openings are toward the right (as shown).
2 Secure the back to the stand assembly with 22 screws (???)(I (26)
Phillips screwdriver
14
www.insigniaproducts.com You'll need:
I ) in the pre-drilled holes, using a Phillips screwdriver.
User Manual English - Page 16

Use the pre-drilled holes so that the hinges are mounted level. You'll need:
G (4)
Phillips screwdriver
H (2)
16
www.insigniaproducts.com NS-HWD1761
Step 11: Attaching the hinges to the door
1 Lay the door (9) down flat on a padded surface with the hinge mounting holes facing up, then fit ...
User Manual English - Page 18

NS-HWD1761
Step 13: Preparing the drawer faces
1 Lay the two drawer fronts (15) face down on a flat, padded surface. 2 Screw four cam screws (F) into the pre-drilled holes in to the depth of each drawer face (as shown). Note: Only screw the cam screws in the back of the thread. You'll need:
F (8)
Phillips screwdriver
18
www.insigniaproducts.com
User Manual English - Page 20

You'll need:
D (8)
Phillips screwdriver
20
www.insigniaproducts.com Phillips head screws through the pre-drilled holes in .
NS-HWD1761
Step 15: Adding the drawer bottoms and backs
1 Slide the drawer bottom (14), finished side up, into the slots in the drawer sides (11 and ...
User Manual English - Page 22
... furniture or household items. Carefully read the following chart. NS-HWD1761
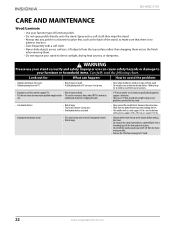
CARE AND MAINTENANCE
Wood/Laminate
• Use your stand correctly and safely.
Note, older CRT TVs tend to direct sunlight, drying heat sources, or dampness. Have a friend help you lift the item and set on a carpeted floor. Lift from the frame or...
User Manual English - Page 23

...REPAIR REPLACEMENT AS PROVIDED UNDER THIS WARRANTY IS YOUR EXCLUSIVE REMEDY FOR BREACH OF WARRANTY. THIS WARRANTY GIVES YOU SPECIFIC... of Products or parts are dark or ...Insignia:
For customer service please call 1-866-BESTBUY.
If you place the Product in China
www.insigniaproducts.com
23
This warranty does not cover: • Customer instruction/education • Installation • Set...
User Manual English - Page 45

... los derechos reservados. Certificate of Best Buy and its affiliated companies. This product was manufactured for: Insignia 4. Distributed by this
product with the CPSC Ban on Lead-Containing Paint (16 CFR 1303). 3. Date of this instruction booklet. 2. This certificate applies to the compliance of Manufacture
Lot number:
Certificado de conformidad 1. All rights...
Insignia NS-HWD1761 Reviews
We have not received any reviews for Insignia yet.