
Warranty (English)
Page 1
... cover: • Customer instruction/education • Installation • Set up adjustments • Cosmetic damage • Damage due to be free of defects in its original packaging or packaging that provides the same amount of Insignia and are required after the Warranty Period expires, you purchased the Product. One-year limited warranty - or (2) replace the Product at Best Buy or Future Shop...
... cover: • Customer instruction/education • Installation • Set up adjustments • Cosmetic damage • Damage due to be free of defects in its original packaging or packaging that provides the same amount of Insignia and are required after the Warranty Period expires, you purchased the Product. One-year limited warranty - or (2) replace the Product at Best Buy or Future Shop...
Warranty (English)
Page 2
...; Products where the factory applied serial number has been altered or removed • Loss or Theft of this product or any part of the product • Display panels containing up to five (5) pixel failures throughout the display. (Pixel based displays may contain a limited number of pixels that are trademarks of their respective owners. 2 www.insigniaproducts.com THIS WARRANTY GIVES YOU SPECIFIC LEGAL RIGHTS, AND...
...; Products where the factory applied serial number has been altered or removed • Loss or Theft of this product or any part of the product • Display panels containing up to five (5) pixel failures throughout the display. (Pixel based displays may contain a limited number of pixels that are trademarks of their respective owners. 2 www.insigniaproducts.com THIS WARRANTY GIVES YOU SPECIFIC LEGAL RIGHTS, AND...

User Manual (English)
Page 1
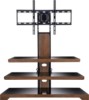
USER GUIDE Wood Finish and Glass 3-in-1 TV Stand for TVs up to prevent any damage. NS-3IN1MT50C/NS-3IN1MT50C-C SAFETY INFORMATION AND SPECIFICATIONS .2 PACKAGE CONTENTS: PARTS 4 PACKAGE CONTENTS: HARDWARE 5 ASSEMBLY INSTRUCTIONS 7 CARE AND MAINTENANCE 29 Before using your new product, please read these instructions to 52"/135 lbs.
USER GUIDE Wood Finish and Glass 3-in-1 TV Stand for TVs up to prevent any damage. NS-3IN1MT50C/NS-3IN1MT50C-C SAFETY INFORMATION AND SPECIFICATIONS .2 PACKAGE CONTENTS: PARTS 4 PACKAGE CONTENTS: HARDWARE 5 ASSEMBLY INSTRUCTIONS 7 CARE AND MAINTENANCE 29 Before using your new product, please read these instructions to 52"/135 lbs.
User Manual (English)
Page 6
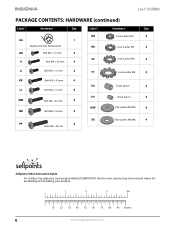
...; 16 mm 4 XX Flat washer M6/M8 4 PP 4 Bolt M8 × 40 mm Sellpoints Video Instruction Guide Go to http://vig.sellpoints.com/insignia/default/ISGBBY00001.html to view step-by-step instructional videos for assembling and installing your product. 1 2 3 4in 10 20 30 40 50 60 70 80 90 100mm 6 www.insigniaproducts.com 3-in-1 TV STAND PACKAGE CONTENTS: HARDWARE (continued...
...; 16 mm 4 XX Flat washer M6/M8 4 PP 4 Bolt M8 × 40 mm Sellpoints Video Instruction Guide Go to http://vig.sellpoints.com/insignia/default/ISGBBY00001.html to view step-by-step instructional videos for assembling and installing your product. 1 2 3 4in 10 20 30 40 50 60 70 80 90 100mm 6 www.insigniaproducts.com 3-in-1 TV STAND PACKAGE CONTENTS: HARDWARE (continued...
User Manual (English)
Page 12
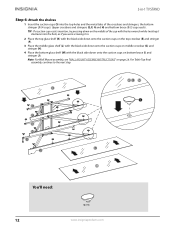
... STAND Step 6: Attach the shelves 1 Insert the suction cups (S) into the top holes and the metal tabs of the cup with the hex wrench while twisting it clockwise into the hole, as if you were screwing it in. 2 Place the top glass shelf (K) with the black ... and stringer (H). 4 Place the bottom glass shelf (M) with the black side down on the middle of the crossbars and stringers, the bottom stringer (J) (4 cups). For Table Top final assembly, continue to the next step. Note: For Wall Mount assembly, see "WALL MOUNT ASSEMBLYINSTRUCTIONS" on bottom brace (I ) (3 cups each). Upper crossbars and...
... STAND Step 6: Attach the shelves 1 Insert the suction cups (S) into the top holes and the metal tabs of the cup with the hex wrench while twisting it clockwise into the hole, as if you were screwing it in. 2 Place the top glass shelf (K) with the black ... and stringer (H). 4 Place the bottom glass shelf (M) with the black side down on the middle of the crossbars and stringers, the bottom stringer (J) (4 cups). For Table Top final assembly, continue to the next step. Note: For Wall Mount assembly, see "WALL MOUNT ASSEMBLYINSTRUCTIONS" on bottom brace (I ) (3 cups each). Upper crossbars and...

User Manual (English)
Page 13
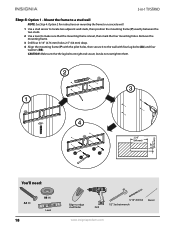
Anchor Anchor Wall Wall Bolt Wall Long screw You'll need: GG (1) Power drill 3/8" masonry or wood drill bit www.insigniaproducts.com 13 3-in-1 TV STAND FINAL TABLE TOP ASSEMBLY INSTRUCTIONS Step 7: Position the TV stand and install the tipping restraint hardware kit 1 Position the assembled stand against a wall where you plan to use it. 2 Follow the instructions printed on the bag containing the tipping restraint hardware kit (GG) to attach the restraint hardware to the wall and the stand.
Anchor Anchor Wall Wall Bolt Wall Long screw You'll need: GG (1) Power drill 3/8" masonry or wood drill bit www.insigniaproducts.com 13 3-in-1 TV STAND FINAL TABLE TOP ASSEMBLY INSTRUCTIONS Step 7: Position the TV stand and install the tipping restraint hardware kit 1 Position the assembled stand against a wall where you plan to use it. 2 Follow the instructions printed on the bag containing the tipping restraint hardware kit (GG) to attach the restraint hardware to the wall and the stand.
User Manual (English)
Page 14
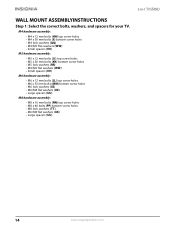
... spacers (UU) M8 hardware assembly: • M8 x 16 mm bolts (NN) top screw holes • M8 x 40 bolts (PP) bottom screw holes • M8 lock washers (TT) • M6/M8 flat washers (XX) • Large spacers (UU) 14 www.insigniaproducts.com 3-in-1 TV STAND WALL MOUNT ASSEMBLYINSTRUCTIONS Step 1: Select the correct bolts, washers, and spacers for your TV.
... spacers (UU) M8 hardware assembly: • M8 x 16 mm bolts (NN) top screw holes • M8 x 40 bolts (PP) bottom screw holes • M8 lock washers (TT) • M6/M8 flat washers (XX) • Large spacers (UU) 14 www.insigniaproducts.com 3-in-1 TV STAND WALL MOUNT ASSEMBLYINSTRUCTIONS Step 1: Select the correct bolts, washers, and spacers for your TV.
User Manual (English)
Page 15
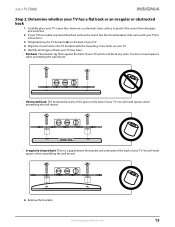
... wall mount. 6 Remove the brackets. You will need spacers when assembling the wall mount. • Obstructed back: The brackets block any jacks. See the documentation that came with the mounting screw holes on your TV. 5 Identify which type of back your TV may have: • Flat back: The brackets lay flush against the back of your TV and do not need spacers when assembling the wall mount...
... wall mount. 6 Remove the brackets. You will need spacers when assembling the wall mount. • Obstructed back: The brackets block any jacks. See the documentation that came with the mounting screw holes on your TV. 5 Identify which type of back your TV may have: • Flat back: The brackets lay flush against the back of your TV and do not need spacers when assembling the wall mount...
User Manual (English)
Page 16
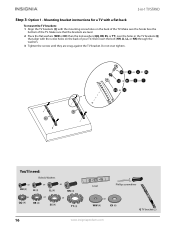
...STAND Step 3: Option 1 - 3-in the TV brackets (Q) that align with the mounting screw holes on the back of the TV. Make sure the hooks face the bottom of your TV, then insert the bolt (HH, JJ, LL, or NN) through the washers. 3 Tighten the screws until they are level. 2 Place the flat... washers (WW or XX) then the lock washers (QQ, RR, SS, or TT) over tighten. Mounting bracket instructions for a TV with a flat back To mount the TV brackets: 1 Align the TV brackets (Q) with the screw holes on the back of the...
...STAND Step 3: Option 1 - 3-in the TV brackets (Q) that align with the mounting screw holes on the back of the TV. Make sure the hooks face the bottom of your TV, then insert the bolt (HH, JJ, LL, or NN) through the washers. 3 Tighten the screws until they are level. 2 Place the flat... washers (WW or XX) then the lock washers (QQ, RR, SS, or TT) over tighten. Mounting bracket instructions for a TV with a flat back To mount the TV brackets: 1 Align the TV brackets (Q) with the screw holes on the back of the...
User Manual (English)
Page 17
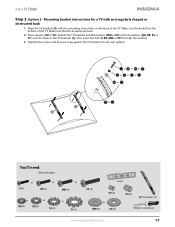
... the washers. 3 Tighten the screws until they are snug against the TV bracket. Make sure the hooks face the bottom of the TV. Make sure that the brackets are level. 2 Place spacers (UU or VV) behind the TV brackets and flat washers (WW or XX) and lock washers (QQ, RR, SS... You'll need: Bolts & Washers or II (4) or KK (4) or MM (4) or or or QQ (4) RR (4) SS (4) TT (4) Level PP (4) VV (4) or WW (4) XX (4) UU (4) Q TV brackets (2) Phillips screwdriver www.insigniaproducts.com 17 Do not over the holes in -1 TV STAND Step 3: Option 2 - Mounting bracket instructions for a ...
... the washers. 3 Tighten the screws until they are snug against the TV bracket. Make sure the hooks face the bottom of the TV. Make sure that the brackets are level. 2 Place spacers (UU or VV) behind the TV brackets and flat washers (WW or XX) and lock washers (QQ, RR, SS... You'll need: Bolts & Washers or II (4) or KK (4) or MM (4) or or or QQ (4) RR (4) SS (4) TT (4) Level PP (4) VV (4) or WW (4) XX (4) UU (4) Q TV brackets (2) Phillips screwdriver www.insigniaproducts.com 17 Do not over the holes in -1 TV STAND Step 3: Option 2 - Mounting bracket instructions for a ...
User Manual (English)
Page 18
...instructions on mounting the frame to a concrete wall. 1 Use a stud sensor to locate two adjacent wall studs, then position the mounting frame (P) exactly between the two studs. 2 Use a level to make sure that the lag bolts are tight and secure, but do not overtighten them. 0.19" (4.76 mm) BB AA BB AA 2.50" (64 mm) You'll need...: AA (4) 18 BB (4) Level Edge-to the wall with four lag bolts (AA) and four washers (BB). CAUTION: Make sure that the mounting frame is level, then mark the four mounting holes. 3-in-1 TV STAND Step 4: Option 1 - Remove the mounting frame. 3...
...instructions on mounting the frame to a concrete wall. 1 Use a stud sensor to locate two adjacent wall studs, then position the mounting frame (P) exactly between the two studs. 2 Use a level to make sure that the lag bolts are tight and secure, but do not overtighten them. 0.19" (4.76 mm) BB AA BB AA 2.50" (64 mm) You'll need...: AA (4) 18 BB (4) Level Edge-to the wall with four lag bolts (AA) and four washers (BB). CAUTION: Make sure that the mounting frame is level, then mark the four mounting holes. 3-in-1 TV STAND Step 4: Option 1 - Remove the mounting frame. 3...
User Manual (English)
Page 19
...-1 TV STAND Step 4: Option 2 - Never locate the mounting holes into each of the screw holes using a hammer. 4 Align the mounting frame over the concrete anchors. 5 Place a washer (BB) over one of 2.5" (64 mm). 3 Insert a concrete anchor (CC) into the mortar between blocks. Use a level to mount the TV. Mount the frame to a block or concrete wall 1 Place the mounting frame...
...-1 TV STAND Step 4: Option 2 - Never locate the mounting holes into each of the screw holes using a hammer. 4 Align the mounting frame over the concrete anchors. 5 Place a washer (BB) over one of 2.5" (64 mm). 3 Insert a concrete anchor (CC) into the mortar between blocks. Use a level to mount the TV. Mount the frame to a block or concrete wall 1 Place the mounting frame...
User Manual (English)
Page 20
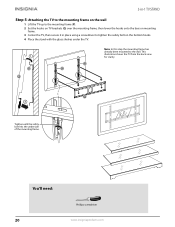
... the TV. 3-in-1 TV STAND Step 5: Attaching the TV to the mounting frame on the wall 1 Lift the TV up to the mounting frame (P). 2 Set the hooks on TV brackets (Q) over the mounting frame, then lower the hooks onto the bars on mounting frame. 3 Center the TV, then secure it in place using a screwdriver to the wall. Tighten until the safety bolt...
... the TV. 3-in-1 TV STAND Step 5: Attaching the TV to the mounting frame on the wall 1 Lift the TV up to the mounting frame (P). 2 Set the hooks on TV brackets (Q) over the mounting frame, then lower the hooks onto the bars on mounting frame. 3 Center the TV, then secure it in place using a screwdriver to the wall. Tighten until the safety bolt...
User Manual (English)
Page 21
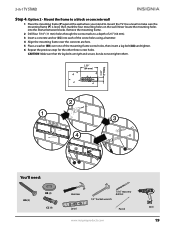
3-in-1 TV STAND Step 6: Position the TV stand and install the tipping restraint hardware kit 1 Position the assembled stand against a wall where you plan to use it. 2 Follow the instructions printed on the bag containing the tipping restraint hardware kit (GG) to attach the restraint hardware to the wall and the stand. Anchor Anchor Wall Wall Bolt Wall Long screw You'll need: GG (1) Power drill 3/8" masonry or wood drill bit www.insigniaproducts.com 21
3-in-1 TV STAND Step 6: Position the TV stand and install the tipping restraint hardware kit 1 Position the assembled stand against a wall where you plan to use it. 2 Follow the instructions printed on the bag containing the tipping restraint hardware kit (GG) to attach the restraint hardware to the wall and the stand. Anchor Anchor Wall Wall Bolt Wall Long screw You'll need: GG (1) Power drill 3/8" masonry or wood drill bit www.insigniaproducts.com 21
User Manual (English)
Page 22
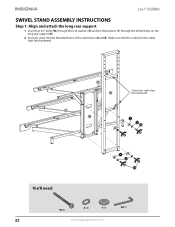
3-in-1 TV STAND SWIVEL STAND ASSEMBLY INSTRUCTIONS Step 1: Align and attach the long rear support 1 Insert four 2¼" bolts (W) through the lock washers (X) and the flat washers (Y) through the drilled holes on the long rear support (D). 2 Securely screw into the threaded holes of the side frames (A and B). Make sure that the sockets for cable clips face backward. You'll need: W (4) X (4) Y (4) EE (1) 22 www.insigniaproducts.com Sockets for the cable clips face backward.
3-in-1 TV STAND SWIVEL STAND ASSEMBLY INSTRUCTIONS Step 1: Align and attach the long rear support 1 Insert four 2¼" bolts (W) through the lock washers (X) and the flat washers (Y) through the drilled holes on the long rear support (D). 2 Securely screw into the threaded holes of the side frames (A and B). Make sure that the sockets for cable clips face backward. You'll need: W (4) X (4) Y (4) EE (1) 22 www.insigniaproducts.com Sockets for the cable clips face backward.
User Manual (English)
Page 24
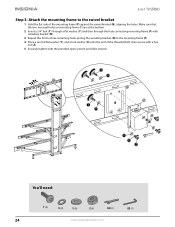
... three remaining holes joining the swiveling bracket (N) to the swivel bracket 1 Hold the flat side of the threaded bolt, then secure with a hex nut (Z). 5 Securely tighten with the provided open wrench and Allen wrench. 3-in-1 TV STAND Step 3: Attach the mounting frame to the mounting frame (P). 4 Place a second flat washer (Y), and a lock washer (X) onto the end of the...
... three remaining holes joining the swiveling bracket (N) to the swivel bracket 1 Hold the flat side of the threaded bolt, then secure with a hex nut (Z). 5 Securely tighten with the provided open wrench and Allen wrench. 3-in-1 TV STAND Step 3: Attach the mounting frame to the mounting frame (P). 4 Place a second flat washer (Y), and a lock washer (X) onto the end of the...
User Manual (English)
Page 26
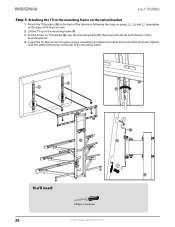
... -1 TV STAND Step 5: Attaching the TV to the mounting frame on the swivel bracket 1 Attach the TV brackets (Q) to the back of the television following the steps on pages 15, 16, and 17, depending on the type of TV that you own. 2 Lift the TV up to the mounting frame (P). 3 Set the hooks on the bottom hooks. You'll need: 26...
... -1 TV STAND Step 5: Attaching the TV to the mounting frame on the swivel bracket 1 Attach the TV brackets (Q) to the back of the television following the steps on pages 15, 16, and 17, depending on the type of TV that you own. 2 Lift the TV up to the mounting frame (P). 3 Set the hooks on the bottom hooks. You'll need: 26...
User Manual (English)
Page 28
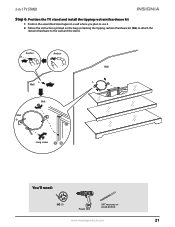
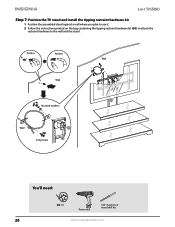
3-in-1 TV STAND Step 7: Position the TV stand and install the tipping restraint hardware kit 1 Position the assembled stand against a wall where you plan to use it. 2 Follow the instructions printed on the bag containing the tipping restraint hardware kit (GG) to attach the restraint hardware to the wall and the stand. Anchor Anchor Wall Wall Nut and washers Wall Long screw You'll need: GG (1) Power drill 3/8" masonry or wood drill bit 28 www.insigniaproducts.com
3-in-1 TV STAND Step 7: Position the TV stand and install the tipping restraint hardware kit 1 Position the assembled stand against a wall where you plan to use it. 2 Follow the instructions printed on the bag containing the tipping restraint hardware kit (GG) to attach the restraint hardware to the wall and the stand. Anchor Anchor Wall Wall Nut and washers Wall Long screw You'll need: GG (1) Power drill 3/8" masonry or wood drill bit 28 www.insigniaproducts.com
User Manual (English)
Page 29
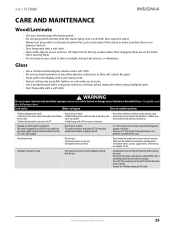
... the problem: • Children climbing on the stand. Children may try to climb to reach them . • Do not expose your furniture or household items. Carefully read the following chart. while the top can support 135 lbs. • Improperly moving the stand. • Do not push the stand, especially on furniture specifically designed to support a television. • Never use...
... the problem: • Children climbing on the stand. Children may try to climb to reach them . • Do not expose your furniture or household items. Carefully read the following chart. while the top can support 135 lbs. • Improperly moving the stand. • Do not push the stand, especially on furniture specifically designed to support a television. • Never use...

User Manual (English)
Page 30
... incorrect voltage or power supply • Attempted repair by any person not authorized by any contact including but not limited to any Best Buy or Future Shop store. Call agents may contain a limited number of the Product is packaged with all labor and parts charges. This warranty does not cover: • Customer instruction/education • Installation • Set up adjustments • Cosmetic...
... incorrect voltage or power supply • Attempted repair by any person not authorized by any contact including but not limited to any Best Buy or Future Shop store. Call agents may contain a limited number of the Product is packaged with all labor and parts charges. This warranty does not cover: • Customer instruction/education • Installation • Set up adjustments • Cosmetic...


