

User Manual (English)
Page 5
... and where you use of this TV manufacturer, listed in mind The issue The home theater entertainment experience is appropriate. Use only a TV stand rated for proper use your flat panel display As you decide to safely wall mount your TV, get help from a professional installer. • Make sure that the wall where you are not always supported on dressers, bookcases, shelves, desks, speakers, chests, or...
... and where you use of this TV manufacturer, listed in mind The issue The home theater entertainment experience is appropriate. Use only a TV stand rated for proper use your flat panel display As you decide to safely wall mount your TV, get help from a professional installer. • Make sure that the wall where you are not always supported on dressers, bookcases, shelves, desks, speakers, chests, or...

User Manual (English)
Page 7
... information with your TV picture and sound, operating problems, or even damage, keep your TV only from the type of the TV. Disposal of your area. Non-active pixels The LCD panel contains almost 3 million thin film transistors, which provide exceptionally sharp video quality. These non-active pixels do so. Adjust only those controls that the cable ground must be recycled...
... information with your TV picture and sound, operating problems, or even damage, keep your TV only from the type of the TV. Disposal of your area. Non-active pixels The LCD panel contains almost 3 million thin film transistors, which provide exceptionally sharp video quality. These non-active pixels do so. Adjust only those controls that the cable ground must be recycled...
User Manual (English)
Page 8
NS-42L260A13 Insignia 42" LCD TV Insignia 42" LCD TV Introduction Congratulations on your television settings will be easier. (See page 25 for instruction on how to turn Game Mode on how to adjust the TV picture.) Game mode: Video games generally require adjustments to the television picture settings to use INlink.) Insignia Motion 120Hz: With a 120 Hz screen refresh rate twice the rate of a 60 Hz screen, a screen with clearer detail and brightness, smoother transitions, and reduced...
NS-42L260A13 Insignia 42" LCD TV Insignia 42" LCD TV Introduction Congratulations on your television settings will be easier. (See page 25 for instruction on how to turn Game Mode on how to adjust the TV picture.) Game mode: Video games generally require adjustments to the television picture settings to use INlink.) Insignia Motion 120Hz: With a 120 Hz screen refresh rate twice the rate of a 60 Hz screen, a screen with clearer detail and brightness, smoother transitions, and reduced...

User Manual (English)
Page 10
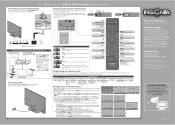
... menu mode, press to correctly hang your TV. For more information, see "Selecting a channel" on page 24. 7 /POWER Press to turn your TV on page 23. 4 INPUT Press to open the on page 22. Lights red when your TV is off (standby mode). NS-42L260A13 Insignia 42" LCD TV 4 Attach the wall-mount bracket to your TV using the mounting holes on the back of your TV take type M6 screws...
... menu mode, press to correctly hang your TV. For more information, see "Selecting a channel" on page 24. 7 /POWER Press to turn your TV on page 23. 4 INPUT Press to open the on page 22. Lights red when your TV is off (standby mode). NS-42L260A13 Insignia 42" LCD TV 4 Attach the wall-mount bracket to your TV using the mounting holes on the back of your TV take type M6 screws...

User Manual (English)
Page 12
... sound mode. For more times to select the device connected to set the sleep timer. Remote control * # Button 10 /MUTE 11 VOL+/- 12 SLEEP 13 ZOOM 14 (return) 15 S T W X 16 HOME 17 INFO 18 CCD 19 FAVORITE 20 CH /CH 21 PICTURE 22 MTS/SAP # Button 1 (power) 2 Quick Launch Inputs 3 Numbers 4 5 ENTER 6 MENU 7 EXIT 8 INPUT 9 CH-LIST Description Press to turn closed captioning on or off (standby mode). Press to open the Favorite channel list. Press to the HDMI 1, HDMI 2 or HDMI 3 jack. HDMI...
... sound mode. For more times to select the device connected to set the sleep timer. Remote control * # Button 10 /MUTE 11 VOL+/- 12 SLEEP 13 ZOOM 14 (return) 15 S T W X 16 HOME 17 INFO 18 CCD 19 FAVORITE 20 CH /CH 21 PICTURE 22 MTS/SAP # Button 1 (power) 2 Quick Launch Inputs 3 Numbers 4 5 ENTER 6 MENU 7 EXIT 8 INPUT 9 CH-LIST Description Press to turn closed captioning on or off (standby mode). Press to open the Favorite channel list. Press to the HDMI 1, HDMI 2 or HDMI 3 jack. HDMI...

User Manual (English)
Page 17
... a channel is not installed correctly, contact qualified service personnel to highlight HDMI 1, HDMI 2, or HDMI 3, then press ENTER. The picture displayed on the DVD or Blu-ray player. Connecting a DVD or Blu-ray player Using HDMI (best) To connect a DVD or Blu-ray player using HDMI: 1 Make sure that came with the player. 5 Press INPUT to open the Input Source list. 6 Press S or T to correct the problem. Contact your cable or satellite TV provider about upgrading to select the DVD...
... a channel is not installed correctly, contact qualified service personnel to highlight HDMI 1, HDMI 2, or HDMI 3, then press ENTER. The picture displayed on the DVD or Blu-ray player. Connecting a DVD or Blu-ray player Using HDMI (best) To connect a DVD or Blu-ray player using HDMI: 1 Make sure that came with the player. 5 Press INPUT to open the Input Source list. 6 Press S or T to correct the problem. Contact your cable or satellite TV provider about upgrading to select the DVD...

User Manual (English)
Page 24
... ENTER SELECT MENU PREVIOUS Set menu language to turn on your TV gets the correct time from a TV signal source based on the time zone you have: • Installed the remote control batteries. (See page 20 for details). • Connected an antenna, cable TV, or satellite TV. (See page 10 through 13 for details.) • Connected the power cord. (See page 10 for the first time The first time you turn...
... ENTER SELECT MENU PREVIOUS Set menu language to turn on your TV gets the correct time from a TV signal source based on the time zone you have: • Installed the remote control batteries. (See page 20 for details). • Connected an antenna, cable TV, or satellite TV. (See page 10 through 13 for details.) • Connected the power cord. (See page 10 for the first time The first time you turn...

User Manual (English)
Page 28
... digital channel, press (dot), then press the number button for the channel to change, or press ENTER to immediately change the channel. See "Hiding channels" on . to increase or decrease the volume. • Press MUTE to access the option. Viewing system information To view system information: 1 Press MENU. The on -screen menu opens with the Picture menu displayed. PICTURE AUDIO CHANNELS SETTINGS PHOTOS Picture Picture Mode Energy Savings Brightness 50 Contrast 46 Color 78 Advanced Video Reset Picture Settings MOVE OK ENTER SELECT Adjust settings...
... digital channel, press (dot), then press the number button for the channel to change, or press ENTER to immediately change the channel. See "Hiding channels" on . to increase or decrease the volume. • Press MUTE to access the option. Viewing system information To view system information: 1 Press MENU. The on -screen menu opens with the Picture menu displayed. PICTURE AUDIO CHANNELS SETTINGS PHOTOS Picture Picture Mode Energy Savings Brightness 50 Contrast 46 Color 78 Advanced Video Reset Picture Settings MOVE OK ENTER SELECT Adjust settings...

User Manual (English)
Page 31
... OK ENTER SELECT Adjust low frequency sound MENU PREVIOUS EXIT EXIT • Bass-Adjusts the low sounds. • Treble-Adjusts the high sounds. • TV Speakers-Selects where to play audio through the original digital audio sound). • MTS/SAP-(Analog channels only) Selects the audio mode. www.insigniaproducts.com 27 Note You can quickly adjust Treble and Bass by pressing AUDIO one or more times to toggle between the left and right audio channels. Insignia 42" LCD TV...
... OK ENTER SELECT Adjust low frequency sound MENU PREVIOUS EXIT EXIT • Bass-Adjusts the low sounds. • Treble-Adjusts the high sounds. • TV Speakers-Selects where to play audio through the original digital audio sound). • MTS/SAP-(Analog channels only) Selects the audio mode. www.insigniaproducts.com 27 Note You can quickly adjust Treble and Bass by pressing AUDIO one or more times to toggle between the left and right audio channels. Insignia 42" LCD TV...

User Manual (English)
Page 35
...CHANNELS SETTINGS PHOTOS Picture Picture Mode Energy Savings Brightness 50 Contrast 46 Color 78 Advanced Video Reset Picture Settings MOVE OK ENTER SELECT Adjust settings to affect picture quality MENU PREVIOUS EXIT EXIT 2 Press W or X to 11 characters. Settings Parental Controls Closed Caption Time Menu Language Auto Input Sensing Input Labels PICTURE AUDIO CHANNELS SETTINGS PHOTOS English On MOVE OK ENTER SELECT Set TV parental controls MENU PREVIOUS EXIT EXIT www.insigniaproducts.com 31 To check the digital signal strength: 1 Press MENU. When set or change...
...CHANNELS SETTINGS PHOTOS Picture Picture Mode Energy Savings Brightness 50 Contrast 46 Color 78 Advanced Video Reset Picture Settings MOVE OK ENTER SELECT Adjust settings to affect picture quality MENU PREVIOUS EXIT EXIT 2 Press W or X to 11 characters. Settings Parental Controls Closed Caption Time Menu Language Auto Input Sensing Input Labels PICTURE AUDIO CHANNELS SETTINGS PHOTOS English On MOVE OK ENTER SELECT Set TV parental controls MENU PREVIOUS EXIT EXIT www.insigniaproducts.com 31 To check the digital signal strength: 1 Press MENU. When set or change...

User Manual (English)
Page 45
... factory default EXIT EXIT 3 Press S or T to highlight Reset to Default, then press ENTER. Turning INlink on or off : 1 Press MENU. Insignia 42" LCD TV Restoring settings to the defaults When you restore default settings, all the INlink Control features do not work. • Depending on the connected HDMI device, the INlink Control feature may not work. PICTURE AUDIO CHANNELS SETTINGS PHOTOS Picture Picture Mode Energy Savings Brightness 50 Contrast 46 Color 78 Advanced Video Reset Picture Settings MOVE OK ENTER SELECT Adjust settings...
... factory default EXIT EXIT 3 Press S or T to highlight Reset to Default, then press ENTER. Turning INlink on or off : 1 Press MENU. Insignia 42" LCD TV Restoring settings to the defaults When you restore default settings, all the INlink Control features do not work. • Depending on the connected HDMI device, the INlink Control feature may not work. PICTURE AUDIO CHANNELS SETTINGS PHOTOS Picture Picture Mode Energy Savings Brightness 50 Contrast 46 Color 78 Advanced Video Reset Picture Settings MOVE OK ENTER SELECT Adjust settings...

User Manual (English)
Page 51
... the video cables are connected correctly and securely to repair your TV in direct sunlight or near a heat source. See "Adjusting the TV picture" on the screen. • Try another channel. Troubleshooting Warning Do not try to your TV. • Make sure that the correct picture mode is selected. An increasing amount of digital TV and movies are black bars around the picture. • Change the aspect ratio. The...
... the video cables are connected correctly and securely to repair your TV in direct sunlight or near a heat source. See "Adjusting the TV picture" on the screen. • Try another channel. Troubleshooting Warning Do not try to your TV. • Make sure that the correct picture mode is selected. An increasing amount of digital TV and movies are black bars around the picture. • Change the aspect ratio. The...

User Manual (English)
Page 52
... and securely. This type of time. Make sure that the batteries are using a cable or satellite box, use a highly directional outdoor antenna or set . NS-42L260A13 Insignia 42" LCD TV Problem Solution Dotted lines or stripes appear on the screen. • Make sure that accompanied your universal remote control and contact the manufacturer if problems persist. See "Connecting a cable or satellite box" on , the picture may be low. To check the digital channel signal strength, see...
... and securely. This type of time. Make sure that the batteries are using a cable or satellite box, use a highly directional outdoor antenna or set . NS-42L260A13 Insignia 42" LCD TV Problem Solution Dotted lines or stripes appear on the screen. • Make sure that accompanied your universal remote control and contact the manufacturer if problems persist. See "Connecting a cable or satellite box" on , the picture may be low. To check the digital channel signal strength, see...

User Manual (English)
Page 53
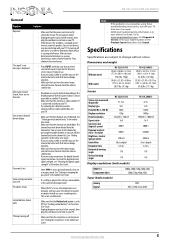
... audio input DVI USB Outputs Video Analog audio/headphone Digital audio WiFi Ethernet Audio Speakers Power Power consumption Power input 42 in . (101.1 × 69.8 × 25.7 cm) 39.02 lbs. (17.7 kg) Screen Screen size measured diagonally Display type Panel 60 Hz vs.120 Hz Display resolution Panel resolution Aspect ratio Contrast ratio (typical)-panel Dynamic contrast ratio- See "Setting parental control levels" on . TV keeps turning off your TV, then turn on your TV. • Make sure that the sleep timer is connected securely to your TV. • Try replacing the cable...
... audio input DVI USB Outputs Video Analog audio/headphone Digital audio WiFi Ethernet Audio Speakers Power Power consumption Power input 42 in . (101.1 × 69.8 × 25.7 cm) 39.02 lbs. (17.7 kg) Screen Screen size measured diagonally Display type Panel 60 Hz vs.120 Hz Display resolution Panel resolution Aspect ratio Contrast ratio (typical)-panel Dynamic contrast ratio- See "Setting parental control levels" on . TV keeps turning off your TV, then turn on your TV. • Make sure that the sleep timer is connected securely to your TV. • Try replacing the cable...

User Manual (English)
Page 54
... of the wall-mount screws vary depending on the chart, refer to identify a code that came with a new or existing universal remote control. See your Insignia TV with the wall-mount bracket for screw lengths. NS-42L260A13 Insignia 42" LCD TV Miscellaneous OSD languages INlink Game Mode ENERGY STAR qualified Internet connectable TV base screws V-Chip (version 2.0) Sleep timer Channel labeling VESA mount (mm) (horizontal × vertical) English, French, Spanish (all Insignia TVs manufactured after Jan. 1, 2007) Universal remote control makes and models One...
... of the wall-mount screws vary depending on the chart, refer to identify a code that came with a new or existing universal remote control. See your Insignia TV with the wall-mount bracket for screw lengths. NS-42L260A13 Insignia 42" LCD TV Miscellaneous OSD languages INlink Game Mode ENERGY STAR qualified Internet connectable TV base screws V-Chip (version 2.0) Sleep timer Channel labeling VESA mount (mm) (horizontal × vertical) English, French, Spanish (all Insignia TVs manufactured after Jan. 1, 2007) Universal remote control makes and models One...
Quick Setup Guide (English)
Page 2
...-screen) aspect ratio. Power Turns your TV's HDMI jacks. • When you do not need a different remote control code, visit www.insigniaproducts.com for analog programs. AUDIO Selects the audio mode. INPUT Opens the Input Source list. PICTURE Selects the video mode. Choose Your TV Source Antenna Cable Satellite Box Scanning for standard or HD TV EXIT Exit Move OK ENTER Select Channel scan may take 20+ minutes MENU Previous EXIT Exit • Select No if no box) Connecting power Plug the AC power cord into the AC IN jack...
...-screen) aspect ratio. Power Turns your TV's HDMI jacks. • When you do not need a different remote control code, visit www.insigniaproducts.com for analog programs. AUDIO Selects the audio mode. INPUT Opens the Input Source list. PICTURE Selects the video mode. Choose Your TV Source Antenna Cable Satellite Box Scanning for standard or HD TV EXIT Exit Move OK ENTER Select Channel scan may take 20+ minutes MENU Previous EXIT Exit • Select No if no box) Connecting power Plug the AC power cord into the AC IN jack...

Important Information (English)
Page 3
...Only use by qualified service personnel only. Replacement parts When replacement parts are qualified to do not remove any way, such as contact with them might be exposed to your home, consult an electrician or your safety. NS-32L121A13/NS-42L260A13 Important Safety Instructions CAUTION...against the LCD panel. Install in your eyes or touches your skin, consult with the manufacturer's instructions. 8 Do not install near water. 6 Clean only with three-prong, grounding-type plug is a Class I apparatus to a grounding-type, three-prong outlet. 17 Remote control batteries ...
...Only use by qualified service personnel only. Replacement parts When replacement parts are qualified to do not remove any way, such as contact with them might be exposed to your home, consult an electrician or your safety. NS-32L121A13/NS-42L260A13 Important Safety Instructions CAUTION...against the LCD panel. Install in your eyes or touches your skin, consult with the manufacturer's instructions. 8 Do not install near water. 6 Clean only with three-prong, grounding-type plug is a Class I apparatus to a grounding-type, three-prong outlet. 17 Remote control batteries ...

Important Information (English)
Page 4
... of the remote control sensor, see "Front" in the online User Guide. • Replace dead batteries with your TV picture and sound, operating problems, or even damage, keep your TV, and are installed correctly. Adjust only those controls that are no obstructions between the remote control and the remote control sensor on the front of the TV. • Point the remote control directly at the remote control sensor on the screen as practical...
... of the remote control sensor, see "Front" in the online User Guide. • Replace dead batteries with your TV picture and sound, operating problems, or even damage, keep your TV, and are installed correctly. Adjust only those controls that are no obstructions between the remote control and the remote control sensor on the front of the TV. • Point the remote control directly at the remote control sensor on the screen as practical...
Important Information (English)
Page 5
... add the channel back to the channel list. See "Setting the sleep timer" in . LCD 60Hz 720p 1366 (H) × 768 (V) 16:9 3000:1 5000:1 350 nits 3d y/c digital 6.5 ms 178 178 NS-42L260A13 42 in . (101.1 × 69.8 × 25.7 cm) 39.02 lbs. (17.7 kg) Screen Screen size measured diagonally Display type Panel 60 Hz vs.120 Hz Display resolution Panel resolution Aspect ratio Contrast ratio (typical)-panel Dynamic contrast ratio- Specifications Specifications are subject to change channels. •...
... add the channel back to the channel list. See "Setting the sleep timer" in . LCD 60Hz 720p 1366 (H) × 768 (V) 16:9 3000:1 5000:1 350 nits 3d y/c digital 6.5 ms 178 178 NS-42L260A13 42 in . (101.1 × 69.8 × 25.7 cm) 39.02 lbs. (17.7 kg) Screen Screen size measured diagonally Display type Panel 60 Hz vs.120 Hz Display resolution Panel resolution Aspect ratio Contrast ratio (typical)-panel Dynamic contrast ratio- Specifications Specifications are subject to change channels. •...

Important Information (English)
Page 6
...(back) Share with Component-Y NS-42L260A13 3 (side) E-EDID compliant HDCP compliant 1 (back) 1 (back) Share with Component-Y Yes Yes No 1 (back) No 1 (back) 1 (side) 1 (side) 1 (side) (HDMI 1/DVI jack) 1 (side) (HDMI 1/DVI jack) 1 (side) 1 (side) Support JPEG and firmware Support JPEG and firmware upgrade upgrade Outputs (both models) Video Analog audio/headphone Digital audio WiFi Ethernet No 1 (side) 1 (back) No No Audio Speakers Power NS-32L121A13 Number: 2 Watts per channel: 8W NS-42L260A13 Number: 2 Watts per channel: 10W Power consumption Power input NS-32L121A13 On...
...(back) Share with Component-Y NS-42L260A13 3 (side) E-EDID compliant HDCP compliant 1 (back) 1 (back) Share with Component-Y Yes Yes No 1 (back) No 1 (back) 1 (side) 1 (side) 1 (side) (HDMI 1/DVI jack) 1 (side) (HDMI 1/DVI jack) 1 (side) 1 (side) Support JPEG and firmware Support JPEG and firmware upgrade upgrade Outputs (both models) Video Analog audio/headphone Digital audio WiFi Ethernet No 1 (side) 1 (back) No No Audio Speakers Power NS-32L121A13 Number: 2 Watts per channel: 8W NS-42L260A13 Number: 2 Watts per channel: 10W Power consumption Power input NS-32L121A13 On...


