
User Manual (English)
Page 3
... a wall-mount bracket 4 TV components 4 Accessories 4 Front 5 Back 5 Side 6 Remote control 6 Using the remote control 7 Installing the remote control batteries 7 Aiming the remote control 8 Programming a universal remote control to work with your TV . . . . 8 Making connections 8 Connecting the power 8 Connecting an outdoor antenna 8 Connecting an indoor antenna 9 Connecting cable TV 9 Connecting satellite TV via a satellite TV box 10 Connecting a VCR 10 Connecting a camcorder or game console 11 Connecting an HDMI device 11 Connecting a component video device 12 Connecting...
... a wall-mount bracket 4 TV components 4 Accessories 4 Front 5 Back 5 Side 6 Remote control 6 Using the remote control 7 Installing the remote control batteries 7 Aiming the remote control 8 Programming a universal remote control to work with your TV . . . . 8 Making connections 8 Connecting the power 8 Connecting an outdoor antenna 8 Connecting an indoor antenna 9 Connecting cable TV 9 Connecting satellite TV via a satellite TV box 10 Connecting a VCR 10 Connecting a camcorder or game console 11 Connecting an HDMI device 11 Connecting a component video device 12 Connecting...

User Manual (English)
Page 4
... DTV signal strength 21 Setting parental controls 22 Setting or changing the password 22 Setting parental control levels 22 Blocking unrated TV 24 Downloading rating information 25 Locking control buttons 25 Using closed captioning 26 Viewing closed captioning 26 Selecting the closed captioning mode 26 Customizing DTV closed captioning styles 26 Adjusting time settings 27 Setting the clock 27 Setting the sleep timer 28 Adjusting menu settings 28 Selecting the menu language 28 Changing the menu transparency 29 Labeling an input source 29 Resetting settings to the defaults 30...
... DTV signal strength 21 Setting parental controls 22 Setting or changing the password 22 Setting parental control levels 22 Blocking unrated TV 24 Downloading rating information 25 Locking control buttons 25 Using closed captioning 26 Viewing closed captioning 26 Selecting the closed captioning mode 26 Customizing DTV closed captioning styles 26 Adjusting time settings 27 Setting the clock 27 Setting the sleep timer 28 Adjusting menu settings 28 Selecting the menu language 28 Changing the menu transparency 29 Labeling an input source 29 Resetting settings to the defaults 30...
User Manual (English)
Page 5
... children can be mounted to wall mount your TV, always remember: • One size of TV stand does not fit all . Use only a wall mount rated for safe wall mount installation. At least two people are not always supported on dressers, bookcases, shelves, desks, speakers, chests, or carts may fall over , or knocked down. • Make sure that you route all instructions supplied by curious...
... children can be mounted to wall mount your TV, always remember: • One size of TV stand does not fit all . Use only a wall mount rated for safe wall mount installation. At least two people are not always supported on dressers, bookcases, shelves, desks, speakers, chests, or carts may fall over , or knocked down. • Make sure that you route all instructions supplied by curious...
User Manual (English)
Page 6
... uses replacement parts specified by the manufacturer, or sold with them might be exposed to keep from touching such power lines or circuits as power-supply cord or plug is required when the apparatus has been damaged in the panel. Power lines An outside antenna system, extreme care should not be careful of fire or electric shock, do not remove any service or repair...
... uses replacement parts specified by the manufacturer, or sold with them might be exposed to keep from touching such power lines or circuits as power-supply cord or plug is required when the apparatus has been damaged in the panel. Power lines An outside antenna system, extreme care should not be careful of fire or electric shock, do not remove any service or repair...
User Manual (English)
Page 8
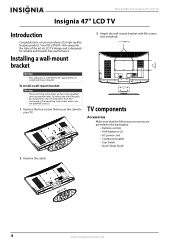
To install a wall-mount bracket: Warning These servicing instructions are provided in the packaging: • Remote control • AAA batteries (2) • AC power cord • Component cable • User Guide • Quick Setup Guide 2 Remove the stand. 4 www.insigniaproducts.com To reduce the risk of hazards, do not perform any servicing other than that contained in LCD TV design and is intended to do so. 1 Remove the four screws that the following accessories are...
To install a wall-mount bracket: Warning These servicing instructions are provided in the packaging: • Remote control • AAA batteries (2) • AC power cord • Component cable • User Guide • Quick Setup Guide 2 Remove the stand. 4 www.insigniaproducts.com To reduce the risk of hazards, do not perform any servicing other than that contained in LCD TV design and is intended to do so. 1 Remove the four screws that the following accessories are...
User Manual (English)
Page 9
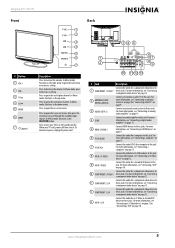
.... 2 ANTENNA/CABLE DIGITAL/ANALOG Connect an antenna or cable TV to these jacks. For more information, see "Connecting a component video device" on page 13. 7 PC IN VGA Connect the video (VGA) for a component video device to decrease the volume. In Menu mode, functions as the up arrow. For more information, see "Connecting a computer" on page 12. 12 COMPONENT 1 L/R Connect the audio for a component video device to the next lower channel. Insignia 47" LCD TV Front # Button 1 VOL+ 2 VOL- 3 CH 4 CH 5 MENU 6 INPUT 7 (power...
.... 2 ANTENNA/CABLE DIGITAL/ANALOG Connect an antenna or cable TV to these jacks. For more information, see "Connecting a component video device" on page 13. 7 PC IN VGA Connect the video (VGA) for a component video device to decrease the volume. In Menu mode, functions as the up arrow. For more information, see "Connecting a computer" on page 12. 12 COMPONENT 1 L/R Connect the audio for a component video device to the next lower channel. Insignia 47" LCD TV Front # Button 1 VOL+ 2 VOL- 3 CH 4 CH 5 MENU 6 INPUT 7 (power...
User Manual (English)
Page 10
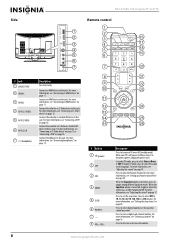
..., see "Connecting a VCR" on , press to enter channel numbers or the parental control password. Connect an HDMI device to this jack. Connect the video for an S-Video device to this jack. To disconnect power, unplug the power cord. Press to adjust the treble, bass, or SRS TruSurround HD. NS-L47Q09-10A Insignia 47" LCD TV Side # Jack 1 SERVICE PORT 2 HDMI 4 3 HDMI 3 4 AV IN 2 S-VIDEO 5 AV IN 2 VIDEO 6 AV IN 2 L/R 7 (headphone) 1 2 3 4 5 6 7 Description For service only. For more information, see "Setting up a favorite channel list" on page...
..., see "Connecting a VCR" on , press to enter channel numbers or the parental control password. Connect an HDMI device to this jack. Connect the video for an S-Video device to this jack. To disconnect power, unplug the power cord. Press to adjust the treble, bass, or SRS TruSurround HD. NS-L47Q09-10A Insignia 47" LCD TV Side # Jack 1 SERVICE PORT 2 HDMI 4 3 HDMI 3 4 AV IN 2 S-VIDEO 5 AV IN 2 VIDEO 6 AV IN 2 L/R 7 (headphone) 1 2 3 4 5 6 7 Description For service only. For more information, see "Setting up a favorite channel list" on page...
User Manual (English)
Page 11
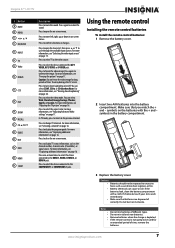
... chemicals can cause a rash. For more information, see "Viewing closed captioning on -screen menus. For more information, see "Displaying additional information" on page 16. For more information, see "Freezing the picture" on page 26. For more information, see "Adjusting Advanced Video settings" on page 16. Using the remote control Installing the remote control batteries To install the remote control batteries: 1 Remove the battery cover. 2 Insert two AAA batteries into...
... chemicals can cause a rash. For more information, see "Viewing closed captioning on -screen menus. For more information, see "Displaying additional information" on page 16. For more information, see "Freezing the picture" on page 26. For more information, see "Adjusting Advanced Video settings" on page 16. Using the remote control Installing the remote control batteries To install the remote control batteries: 1 Remove the battery cover. 2 Insert two AAA batteries into...
User Manual (English)
Page 12
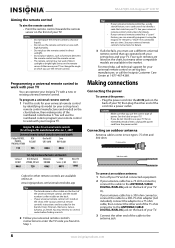
... connector, connect the cable to the ANTENNA/CABLE DIGITAL/ANALOG jack on the back of your set -top box and your universal remote control's instructions and try several codes before finding a match. 2 Follow your TV. You may not work with your TV You can operate your Insignia TV with your TV. 3 Connect the other end of the cord into the AC IN jack on the remote sensor. Four such remotes are listed on...
... connector, connect the cable to the ANTENNA/CABLE DIGITAL/ANALOG jack on the back of your set -top box and your universal remote control's instructions and try several codes before finding a match. 2 Follow your TV. You may not work with your TV You can operate your Insignia TV with your TV. 3 Connect the other end of the cord into the AC IN jack on the remote sensor. Four such remotes are listed on...
User Manual (English)
Page 13
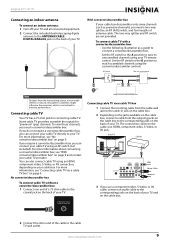
... TV Cable box IANNTENONUAT HDMI Video or S-Video Component 3 If you need a two-way splitter, an RF (A/B) switch, and four lengths of antenna cable. Insignia 47" LCD TV Connecting an indoor antenna To connect an indoor antenna: 1 Turn off your TV and all connected equipment. 2 Connect the included dual-telescoping dipole antenna to the ANTENNA/CABLE DIGITAL/ANALOG jack on the back of your TV. For more information about connecting a converter/descrambler box, see "Connecting cable TV via a cable TV box 1 Connect...
... TV Cable box IANNTENONUAT HDMI Video or S-Video Component 3 If you need a two-way splitter, an RF (A/B) switch, and four lengths of antenna cable. Insignia 47" LCD TV Connecting an indoor antenna To connect an indoor antenna: 1 Turn off your TV and all connected equipment. 2 Connect the included dual-telescoping dipole antenna to the ANTENNA/CABLE DIGITAL/ANALOG jack on the back of your TV. For more information about connecting a converter/descrambler box, see "Connecting cable TV via a cable TV box 1 Connect...

User Manual (English)
Page 14
... VCR. 4 Press INPUT to open the Source List, then press or to select AV1. 5 Insert a videotape into the VCR, then press PLAY. 10 www.insigniaproducts.com To assign the audio jacks to the AV IN 1 VIDEO jack, unplug the S-Video device. 3 Turn on your TV, then turn on the back of your TV. Note If a device is connected to the HDMI, component video, S-Video, or AV jack. NS-L47Q09-10A Insignia 47" LCD TV Connecting...
... VCR. 4 Press INPUT to open the Source List, then press or to select AV1. 5 Insert a videotape into the VCR, then press PLAY. 10 www.insigniaproducts.com To assign the audio jacks to the AV IN 1 VIDEO jack, unplug the S-Video device. 3 Turn on your TV, then turn on the back of your TV. Note If a device is connected to the HDMI, component video, S-Video, or AV jack. NS-L47Q09-10A Insignia 47" LCD TV Connecting...
User Manual (English)
Page 19
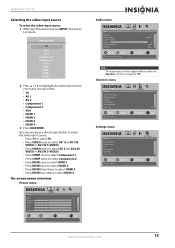
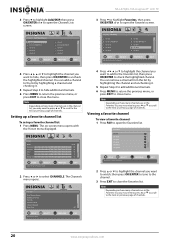
... sound quality MENU PREVIOUS EXIT EXIT Note The Audio menu will look slightly different when the Equalizer setting is changed to select HDMI 4. Source List TV AV 1 AV 2 Component 1 Component 2 VGA HDMI 1 HDMI 2 HDMI 3 HDMI 4 2 Press or to highlight the video input source your TV turned on, press INPUT. Channels menu Channels Auto Channel Search Add/Skip Channels Favorites Channel Labels Channel Strength Audio Only PICTURE AUDIO CHANNELS SETTINGS Off MOVE OK ENTER SELECT Adjust channel options MENU PREVIOUS EXIT EXIT Settings menu Settings Parental Controls Closed Caption...
... sound quality MENU PREVIOUS EXIT EXIT Note The Audio menu will look slightly different when the Equalizer setting is changed to select HDMI 4. Source List TV AV 1 AV 2 Component 1 Component 2 VGA HDMI 1 HDMI 2 HDMI 3 HDMI 4 2 Press or to highlight the video input source your TV turned on, press INPUT. Channels menu Channels Auto Channel Search Add/Skip Channels Favorites Channel Labels Channel Strength Audio Only PICTURE AUDIO CHANNELS SETTINGS Off MOVE OK ENTER SELECT Adjust channel options MENU PREVIOUS EXIT EXIT Settings menu Settings Parental Controls Closed Caption...
User Manual (English)
Page 20
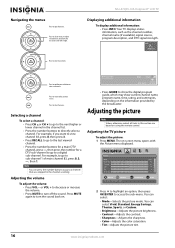
... 1. Adjusting the TV picture To adjust the picture: 1 Press MENU. You can press the number buttons to go to the next higher or lower channel in the channel list. • Press the number buttons to a digital sub-channel. Press to select menu items. NS-L47Q09-10A Insignia 47" LCD TV Displaying additional information To display additional information: • Press INFO. Adjusting the picture Note Unless otherwise noted, all tasks in the channel scanning. Picture Mode Brightness Contrast Color Tint Sharpness PICTURE AUDIO CHANNELS SETTINGS...
... 1. Adjusting the TV picture To adjust the picture: 1 Press MENU. You can press the number buttons to go to the next higher or lower channel in the channel list. • Press the number buttons to a digital sub-channel. Press to select menu items. NS-L47Q09-10A Insignia 47" LCD TV Displaying additional information To display additional information: • Press INFO. Adjusting the picture Note Unless otherwise noted, all tasks in the channel scanning. Picture Mode Brightness Contrast Color Tint Sharpness PICTURE AUDIO CHANNELS SETTINGS...
User Manual (English)
Page 21
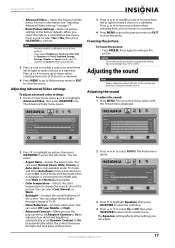
... down to close the menu. Press or to move from a list of the picture. Freezing the picture To freeze the picture: • Press FREEZE. Adjusting the sound To adjust the sound: 1 Press MENU. Picture Advanced Video Aspect Ratio Overscan Color Temperature Backlight Noise Reduction Advanced Contrast PICTURE AUDIO CHANNELS SETTINGS Auto On Cool 30 Middle MOVE OK ENTER SELECT Adjust how the picture fills the screen MENU PREVIOUS EXIT EXIT Picture Mode Brightness Contrast Color Tint Sharpness PICTURE AUDIO CHANNELS SETTINGS Vivid 42...
... down to close the menu. Press or to move from a list of the picture. Freezing the picture To freeze the picture: • Press FREEZE. Adjusting the sound To adjust the sound: 1 Press MENU. Picture Advanced Video Aspect Ratio Overscan Color Temperature Backlight Noise Reduction Advanced Contrast PICTURE AUDIO CHANNELS SETTINGS Auto On Cool 30 Middle MOVE OK ENTER SELECT Adjust how the picture fills the screen MENU PREVIOUS EXIT EXIT Picture Mode Brightness Contrast Color Tint Sharpness PICTURE AUDIO CHANNELS SETTINGS Vivid 42...

User Manual (English)
Page 22
... selection. • Equalizer Settings-Sets the equalizer frequency. NS-L47Q09-10A Insignia 47" LCD TV 5 Press to highlight an option, then press OK/ENTER to factory defaults. You can turn off the TV picture and listen to close the menu. You can select On or Off. • Reset Audio Settings- Press OK/ENTER after the menu closes and the picture disappears before the audio plays. You can select RAW or PCM. • MTS/SAP-Selects the sound mode...
... selection. • Equalizer Settings-Sets the equalizer frequency. NS-L47Q09-10A Insignia 47" LCD TV 5 Press to highlight an option, then press OK/ENTER to factory defaults. You can turn off the TV picture and listen to close the menu. You can select On or Off. • Reset Audio Settings- Press OK/ENTER after the menu closes and the picture disappears before the audio plays. You can select RAW or PCM. • MTS/SAP-Selects the sound mode...
User Manual (English)
Page 24
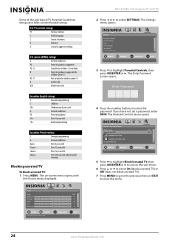
... channels. Picture Mode Brightness Contrast Color Tint Sharpness PICTURE AUDIO CHANNELS SETTINGS Vivid 42 45 54 0 +5 MOVE OK ENTER SELECT Adjust settings to affect picture quality MENU PREVIOUS EXIT EXIT 2 Press or to open the Favorites list. The Channels menu opens. You can add a channel to the list by highlighting the channel and unchecking it . 5 Repeat Step 4 to hide additional channels. 6 Press MENU to return the previous menu, or press EXIT to close...
... channels. Picture Mode Brightness Contrast Color Tint Sharpness PICTURE AUDIO CHANNELS SETTINGS Vivid 42 45 54 0 +5 MOVE OK ENTER SELECT Adjust settings to affect picture quality MENU PREVIOUS EXIT EXIT 2 Press or to open the Favorites list. The Channels menu opens. You can add a channel to the list by highlighting the channel and unchecking it . 5 Repeat Step 4 to hide additional channels. 6 Press MENU to return the previous menu, or press EXIT to close...
User Manual (English)
Page 26
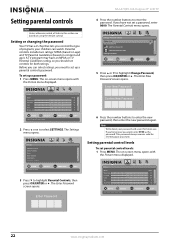
... Write down your password. Setting parental control levels To set controls for future use. The Settings menu opens. Settings Parental Controls Closed Caption Time Menu Settings Input labels Computer Settings PICTURE AUDIO CHANNELS SETTINGS MOVE OK ENTER SELECT Set various TV options MENU PREVIOUS EXIT EXIT 3 Press to affect picture quality MENU PREVIOUS EXIT EXIT 22 www.insigniaproducts.com NS-L47Q09-10A Insignia 47" LCD TV Setting parental controls Note Unless otherwise noted, all tasks in this section are based on content and age). A TV program may have...
... Write down your password. Setting parental control levels To set controls for future use. The Settings menu opens. Settings Parental Controls Closed Caption Time Menu Settings Input labels Computer Settings PICTURE AUDIO CHANNELS SETTINGS MOVE OK ENTER SELECT Set various TV options MENU PREVIOUS EXIT EXIT 3 Press to affect picture quality MENU PREVIOUS EXIT EXIT 22 www.insigniaproducts.com NS-L47Q09-10A Insignia 47" LCD TV Setting parental controls Note Unless otherwise noted, all tasks in this section are based on content and age). A TV program may have...
User Manual (English)
Page 28
... Enter Password screen opens. Settings Parental Controls Closed Caption Time Menu Settings Input labels Computer Settings PICTURE AUDIO CHANNELS SETTINGS MOVE OK ENTER SELECT Set various TV options MENU PREVIOUS EXIT EXIT 3 Press to enter the password. TV content ratings FV Fantasy violence L Adult language. U.S. The Parental Controls menu opens. Picture Mode Brightness Contrast Color Tint Sharpness PICTURE AUDIO CHANNELS SETTINGS Vivid 42 45 54 0 +5 MOVE OK ENTER SELECT Adjust settings to affect picture quality MENU PREVIOUS EXIT EXIT NS-L47Q09-10A Insignia 47" LCD TV...
... Enter Password screen opens. Settings Parental Controls Closed Caption Time Menu Settings Input labels Computer Settings PICTURE AUDIO CHANNELS SETTINGS MOVE OK ENTER SELECT Set various TV options MENU PREVIOUS EXIT EXIT 3 Press to enter the password. TV content ratings FV Fantasy violence L Adult language. U.S. The Parental Controls menu opens. Picture Mode Brightness Contrast Color Tint Sharpness PICTURE AUDIO CHANNELS SETTINGS Vivid 42 45 54 0 +5 MOVE OK ENTER SELECT Adjust settings to affect picture quality MENU PREVIOUS EXIT EXIT NS-L47Q09-10A Insignia 47" LCD TV...
User Manual (English)
Page 30
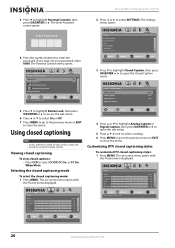
... Password screen opens. Settings Parental Controls PICTURE AUDIO CHANNELS SETTINGS Button Lock Off Block Unrated TV Off USA Parental Locks Canadian Parental Locks Change Password MOVE OK ENTER SELECT Lock or unlock the buttons on using the remote control. The Settings menu opens. Using closed captioning mode: 1 Press MENU. If you have not set a password, enter 0000. NS-L47Q09-10A Insignia 47" LCD TV 3 Press to select SETTINGS. Selecting the closed captioning mode To select the closed captioning Note Unless otherwise noted, all tasks in this section are based...
... Password screen opens. Settings Parental Controls PICTURE AUDIO CHANNELS SETTINGS Button Lock Off Block Unrated TV Off USA Parental Locks Canadian Parental Locks Change Password MOVE OK ENTER SELECT Lock or unlock the buttons on using the remote control. The Settings menu opens. Using closed captioning mode: 1 Press MENU. If you have not set a password, enter 0000. NS-L47Q09-10A Insignia 47" LCD TV 3 Press to select SETTINGS. Selecting the closed captioning mode To select the closed captioning Note Unless otherwise noted, all tasks in this section are based...
User Manual (English)
Page 35
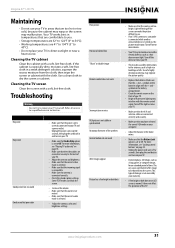
... antenna is connected correctly. • Check the closed caption settings. Troubleshooting Warning Do not try to your TV and a power outlet. • Unplug the power cord, wait 60 seconds, then plug the cord back in and turn on your computer. • Adjust the balance in direct sunlight or near a heat source. Refer all service to dry the screen or cabinet. Problem No power No picture Good picture but no sound Good sound...
... antenna is connected correctly. • Check the closed caption settings. Troubleshooting Warning Do not try to your TV and a power outlet. • Unplug the power cord, wait 60 seconds, then plug the cord back in and turn on your computer. • Adjust the balance in direct sunlight or near a heat source. Refer all service to dry the screen or cabinet. Problem No power No picture Good picture but no sound Good sound...


