
Integration Guide
Page 2
... les derniers pilotes et mises a jour de BIOS, accedez a : http://downloadcenter.intel.com. Ell LI` 22-I xFAil J LH 5at, El-A Cl uFIN Al 2: http://www.intel.com/support/kr/motherboards/desktop/sb/CS-O34O57.htm. Para obter uma lista de memorias...www.inteLcom/NUCSupport. Aby wytwietlie listg przetestowanych pamigci, odwiedi strong: http://www.intel.com/NUCSupport. N ' OAI-M97 M.2 SSD PJV, *Mg: http://www.intel.com/NUCSupporto PIMERNMIJKAn M.2 EINEWOIMM , MEE : http://www.intel.com/NUCSupport Cnincoic npoTecTinpobaHHbix TBepAOTeAbHbIX HaKonion-eneiA M.2 npinemeH Ha ci-paHinue http...
... les derniers pilotes et mises a jour de BIOS, accedez a : http://downloadcenter.intel.com. Ell LI` 22-I xFAil J LH 5at, El-A Cl uFIN Al 2: http://www.intel.com/support/kr/motherboards/desktop/sb/CS-O34O57.htm. Para obter uma lista de memorias...www.inteLcom/NUCSupport. Aby wytwietlie listg przetestowanych pamigci, odwiedi strong: http://www.intel.com/NUCSupport. N ' OAI-M97 M.2 SSD PJV, *Mg: http://www.intel.com/NUCSupporto PIMERNMIJKAn M.2 EINEWOIMM , MEE : http://www.intel.com/NUCSupport Cnincoic npoTecTinpobaHHbix TBepAOTeAbHbIX HaKonion-eneiA M.2 npinemeH Ha ci-paHinue http...

User Guide
Page 2
... wires that could cause a short circuit Observe all warnings and cautions that instruct you install and test the Intel NUC, observe all warnings and cautions in the installation instructions. Intel NUC Kit NUC5i3RYH & NUC5i5RYH User Guide Before You Begin CAUTIONS The procedures in this user guide assume familiarity with the general terminology associated...
... wires that could cause a short circuit Observe all warnings and cautions that instruct you install and test the Intel NUC, observe all warnings and cautions in the installation instructions. Intel NUC Kit NUC5i3RYH & NUC5i5RYH User Guide Before You Begin CAUTIONS The procedures in this user guide assume familiarity with the general terminology associated...
User Guide
Page 3
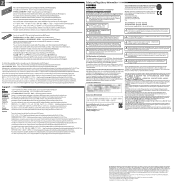
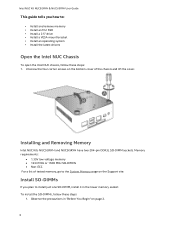
Observe the precautions in the lower memory socket. Unscrew the four corner screws on page 2. 3 Installing and Removing Memory Intel NUC Kits NUC5i3RYH and NUC5i5RYH have two 204-pin DDR3L SO-DIMM sockets. Memory requirements: 1.35V low voltage memory 1333 MHz or 1600 MHz SO-DIMMs ...; Non-ECC For a list of the chassis and lift the cover. To install the SO-DIMMs, follow these steps: 1. Intel NUC Kit NUC5i3RYH & NUC5i5RYH User Guide This guide tells you plan to install just one SO-DIMM, install it in "Before You Begin" on the bottom cover of...
Observe the precautions in the lower memory socket. Unscrew the four corner screws on page 2. 3 Installing and Removing Memory Intel NUC Kits NUC5i3RYH and NUC5i5RYH have two 204-pin DDR3L SO-DIMM sockets. Memory requirements: 1.35V low voltage memory 1333 MHz or 1600 MHz SO-DIMMs ...; Non-ECC For a list of the chassis and lift the cover. To install the SO-DIMMs, follow these steps: 1. Intel NUC Kit NUC5i3RYH & NUC5i5RYH User Guide This guide tells you plan to install just one SO-DIMM, install it in "Before You Begin" on the bottom cover of...
User Guide
Page 4
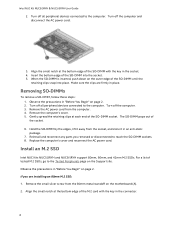
... an 80mm M.2 SSD: 1. Removing SO-DIMMs To remove a SO-DIMM, follow these steps: 1. Remove the computer's cover. 5. Install an M.2 SSD Intel NUC Kits NUC5i3RYH and NUC5i5RYH support 80mm, 60mm, and 42mm M.2 SSDs. For a list of the socket. 6. Align the small notch at each end of the SO-DIMM socket...Insert the bottom edge of the SO-DIMM with the key in the socket. 4. Observe the precautions in an anti-static package. 7. Intel NUC Kit NUC5i3RYH & NUC5i5RYH User Guide 2. Align the small notch at the bottom edge of the SO-DIMM into place. Remove the AC power cord from the socket...
... an 80mm M.2 SSD: 1. Removing SO-DIMMs To remove a SO-DIMM, follow these steps: 1. Remove the computer's cover. 5. Install an M.2 SSD Intel NUC Kits NUC5i3RYH and NUC5i5RYH support 80mm, 60mm, and 42mm M.2 SSDs. For a list of the socket. 6. Align the small notch at each end of the SO-DIMM socket...Insert the bottom edge of the SO-DIMM with the key in the socket. 4. Observe the precautions in an anti-static package. 7. Intel NUC Kit NUC5i3RYH & NUC5i5RYH User Guide 2. Align the small notch at the bottom edge of the SO-DIMM into place. Remove the AC power cord from the socket...
User Guide
Page 5
... the card to the Tested Peripherals page on the Support site. Install a 2.5" SSD or Hard Drive For a list of the M.2 card into the connector (D). 5. Intel NUC Kit NUC5i3RYH & NUC5i5RYH User Guide 3. If you are installing a 60mm or 42mm M.2 SSD: 1. Insert the bottom edge of the M.2 card with the small silver screw (C). Align...
... the card to the Tested Peripherals page on the Support site. Install a 2.5" SSD or Hard Drive For a list of the M.2 card into the connector (D). 5. Intel NUC Kit NUC5i3RYH & NUC5i5RYH User Guide 3. If you are installing a 60mm or 42mm M.2 SSD: 1. Insert the bottom edge of the M.2 card with the small silver screw (C). Align...
User Guide
Page 6
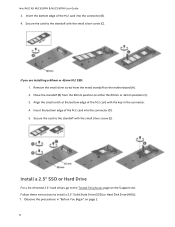
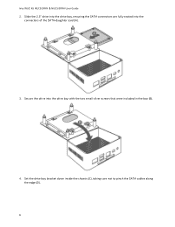
Slide the 2.5" drive into the drive bay, ensuring the SATA connectors are fully seated into the drive bay with the two small silver screws that were included in the box (B). 4. Secure the drive into the connectors of the SATA daughter card (A). 3. Set the drive bay bracket down inside the chassis (C), taking care not to pinch the SATA cables along the edge (D). 6 Intel NUC Kit NUC5i3RYH & NUC5i5RYH User Guide 2.
Slide the 2.5" drive into the drive bay, ensuring the SATA connectors are fully seated into the drive bay with the two small silver screws that were included in the box (B). 4. Secure the drive into the connectors of the SATA daughter card (A). 3. Set the drive bay bracket down inside the chassis (C), taking care not to pinch the SATA cables along the edge (D). 6 Intel NUC Kit NUC5i3RYH & NUC5i5RYH User Guide 2.

User Guide
Page 7
Intel NUC Kit NUC5i3RYH & NUC5i5RYH User Guide Close the Chassis After all components have been installed, close the Intel NUC chassis. Attach and Use the VESA Bracket (Optional) Follow these instructions to the back of the monitor or TV. 7 Using the four small black screws that were included in the box, attach the VESA bracket to attach and use the VESA mount bracket: 1.
Intel NUC Kit NUC5i3RYH & NUC5i5RYH User Guide Close the Chassis After all components have been installed, close the Intel NUC chassis. Attach and Use the VESA Bracket (Optional) Follow these instructions to the back of the monitor or TV. 7 Using the four small black screws that were included in the box, attach the VESA bracket to attach and use the VESA mount bracket: 1.

User Guide
Page 8
Attach the two slightly larger black screws to the bottom chassis cover of Linux that have been reported as compatible by Intel NUC owners. Intel NUC Kit NUC5i3RYH & NUC5i5RYH User Guide 2. Refer to Supported Operating Systems for system requirements and installation steps. 8 Slide the Intel NUC onto the VESA mount bracket. Install an Operating System Refer to Operating System Installation for a list of Intel-validated Windows* operating systems, as well as versions of the Intel NUC. 3.
Attach the two slightly larger black screws to the bottom chassis cover of Linux that have been reported as compatible by Intel NUC owners. Intel NUC Kit NUC5i3RYH & NUC5i5RYH User Guide 2. Refer to Supported Operating Systems for system requirements and installation steps. 8 Slide the Intel NUC onto the VESA mount bracket. Install an Operating System Refer to Operating System Installation for a list of Intel-validated Windows* operating systems, as well as versions of the Intel NUC. 3.
User Guide
Page 9
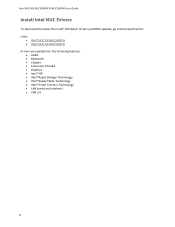
... to Download Center: Links: Intel® NUC Kit NUC5i3RYH Intel® NUC Kit NUC5i5RYH Drivers are available for the following features: Audio Bluetooth Chipset Consumer Infrared Graphics Intel® ME Intel® Rapid Storage Technology Intel® Ready Mode Technology Intel® Smart Connect Technology ...
... to Download Center: Links: Intel® NUC Kit NUC5i3RYH Intel® NUC Kit NUC5i5RYH Drivers are available for the following features: Audio Bluetooth Chipset Consumer Infrared Graphics Intel® ME Intel® Rapid Storage Technology Intel® Ready Mode Technology Intel® Smart Connect Technology ...