
Service Guide
Page 10
... processors can be found at: http://support.intel.com/support/motherboards/server/S3420GP/ DIMMs that you can use with this product and need more information about this product or information about the server chassis, including sub-system overviews and mechanical drawings If you can be found at : http://support.intel.com/support/motherboards/server/S3420GP/ x Intel® Server System SR1630GP/SR1630HGP...
... processors can be found at: http://support.intel.com/support/motherboards/server/S3420GP/ DIMMs that you can use with this product and need more information about this product or information about the server chassis, including sub-system overviews and mechanical drawings If you can be found at : http://support.intel.com/support/motherboards/server/S3420GP/ x Intel® Server System SR1630GP/SR1630HGP...

Service Guide
Page 13
... ...viii Intel® Server System SR1630GP Contents viii Intel® Server System SR1630HGP Contents ix Server System References ...x Chapter 1: Server System Features 1 Chassis Component Identification 5 System Front Panel (SR1630GP 5 System Front Panel (SR1630HGP 7 System Rear ...8 Peripheral Devices (SR1630GP 9 Peripheral Devices (SR1630HGP 9 Hard Disk Drives ...9 Slimline Optical Drive Carrier 10 Internal Components (SR1630GP 11 Internal Components (SR1630HGP 12 Server Board Connectors / Components 13 Configuration Jumpers ...15 Hardware Requirements ...17 Processor...
... ...viii Intel® Server System SR1630GP Contents viii Intel® Server System SR1630HGP Contents ix Server System References ...x Chapter 1: Server System Features 1 Chassis Component Identification 5 System Front Panel (SR1630GP 5 System Front Panel (SR1630HGP 7 System Rear ...8 Peripheral Devices (SR1630GP 9 Peripheral Devices (SR1630HGP 9 Hard Disk Drives ...9 Slimline Optical Drive Carrier 10 Internal Components (SR1630GP 11 Internal Components (SR1630HGP 12 Server Board Connectors / Components 13 Configuration Jumpers ...15 Hardware Requirements ...17 Processor...

Service Guide
Page 14
... and Installing the Server Cover 30 Removing the Server System Cover 30 Installing the Server System Cover 32 Removing and Installing the Processor Air Duct 33 Removing the Processor Air Duct 33 Installing the Processor Air Duct 35 ...SR1630HGP 58 Removing a Slimline Optical Drive (SR1630HGP 59 Installing and Removing the PCIe* Riser Assembly 61 Removing the PCIe* Riser Assembly 61 Installing the PCIe* Riser Assembly 62 Installing or Replacing a PCIe* Riser Card 63 Removing a PCIe* Riser Card 63 Installing a PCIe* Riser Card 64 xiv Intel® Server System SR1630GP / SR1630HGP...
... and Installing the Server Cover 30 Removing the Server System Cover 30 Installing the Server System Cover 32 Removing and Installing the Processor Air Duct 33 Removing the Processor Air Duct 33 Installing the Processor Air Duct 35 ...SR1630HGP 58 Removing a Slimline Optical Drive (SR1630HGP 59 Installing and Removing the PCIe* Riser Assembly 61 Removing the PCIe* Riser Assembly 61 Installing the PCIe* Riser Assembly 62 Installing or Replacing a PCIe* Riser Card 63 Removing a PCIe* Riser Card 63 Installing a PCIe* Riser Card 64 xiv Intel® Server System SR1630GP / SR1630HGP...

Service Guide
Page 19
... Figure 11. Installing the Server System Cover (SR1630GP 32 Figure 19. Installing the Server System Cover (SR1630HGP 33 Figure 20. Installing the Processor Air Duct (SR1630HGP 36 Figure 24. Install Drive Assembly into Drive Carrier (SR1630HGP 52 Figure 40. Removing the Drive Carrier (SR1630HGP 52 Figure 39. Installing Drive into the Server System (SR1630GP 46 Figure 35. Intel® Server System SR1630HGP 2 Figure 3. S3420GP Connector...
... Figure 11. Installing the Server System Cover (SR1630GP 32 Figure 19. Installing the Server System Cover (SR1630HGP 33 Figure 20. Installing the Processor Air Duct (SR1630HGP 36 Figure 24. Install Drive Assembly into Drive Carrier (SR1630HGP 52 Figure 40. Removing the Drive Carrier (SR1630HGP 52 Figure 39. Installing Drive into the Server System (SR1630GP 46 Figure 35. Intel® Server System SR1630HGP 2 Figure 3. S3420GP Connector...

Service Guide
Page 25
... 16 GB maximum with 8 MB video memory • 64 MB DDR2 667 MHz memory Intel® Server System SR1630GP / SR1630HGP Service Guide 3 Table 1 summarizes the features of the server system. Intel® Server System SR1630GP / SR1630HGP Feature Summary Feature Description Dimensions (SR1630GP) Dimensions (Sr1630HGP) Server Board Processor • 1.70 inches high... (front) Expansion Capabilities (optional accessory required) One low-profile riser slot supporting one Intel® Xeon® 3400 Series Processor in card slot (Gen 2). Fans Supports two system fans. Table 1.
... 16 GB maximum with 8 MB video memory • 64 MB DDR2 667 MHz memory Intel® Server System SR1630GP / SR1630HGP Service Guide 3 Table 1 summarizes the features of the server system. Intel® Server System SR1630GP / SR1630HGP Feature Summary Feature Description Dimensions (SR1630GP) Dimensions (Sr1630HGP) Server Board Processor • 1.70 inches high... (front) Expansion Capabilities (optional accessory required) One low-profile riser slot supporting one Intel® Xeon® 3400 Series Processor in card slot (Gen 2). Fans Supports two system fans. Table 1.

Service Guide
Page 33
Processor Air Duct D. Server Board C. Power Supply G. System Memory DIMM Sockets H. System Blower Fans (two) I A E F G H AF003242 A. PCIe* Riser Assembly E. Front Panel K. Slimline Optical Drive Bay Figure 6. System Components (SR1630GP) Intel® Server System SR1630GP / SR1630HGP Service Guide 11 Processor and Heatsink F. Hard Drive Bays J. Internal Components (SR1630GP) D C B A K J I . Rack Handles (two) B.
Processor Air Duct D. Server Board C. Power Supply G. System Memory DIMM Sockets H. System Blower Fans (two) I A E F G H AF003242 A. PCIe* Riser Assembly E. Front Panel K. Slimline Optical Drive Bay Figure 6. System Components (SR1630GP) Intel® Server System SR1630GP / SR1630HGP Service Guide 11 Processor and Heatsink F. Hard Drive Bays J. Internal Components (SR1630GP) D C B A K J I . Rack Handles (two) B.
Service Guide
Page 34
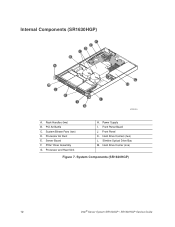
Power Supply I J A G H AF003243 A. Front Panel Board J. PCI Air Baffle C. Slimline Optical Drive Bay M. System Blower Fans (two) D. PCIe* Riser Assembly G. Internal Components (SR1630HGP) F E D C B A M L K I . Hard Drive Carriers (two) L. System Components (SR1630HGP) 12 Intel® Server System SR1630GP / SR1630HGP Service Guide Processor and Heat Sink H. Front Panel K. Hard Drive Carrier (one) Figure 7. Server Board F. Rack Handles (two) B. Processor Air Duct E.
Power Supply I J A G H AF003243 A. Front Panel Board J. PCI Air Baffle C. Slimline Optical Drive Bay M. System Blower Fans (two) D. PCIe* Riser Assembly G. Internal Components (SR1630HGP) F E D C B A M L K I . Hard Drive Carriers (two) L. System Components (SR1630HGP) 12 Intel® Server System SR1630GP / SR1630HGP Service Guide Processor and Heat Sink H. Front Panel K. Hard Drive Carrier (one) Figure 7. Server Board F. Rack Handles (two) B. Processor Air Duct E.

Service Guide
Page 39
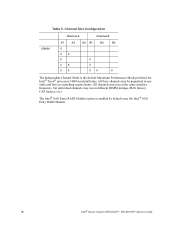
... supports one Intel® Xeon® 3400 processor series with 95 W Thermal Design Power (TDP) with 2.5 GT/s or one DIMM in memory slot DIMM_A1. Table 5. Channel Slot Configuration Channel A Channel B RDIMM A1 A2 A3 B1 B2 B3 X XX XX X X X XX X XX XX XX XX XX XXX XX XXX X Intel® Server System SR1630GP / SR1630HGP Service Guide...
... supports one Intel® Xeon® 3400 processor series with 95 W Thermal Design Power (TDP) with 2.5 GT/s or one DIMM in memory slot DIMM_A1. Table 5. Channel Slot Configuration Channel A Channel B RDIMM A1 A2 A3 B1 B2 B3 X XX XX X X X XX X XX XX XX XX XX XXX XX XXX X Intel® Server System SR1630GP / SR1630HGP Service Guide...
Service Guide
Page 40
...; SAS Entry RAID Module option is the default Maximum Performance Mode preferred for Intel® Xeon® processor 3400 based platforms. All three channels may run at different DIMM timings (RAS latency, CAS latency, etc.). All channels must run at the same interface ... Slot Configuration UDIMM Channel A Channel B A1 A2 A3 B1 B2 B3 X XX X XX XX X X XX X The Independent Channel Mode is enabled by default once the Intel® SAS Entry RAID Module. 18 Intel® Server System SR1630GP / SR1630HGP Service Guide
...; SAS Entry RAID Module option is the default Maximum Performance Mode preferred for Intel® Xeon® processor 3400 based platforms. All three channels may run at different DIMM timings (RAS latency, CAS latency, etc.). All channels must run at the same interface ... Slot Configuration UDIMM Channel A Channel B A1 A2 A3 B1 B2 B3 X XX X XX XX X X XX X The Independent Channel Mode is enabled by default once the Intel® SAS Entry RAID Module. 18 Intel® Server System SR1630GP / SR1630HGP Service Guide

Service Guide
Page 55
... ESD precautions at the beginning of this book. For instructions, see Figure 20 for SR1630GP; Remove the server system cover. Removing and Installing the Processor Air Duct Always operate your server system with the processor air duct in place. Intel® Server System SR1630GP / SR1630HGP Service Guide 33 A B AF001579 Figure 19. Reconnect all peripheral devices and the AC power cable. 3.
... ESD precautions at the beginning of this book. For instructions, see Figure 20 for SR1630GP; Remove the server system cover. Removing and Installing the Processor Air Duct Always operate your server system with the processor air duct in place. Intel® Server System SR1630GP / SR1630HGP Service Guide 33 A B AF001579 Figure 19. Reconnect all peripheral devices and the AC power cable. 3.

Service Guide
Page 57
... pinch or disengage cables that may be near or under the air duct. 5. AF003250 Figure 22. Remove the server system cover. Installing the Processor Air Duct (SR1630GP) Intel® Server System SR1630GP / SR1630HGP Service Guide 35 Power down the server and unplug all peripheral devices and the AC power cable. 3. Lower the air duct into place, insert the...
... pinch or disengage cables that may be near or under the air duct. 5. AF003250 Figure 22. Remove the server system cover. Installing the Processor Air Duct (SR1630GP) Intel® Server System SR1630GP / SR1630HGP Service Guide 35 Power down the server and unplug all peripheral devices and the AC power cable. 3. Lower the air duct into place, insert the...
Service Guide
Page 58
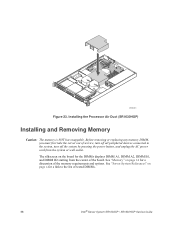
..." on the board for a discussion of tested DIMMs. 36 Intel® Server System SR1630GP / SR1630HGP Service Guide The silkscreen on page 14 for the DIMMs displays DIMM A1, DIMM A2, DIMM B1, and DIMM B2 starting from the system or wall outlet. Installing the Processor Air Duct (SR1630HGP) Installing and Removing Memory Caution: The memory is NOT...
..." on the board for a discussion of tested DIMMs. 36 Intel® Server System SR1630GP / SR1630HGP Service Guide The silkscreen on page 14 for the DIMMs displays DIMM A1, DIMM A2, DIMM B1, and DIMM B2 starting from the system or wall outlet. Installing the Processor Air Duct (SR1630HGP) Installing and Removing Memory Caution: The memory is NOT...

Service Guide
Page 61
... the AC power cable. 3. Otherwise, install the protective socket cover over the empty processor socket and then reinstall the chassis cover. See "Server System References" on page x for the first time, see "Removing the Server System Cover" on page 40. Intel® Server System SR1630GP / SR1630HGP Service Guide 39 See "Safety Information" on the corners of the heat sink...
... the AC power cable. 3. Otherwise, install the protective socket cover over the empty processor socket and then reinstall the chassis cover. See "Server System References" on page x for the first time, see "Removing the Server System Cover" on page 40. Intel® Server System SR1630GP / SR1630HGP Service Guide 39 See "Safety Information" on the corners of the heat sink...
Service Guide
Page 62
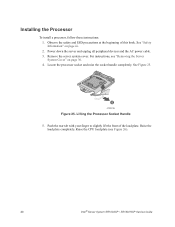
... the load plate completely. See "Safety Information" on page 30. 4. Installing the Processor To install a processor, follow these instructions: 1. Observe the safety and ESD precautions at the beginning of the load plate. For instructions, see Figure 26). 40 Intel® Server System SR1630GP / SR1630HGP Service Guide Push the rear tab with your finger to slightly lift...
... the load plate completely. See "Safety Information" on page 30. 4. Installing the Processor To install a processor, follow these instructions: 1. Observe the safety and ESD precautions at the beginning of the load plate. For instructions, see Figure 26). 40 Intel® Server System SR1630GP / SR1630HGP Service Guide Push the rear tab with your finger to slightly lift...

Service Guide
Page 63
Removing the Shipping Cover Intel® Server System SR1630GP / SR1630HGP Service Guide 41 Opening the Load Plate Caution: Do not touch the socket pins; A REMOVE B REMOVE AF003187 Figure 26. they are very sensitive and easily damaged. 6. Remove the processor from the packaging box and remove the protective shipping cover. A AF003189 Figure 27. See Figure 27.
Removing the Shipping Cover Intel® Server System SR1630GP / SR1630HGP Service Guide 41 Opening the Load Plate Caution: Do not touch the socket pins; A REMOVE B REMOVE AF003187 Figure 26. they are very sensitive and easily damaged. 6. Remove the processor from the packaging box and remove the protective shipping cover. A AF003189 Figure 27. See Figure 27.
Service Guide
Page 64
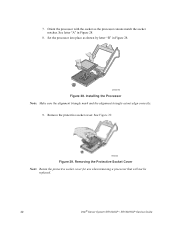
... the processor into place as shown by letter "B" in Figure 28. 8. Installing the Processor Note: Make sure the alignment triangle mark and the alignment triangle cutout align correctly. 9. Removing the Protective Socket Cover Note: Retain the protective socket cover for use when removing a processor that will not be replaced. 42 Intel® Server System SR1630GP / SR1630HGP Service...
... the processor into place as shown by letter "B" in Figure 28. 8. Installing the Processor Note: Make sure the alignment triangle mark and the alignment triangle cutout align correctly. 9. Removing the Protective Socket Cover Note: Retain the protective socket cover for use when removing a processor that will not be replaced. 42 Intel® Server System SR1630GP / SR1630HGP Service...

Service Guide
Page 65
... before tightening another. 5. Installing the Heat Sink Intel® Server System SR1630GP / SR1630HGP Service Guide 43 For instructions, see "Installing the Processor" on the underside of it. Set the heat sink over the processor as shown to provide correct airflow through the system. 3. Orient the heat sink over the processor, lining up the four captive screws with the...
... before tightening another. 5. Installing the Heat Sink Intel® Server System SR1630GP / SR1630HGP Service Guide 43 For instructions, see "Installing the Processor" on the underside of it. Set the heat sink over the processor as shown to provide correct airflow through the system. 3. Orient the heat sink over the processor, lining up the four captive screws with the...

Service Guide
Page 66
.... you removed or disconnected to reach the processor sockets. 7. For instructions, see "Removing the Server System Cover" on page 48 for an Internet link to two SATA drives. See Figure 31. 44 Intel® Server System SR1630GP / SR1630HGP Service Guide 6. Reinstall and reconnect any parts you can install up to a list of supported hardware. Before removing or...
.... you removed or disconnected to reach the processor sockets. 7. For instructions, see "Removing the Server System Cover" on page 48 for an Internet link to two SATA drives. See Figure 31. 44 Intel® Server System SR1630GP / SR1630HGP Service Guide 6. Reinstall and reconnect any parts you can install up to a list of supported hardware. Before removing or...

Service Guide
Page 86
... Assembly 8. For instructions, see "Installing the Processor Air Duct" on page 62. 10. For instructions, see "Installing the PCIe* Riser Assembly" on page 35. 64 Intel® Server System SR1630GP / SR1630HGP Service Guide Power down the server and unplug all peripheral devices and the AC ...power cable into the server. Disconnect any cables attached to add-in Card" on page 64. ...
... Assembly 8. For instructions, see "Installing the Processor Air Duct" on page 62. 10. For instructions, see "Installing the PCIe* Riser Assembly" on page 35. 64 Intel® Server System SR1630GP / SR1630HGP Service Guide Power down the server and unplug all peripheral devices and the AC ...power cable into the server. Disconnect any cables attached to add-in Card" on page 64. ...

Service Guide
Page 89
... 11. Install the processor air duct. You will use caution so you removed in step 5. See letter "A" in Figure 55. 8. AF003287 Figure 55. Save this screw. You may need to remove it, but use it later. 6. For instructions, see "Installing the Server System Cover". 12. Pull...to wriggle the card from the socket in card slots have filler panels installed. 9. Install the server system cover. Plug all empty add-in the riser assembly. 5. Intel® Server System SR1630GP / SR1630HGP Service Guide 67 Remove the screw at the rear of the riser assembly. Removing a Full ...
... 11. Install the processor air duct. You will use caution so you removed in step 5. See letter "A" in Figure 55. 8. AF003287 Figure 55. Save this screw. You may need to remove it, but use it later. 6. For instructions, see "Installing the Server System Cover". 12. Pull...to wriggle the card from the socket in card slots have filler panels installed. 9. Install the server system cover. Plug all empty add-in the riser assembly. 5. Intel® Server System SR1630GP / SR1630HGP Service Guide 67 Remove the screw at the rear of the riser assembly. Removing a Full ...