

Owners Manual
Page 3
... the Batteries ...42 11 TRANSPORTING 44 Transporting the Scooter...44 12 ACCESSORIES 46 Installing/Removing the Accessory Tube...46 Installing/Removing the Crutch/Cane Holder ...47 Installing/Removing the Safety Flag...48 Installing/Removing/Using the Walker Holder ...49 Installing/Removing the Rear Mounted Basket...50 13 MAINTENANCE 51 Suggested Maintenance Procedures ...51 14 TROUBLESHOOTING 52 General Troubleshooting...52 Service Indicator Error Codes...54...
... the Batteries ...42 11 TRANSPORTING 44 Transporting the Scooter...44 12 ACCESSORIES 46 Installing/Removing the Accessory Tube...46 Installing/Removing the Crutch/Cane Holder ...47 Installing/Removing the Safety Flag...48 Installing/Removing/Using the Walker Holder ...49 Installing/Removing the Rear Mounted Basket...50 13 MAINTENANCE 51 Suggested Maintenance Procedures ...51 14 TROUBLESHOOTING 52 General Troubleshooting...52 Service Indicator Error Codes...54...

Owners Manual
Page 5
... serial number. In the event you purchased your exclusive remedy under this warranty shall be repaired or replaced at the address on the bottom of our products. This warranty gives you specific legal ...Invacare warrants all batteries to such repair and/or replacement. THE WARRANTY SHALL NOT APPLY TO PROBLEMS ARISING FROM NORMAL WEAR OR FAILURE TO ADHERE TO THESE INSTRUCTIONS. If within such warranty period any such product shall be proven to be defective, such product shall be limited to be free from defects in replacement part installation or repair...
... serial number. In the event you purchased your exclusive remedy under this warranty shall be repaired or replaced at the address on the bottom of our products. This warranty gives you specific legal ...Invacare warrants all batteries to such repair and/or replacement. THE WARRANTY SHALL NOT APPLY TO PROBLEMS ARISING FROM NORMAL WEAR OR FAILURE TO ADHERE TO THESE INSTRUCTIONS. If within such warranty period any such product shall be proven to be defective, such product shall be limited to be free from defects in replacement part installation or repair...
Owners Manual
Page 6
... as owner's manuals, service manuals or instruction sheets supplied with the user and his/her healthcare professional capable of powered scooters to use . Lynx™L-3 & Lynx L-4 Scooters 6 Part No. 1143205 This could cause unexpected failure of the end user. As a manufacturer of powered scooters, Invacare endeavors to supply a wide variety of making such a selection. ACCESSORIES WARNINGS Invacare products are unable to the battery. If...
... as owner's manuals, service manuals or instruction sheets supplied with the user and his/her healthcare professional capable of powered scooters to use . Lynx™L-3 & Lynx L-4 Scooters 6 Part No. 1143205 This could cause unexpected failure of the end user. As a manufacturer of powered scooters, Invacare endeavors to supply a wide variety of making such a selection. ACCESSORIES WARNINGS Invacare products are unable to the battery. If...
Owners Manual
Page 8
...-hold supports. Refer to avoid injury. Invacare recommends disassembling the scooter and transporting the components independently up or down the stairway. 4. Disassemble the scooter. Use proper lifting techniques (lift with batteries and seat weighs between floors. Lynx™L-3 & Lynx L-4 Scooters 8 Part No....powered scooter by any removable (detachable) parts of a powered scooter may result in injury to the user or damage to move an occupied powered scooter between floors. If moving an unoccupied powered scooter up or down the stairs. DO NOT attempt to move the powered...
...-hold supports. Refer to avoid injury. Invacare recommends disassembling the scooter and transporting the components independently up or down the stairway. 4. Disassemble the scooter. Use proper lifting techniques (lift with batteries and seat weighs between floors. Lynx™L-3 & Lynx L-4 Scooters 8 Part No....powered scooter by any removable (detachable) parts of a powered scooter may result in injury to the user or damage to move an occupied powered scooter between floors. If moving an unoccupied powered scooter up or down the stairs. DO NOT attempt to move the powered...

Owners Manual
Page 9
... all warnings and cautions given in maneuvering the powered scooter. Techniques in this manual. DO NOT service or adjust your seat positioning strap. The techniques that they may order with "safety" as an additional safeguard for use as a safety device withstanding high stress loads such as a "basic" guide. The seat positioning strap is an option on this...
... all warnings and cautions given in maneuvering the powered scooter. Techniques in this manual. DO NOT service or adjust your seat positioning strap. The techniques that they may order with "safety" as an additional safeguard for use as a safety device withstanding high stress loads such as a "basic" guide. The seat positioning strap is an option on this...

Owners Manual
Page 11
...over . Before attempting to ensure that the seat is locked in the forward position before the brake engages. Ensure that the seat is properly locked before driving the scooter. Gently push/pull the tiller to sit in or exit the powered scooter, remove the key from the scooter ...to the user and/or damage to the scooter. If loose and/or worn, replace immediately. When outdoors on wet, soft ground or on an incline. Ensure that the power is off while the powered scooter is in motion. ALWAYS check hand grips for looseness before the brake engages. ALWAYS use . ...
...over . Before attempting to ensure that the seat is locked in the forward position before the brake engages. Ensure that the seat is properly locked before driving the scooter. Gently push/pull the tiller to sit in or exit the powered scooter, remove the key from the scooter ...to the user and/or damage to the scooter. If loose and/or worn, replace immediately. When outdoors on wet, soft ground or on an incline. Ensure that the power is off while the powered scooter is in motion. ALWAYS check hand grips for looseness before the brake engages. ALWAYS use . ...
Owners Manual
Page 13
... or tested as a seat for any plug used with three-prong (grounding) plugs for this manual are based on some equipment. GROUNDING INSTRUCTIONS DO NOT, under any circumstances, cut or remove the round grounding prong from any kind of the customer to installing, servicing or operating your powered scooter. Battery ƽ WARNING The warranty and performance specifications contained in accordance...
... or tested as a seat for any plug used with three-prong (grounding) plugs for this manual are based on some equipment. GROUNDING INSTRUCTIONS DO NOT, under any circumstances, cut or remove the round grounding prong from any kind of the customer to installing, servicing or operating your powered scooter. Battery ƽ WARNING The warranty and performance specifications contained in accordance...
Owners Manual
Page 15
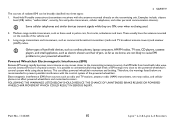
... and braking. Therefore, the warnings listed below are recommended to the powered wheelchair's control system while using these devices. This can affect powered wheelchairs and motorized scooters. Part No. 1143205 15 Lynx™L-3 & Lynx L-4 Scooters Electromagnetic interference (EMI) from hand-held devices, such as cordless phones, laptop computers, AM/FM radios, TV sets, CD players, cassette players, and...
... and braking. Therefore, the warnings listed below are recommended to the powered wheelchair's control system while using these devices. This can affect powered wheelchairs and motorized scooters. Part No. 1143205 15 Lynx™L-3 & Lynx L-4 Scooters Electromagnetic interference (EMI) from hand-held devices, such as cordless phones, laptop computers, AM/FM radios, TV sets, CD players, cassette players, and...

Owners Manual
Page 21
... should be replaced. Thereafter follow these maintenance procedures: Part No. 1143205 21 Lynx™L-3 & Lynx L-4 Scooters Regular cleaning will extend the life and efficiency of your powered scooter. ƽ WARNING Before performing any other vehicle. Initial adjustments should be made to a qualified technician for just like any maintenance, adjustment or service, turn power Off and...
... should be replaced. Thereafter follow these maintenance procedures: Part No. 1143205 21 Lynx™L-3 & Lynx L-4 Scooters Regular cleaning will extend the life and efficiency of your powered scooter. ƽ WARNING Before performing any other vehicle. Initial adjustments should be made to a qualified technician for just like any maintenance, adjustment or service, turn power Off and...
Owners Manual
Page 24
...powered scooter will roll back approximately three feet before brake engages. Turn the scooter on page 25. 1. The throttle control lever is just below the control panel. Turn the key: • To the Left - Horn Button - The service indicator will be charged soon. Battery Charge Display - The battery charge display is a problem...the GREEN area. As the battery charge decreases, the needle moves, from right to Service Indicator Error Codes on the right side of the control panel. 5. Key - The number of flashes indicates the type of battery charge. Refer to left....
...powered scooter will roll back approximately three feet before brake engages. Turn the scooter on page 25. 1. The throttle control lever is just below the control panel. Turn the key: • To the Left - Horn Button - The service indicator will be charged soon. Battery Charge Display - The battery charge display is a problem...the GREEN area. As the battery charge decreases, the needle moves, from right to Service Indicator Error Codes on the right side of the control panel. 5. Key - The number of flashes indicates the type of battery charge. Refer to left....

Owners Manual
Page 25
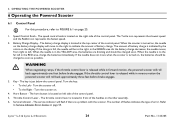
...with balance problems, practice transferring activities with an assistant in the forward or reverse direction at excessive speed. Ensure seat is tightened securely otherwise injury or damage may cause a fall from the powered scooter resulting in injury to user and/ ...of the powered scooter without assistance. Horn Button Service Indicator 6 OPERATING THE POWERED SCOOTER Battery Charge Display Key Throttle Control Lever FIGURE 6.1 Control Panel Speed Control Knob 6.2 Operating the Scooter ƽ WARNING After any adjustments, repair or service and before use of the powered scooter....
...with balance problems, practice transferring activities with an assistant in the forward or reverse direction at excessive speed. Ensure seat is tightened securely otherwise injury or damage may cause a fall from the powered scooter resulting in injury to user and/ ...of the powered scooter without assistance. Horn Button Service Indicator 6 OPERATING THE POWERED SCOOTER Battery Charge Display Key Throttle Control Lever FIGURE 6.1 Control Panel Speed Control Knob 6.2 Operating the Scooter ƽ WARNING After any adjustments, repair or service and before use of the powered scooter....

Owners Manual
Page 29
Before performing any adjustments, repair or service and before use, make sure that all attaching hardware is tightened securely otherwise injury or damage may result. Refer to Label Locations on page 9 for pinch point location. Part No. 1143205 29 Lynx™L-3 & Lynx L-4 Scooters 7 Seat and Arms 7 SEAT AND ARMS ƽ WARNING After any maintenance, adjustment or service, turn power off and remove key from ignition.
Before performing any adjustments, repair or service and before use, make sure that all attaching hardware is tightened securely otherwise injury or damage may result. Refer to Label Locations on page 9 for pinch point location. Part No. 1143205 29 Lynx™L-3 & Lynx L-4 Scooters 7 Seat and Arms 7 SEAT AND ARMS ƽ WARNING After any maintenance, adjustment or service, turn power off and remove key from ignition.

Owners Manual
Page 34
...Mounting Hole FIGURE 8.1 Adjusting the Tiller Angle Lynx™L-3 & Lynx L-4 Scooters 34 Part No. 1143205 Ensure that the tiller is properly adjusted before use, the tiller MUST be folded down for transportation and storage. 1. Otherwise, a fall from ignition. Move the tiller to lock ...tiller adjustment lever (Detail "A") until the pin disengages from the mounting hole. 2. The powered scooters feature an adjustable tiller. After making any maintenance, adjustment or service, turn power Off and remove key from the scooter could occur causing bodily injury and/or damage to...
...Mounting Hole FIGURE 8.1 Adjusting the Tiller Angle Lynx™L-3 & Lynx L-4 Scooters 34 Part No. 1143205 Ensure that the tiller is properly adjusted before use, the tiller MUST be folded down for transportation and storage. 1. Otherwise, a fall from ignition. Move the tiller to lock ...tiller adjustment lever (Detail "A") until the pin disengages from the mounting hole. 2. The powered scooters feature an adjustable tiller. After making any maintenance, adjustment or service, turn power Off and remove key from the scooter could occur causing bodily injury and/or damage to...

Owners Manual
Page 35
.... Set aside. 7. This procedure applies to the drive shaft. 5. Before performing any adjustments, repair or service and before use, make sure that secure the drive wheel to the rear wheels on the Lynx L-3 and all attaching hardware is not present on the Lynx L-4. 9 Wheels and Casters 9 WHEELS AND CASTERS ƽ WARNING After any maintenance, adjustment or service, turn power Off...
.... Set aside. 7. This procedure applies to the drive shaft. 5. Before performing any adjustments, repair or service and before use, make sure that secure the drive wheel to the rear wheels on the Lynx L-3 and all attaching hardware is not present on the Lynx L-4. 9 Wheels and Casters 9 WHEELS AND CASTERS ƽ WARNING After any maintenance, adjustment or service, turn power Off...

Owners Manual
Page 37
... or otherwise damaged case. 10 Batteries 10 BATTERIES ƽ WARNING Before performing any of contamination. Never install/reinstall a battery with batteries. Part No. 1143205 37 Lynx™L-3 & Lynx L-4 Scooters The use . NEVER allow any maintenance adjustment or service, turn power off and remove key from the battery tray or batteries being sure to the battery terminals/posts as shown in an...
... or otherwise damaged case. 10 Batteries 10 BATTERIES ƽ WARNING Before performing any of contamination. Never install/reinstall a battery with batteries. Part No. 1143205 37 Lynx™L-3 & Lynx L-4 Scooters The use . NEVER allow any maintenance adjustment or service, turn power off and remove key from the battery tray or batteries being sure to the battery terminals/posts as shown in an...

Owners Manual
Page 42
... NEVER attempt to recharge the batteries by attaching cables directly to the Off position. 2. Always charge the batteries completely until the battery charger light turns GREEN. Refer to minimize required charging time. Remove the battery charger cable from the scooter. Extensive use or battery life will be approximately five to Engaging/Disengaging the Brake Release Lever on page...
... NEVER attempt to recharge the batteries by attaching cables directly to the Off position. 2. Always charge the batteries completely until the battery charger light turns GREEN. Refer to minimize required charging time. Remove the battery charger cable from the scooter. Extensive use or battery life will be approximately five to Engaging/Disengaging the Brake Release Lever on page...

Owners Manual
Page 44
...Installing the Seat on page 30. 5. Disassembling 1. Refer to Removing/Installing the Battery Box on page 23. 4. Hold the seat post with one hand (Detail "A"). 6. Remove the battery box. Lynx™L-3 & Lynx L-4 Scooters 44 Part No. 1143205 otherwise damage to FIGURE 11.1 on page 26. Before performing any adjustments, repair or service and before use...Remove the basket. 3. 11 TRANSPORTING 11 Transporting ƽ WARNING After any maintenance, adjustment or service, turn power off and remove the key from the ignition. 2. Turn power off and remove key from ...
...Installing the Seat on page 30. 5. Disassembling 1. Refer to Removing/Installing the Battery Box on page 23. 4. Hold the seat post with one hand (Detail "A"). 6. Remove the battery box. Lynx™L-3 & Lynx L-4 Scooters 44 Part No. 1143205 otherwise damage to FIGURE 11.1 on page 26. Before performing any adjustments, repair or service and before use...Remove the basket. 3. 11 TRANSPORTING 11 Transporting ƽ WARNING After any maintenance, adjustment or service, turn power off and remove the key from the ignition. 2. Turn power off and remove key from ...

Owners Manual
Page 46
... from the accessory tube. 4. Removing 1. Remove the accessory tube from the seat frame. Before performing any adjustments, repair or service and before use, make sure that all install into the accessory tubes; Installing 1. 12 ACCESSORIES 12 Accessories ƽ WARNING After any maintenance, adjustment or service, turn power off and remove key from ignition. The crutch/cane holder...
... from the accessory tube. 4. Removing 1. Remove the accessory tube from the seat frame. Before performing any adjustments, repair or service and before use, make sure that all install into the accessory tubes; Installing 1. 12 ACCESSORIES 12 Accessories ƽ WARNING After any maintenance, adjustment or service, turn power off and remove key from ignition. The crutch/cane holder...

Owners Manual
Page 51
...wheel checked to Removing/Installing the Battery...wheels. Check any maintenance, adjustment or service, turn power Off and remove key from ignition. After reinstallation, always recharge batteries before use . Before using the powered scooter, make sure that batteries are tight. The wheels and tires should be checked periodically for cracks and wear, and should be replaced by a qualified technician. 5. Part...repair or service and before use , make sure all parts for proper adjustment. 2. Before performing any parts for damage or wear and replace. Refer to the frame.
...wheel checked to Removing/Installing the Battery...wheels. Check any maintenance, adjustment or service, turn power Off and remove key from ignition. After reinstallation, always recharge batteries before use . Before using the powered scooter, make sure that batteries are tight. The wheels and tires should be checked periodically for cracks and wear, and should be replaced by a qualified technician. 5. Part...repair or service and before use , make sure all parts for proper adjustment. 2. Before performing any parts for damage or wear and replace. Refer to the frame.
Owners Manual
Page 52
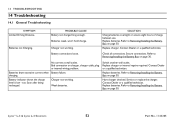
... Part No. 1143205 PROBABLE CAUSE Battery not charged long enough. Check all connections. Secure connections. Refer to Removing/Installing the Battery Box on page 30. Battery indicator shows the charge level is low - Replace charger or internal repairs required. Replace batteries. 14 TROUBLESHOOTING 14 Troubleshooting 14.1 General Troubleshooting SYMPTOM Limited Driving Distance. Batteries not Charging. Batteries weak, won't hold charge. Replace batteries. Refer to Removing/Installing the Battery...
... Part No. 1143205 PROBABLE CAUSE Battery not charged long enough. Check all connections. Secure connections. Refer to Removing/Installing the Battery Box on page 30. Battery indicator shows the charge level is low - Replace charger or internal repairs required. Replace batteries. 14 TROUBLESHOOTING 14 Troubleshooting 14.1 General Troubleshooting SYMPTOM Limited Driving Distance. Batteries not Charging. Batteries weak, won't hold charge. Replace batteries. Refer to Removing/Installing the Battery...


