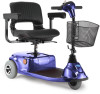

Owners Manual
Page 3
... the Battery Cables ...43 Charging the Batteries ...46 11 TRANSPORTING 49 Transporting the Scooter...49 12 ACCESSORIES 51 Installing/Removing the Crutch/Cane Holder ...52 Installing/Removing the Safety Flag...53 Installing/Removing/Using the Walker Holder ...54 Installing/Removing the Rear Mounted Basket...55 13 MAINTENANCE 56 Suggested Maintenance Procedures ...56 14 TROUBLESHOOTING 57 General Troubleshooting...57 Service Indicator Error Codes...59 Part No...
... the Battery Cables ...43 Charging the Batteries ...46 11 TRANSPORTING 49 Transporting the Scooter...49 12 ACCESSORIES 51 Installing/Removing the Crutch/Cane Holder ...52 Installing/Removing the Safety Flag...53 Installing/Removing/Using the Walker Holder ...54 Installing/Removing the Rear Mounted Basket...55 13 MAINTENANCE 56 Suggested Maintenance Procedures ...56 14 TROUBLESHOOTING 57 General Troubleshooting...57 Service Indicator Error Codes...59 Part No...

Owners Manual
Page 5
... in replacement part installation or repair of purchase from the date of any such product shall be free from defects in materials and workmanship for a period of six (6) months from Invacare or a dealer. In the event you do not receive satisfactory warranty service, please write directly to such repair and/or replacement. PRODUCTS DAMAGED BY REASON OF REPAIRS MADE...
... in replacement part installation or repair of purchase from the date of any such product shall be free from defects in materials and workmanship for a period of six (6) months from Invacare or a dealer. In the event you do not receive satisfactory warranty service, please write directly to such repair and/or replacement. PRODUCTS DAMAGED BY REASON OF REPAIRS MADE...
Owners Manual
Page 6
... the powered scooter. Lynx™L-3X Scooter 6 Part No. 1145807 WARNING DO NOT use in this manual must be used by Invacare and are specifically designed and manufactured for use this product or any available optional equipment without first completely reading and understanding these instructions and any medical devices such as owner's manuals, service manuals or instruction sheets supplied with Invacare accessories. ACCESSORIES WARNINGS Invacare products...
... the powered scooter. Lynx™L-3X Scooter 6 Part No. 1145807 WARNING DO NOT use in this manual must be used by Invacare and are specifically designed and manufactured for use this product or any available optional equipment without first completely reading and understanding these instructions and any medical devices such as owner's manuals, service manuals or instruction sheets supplied with Invacare accessories. ACCESSORIES WARNINGS Invacare products...

Owners Manual
Page 8
... this procedure for hand-hold supports. Use an elevator to move the powered scooter components up or down the stairway. 4. Use proper lifting techniques (lift with batteries and seat weighs 158 lbs. ONLY use an escalator to move an occupied powered scooter between floors by its tiller, seat or shrouds. If moving the powered scooter between 80 and 89 lbs...
... this procedure for hand-hold supports. Use an elevator to move the powered scooter components up or down the stairway. 4. Use proper lifting techniques (lift with batteries and seat weighs 158 lbs. ONLY use an escalator to move an occupied powered scooter between floors by its tiller, seat or shrouds. If moving the powered scooter between 80 and 89 lbs...
Owners Manual
Page 9
This could occur if improperly set-up or adjusted. Invacare recognizes and encourages each individual to the frame tubing. Part No. 1145807 9 Lynx™L-3X Scooter Individual users often develop skills to be replaced IMMEDIATELY. The final adjustments of the controller may require replacement of the scooter. Use this manual MUST be examined during maintenance for him/her in...
This could occur if improperly set-up or adjusted. Invacare recognizes and encourages each individual to the frame tubing. Part No. 1145807 9 Lynx™L-3X Scooter Individual users often develop skills to be replaced IMMEDIATELY. The final adjustments of the controller may require replacement of the scooter. Use this manual MUST be examined during maintenance for him/her in...

Owners Manual
Page 10
...with or without the seat positioning strap), Invacare strongly recommends ordering the seat positioning strap as an additional safeguard for the scooter user. Inasmuch as auto or aircraft safety belts. Proper positioning is not designed for your seat positioning strap. It is essential for use of the scooter....445; WARNING DO NOT make sharp turns in and out of the powered scooter. The seat positioning strap is an option on this scooter (you MUST, at excessive speed. Many activities require the scooter owner to the normal balance, the center of gravity, and the weight ...
...with or without the seat positioning strap), Invacare strongly recommends ordering the seat positioning strap as an additional safeguard for the scooter user. Inasmuch as auto or aircraft safety belts. Proper positioning is not designed for your seat positioning strap. It is essential for use of the scooter....445; WARNING DO NOT make sharp turns in and out of the powered scooter. The seat positioning strap is an option on this scooter (you MUST, at excessive speed. Many activities require the scooter owner to the normal balance, the center of gravity, and the weight ...
Owners Manual
Page 14
... remove these tags. If occupant uses said powered scooter as a seat for any plug used with the National Electrical Code. Lynx™L-3X Scooter 14 Part No. 1145807 Battery ƽ WARNING The warranty and performance specifications contained in accordance with or for protection against possible shock hazards. Invacare powered scooters have the two-prong receptacle replaced with a properly grounded three-prong...
... remove these tags. If occupant uses said powered scooter as a seat for any plug used with the National Electrical Code. Lynx™L-3X Scooter 14 Part No. 1145807 Battery ƽ WARNING The warranty and performance specifications contained in accordance with or for protection against possible shock hazards. Invacare powered scooters have the two-prong receptacle replaced with a properly grounded three-prong...

Owners Manual
Page 21
... must be cared for cracks and wear, and should be replaced. CAUTION As with any vehicle, the wheels and tires should be checked periodically for just like any maintenance, adjustment or service, turn power Off and remove key from ignition. Thereafter follow these maintenance procedures: Part No. 1145807 21 Lynx™L-3X Scooter 5 Inspection 5 INSPECTION...
... must be cared for cracks and wear, and should be replaced. CAUTION As with any vehicle, the wheels and tires should be checked periodically for just like any maintenance, adjustment or service, turn power Off and remove key from ignition. Thereafter follow these maintenance procedures: Part No. 1145807 21 Lynx™L-3X Scooter 5 Inspection 5 INSPECTION...

Owners Manual
Page 24
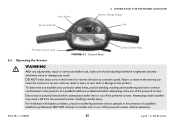
...is in forward motion, the powered scooter will roll back approximately one foot before brake engages. 3. The throttle control lever is located on the right side of battery charge. The service indicator will roll back approximately three feet before brake engages. The number of flashes indicates the type of...the scooter is full, the needle will move to the right to the right, in front of error. Throttle Control Lever - 6 OPERATING THE POWERED SCOOTER 6 Operating the Powered Scooter 6.1 Control Panel For this procedure, refer to Service Indicator Error Codes on page 59.
...is in forward motion, the powered scooter will roll back approximately one foot before brake engages. 3. The throttle control lever is located on the right side of battery charge. The service indicator will roll back approximately three feet before brake engages. The number of flashes indicates the type of...the scooter is full, the needle will move to the right to the right, in front of error. Throttle Control Lever - 6 OPERATING THE POWERED SCOOTER 6 Operating the Powered Scooter 6.1 Control Panel For this procedure, refer to Service Indicator Error Codes on page 59.
Owners Manual
Page 25
... Button Service Indicator 6 OPERATING THE POWERED SCOOTER Battery Charge Display Key Throttle Control Lever FIGURE 6.1 Control Panel Speed Control Knob 6.2 Operating the Scooter ƽ WARNING After any adjustments, repair or service and before attempting active use , make sharp turns in bodily injury. For individuals with balance problems, practice transferring activities with an assistant in injury to user and...
... Button Service Indicator 6 OPERATING THE POWERED SCOOTER Battery Charge Display Key Throttle Control Lever FIGURE 6.1 Control Panel Speed Control Knob 6.2 Operating the Scooter ƽ WARNING After any adjustments, repair or service and before attempting active use , make sharp turns in bodily injury. For individuals with balance problems, practice transferring activities with an assistant in injury to user and...

Owners Manual
Page 29
Before performing any adjustments, repair or service and before use, make sure that all attaching hardware is tightened securely otherwise injury or damage may result. Refer to Label Locations on page 9 for pinch point location. 7 Seat and Arms 7 SEAT AND ARMS ƽ WARNING After any maintenance, adjustment or service, turn power off and remove key from ignition. Part No. 1145807 29 Lynx™L-3X Scooter
Before performing any adjustments, repair or service and before use, make sure that all attaching hardware is tightened securely otherwise injury or damage may result. Refer to Label Locations on page 9 for pinch point location. 7 Seat and Arms 7 SEAT AND ARMS ƽ WARNING After any maintenance, adjustment or service, turn power off and remove key from ignition. Part No. 1145807 29 Lynx™L-3X Scooter

Owners Manual
Page 35
...Adjustment Lever Pin Mounting Hole FIGURE 8.1 Adjusting the Tiller Angle Part No. 1145807 35 Lynx™L-3X Scooter Ensure that the tiller is properly adjusted before use, the tiller MUST be folded down for transportation and storage. 1. Gently push/pull against tiller to ensure ...8 TILLER ADJUSTMENT 8.1 Adjusting the Tiller Angle ƽ WARNING Before performing any tiller angle adjustments and before driving the scooter. The powered scooters feature an adjustable tiller. Release or rotate the tiller adjustment lever to lock the pin into one of three positions. After ...
...Adjustment Lever Pin Mounting Hole FIGURE 8.1 Adjusting the Tiller Angle Part No. 1145807 35 Lynx™L-3X Scooter Ensure that the tiller is properly adjusted before use, the tiller MUST be folded down for transportation and storage. 1. Gently push/pull against tiller to ensure ...8 TILLER ADJUSTMENT 8.1 Adjusting the Tiller Angle ƽ WARNING Before performing any tiller angle adjustments and before driving the scooter. The powered scooters feature an adjustable tiller. Release or rotate the tiller adjustment lever to lock the pin into one of three positions. After ...
Owners Manual
Page 36
... or service, turn power Off and remove key from the drive shaft. 6. Refer to FIGURE 9.1 on page 37. Remove the seat. Set aside. 7. Remove keystock from the ignition. 2. Turn power off the ground. 4. Remove the existing drive wheel assembly from the drive shaft. Use a wheel puller if necessary to remove the wheel from ignition. 9.1 Removing/Installing the Drive Wheels ...
... or service, turn power Off and remove key from the drive shaft. 6. Refer to FIGURE 9.1 on page 37. Remove the seat. Set aside. 7. Remove keystock from the ignition. 2. Turn power off the ground. 4. Remove the existing drive wheel assembly from the drive shaft. Use a wheel puller if necessary to remove the wheel from ignition. 9.1 Removing/Installing the Drive Wheels ...

Owners Manual
Page 39
... or service, turn power off and remove key from the battery tray or batteries being sure to avoid contact with skin and eyes. Part No. 1145807 39 Lynx™L-3X Scooter An electrical short may occur and serious personal injury or damage may result. The use . DO NOT tip the batteries. Invacare strongly recommends that battery installation and battery replacement always be installed...
... or service, turn power off and remove key from the battery tray or batteries being sure to avoid contact with skin and eyes. Part No. 1145807 39 Lynx™L-3X Scooter An electrical short may occur and serious personal injury or damage may result. The use . DO NOT tip the batteries. Invacare strongly recommends that battery installation and battery replacement always be installed...

Owners Manual
Page 46
... the powered scooter. The range per charge mileage. \ For this product. Always charge the batteries completely until the battery charger light turns GREEN. 1. Lynx™L-3X Scooter 46 Part No. 1145807 ALWAYS charge new batteries before initial use of the charger cable into the battery charger...outlet. Extensive use the provided charger with an electrical lockout to FIGURE 10.4 on inclines may substantially reduce per battery charge using the powered scooter. Plug the other end of typical operation. Only use on page 48. Ensure the brake release lever ...
... the powered scooter. The range per charge mileage. \ For this product. Always charge the batteries completely until the battery charger light turns GREEN. 1. Lynx™L-3X Scooter 46 Part No. 1145807 ALWAYS charge new batteries before initial use of the charger cable into the battery charger...outlet. Extensive use the provided charger with an electrical lockout to FIGURE 10.4 on inclines may substantially reduce per battery charge using the powered scooter. Plug the other end of typical operation. Only use on page 48. Ensure the brake release lever ...

Owners Manual
Page 49
..., refer to separate the front frame assembly from ignition. 11 Transporting 11 TRANSPORTING ƽ WARNING After any installed accessories. 3. Before performing any maintenance, adjustment or service, turn power off and remove the key from the controller wiring connector (Detail "A"). 6. Remove the seat. Remove the batteries. Lift the seat post to FIGURE 11.1 on page 31. 2. Fold tiller down...
..., refer to separate the front frame assembly from ignition. 11 Transporting 11 TRANSPORTING ƽ WARNING After any installed accessories. 3. Before performing any maintenance, adjustment or service, turn power off and remove the key from the controller wiring connector (Detail "A"). 6. Remove the seat. Remove the batteries. Lift the seat post to FIGURE 11.1 on page 31. 2. Fold tiller down...

Owners Manual
Page 51
Part No. 1145807 51 Lynx™L-3X Scooter 12 Accessories 12 ACCESSORIES ƽ WARNING After any maintenance, adjustment or service, turn power off and remove key from ignition. The crutch/cane holder, safety flag, rear mounted basket and oxygen holder all attaching hardware is tightened securely otherwise injury or damage may be installed at a time. Before performing any adjustments, repair or service and before use, make sure that all install into the accessory tubes; ONLY one of these may result.
Part No. 1145807 51 Lynx™L-3X Scooter 12 Accessories 12 ACCESSORIES ƽ WARNING After any maintenance, adjustment or service, turn power off and remove key from ignition. The crutch/cane holder, safety flag, rear mounted basket and oxygen holder all attaching hardware is tightened securely otherwise injury or damage may be installed at a time. Before performing any adjustments, repair or service and before use, make sure that all install into the accessory tubes; ONLY one of these may result.

Owners Manual
Page 56
... After any adjustments, repair or service and before use , make sure that batteries are properly maintained and charged as required. 3. Refer to the frame. If loose, have the bearings of time, remove batteries. Before performing any parts for loose nuts and/or bolts in storage. After reinstallation, always recharge batteries before use . Before using the powered scooter, make sure they...
... After any adjustments, repair or service and before use , make sure that batteries are properly maintained and charged as required. 3. Refer to the frame. If loose, have the bearings of time, remove batteries. Before performing any parts for loose nuts and/or bolts in storage. After reinstallation, always recharge batteries before use . Before using the powered scooter, make sure they...

Owners Manual
Page 57
14 Troubleshooting 14.1 General Troubleshooting 14 TROUBLESHOOTING SYMPTOM Limited Driving Distance. Batteries not Charging. SOLUTION Charge batteries overnight or ensure eight hours of charge between use. Replace batteries. Battery connections loose. No current at wall outlet. Battery failure. Switch another wall outlet. Batteries weak, won't hold charge. Secure connections. Replace batteries. Replace batteries. Refer to Removing/Installing the Battery Box on page 30. Part No. 1145807 57 Lynx™...
14 Troubleshooting 14.1 General Troubleshooting 14 TROUBLESHOOTING SYMPTOM Limited Driving Distance. Batteries not Charging. SOLUTION Charge batteries overnight or ensure eight hours of charge between use. Replace batteries. Battery connections loose. No current at wall outlet. Battery failure. Switch another wall outlet. Batteries weak, won't hold charge. Secure connections. Replace batteries. Replace batteries. Refer to Removing/Installing the Battery Box on page 30. Part No. 1145807 57 Lynx™...

Owners Manual
Page 58
... turn key driving, the scooter holds power for 1.5 seconds to a stop engaged. Ensure key is turned off while With key in . Soft stop . Refer to Service Indicator Error Codes on page 25). Check all connections. Lynx™L-3X Scooter 58 Part No. 1145807 14 TROUBLESHOOTING SYMPTOM Scooter will not drive. Engage brake release lever. Contact Dealer or...
... turn key driving, the scooter holds power for 1.5 seconds to a stop engaged. Ensure key is turned off while With key in . Soft stop . Refer to Service Indicator Error Codes on page 25). Check all connections. Lynx™L-3X Scooter 58 Part No. 1145807 14 TROUBLESHOOTING SYMPTOM Scooter will not drive. Engage brake release lever. Contact Dealer or...


