

Owners Manual
Page 1
microAIR® MA65 Series MA65, MA65B42, MA65B48, MA65RSR en Alternating Pressure Low Air Loss Mattress User Manual This manual MUST be given to the user of the product. BEFORE using this product, read this manual and save for future reference.
microAIR® MA65 Series MA65, MA65B42, MA65B48, MA65RSR en Alternating Pressure Low Air Loss Mattress User Manual This manual MUST be given to the user of the product. BEFORE using this product, read this manual and save for future reference.
Owners Manual
Page 3
...4 2 Safety 5 2.1 General Guidelines 5 3 Overview 11 3.1 Label Location 11 3.2 Technical Data 12 4 Setup 14 4.1 Unpacking 14 4.2 Mattress Replacement System Installation 14 4.3 Installing the Bed Side Rails 16 4.4 Installing the Power Unit 16 4.5 Connecting the Hose 16 4.6 Connecting the Power... Silence Button 23 5.1.9 Power Fail LED 23 5.1.10 Low Pressure LED 23 5.2 Powering Up the System 23 5.3 Placing the Patient on the Mattress 24 5.4 Transferring Patient From/To a Gurney 25 5.5 Transferring Patient From/To a Wheelchair 25 5.6 Preparing for CPR Procedure 26 5.7 About Power...
...4 2 Safety 5 2.1 General Guidelines 5 3 Overview 11 3.1 Label Location 11 3.2 Technical Data 12 4 Setup 14 4.1 Unpacking 14 4.2 Mattress Replacement System Installation 14 4.3 Installing the Bed Side Rails 16 4.4 Installing the Power Unit 16 4.5 Connecting the Hose 16 4.6 Connecting the Power... Silence Button 23 5.1.9 Power Fail LED 23 5.1.10 Low Pressure LED 23 5.2 Powering Up the System 23 5.3 Placing the Patient on the Mattress 24 5.4 Transferring Patient From/To a Gurney 25 5.5 Transferring Patient From/To a Wheelchair 25 5.6 Preparing for CPR Procedure 26 5.7 About Power...

Owners Manual
Page 5
...or Damage Improper use of Death, Injury or Damage Parts and accessories designed by Invacare. DANGER! Stop using this product or optional equipment. Use ONLY Invacare rails, mattresses, bed extenders, other accessories and parts with these instructions and any available optional equipment... technical personnel before attempting to smoke near this equipment. - Place mattress deck in death, injury or damage. - DO NOT allow others to use damaged or malfunctioning product. - Monitor patients with Invacare products. Use of entrapment. - Risk of Death, Injury or ...
...or Damage Improper use of Death, Injury or Damage Parts and accessories designed by Invacare. DANGER! Stop using this product or optional equipment. Use ONLY Invacare rails, mattresses, bed extenders, other accessories and parts with these instructions and any available optional equipment... technical personnel before attempting to smoke near this equipment. - Place mattress deck in death, injury or damage. - DO NOT allow others to use damaged or malfunctioning product. - Monitor patients with Invacare products. Use of entrapment. - Risk of Death, Injury or ...

Owners Manual
Page 6
... or death from choking or ingestion of death or injury due to hear or see alarms or communicate discomfort. Consult your individual needs. - microAIR® MA65 Series DANGER! Always consult the patient's physician before using this product in any questions regarding individual limitations and needs. DO NOT modify the product or...
... or death from choking or ingestion of death or injury due to hear or see alarms or communicate discomfort. Consult your individual needs. - microAIR® MA65 Series DANGER! Always consult the patient's physician before using this product in any questions regarding individual limitations and needs. DO NOT modify the product or...

Owners Manual
Page 8
... your dealer. - Refer to the Bed Rail Entrapment Risk Notification Guide at www.invacare.com for additional product safety information. - Variations in bed rail dimensions, and mattress thickness, size or density could increase risk of equipment is required. The Invacare mattress MUST fit firmly against the bed frame AND bed side rails to reduce... safety information. Proper patient assessment and monitoring is required to prevent patient entrapment. Check for repair if leakage is tightened securely. 8 1148137-H WARNING! microAIR® MA65 Series WARNING!
... your dealer. - Refer to the Bed Rail Entrapment Risk Notification Guide at www.invacare.com for additional product safety information. - Variations in bed rail dimensions, and mattress thickness, size or density could increase risk of equipment is required. The Invacare mattress MUST fit firmly against the bed frame AND bed side rails to reduce... safety information. Proper patient assessment and monitoring is required to prevent patient entrapment. Check for repair if leakage is tightened securely. 8 1148137-H WARNING! microAIR® MA65 Series WARNING!

Owners Manual
Page 9
... cords: - Installation WARNING! Ensure that all drive shafts, free of such legislation. Keep all moving parts, including the main frame, mattress deck, and all cord(s) are warranted after assessing patient risks of entrapment and falls in the raised or guard position whenever a patient ...is on the bed. - Invacare suggests rails be in accordance with state patient restraint legislation or facility interpretation of obstruction (i.e. Risk Of Injury Or Damage To avoid ...
... cords: - Installation WARNING! Ensure that all drive shafts, free of such legislation. Keep all moving parts, including the main frame, mattress deck, and all cord(s) are warranted after assessing patient risks of entrapment and falls in the raised or guard position whenever a patient ...is on the bed. - Invacare suggests rails be in accordance with state patient restraint legislation or facility interpretation of obstruction (i.e. Risk Of Injury Or Damage To avoid ...

Owners Manual
Page 10
...Risk Of Injury Or Damage To avoid injury or damage due to the mattress: - Repair and Service DANGER! WARNING! Avoid use , make sure all attaching hardware is tightened securely. 10 1148137-H Contact a qualified technician or Invacare if any adjustments, repair or service and before use in a well ...- Keep product at least 12 inches (30,5 cm) away from airborne pollutants and/or fumes and for optimal performance: - microAIR® MA65 Series WARNING! Locate and position the product in presence of Death, Injury, or Damage To avoid death, injury or damage due to the bed...
...Risk Of Injury Or Damage To avoid injury or damage due to the mattress: - Repair and Service DANGER! WARNING! Avoid use , make sure all attaching hardware is tightened securely. 10 1148137-H Contact a qualified technician or Invacare if any adjustments, repair or service and before use in a well ...- Keep product at least 12 inches (30,5 cm) away from airborne pollutants and/or fumes and for optimal performance: - microAIR® MA65 Series WARNING! Locate and position the product in presence of Death, Injury, or Damage To avoid death, injury or damage due to the bed...

Owners Manual
Page 13
Performance Specifications MATTRESS WEIGHT CAPACITY STANDARD-36 INCH: BARIATRIC -42 INCH: BARIATRIC -48 INCH: PRESSURE ZONE: MAXIMUM FLOW: MAXIMUM FLOW PRESSURE: MAXIMUM FLOW TIMER: SUPPORT SURFACE INFLATION TIME: ... 30 minutes 5 -10 minutes 8 ± 4 mmHg 32 ± 4 mmHg 5, 10, 15, 20 minutes Control unit and mattress have Latex-Free components Overview Mechanical Specifications CONTROL UNIT DIMENSIONS (L X W X H): WEIGHT: POWER CORD: CONNECTION: PACKAGING: AIR FILTER: MA65 15" x 6.5" x 11" 15 lbs 10 - 14 Feet Long, Hospital Grade Three ¼" Flow Couplings 1 piece/box None...
Performance Specifications MATTRESS WEIGHT CAPACITY STANDARD-36 INCH: BARIATRIC -42 INCH: BARIATRIC -48 INCH: PRESSURE ZONE: MAXIMUM FLOW: MAXIMUM FLOW PRESSURE: MAXIMUM FLOW TIMER: SUPPORT SURFACE INFLATION TIME: ... 30 minutes 5 -10 minutes 8 ± 4 mmHg 32 ± 4 mmHg 5, 10, 15, 20 minutes Control unit and mattress have Latex-Free components Overview Mechanical Specifications CONTROL UNIT DIMENSIONS (L X W X H): WEIGHT: POWER CORD: CONNECTION: PACKAGING: AIR FILTER: MA65 15" x 6.5" x 11" 15 lbs 10 - 14 Feet Long, Hospital Grade Three ¼" Flow Couplings 1 piece/box None...

Owners Manual
Page 14
...- Do not strap the mattress to the user and/or caregiver. - microAIR® MA65 Series 4 Setup 4.1 Unpacking 1. Risk of Injury or Damage Continued use of assembly. 4.2 Mattress Replacement System Installation CAUTION! ...Inspect all components from the carton. 2. DO NOT attempt to operate product controls prior to the mattress: - Check ALL product components and carton for repair. Contact dealer or Invacare...
...- Do not strap the mattress to the user and/or caregiver. - microAIR® MA65 Series 4 Setup 4.1 Unpacking 1. Risk of Injury or Damage Continued use of assembly. 4.2 Mattress Replacement System Installation CAUTION! ...Inspect all components from the carton. 2. DO NOT attempt to operate product controls prior to the mattress: - Check ALL product components and carton for repair. Contact dealer or Invacare...

Owners Manual
Page 15
Remove the original foam mattress from the bed. 2. If necessary, lower the side rails to the bed deck in the following locations: • Head End-Head End Bed Deck A • Foot End-Foot End Bed Deck B • Center-Center of the mattress. 1148137-H 15 Use the buckle straps F to secure the powered mattress to facilitate installation of the Bed Frame C 1. Ensure that the hose E is towards the foot end B of the bed. 4. Setup 3. Unroll the powered mattress D and place it on the bed frame.
Remove the original foam mattress from the bed. 2. If necessary, lower the side rails to the bed deck in the following locations: • Head End-Head End Bed Deck A • Foot End-Foot End Bed Deck B • Center-Center of the mattress. 1148137-H 15 Use the buckle straps F to secure the powered mattress to facilitate installation of the Bed Frame C 1. Ensure that the hose E is towards the foot end B of the bed. 4. Setup 3. Unroll the powered mattress D and place it on the bed frame.

Owners Manual
Page 16
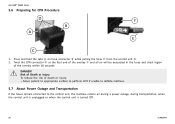
.... 1. Squeeze and hold the tabs C on the footboard. microAIR® MA65 Series 4.3 Installing the Bed Side Rails Refer to the Bed Rail Entrapment Risk Notification Guide at the foot end of the mattress. 2. Ensure that the hose connectors are properly engaged with the side rails for...on the back of the control unit. 3. The audible click indicates that the hose connecting the control unit to the mattress is heard. Locate the hose A at www.invacare.com for the installation procedure. 4.4 Installing the Power Unit 4.5 Connecting the Hose CAUTION! DO NOT place control unit ...
.... 1. Squeeze and hold the tabs C on the footboard. microAIR® MA65 Series 4.3 Installing the Bed Side Rails Refer to the Bed Rail Entrapment Risk Notification Guide at the foot end of the mattress. 2. Ensure that the hose connectors are properly engaged with the side rails for...on the back of the control unit. 3. The audible click indicates that the hose connecting the control unit to the mattress is heard. Locate the hose A at www.invacare.com for the installation procedure. 4.4 Installing the Power Unit 4.5 Connecting the Hose CAUTION! DO NOT place control unit ...

Owners Manual
Page 17
Ensure that the system is in indicating that all drive shafts, free of the control unit. 3. Keep all moving parts, including the main frame, mattress deck, and all cord(s) are routed and secured properly. - Plug the other end of the plug into the power outlet on the wall. Perform one ...
Ensure that the system is in indicating that all drive shafts, free of the control unit. 3. Keep all moving parts, including the main frame, mattress deck, and all cord(s) are routed and secured properly. - Plug the other end of the plug into the power outlet on the wall. Perform one ...
Owners Manual
Page 20
...selected pressure setting. 1. For example, 10 minutes is 50% of four alternating pressure times - 5, 10, 15 and 20 minutes. microAIR® MA65 Series 5.1.2 Alternating Pressure Button 1. The On and Standby LEDs will exit this as long as possible during the deflation time when using 5, 10, 15...times, half of the air cushions (even or odd numbered). The air cushions continue to 0 (8±4 mmHg) at constant pressure. This means that the mattress will show: • 0 if the current setting is 0 (8±4 mmHg). • 5 if the current setting is selected. The LCD Display ...
...selected pressure setting. 1. For example, 10 minutes is 50% of four alternating pressure times - 5, 10, 15 and 20 minutes. microAIR® MA65 Series 5.1.2 Alternating Pressure Button 1. The On and Standby LEDs will exit this as long as possible during the deflation time when using 5, 10, 15...times, half of the air cushions (even or odd numbered). The air cushions continue to 0 (8±4 mmHg) at constant pressure. This means that the mattress will show: • 0 if the current setting is 0 (8±4 mmHg). • 5 if the current setting is selected. The LCD Display ...

Owners Manual
Page 21
... Control LED displays the patient comfort pressure levels from bottoming out. Fowler LED illuminates when in this button reduces the pressure setting in mattress to prevent the patient from 0 to 9 and provides a guide to the caregiver to set approximate comfort pressure level depending on the... Press and hold the Mode and Fowler buttons. Press the Static button C to height ratio is activated, control unit increases pressure in the mattress. • Firm Button - Make sure fowler transmitter is lit and L displays in the flat position. 2. Automatic Wireless Mode When the bed...
... Control LED displays the patient comfort pressure levels from bottoming out. Fowler LED illuminates when in this button reduces the pressure setting in mattress to prevent the patient from 0 to 9 and provides a guide to the caregiver to set approximate comfort pressure level depending on the... Press and hold the Mode and Fowler buttons. Press the Static button C to height ratio is activated, control unit increases pressure in the mattress. • Firm Button - Make sure fowler transmitter is lit and L displays in the flat position. 2. Automatic Wireless Mode When the bed...

Owners Manual
Page 22
... the max inflate mode or the low air loss mode. • Max Inflate Mode-In this mode, the mattress goes into on fowlers where batteries are accessible. Batteries may be manually disengaged by pressing the Max Inflate button. ... ingress/egress, patient wound care, patient turning or patient cleaning. • Low Air Loss Mode-In this mode, the mattress inflates rapidly to maximum firmness (pressurized to a transmitter. • Save-Wait 60 seconds without pressing a key. Max Inflate...according to 45°. Replace fowler if red indicator is active. microAIR® MA65 Series 4.
... the max inflate mode or the low air loss mode. • Max Inflate Mode-In this mode, the mattress goes into on fowlers where batteries are accessible. Batteries may be manually disengaged by pressing the Max Inflate button. ... ingress/egress, patient wound care, patient turning or patient cleaning. • Low Air Loss Mode-In this mode, the mattress inflates rapidly to maximum firmness (pressurized to a transmitter. • Save-Wait 60 seconds without pressing a key. Max Inflate...according to 45°. Replace fowler if red indicator is active. microAIR® MA65 Series 4.

Owners Manual
Page 23
... unit has internal memory and retains the previous settings during the power outage. See troubleshooting section of this button silences the alarm that the mattress hose disconnects, an alarm sounds and Low Pressure LED J flashes Amber. Once the button is released, a green led illuminates when the ...Alarm Silence button H to the control unit. Pressing this manual if alarm fails to sound. During a power outage, the mattress retains the air as long as the mattress is connected to select one of this button locks out all control unit functions, including the Power button, to sound. 5.2...
... unit has internal memory and retains the previous settings during the power outage. See troubleshooting section of this button silences the alarm that the mattress hose disconnects, an alarm sounds and Low Pressure LED J flashes Amber. Once the button is released, a green led illuminates when the ...Alarm Silence button H to the control unit. Pressing this manual if alarm fails to sound. During a power outage, the mattress retains the air as long as the mattress is connected to select one of this button locks out all control unit functions, including the Power button, to sound. 5.2...

Owners Manual
Page 24
... bottomed out by performing the following steps: a. Wait five minutes for the mattress pressure to stabilize. 7. microAIR® MA65 Series 5.3 Placing the Patient on the mattress. 3. Wait five minutes for the mattress pressure to stabilize. 9. Ensure that there is too soft/hard, press the...'s etc. 6. Ensure that the patient's feet are towards the foot end of the patient's body. Wait five minutes for the mattress pressure to maximum flow. Use a regular pillow to stabilize. Special positioning may be required with contracted patients to 4-finger width clearance...
... bottomed out by performing the following steps: a. Wait five minutes for the mattress pressure to stabilize. 7. microAIR® MA65 Series 5.3 Placing the Patient on the mattress. 3. Wait five minutes for the mattress pressure to stabilize. 9. Ensure that there is too soft/hard, press the...'s etc. 6. Ensure that the patient's feet are towards the foot end of the patient's body. Wait five minutes for the mattress pressure to maximum flow. Use a regular pillow to stabilize. Special positioning may be required with contracted patients to 4-finger width clearance...

Owners Manual
Page 25
...of the bed and the wheel locks of the following : • Bed to the user manual provided with the bed. 5. When the mattress has reached maximum firmness, perform one of the gurney before transferring the patient between the bed and the wheelchair. 1. Slide the patient onto ... the wheel locks of the following : • Bed to the user manual provided with the bed. 2. Refer to Wheelchair Transfer - When the mattress has reached maximum firmness, perform one of the gurney before transferring the patient between the bed and the gurney. 1. Usage 5.5 Transferring Patient From/To...
...of the bed and the wheel locks of the following : • Bed to the user manual provided with the bed. 5. When the mattress has reached maximum firmness, perform one of the gurney before transferring the patient between the bed and the wheelchair. 1. Slide the patient onto ... the wheel locks of the following : • Bed to the user manual provided with the bed. 2. Refer to Wheelchair Transfer - When the mattress has reached maximum firmness, perform one of the gurney before transferring the patient between the bed and the gurney. 1. Usage 5.5 Transferring Patient From/To...
Owners Manual
Page 26
... To reduce the risk of the overlay within 18 seconds. DANGER! microAIR® MA65 Series 5.6 Preparing for CPR Procedure 1. Move patient to appropriate surface to perform CPR if unable to deflate mattress. 5.7 About Power Outage and Transportation If the hoses remain connected to the control ...unit, the mattress retains air during a power outage, during transportation, when the control unit is unplugged ...
... To reduce the risk of the overlay within 18 seconds. DANGER! microAIR® MA65 Series 5.6 Preparing for CPR Procedure 1. Move patient to appropriate surface to perform CPR if unable to deflate mattress. 5.7 About Power Outage and Transportation If the hoses remain connected to the control ...unit, the mattress retains air during a power outage, during transportation, when the control unit is unplugged ...

Owners Manual
Page 27
.... 6. Remove the bedding. 2. Unplug the power cord from sharp objects: - Risk of Injury or Damage Use of the control unit and mattress assembly components for visible blood or body fluids. 1148137-H 27 Perform all soiled bedding as scissors, needles, etc. - Do not clean the bed...and correct use and dilution. 1. Maintenance WARNING! Risk Of Injury Or Damage To avoid infectious exposure: - Ensure that the underside of the mattress is occupying the bed. - Before cleaning or disassembling, check the underside of one (1) years when used in this time period may cause product...
.... 6. Remove the bedding. 2. Unplug the power cord from sharp objects: - Risk of Injury or Damage Use of the control unit and mattress assembly components for visible blood or body fluids. 1148137-H 27 Perform all soiled bedding as scissors, needles, etc. - Do not clean the bed...and correct use and dilution. 1. Maintenance WARNING! Risk Of Injury Or Damage To avoid infectious exposure: - Ensure that the underside of the mattress is occupying the bed. - Before cleaning or disassembling, check the underside of one (1) years when used in this time period may cause product...


