

Owners Manual
Page 1
BEFORE using this product, read this manual and save for future reference. microAIR® MA90 and MA95 Series 90Z, 90ZB42, 90ZB48, 95Z, 95ZB42, 95ZB48 en Rotation with Alternating Pressure and Low Air Loss Mattress User Manual This manual MUST be given to the user of the product.
BEFORE using this product, read this manual and save for future reference. microAIR® MA90 and MA95 Series 90Z, 90ZB42, 90ZB48, 95Z, 95ZB42, 95ZB48 en Rotation with Alternating Pressure and Low Air Loss Mattress User Manual This manual MUST be given to the user of the product.

Owners Manual
Page 3
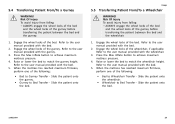
... 4 2 Safety 5 2.1 General Guidelines 5 3 Overview 11 3.1 Label Location 11 3.2 Technical Data 12 4 Setup 15 4.1 Unpacking 15 4.2 Mattress Replacement System Installation 16 4.3 Installing the Side Rails 17 4.4 Installing the Power Unit 17 4.5 Connecting the Hose 17 4.6 Connecting the Power Cord ...26 5.1.13 Power Fail LED 26 5.1.14 Low Pressure LED 27 5.1.15 Displaying the Total Run Time (MA95Z Power Unit 27 5.2 Powering Up the System 27 5.3 Placing Patient on the Mattress 28 5.4 Transferring Patient From/To a Gurney 29 5.5 Transferring Patient From/To a Wheelchair 29 5.6 ...
... 4 2 Safety 5 2.1 General Guidelines 5 3 Overview 11 3.1 Label Location 11 3.2 Technical Data 12 4 Setup 15 4.1 Unpacking 15 4.2 Mattress Replacement System Installation 16 4.3 Installing the Side Rails 17 4.4 Installing the Power Unit 17 4.5 Connecting the Hose 17 4.6 Connecting the Power Cord ...26 5.1.13 Power Fail LED 26 5.1.14 Low Pressure LED 27 5.1.15 Displaying the Total Run Time (MA95Z Power Unit 27 5.2 Powering Up the System 27 5.3 Placing Patient on the Mattress 28 5.4 Transferring Patient From/To a Gurney 29 5.5 Transferring Patient From/To a Wheelchair 29 5.6 ...

Owners Manual
Page 5
... death, injury or damage. - Use of Death, Injury or Damage Parts and accessories designed by other accessories and parts with this equipment. - Use ONLY Invacare rails, mattresses, bed extenders, other manufacturers have an increased risk of this product or any additional instructional material such as restlessness, mental deterioration and dementia or seizure...
... death, injury or damage. - Use of Death, Injury or Damage Parts and accessories designed by other accessories and parts with this equipment. - Use ONLY Invacare rails, mattresses, bed extenders, other manufacturers have an increased risk of this product or any additional instructional material such as restlessness, mental deterioration and dementia or seizure...

Owners Manual
Page 6
... any questions regarding individual limitations and needs. DO NOT use of injury due to pressure ulcers: - Always consult the patient's physician before using the MicroAir mattress system. 6 1148139-H DANGER! DANGER! DO NOT modify the product or any way other than described in any components of small parts or materials: - microAIR®...
... any questions regarding individual limitations and needs. DO NOT use of injury due to pressure ulcers: - Always consult the patient's physician before using the MicroAir mattress system. 6 1148139-H DANGER! DANGER! DO NOT modify the product or any way other than described in any components of small parts or materials: - microAIR®...

Owners Manual
Page 8
...Death, Injury or Damage Proper patient assessment and monitoring, and proper maintenance and use , make sure all attaching hardware is found. The Invacare mattress MUST fit firmly against the bed frame AND bed side rails to perform assessment and patient monitoring. - Entrapment DANGER! Risk Of Death...is required to the Bed Rail Entrapment Risk Notification Guide at www.invacare.com or your dealer. - Risk Of Injury Or Damage To avoid personal injury or damage: - Variations in bed rail dimensions, and mattress thickness, size or density could increase risk of entrapment. - ...
...Death, Injury or Damage Proper patient assessment and monitoring, and proper maintenance and use , make sure all attaching hardware is found. The Invacare mattress MUST fit firmly against the bed frame AND bed side rails to perform assessment and patient monitoring. - Entrapment DANGER! Risk Of Death...is required to the Bed Rail Entrapment Risk Notification Guide at www.invacare.com or your dealer. - Risk Of Injury Or Damage To avoid personal injury or damage: - Variations in bed rail dimensions, and mattress thickness, size or density could increase risk of entrapment. - ...

Owners Manual
Page 9
... injury or damage from fire: - Ensure that all drive shafts, free of obstruction (i.e. Health care professionals assigned to extend below mattress support level. Safety Fire Hazard DANGER! Risk Of Product Damage, Injury, Or Death To avoid damage, injury, or death from ...: - Only use with oxygen administering equipment. - Do not use nasal mask or half bed tent type with flammable anesthetics. WARNING! Invacare suggests rails be in accordance with state patient restraint legislation or facility interpretation of the product. 1148139-H 9 blankets/sheets, tubing, wiring,...
... injury or damage from fire: - Ensure that all drive shafts, free of obstruction (i.e. Health care professionals assigned to extend below mattress support level. Safety Fire Hazard DANGER! Risk Of Product Damage, Injury, Or Death To avoid damage, injury, or death from ...: - Only use with oxygen administering equipment. - Do not use nasal mask or half bed tent type with flammable anesthetics. WARNING! Invacare suggests rails be in accordance with state patient restraint legislation or facility interpretation of the product. 1148139-H 9 blankets/sheets, tubing, wiring,...

Owners Manual
Page 10
... or similar foreign items. - Keep openings free from airborne pollutants and/or fumes and for optimal performance: - Contact a qualified technician or Invacare if any adjustments, repair or service and before use in this manual. Sharp edges or surfaces should be corrected or replaced. - After any...1148139-H WARNING! WARNING! Parts showing excessive wear should be replaced. - Risk Of Injury Or Damage To avoid injury or damage due to the mattress: - Risk Of Damage To avoid damage to collapse or missing hardware: - Loose or missing parts such as end caps, knobs, bolts, ...
... or similar foreign items. - Keep openings free from airborne pollutants and/or fumes and for optimal performance: - Contact a qualified technician or Invacare if any adjustments, repair or service and before use in this manual. Sharp edges or surfaces should be corrected or replaced. - After any...1148139-H WARNING! WARNING! Parts showing excessive wear should be replaced. - Risk Of Injury Or Damage To avoid injury or damage due to the mattress: - Risk Of Damage To avoid damage to collapse or missing hardware: - Loose or missing parts such as end caps, knobs, bolts, ...

Owners Manual
Page 13
Performance Specifications MA90Z MA95Z Mattress Weight Capacity Standard - 36 inch: 350 lbs Bariatric - 42 Inch: 650 lbs Bariatric - 48 Inch: 1000 lbs Pressure Zone Maximum Flow: 50 ± 15 LPM ... Rotation Time: 10, 20, 30, 60 5 minutes-4 hrs minutes Rotation Angle: Patient Contact: Overview 0-30° ± 5° 0-40° ± 5° Control unit and mattress have Latex-Free components 1148139-H 13
Performance Specifications MA90Z MA95Z Mattress Weight Capacity Standard - 36 inch: 350 lbs Bariatric - 42 Inch: 650 lbs Bariatric - 48 Inch: 1000 lbs Pressure Zone Maximum Flow: 50 ± 15 LPM ... Rotation Time: 10, 20, 30, 60 5 minutes-4 hrs minutes Rotation Angle: Patient Contact: Overview 0-30° ± 5° 0-40° ± 5° Control unit and mattress have Latex-Free components 1148139-H 13
Owners Manual
Page 16
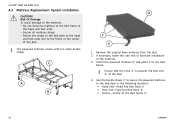
... place it on the bed frame. Do not strap the mattress to the bed frame at the center of the mattress. 3. The powered mattress comes with ten nylon buckle straps. 1. Risk Of Damage To avoid damage to the frame at the head and foot ends. - Use the buckle straps F ...to secure the powered mattress to facilitate installation of the bed. Remove the original foam mattress from the bed. 2. Ensure that the hose E is towards the foot end B of the Bed Frame C 16 1148139-H If necessary...
... place it on the bed frame. Do not strap the mattress to the bed frame at the center of the mattress. 3. The powered mattress comes with ten nylon buckle straps. 1. Risk Of Damage To avoid damage to the frame at the head and foot ends. - Use the buckle straps F ...to secure the powered mattress to facilitate installation of the bed. Remove the original foam mattress from the bed. 2. Ensure that the hose E is towards the foot end B of the Bed Frame C 16 1148139-H If necessary...

Owners Manual
Page 17
Ensure that the hose connecting the control unit to the mattress is routed such that it cannot be stepped on a flat surface, leaving room for the hose to hang down. 1148139-H 17 If the bed does ... rails for the installation procedure. 4.4 Installing the Power Unit Setup 4.5 Connecting the Hose CAUTION! Refer to the Bed Rail Entrapment Risk Notification Guide at www.invacare.com for additional safety information. Pull out the bed hook A on the hose, or causing other injuries or damage: - Risk Of Injury Or Damage To...
Ensure that the hose connecting the control unit to the mattress is routed such that it cannot be stepped on a flat surface, leaving room for the hose to hang down. 1148139-H 17 If the bed does ... rails for the installation procedure. 4.4 Installing the Power Unit Setup 4.5 Connecting the Hose CAUTION! Refer to the Bed Rail Entrapment Risk Notification Guide at www.invacare.com for additional safety information. Pull out the bed hook A on the hose, or causing other injuries or damage: - Risk Of Injury Or Damage To...
Owners Manual
Page 18
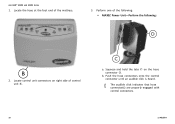
b. Push the hose connectors onto the control connector until an audible click is heard. Locate control unit connectors on the hose connector D. Squeeze and hold the tabs C on right side of control unit B. The audible click indicates that hose connector(s) are properly engaged with control connectors. 18 1148139-H a. microAIR® MA90 and MA95 Series 1. Perform one of the mattress. 3. Locate the hose at the foot end of the following: • MA90Z Power Unit-Perform the following: 2.
b. Push the hose connectors onto the control connector until an audible click is heard. Locate control unit connectors on the hose connector D. Squeeze and hold the tabs C on right side of control unit B. The audible click indicates that hose connector(s) are properly engaged with control connectors. 18 1148139-H a. microAIR® MA90 and MA95 Series 1. Perform one of the mattress. 3. Locate the hose at the foot end of the following: • MA90Z Power Unit-Perform the following: 2.
Owners Manual
Page 19
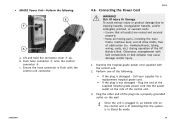
c. Keep all moving parts, including the main frame, mattress deck, and all cord(s) are routed and secured properly. - Ensure the hose connector is in Stand By mode. 19 Plug the other end of the ... bed collapse may cause damage and/or injury. 1. Once the unit is plugged in, an Amber LED on the control unit is not damaged - • MA95Z Power Unit-Perform the following : • If the plug is damaged -
c. Keep all moving parts, including the main frame, mattress deck, and all cord(s) are routed and secured properly. - Ensure the hose connector is in Stand By mode. 19 Plug the other end of the ... bed collapse may cause damage and/or injury. 1. Once the unit is plugged in, an Amber LED on the control unit is not damaged - • MA95Z Power Unit-Perform the following : • If the plug is damaged -

Owners Manual
Page 23
...duration. The cycle duration can be set pressure setting and remain static for the time selected. Then, every two minutes, the pressure in the mattress will once again inflate to 99 minutes. Rotation to the Left side. This pulse cycle repeats itself for the selected time. (i.e...if 10 ...air cushions maintain constant pressure. Set 10 minute pulse time cycle. Rotation to the set from bottoming out. 23 In this setting, the mattress will increase to prevent the patient from 1 to the set pressure settings for 10 minutes, then deflate by 20% for five seconds. the...
...duration. The cycle duration can be set pressure setting and remain static for the time selected. Then, every two minutes, the pressure in the mattress will once again inflate to 99 minutes. Rotation to the Left side. This pulse cycle repeats itself for the selected time. (i.e...if 10 ...air cushions maintain constant pressure. Set 10 minute pulse time cycle. Rotation to the set from bottoming out. 23 In this setting, the mattress will increase to prevent the patient from 1 to the set pressure settings for 10 minutes, then deflate by 20% for five seconds. the...

Owners Manual
Page 24
... comfort pressure levels and provides a guide to the caregiver to change the times or attributes. 5.1.7 Hold Button (MA95Z Power Unit) Low Air Loss Mode 1. A series of mattress). • Max Inflate mode can be used during patient ingress/egress, patient wound care, patient turning or patient... cleaning. 5.1.10 Max Inflate Button (MA95Z Power Unit) Press the Max Inflate button K to select the max inflate mode and inflate the mattress rapidly to maximum firmness (pressurized to height ratio is pressed again. 5.1.8 Firm/Soft Buttons...
... comfort pressure levels and provides a guide to the caregiver to change the times or attributes. 5.1.7 Hold Button (MA95Z Power Unit) Low Air Loss Mode 1. A series of mattress). • Max Inflate mode can be used during patient ingress/egress, patient wound care, patient turning or patient... cleaning. 5.1.10 Max Inflate Button (MA95Z Power Unit) Press the Max Inflate button K to select the max inflate mode and inflate the mattress rapidly to maximum firmness (pressurized to height ratio is pressed again. 5.1.8 Firm/Soft Buttons...

Owners Manual
Page 25
... indicated on the transmitter. The Fowler LED is on the inside of the mattress cover on the LCD to Standby. Cancel-Press the Turn Angle button to exit Fowler Transmitter Setup without pressing a key. • MA95Z Power Unit-Perform the following steps: a. AUTO FOWLER LEARN MODE will beep.... c. d. e. The control unit will display. Use the Firm and Soft buttons until Fowler displays. When this mode is in the mattress cover pocket in the LCD Display. ...
... indicated on the transmitter. The Fowler LED is on the inside of the mattress cover on the LCD to Standby. Cancel-Press the Turn Angle button to exit Fowler Transmitter Setup without pressing a key. • MA95Z Power Unit-Perform the following steps: a. AUTO FOWLER LEARN MODE will beep.... c. d. e. The control unit will display. Use the Firm and Soft buttons until Fowler displays. When this mode is in the mattress cover pocket in the LCD Display. ...

Owners Manual
Page 26
... are accessible. Pressing this mode. • Alarm Silence mode - Sealed fowlers will need to be replaced as the mattress is present. During a power outage, the MA90Z, MA90ZB42 and MA90ZB48 mattress retains the air as long as a whole part. • Battery must be replaced on the transmitter. • ...or when the hose is first inserted the LED light will flash four times to indicate a 45° fowler. • Replace transmitter in mattress cover pocket in this mode. 5.1.13 Power Fail LED In the event of old battery according to the control unit. 26 1148139-H Replace ...
... are accessible. Pressing this mode. • Alarm Silence mode - Sealed fowlers will need to be replaced as the mattress is present. During a power outage, the MA90Z, MA90ZB42 and MA90ZB48 mattress retains the air as long as a whole part. • Battery must be replaced on the transmitter. • ...or when the hose is first inserted the LED light will flash four times to indicate a 45° fowler. • Replace transmitter in mattress cover pocket in this mode. 5.1.13 Power Fail LED In the event of old battery according to the control unit. 26 1148139-H Replace ...

Owners Manual
Page 27
... minutes displays as described above. 1148139-H Usage 5.2 Powering Up the System For this procedure, refer to sound. 5.1.15 Displaying the Total Run Time (MA95Z Power Unit) Every time the control unit is plugged in, the LCD screen displays the Run Time in hours and minutes. Once the button is... released, a green led illuminates when the unit is on the power to sound. 5.1.14 Low Pressure LED In the event that the mattress hose disconnects, an alarm sounds and Low Pressure LED N flashes Amber. See troubleshooting section of this manual if alarm fails to 5.1 Using the Front...
... minutes displays as described above. 1148139-H Usage 5.2 Powering Up the System For this procedure, refer to sound. 5.1.15 Displaying the Total Run Time (MA95Z Power Unit) Every time the control unit is plugged in, the LCD screen displays the Run Time in hours and minutes. Once the button is... released, a green led illuminates when the unit is on the power to sound. 5.1.14 Low Pressure LED In the event that the mattress hose disconnects, an alarm sounds and Low Pressure LED N flashes Amber. See troubleshooting section of this manual if alarm fails to 5.1 Using the Front...
Owners Manual
Page 28
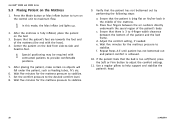
...placing the patient, make certain no objects will fall under the patient, such as feeding tubes, IV's etc. 6. Wait five minutes for the mattress pressure to the desired comfort level. 8. Set the comfort pressure to stabilize. 7. Verify that the patient is lying flat on the bed from side.... 11. If the patient feels that there is too soft/hard, press the Soft or Firm button to maximum flow. Wait five minutes for the mattress pressure to stabilize. 9. Ensure that the bed is 3 to provide comfortable positions. 5. Adjust the comfort setting, if needed. Repeat Steps A-E until ...
...placing the patient, make certain no objects will fall under the patient, such as feeding tubes, IV's etc. 6. Wait five minutes for the mattress pressure to the desired comfort level. 8. Set the comfort pressure to stabilize. 7. Verify that the patient is lying flat on the bed from side.... 11. If the patient feels that there is too soft/hard, press the Soft or Firm button to maximum flow. Wait five minutes for the mattress pressure to stabilize. 9. Ensure that the bed is 3 to provide comfortable positions. 5. Adjust the comfort setting, if needed. Repeat Steps A-E until ...
Owners Manual
Page 29
... the bed and the wheel locks of the following : • Bed to the user manual provided with the gurney. 3. When the mattress has reached maximum firmness, perform one of the gurney before transferring the patient between the bed and the gurney. 1. Engage the wheel locks... of the wheelchair, if applicable. Engage the wheel locks of the gurney. Raise or lower the bed to achieve maximum mattress pressure. 4. Refer to the user manual provided with the bed. 2. Usage 5.5 Transferring Patient From/To a Wheelchair WARNING! Press the Max Inflate ...
... the bed and the wheel locks of the following : • Bed to the user manual provided with the gurney. 3. When the mattress has reached maximum firmness, perform one of the gurney before transferring the patient between the bed and the gurney. 1. Engage the wheel locks... of the wheelchair, if applicable. Engage the wheel locks of the gurney. Raise or lower the bed to achieve maximum mattress pressure. 4. Refer to the user manual provided with the bed. 2. Usage 5.5 Transferring Patient From/To a Wheelchair WARNING! Press the Max Inflate ...
Owners Manual
Page 31
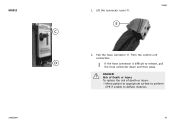
DANGER! Move patient to appropriate surface to perform CPR if unable to release, pull the hose connector down and then away. Pull the hose connector E from the control unit connectors. If the hose connector is difficult to deflate mattress. 31 Lift the connector cover C. 2. MA95Z 1148139-H Usage 1. Risk of Death or Injury To reduce the risk of death or injury: -
DANGER! Move patient to appropriate surface to perform CPR if unable to release, pull the hose connector down and then away. Pull the hose connector E from the control unit connectors. If the hose connector is difficult to deflate mattress. 31 Lift the connector cover C. 2. MA95Z 1148139-H Usage 1. Risk of Death or Injury To reduce the risk of death or injury: -


