
User Manual
Page 1
M-151003 Revision B 08/2014 Copyright © 2014 JET This .pdf document is bookmarked Operating Instructions and Parts Manual PTJ Series Pallet Trucks JET 427 New Sanford Road LaVergne, Tennessee 37086 Ph.: 800-274-6848 www.jettools.com Part No.
M-151003 Revision B 08/2014 Copyright © 2014 JET This .pdf document is bookmarked Operating Instructions and Parts Manual PTJ Series Pallet Trucks JET 427 New Sanford Road LaVergne, Tennessee 37086 Ph.: 800-274-6848 www.jettools.com Part No.
User Manual
Page 2
... turning. JET reserves the right to 5PM CST, Monday through distributors only. Motors; Manual Hoist Accessories; Shop Tools; The exceptions are made specifically for further clarification. More Information JET is designed to be asked to provide proof of use the Service Center Locator on the official JET branded website. • JET products carry a limited warranty which they may void the warranty. JET sells through Friday. Light...
... turning. JET reserves the right to 5PM CST, Monday through distributors only. Motors; Manual Hoist Accessories; Shop Tools; The exceptions are made specifically for further clarification. More Information JET is designed to be asked to provide proof of use the Service Center Locator on the official JET branded website. • JET products carry a limited warranty which they may void the warranty. JET sells through Friday. Light...
User Manual
Page 3
Parts List 11 3 2.0 Table of contents Section Page 1.0 Warranty and Service...2 2.0 Table of contents...3 3.0 Safety warnings...4 4.0 Introduction ...5 5.0 Specifications ...5 6.0 Setup and assembly...6 7.0 Operations...6 7.1 Lifting Load ...7 7.2 Moving Load ...7 7.3 Lowering Load ...7 7.4 Up-Down Cam Adjustment...7 8.0 Maintenance...7 8.1 Cleaning Release Valve ...7 8.2 Lubrication...7 8.3 Piston Seal/O-Ring Replacement...8 9.0 Troubleshooting the PTJ Series Pallet Trucks 9 10.0 Replacement Parts...9 10.1.1 PTJ-Series Pallet Trucks - Exploded View 10 10.1.2 PTJ-Series Pallet Trucks ...
Parts List 11 3 2.0 Table of contents Section Page 1.0 Warranty and Service...2 2.0 Table of contents...3 3.0 Safety warnings...4 4.0 Introduction ...5 5.0 Specifications ...5 6.0 Setup and assembly...6 7.0 Operations...6 7.1 Lifting Load ...7 7.2 Moving Load ...7 7.3 Lowering Load ...7 7.4 Up-Down Cam Adjustment...7 8.0 Maintenance...7 8.1 Cleaning Release Valve ...7 8.2 Lubrication...7 8.3 Piston Seal/O-Ring Replacement...8 9.0 Troubleshooting the PTJ Series Pallet Trucks 9 10.0 Replacement Parts...9 10.1.1 PTJ-Series Pallet Trucks - Exploded View 10 10.1.2 PTJ-Series Pallet Trucks ...
User Manual
Page 4
... pallet truck. 2. Do not move a loaded pallet truck by other purposes, JET disclaims any real or implied warranty and holds itself harmless from any time. 6. Failure to comply with all of 5,000 lbs. 10. Read and understand the entire owner's manual before transporting. 11. Do not use . 5. Secure load before attempting assembly or operation of the pallet truck suddenly...
... pallet truck. 2. Do not move a loaded pallet truck by other purposes, JET disclaims any real or implied warranty and holds itself harmless from any time. 6. Failure to comply with all of 5,000 lbs. 10. Read and understand the entire owner's manual before transporting. 11. Do not use . 5. Secure load before attempting assembly or operation of the pallet truck suddenly...
User Manual
Page 5
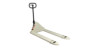
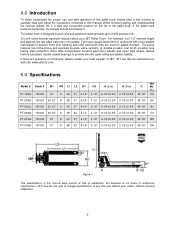
... manual were current at any time and without prior notice, without incurring obligations. 5 4.0 Introduction To better understand the proper use and safe operation of this pallet truck, please take a few minutes to provide smooth, quiet rolling and added stability. The heavy-gauge steel frame is designed to push and pull palletized material loads up to change specifications...
... manual were current at any time and without prior notice, without incurring obligations. 5 4.0 Introduction To better understand the proper use and safe operation of this pallet truck, please take a few minutes to provide smooth, quiet rolling and added stability. The heavy-gauge steel frame is designed to push and pull palletized material loads up to change specifications...
User Manual
Page 6
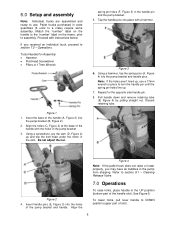
... cam. Using a hammer, tap the spring pins (A, Figure 4) into place with a hammer. To lower forks, pull lever handle to a crate) require some assembly. Using a screwdriver, pry the cam (D, Figure 2) up . 7. Figure 3 6. Figure 2 4. Cleaning Release Valve. Align the 7.0 Operations To raise forks, place handle in the pump bracket. 3. Do not adjust the nut. Pallet trucks purchased in the pump from shipping. Tools Needed for the opposite side handle pin. 8. 6.0 Setup and assembly Note...
... cam. Using a hammer, tap the spring pins (A, Figure 4) into place with a hammer. To lower forks, pull lever handle to a crate) require some assembly. Using a screwdriver, pry the cam (D, Figure 2) up . 7. Figure 3 6. Figure 2 4. Cleaning Release Valve. Align the 7.0 Operations To raise forks, place handle in the pump bracket. 3. Do not adjust the nut. Pallet trucks purchased in the pump from shipping. Tools Needed for the opposite side handle pin. 8. 6.0 Setup and assembly Note...
User Manual
Page 7
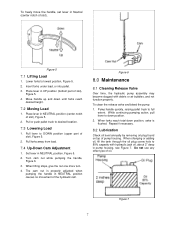
... load. 7.4 Up-Down Cam Adjustment 1. Turn cam nut while pumping the handle, Figure 6. 3. Figure 6 8.0 Maintenance 8.1 Cleaning Release Valve Over time, the hydraulic pump assembly may become clogged with hydraulic jack oil, about 2" deep in NEUTRAL position, Figure 5. 2. Lower forks to 80% capacity with debris or air bubbles, and not function properly. When forks reach total down position. 2. To freely move the handle, set lever...
... load. 7.4 Up-Down Cam Adjustment 1. Turn cam nut while pumping the handle, Figure 6. 3. Figure 6 8.0 Maintenance 8.1 Cleaning Release Valve Over time, the hydraulic pump assembly may become clogged with hydraulic jack oil, about 2" deep in NEUTRAL position, Figure 5. 2. Lower forks to 80% capacity with debris or air bubbles, and not function properly. When forks reach total down position. 2. To freely move the handle, set lever...
User Manual
Page 8
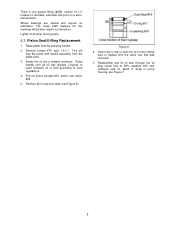
... #25. 5. Lightly oil all oil has drained. Remove screws #70, sect. 10.1.1. Empty the oil into a suitable container. Dispose of used hydraulic oil or fluid according to replace with new hydraulic jack oil, about 2" deep in pump housing, see Figure 8). Insert new o-ring or seal one grease fitting (#55B, section 10.1.1) located on a semiannual basis. This will free the pump and handle assembly from...
... #25. 5. Lightly oil all oil has drained. Remove screws #70, sect. 10.1.1. Empty the oil into a suitable container. Dispose of used hydraulic oil or fluid according to replace with new hydraulic jack oil, about 2" deep in pump housing, see Figure 8). Insert new o-ring or seal one grease fitting (#55B, section 10.1.1) located on a semiannual basis. This will free the pump and handle assembly from...
User Manual
Page 9
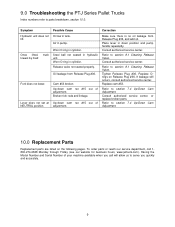
... 7.4 Up-Down Cam Adjustment. Tighten Release Plug #36. Replace cam #53. Lever does not set at NEUTRAL position. Correction Make sure there is no oil leakage from Release Plug #36. Consult authorized service center. Replace Orings on the following pages. Oil leakage from Release Plug #36, and add oil. Cam #53 broken. Refer to section 8.1 Cleaning Release Valve. To order parts or reach our service department, call...
... 7.4 Up-Down Cam Adjustment. Tighten Release Plug #36. Replace cam #53. Lever does not set at NEUTRAL position. Correction Make sure there is no oil leakage from Release Plug #36. Consult authorized service center. Replace Orings on the following pages. Oil leakage from Release Plug #36, and add oil. Cam #53 broken. Refer to section 8.1 Cleaning Release Valve. To order parts or reach our service department, call...
User Manual
Page 11
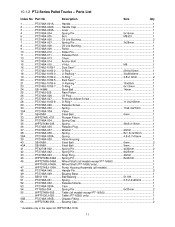
... Oil Plug ...1 27 PT2748A-027 Pressure Adjust Screw 1 28 PT2748J-101B-8 ....... Plunger Piston 1 34 PT2748A-034 Spring Cap...1 35 WPT2748A-035......... Spring Pin 8x40mm 1 46 WPT2748A-046A ...... Bearing Cap 2 * Available only in the repair kit, WPT2748J-101A 11 Spring 38x5x113mm 1 36 PT2748A-036 Release Plug 1 37 PT2748A-037 Washer 20mm 1 38 PT2748A-038 Spring 8x1.5x12.8mm 1 38A............PT2748A-038A.......... Wheel Shaft (all models except PT...
... Oil Plug ...1 27 PT2748A-027 Pressure Adjust Screw 1 28 PT2748J-101B-8 ....... Plunger Piston 1 34 PT2748A-034 Spring Cap...1 35 WPT2748A-035......... Spring Pin 8x40mm 1 46 WPT2748A-046A ...... Bearing Cap 2 * Available only in the repair kit, WPT2748J-101A 11 Spring 38x5x113mm 1 36 PT2748A-036 Release Plug 1 37 PT2748A-037 Washer 20mm 1 38 PT2748A-038 Spring 8x1.5x12.8mm 1 38A............PT2748A-038A.......... Wheel Shaft (all models except PT...

User Manual
Page 12
... (N/A 1 69 TS-1551061 Lock Washer 8mm 2 70 TS-1504031 Socket Head Cap Screw M8x14 2 71 PT2748A-071 Crank Shaft (PT-2742J / PT-2748J 1 PT2048A-071 Crank Shaft (PT-2036J / PT-2042J / PT-2048J 1 PT1636J-071 Crank Shaft (PT-1636J Only 1 73 PT2748J-073 Oil Lite Bushing (PT-2748J Only 2 PT2048J-073 Oil Lite Bushing (all models except PT-1636J 1 PT1636J-109A .......... Pump, Handle, Wheel Assembly (all models except PT-1636J 1 WPT1636J-110...
... (N/A 1 69 TS-1551061 Lock Washer 8mm 2 70 TS-1504031 Socket Head Cap Screw M8x14 2 71 PT2748A-071 Crank Shaft (PT-2742J / PT-2748J 1 PT2048A-071 Crank Shaft (PT-2036J / PT-2042J / PT-2048J 1 PT1636J-071 Crank Shaft (PT-1636J Only 1 73 PT2748J-073 Oil Lite Bushing (PT-2748J Only 2 PT2048J-073 Oil Lite Bushing (all models except PT-1636J 1 PT1636J-109A .......... Pump, Handle, Wheel Assembly (all models except PT-1636J 1 WPT1636J-110...


