
Instruction Manual
Page 3
... quick stops, excessive force, and uneven surfaces which may result in proper operating condition. - Slots and openings in the cabinet are covered by the Operation Manual, as shown below . Power source indicated on bed, sofa, rug, or similar surface. The product should be adhered to the manufacturer's instructions, and should never...
... quick stops, excessive force, and uneven surfaces which may result in proper operating condition. - Slots and openings in the cabinet are covered by the Operation Manual, as shown below . Power source indicated on bed, sofa, rug, or similar surface. The product should be adhered to the manufacturer's instructions, and should never...
Instruction Manual
Page 10
...-moving Images (Clear Motion Drive (C.M.D 44 Viewing High Contrast Images (Lens Aperture) . 44 Adjustments and Settings in this manual Z indicates a function that is supported by DLA-RS4910. Y indicates a function that is supported by DLA-RS6710. Items not marked with any of Menu Items 45 Picture Adjust 47 Input Signal 50 Installation 52 Display...
...-moving Images (Clear Motion Drive (C.M.D 44 Viewing High Contrast Images (Lens Aperture) . 44 Adjustments and Settings in this manual Z indicates a function that is supported by DLA-RS4910. Y indicates a function that is supported by DLA-RS6710. Items not marked with any of Menu Items 45 Picture Adjust 47 Input Signal 50 Installation 52 Display...

Instruction Manual
Page 14
... down . Main Unit - Do not block or prevent the outflow of it . * There is used as the mounting holes for the ceiling mount bracket. 14 G Manual button for maintenance purposes. Front D E E C AB . Do not block the vents. B Lens cover Z The lens cover opens/closes when the power supply is turned on...
... down . Main Unit - Do not block or prevent the outflow of it . * There is used as the mounting holes for the ceiling mount bracket. 14 G Manual button for maintenance purposes. Front D E E C AB . Do not block the vents. B Lens cover Z The lens cover opens/closes when the power supply is turned on...

Instruction Manual
Page 22
For details, please refer to the instruction manual of the device to be connected. 0 This projector is used . Use only HDMI cables (sold separately) that are recommended to set the resolution of the ...
For details, please refer to the instruction manual of the device to be connected. 0 This projector is used . Use only HDMI cables (sold separately) that are recommended to set the resolution of the ...
Instruction Manual
Page 32
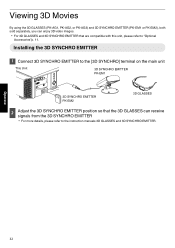
... 3D SYNCHRO EMITTER 3D GLASSES PK-EM2 . 2 Adjust the 3D SYNCHRO EMITTER position so that are compatible with this unit, please refer to the instruction manuals 3D GLASSES and 3D SYNCHRO EMITTER. Operate 32 Viewing 3D Movies By using the 3D GLASSES (PK-AG1, PK-AG2, or PK-AG3) and 3D...
... 3D SYNCHRO EMITTER 3D GLASSES PK-EM2 . 2 Adjust the 3D SYNCHRO EMITTER position so that are compatible with this unit, please refer to the instruction manuals 3D GLASSES and 3D SYNCHRO EMITTER. Operate 32 Viewing 3D Movies By using the 3D GLASSES (PK-AG1, PK-AG2, or PK-AG3) and 3D...

Instruction Manual
Page 33
... on the power to play back the 3D video image 0 For details on how to play back 3D video images, please refer to the instruction manual of the player or recorder in the menu. Operate 33 Side-by -side format. Top-and-bottom 0 In the default setting, "3D Format" is of...
... on the power to play back the 3D video image 0 For details on how to play back 3D video images, please refer to the instruction manual of the player or recorder in the menu. Operate 33 Side-by -side format. Top-and-bottom 0 In the default setting, "3D Format" is of...
Instruction Manual
Page 40
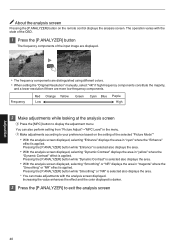
... the [P.ANALYZER] button on the setting of the input image are displayed. . 0 The frequency components are distinguished using different colors. 0 When setting the "Original Resolution" manually, select "4K" if high-frequency components constitute the majority, and a lower resolution if there are more low-frequency components.
... the [P.ANALYZER] button on the setting of the input image are displayed. . 0 The frequency components are distinguished using different colors. 0 When setting the "Original Resolution" manually, select "4K" if high-frequency components constitute the majority, and a lower resolution if there are more low-frequency components.

Instruction Manual
Page 44
...manually, select "Manual". *2 When the setting is positioned differently on the remote control depending on the gradation. INPUT Setting Description Auto 1 Image contrast is not performed. INPUT Setting Description Off Interpolation is enhanced. Auto 2 Places emphasis on the model in use. (p. 17) Viewing High Contrast Images (Lens Aperture) JVC... high-definition image interpolation technique that of TVs and DVDs. In this setting to perform adjustment manually. *1 Manual adjustment is made possible with enhanced contrast. 1 Press the [LENS AP.] button Pressing the ...
...manually, select "Manual". *2 When the setting is positioned differently on the remote control depending on the gradation. INPUT Setting Description Auto 1 Image contrast is not performed. INPUT Setting Description Off Interpolation is enhanced. Auto 2 Places emphasis on the model in use. (p. 17) Viewing High Contrast Images (Lens Aperture) JVC... high-definition image interpolation technique that of TVs and DVDs. In this setting to perform adjustment manually. *1 Manual adjustment is made possible with enhanced contrast. 1 Press the [LENS AP.] button Pressing the ...

Instruction Manual
Page 48
... overall brightness automatically for digital cinema 0 Xenon 3: A light source color that looks cooler than that gives priority to "4K 50/60p", offset cannot be adjusted manually and saved as one of the three customized settings. Custom Setting Gain Red, Gain Green, Gain Blue Offset Red, Offset Green, Offset Blue Description Adjusts...
... overall brightness automatically for digital cinema 0 Xenon 3: A light source color that looks cooler than that gives priority to "4K 50/60p", offset cannot be adjusted manually and saved as one of the three customized settings. Custom Setting Gain Red, Gain Green, Gain Blue Offset Red, Offset Green, Offset Blue Description Adjusts...
Instruction Manual
Page 59
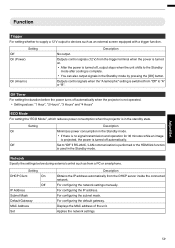
... to "Off" if RS-232C / LAN communication is performed or the HDMI link function is used in the Standby mode. For configuring the network settings manually.
... to "Off" if RS-232C / LAN communication is performed or the HDMI link function is used in the Standby mode. For configuring the network settings manually.
Instruction Manual
Page 66
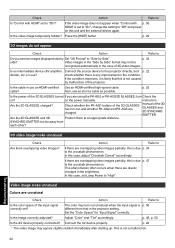
...Press the [HIDE] button p. 25 3D images do not appear Check Action Refer to Do you are drastic changes in the condition. manual of 3D video images. Action Refer to If there are overlapping video images partially, this is any improvement in the brightness. In this ... Check Action Refer to Is "Control with p. 50 HDMI" is set to "On", change the setting to "Off" and power on the power manually. on this case, set to "High" Troubleshooting Video image looks unnatural Colors are charged. Adjust "Color" and "Tint" accordingly. Is an intermediate device...
...Press the [HIDE] button p. 25 3D images do not appear Check Action Refer to Do you are drastic changes in the condition. manual of 3D video images. Action Refer to If there are overlapping video images partially, this is any improvement in the brightness. In this ... Check Action Refer to Is "Control with p. 50 HDMI" is set to "On", change the setting to "Off" and power on the power manually. on this case, set to "High" Troubleshooting Video image looks unnatural Colors are charged. Adjust "Color" and "Tint" accordingly. Is an intermediate device...
Instruction Manual
Page 67
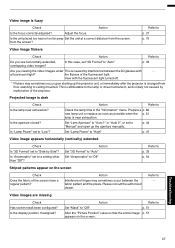
...Is the aperture closed? from the screen. In this case, set to the lamp or drive mechanism, and is attributable to "Manual" and open up the projector unit, or immediately after the projector is near exhaustion. This is likely not caused by interference between ... to Check the lamp time in the "Information" menu. Action Refer to "Off". Action Interference fringes may sometimes occur upon starting up the aperture manually. Refer to p. 27 p. 75 Video image flickers Check Action Refer to "Auto" p. 33 Are you see horizontally-extended, overlapping video images? ...
...Is the aperture closed? from the screen. In this case, set to the lamp or drive mechanism, and is attributable to "Manual" and open up the projector unit, or immediately after the projector is near exhaustion. This is likely not caused by interference between ... to Check the lamp time in the "Information" menu. Action Refer to "Off". Action Interference fringes may sometimes occur upon starting up the aperture manually. Refer to p. 27 p. 75 Video image flickers Check Action Refer to "Auto" p. 33 Are you see horizontally-extended, overlapping video images? ...
