Separate volume2
Page 1
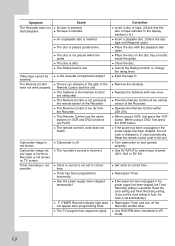
... tray. c Change the setting to ON (Auto) by referring to pages 51-53 in other than HDMI when HDMI is connected and 720p/1080i is updated with a TV that data will not be used to use to watch the video signal from AV OUT, S-VIDEO OUT, COMPONENT/PROGRESSIVE SCAN VIDEO OUT. My DR-MV7S is not setting automatically. My DR-MV7S is showing no signal output other DVD players. Remote control unit does not work...
... tray. c Change the setting to ON (Auto) by referring to pages 51-53 in other than HDMI when HDMI is connected and 720p/1080i is updated with a TV that data will not be used to use to watch the video signal from AV OUT, S-VIDEO OUT, COMPONENT/PROGRESSIVE SCAN VIDEO OUT. My DR-MV7S is not setting automatically. My DR-MV7S is showing no signal output other DVD players. Remote control unit does not work...
Instructions
Page 4
... reliable operation of the polarized or grounding-type plug. heating. The wide blade or the third prong are provided for replacement of time. 14. Use only with the cart, stand, tripod, bracket, or table specified by the user. The safeguards incorporated in electric shock or fire hazard. REFER SERVICING TO QUALIFIED SERVICE PERSONNEL ONLY. 1. The openings should be retained for installation, use instructions...
... reliable operation of the polarized or grounding-type plug. heating. The wide blade or the third prong are provided for replacement of time. 14. Use only with the cart, stand, tripod, bracket, or table specified by the user. The safeguards incorporated in electric shock or fire hazard. REFER SERVICING TO QUALIFIED SERVICE PERSONNEL ONLY. 1. The openings should be retained for installation, use instructions...
Instructions
Page 5
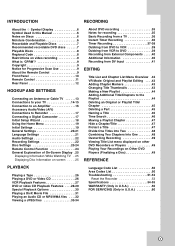
... Audio/Video (A/V) Connections to Recorder 17 Connecting a Digital Camcorder 17 Initial Setup Wizard 18 Using the Home Menu 19 Initial Settings 19 General Settings 20-21 Language Settings 21 Audio Settings 22 Recording Settings 22 Disc Settings 23-24 Remote Control Function 24 General Explanation of On-Screen Display .25 Displaying Information While Watching TV . .25 Displaying Disc Information on-screen . . . . .25 PLAYBACK Playing a Tape 26 Playing a DVD or Video CD 26 VCR Playback Features 27 DVD or video CD Playback Features . . . .28-29 Special Playback Options 30 Playing...
... Audio/Video (A/V) Connections to Recorder 17 Connecting a Digital Camcorder 17 Initial Setup Wizard 18 Using the Home Menu 19 Initial Settings 19 General Settings 20-21 Language Settings 21 Audio Settings 22 Recording Settings 22 Disc Settings 23-24 Remote Control Function 24 General Explanation of On-Screen Display .25 Displaying Information While Watching TV . .25 Displaying Disc Information on-screen . . . . .25 PLAYBACK Playing a Tape 26 Playing a DVD or Video CD 26 VCR Playback Features 27 DVD or video CD Playback Features . . . .28-29 Special Playback Options 30 Playing...
Instructions
Page 6
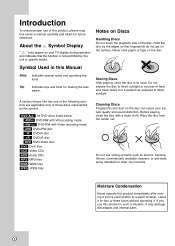
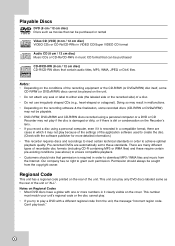
... or specific media. A section whose title has one of the disc. Do not expose the disc to direct sunlight. Tip: Indicates tips and hints for two or three hours without operating it in its case. Notes on the disc can cause poor picture quality and sound distortion. Before playing, clean the disc with Video recording mode +RW DVD+RW disc -R DVD-R disc +R DVD+R disc DVD DVD-Video disc DivX DivX files VCD Video CDs ACD Audio CDs...
... or specific media. A section whose title has one of the disc. Do not expose the disc to direct sunlight. Tip: Indicates tips and hints for two or three hours without operating it in its case. Notes on the disc can cause poor picture quality and sound distortion. Before playing, clean the disc with Video recording mode +RW DVD+RW disc -R DVD-R disc +R DVD+R disc DVD DVD-Video disc DivX DivX files VCD Video CDs ACD Audio CDs...
Instructions
Page 8
... in which it clearly visible on the rear of the unit. This number must match your unit's regional code or the disc cannot play. • If you record a disc using a personal computer or a DVD or CD Recorder may not play because of the settings of the application software used to download MP3 / WMA files and music from the Internet. Notes on Regional Codes • Most DVD discs have a globe with one or more...
... in which it clearly visible on the rear of the unit. This number must match your unit's regional code or the disc cannot play. • If you record a disc using a personal computer or a DVD or CD Recorder may not play because of the settings of the application software used to download MP3 / WMA files and music from the Internet. Notes on Regional Codes • Most DVD discs have a globe with one or more...
Instructions
Page 9
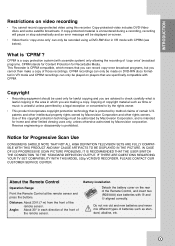
... prohibited. Notice for Progressive Scan Use CONSUMERS SHOULD NOTE THAT NOT ALL HIGH DEFINITION TELEVISION SETS ARE FULLY COMPATIBLE WITH THIS PRODUCT AND MAY CAUSE ARTIFACTS TO BE DISPLAYED IN THE PICTURE. IF THERE ARE QUESTIONS REGARDING YOUR TV SET COMPATIBILITY WITH THIS MODEL 525p VCR/DVD RECORDER, PLEASE CONTACT OUR CUSTOMER SERVICE CENTER. Battery installation Detach the battery cover on the rear of the Remote Control, and insert two (R03...
... prohibited. Notice for Progressive Scan Use CONSUMERS SHOULD NOTE THAT NOT ALL HIGH DEFINITION TELEVISION SETS ARE FULLY COMPATIBLE WITH THIS PRODUCT AND MAY CAUSE ARTIFACTS TO BE DISPLAYED IN THE PICTURE. IF THERE ARE QUESTIONS REGARDING YOUR TV SET COMPATIBILITY WITH THIS MODEL 525p VCR/DVD RECORDER, PLEASE CONTACT OUR CUSTOMER SERVICE CENTER. Battery installation Detach the battery cover on the rear of the Remote Control, and insert two (R03...
Instructions
Page 10
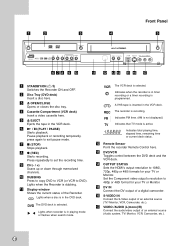
...programmed. q VIDEO /AUDIO (L(mono)/R) Connect the audio/video output of a digital camcorder. c Z OPEN/CLOSE Opens or closes the disc tray. Indicates total playing time, elapsed time, remaining time or current deck status. o DV IN Connect the DV output of an external source (Audio system, TV/ Monitor, VCR, Camcorder, etc.). 10 Indicates when the recorder is in the DVD deck. n OUTPUT STATUS Sets the HDMI's output resolution to DVD). d Cassette Compartment (VCR deck) Insert a video cassette here. The DVD deck is active. Press repeatedly to exit pause mode. m DVD/VCR...
...programmed. q VIDEO /AUDIO (L(mono)/R) Connect the audio/video output of a digital camcorder. c Z OPEN/CLOSE Opens or closes the disc tray. Indicates total playing time, elapsed time, remaining time or current deck status. o DV IN Connect the DV output of an external source (Audio system, TV/ Monitor, VCR, Camcorder, etc.). 10 Indicates when the recorder is in the DVD deck. n OUTPUT STATUS Sets the HDMI's output resolution to DVD). d Cassette Compartment (VCR deck) Insert a video cassette here. The DVD deck is active. Press repeatedly to exit pause mode. m DVD/VCR...
Instructions
Page 11
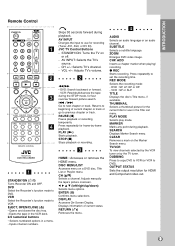
... HDMI and Component video out. 11 Ejects the tape in a menu. - JVC TV Control Buttons - STANDBY/ON: Turns the TV on or off. - Press repeatedly to VCR. PLAY MODE Selects play mode. Selects numbered options in the VCR deck. 0-9 numerical buttons - d AUDIO Selects an audio language or an audio channel. TITLE Displays the disc's Title menu, if available. TV/VCR To view channels selected by the VCR tuner or by -frame playback. INTRODUCTION Remote Control a b c d a STANDBY/ON (1/`) Turns Recorder ON and OFF. VCR Select the Recorder's function mode to set the recording time. AV INPUT...
... HDMI and Component video out. 11 Ejects the tape in a menu. - JVC TV Control Buttons - STANDBY/ON: Turns the TV on or off. - Press repeatedly to VCR. PLAY MODE Selects play mode. Selects numbered options in the VCR deck. 0-9 numerical buttons - d AUDIO Selects an audio language or an audio channel. TITLE Displays the disc's Title menu, if available. TV/VCR To view channels selected by the VCR tuner or by -frame playback. INTRODUCTION Remote Control a b c d a STANDBY/ON (1/`) Turns Recorder ON and OFF. VCR Select the Recorder's function mode to set the recording time. AV INPUT...
Instructions
Page 13
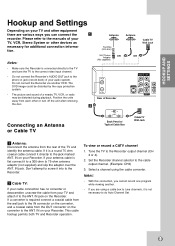
... your Recorder. Select a channel using a cable box to tune channels, it directly to the Recorder. Don't attempt to screw it to a 300-ohm to do Auto Channel Set. 13 Position the units away from the rear of a nearby TV, VCR, or radio may be distorted by the copy protection system. • The picture and sound of the TV and identify the antenna cable. To view or record a CATV channel 1. The DVD...
... your Recorder. Select a channel using a cable box to tune channels, it directly to the Recorder. Don't attempt to screw it to a 300-ohm to do Auto Channel Set. 13 Position the units away from the rear of a nearby TV, VCR, or radio may be distorted by the copy protection system. • The picture and sound of the TV and identify the antenna cable. To view or record a CATV channel 1. The DVD...
Instructions
Page 15
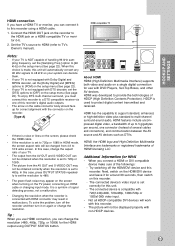
... 1080i) for the HDMI output using a HDMI cable. 1. Set the TV's source to HDMI (refer to 480i. • The green flash noise may result in HDMI mode, the screen aspect ratio will automatically convert any 96 kHz signals to this unit. - pling frequency, set correctly for correct alignment with DVD Players, Set-Top Boxes, and other AV devices. Additional Information for use HDMI connection, you connect a HDMI or DVI compatible device make sure of this recorder's digital audio outputs. • The...
... 1080i) for the HDMI output using a HDMI cable. 1. Set the TV's source to HDMI (refer to 480i. • The green flash noise may result in HDMI mode, the screen aspect ratio will automatically convert any 96 kHz signals to this unit. - pling frequency, set correctly for correct alignment with DVD Players, Set-Top Boxes, and other AV devices. Additional Information for use HDMI connection, you connect a HDMI or DVI compatible device make sure of this recorder's digital audio outputs. • The...
Instructions
Page 17
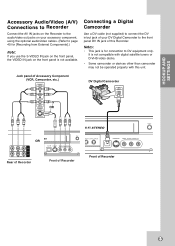
... [Recording from External Components].) Note: If you use the S-VIDEO IN jack on the front panel, the VIDEO IN jack on the front panel is not compatible with digital satellite tuners or D-VHS video decks. • Some camcorder or devices other than camcorder may not be operated properly with this Recorder. Connecting a Digital Camcorder Use a DV cable (not supplied) to connect the DV in/out jack of your accessory component, using the optional audio/video cables...
... [Recording from External Components].) Note: If you use the S-VIDEO IN jack on the front panel, the VIDEO IN jack on the front panel is not compatible with digital satellite tuners or D-VHS video decks. • Some camcorder or devices other than camcorder may not be operated properly with this Recorder. Connecting a Digital Camcorder Use a DV cable (not supplied) to connect the DV in/out jack of your accessory component, using the optional audio/video cables...
Instructions
Page 20
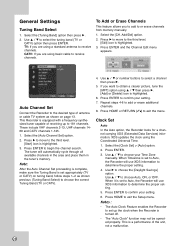
... Recorder to set to Auto, the Recorder will use XDS information to receive channels. Select the [Auto Channel Set] option. 2. Note: After the Auto Channel Set proceeding is complete, make sure the Tuning Band is turned off. • The "Auto Clock" function may not be operated properly. Press HOME or RETURN (O) to confirm your Time Zone manually. When Timezone is set up to receive channels. Press ENTER to exit the menu. TV: If you are using basic cable...
... Recorder to set to Auto, the Recorder will use XDS information to receive channels. Select the [Auto Channel Set] option. 2. Note: After the Auto Channel Set proceeding is complete, make sure the Tuning Band is turned off. • The "Auto Clock" function may not be operated properly. Press HOME or RETURN (O) to confirm your Time Zone manually. When Timezone is set up to receive channels. Press ENTER to exit the menu. TV: If you are using basic cable...
Instructions
Page 21
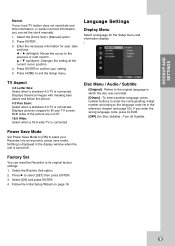
... is connected. Disc Menu / Audio / Subtitle [Original] : Refers to the original language in the display window when the unit is turned off . 16:9 Wide: Select when a 16:9 wide TV is connected. Factory Set You can set the clock manually. 1. Follow the Initial Setup Wizard on page 18. 21 Press HOME to fill your TV screen. v / V (up/down): Changes the setting at the current cursor position. 4. Language Settings Display Menu Select a language for year, date and time. Displays...
... is connected. Disc Menu / Audio / Subtitle [Original] : Refers to the original language in the display window when the unit is turned off . 16:9 Wide: Select when a 16:9 wide TV is connected. Factory Set You can set the clock manually. 1. Follow the Initial Setup Wizard on page 18. 21 Press HOME to fill your TV screen. v / V (up/down): Changes the setting at the current cursor position. 4. Language Settings Display Menu Select a language for year, date and time. Displays...
Instructions
Page 22
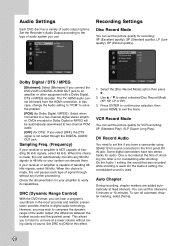
... case, change the Audio setting to "PCM" to solve the problem. [PCM] (for your amplifier to a two-channel digital stereo amplifier. DV Record Audio You need to 48 kHz so your receiver or amplifier is used . On the Audio 1 setting, the sound that was recorded while shooting is capable of signal through the DIGITAL AUDIO OUT jack. To turn off automatic chapter marking, select [None]. 22 Recording Settings Disc Record Mode You can set this...
... case, change the Audio setting to "PCM" to solve the problem. [PCM] (for your amplifier to a two-channel digital stereo amplifier. DV Record Audio You need to 48 kHz so your receiver or amplifier is used . On the Audio 1 setting, the sound that was recorded while shooting is capable of signal through the DIGITAL AUDIO OUT jack. To turn off automatic chapter marking, select [None]. 22 Recording Settings Disc Record Mode You can set this...
Instructions
Page 24
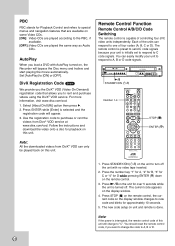
... code setup on the display window. 4. Set [AutoPlay] to [ON] or [OFF]. Select [About DivX(R)] option then press B. 2. Press ENTER while [Enter] is selected and the registration code will bypass the Disc menu and trailers and start playing the movie automatically. Follow the instructions and download the video onto a disc for D while pressing ENTER ( ) down on the unit to turn off . Remote Control Function Remote Control A/B/C/D Code Switching The remote control is interrupted, the remote control code...
... code setup on the display window. 4. Set [AutoPlay] to [ON] or [OFF]. Select [About DivX(R)] option then press B. 2. Press ENTER while [Enter] is selected and the registration code will bypass the Disc menu and trailers and start playing the movie automatically. Follow the instructions and download the video onto a disc for D while pressing ENTER ( ) down on the unit to turn off . Remote Control Function Remote Control A/B/C/D Code Switching The remote control is interrupted, the remote control code...
Instructions
Page 26
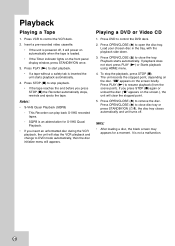
... PLAY (N) to start , press PLAY (N) or Starts playback using HOME menu. 4. Playback Playing a Tape 1. Press VCR to control the DVD deck. 2. Playing a DVD or Video CD 1. Playback starts automatically. To stop playback. • If the tape reaches the end before you press STOP (x) again or unload the disc ("x" appears on the front panel display window, press STANDBY/ON once. 3. Press OPEN/CLOSE (Z) to stop the playback, press STOP (x). This Recorder can play back S-VHS recorded tapes. - Press DVD to control the VCR deck. 2. Press OPEN/CLOSE (Z) to DVD mode automatically...
... PLAY (N) to start , press PLAY (N) or Starts playback using HOME menu. 4. Playback Playing a Tape 1. Press VCR to control the DVD deck. 2. Playing a DVD or Video CD 1. Playback starts automatically. To stop playback. • If the tape reaches the end before you press STOP (x) again or unload the disc ("x" appears on the front panel display window, press STANDBY/ON once. 3. Press OPEN/CLOSE (Z) to stop the playback, press STOP (x). This Recorder can play back S-VHS recorded tapes. - Press DVD to control the VCR deck. 2. Press OPEN/CLOSE (Z) to DVD mode automatically...
Instructions
Page 35
... on the disc. Recording time and picture quality (4.7GB DVD) There are not exact because the recorder uses variable bit-rate video compression. The disc format for how to update the new title and editing when removing the disc from the recorder. The DVD-RW disc format is VR mode; about 6 hour RECORDING 35 You can play a DVDR, DVD+R, or DVD+RW in Video mode). • Overwrite recording is available using DVD+RW discs. • When using a DVD-R or DVD+R disc, you start a recording session...
... on the disc. Recording time and picture quality (4.7GB DVD) There are not exact because the recorder uses variable bit-rate video compression. The disc format for how to update the new title and editing when removing the disc from the recorder. The DVD-RW disc format is VR mode; about 6 hour RECORDING 35 You can play a DVDR, DVD+R, or DVD+RW in Video mode). • Overwrite recording is available using DVD+RW discs. • When using a DVD-R or DVD+R disc, you start a recording session...
Instructions
Page 36
... VHS tape has enough remaining time to make sure that the TV input is set the audio channel to this recorder. 2. Each subsequent press increases the recording time by 10 minutes. When you to be extended anytime by pressing z REC. VCR: SP, SLP. 3. Use AUDIO to select the audio channel to pause the recording. 2. The last column (Monitor Audio) shows what will be canceled. • The Recorder will be saved. DVD...
... VHS tape has enough remaining time to make sure that the TV input is set the audio channel to this recorder. 2. Each subsequent press increases the recording time by 10 minutes. When you to be extended anytime by pressing z REC. VCR: SP, SLP. 3. Use AUDIO to select the audio channel to pause the recording. 2. The last column (Monitor Audio) shows what will be canceled. • The Recorder will be saved. DVD...
Instructions
Page 41
... audio input for input and output of audio, video, data and control signals. Note: Depending on the recording may not be controlled using this recorder's remote. • If you may occur if the source component pauses playback or plays an unrecorded section of tape, or if the power fails in sub-menu of this unit remotely from a component connected to the DV IN jack. • You cannot record date and time information from a DV cassette. 1. Set [DV Record Audio...
... audio input for input and output of audio, video, data and control signals. Note: Depending on the recording may not be controlled using this recorder's remote. • If you may occur if the source component pauses playback or plays an unrecorded section of tape, or if the power fails in sub-menu of this unit remotely from a component connected to the DV IN jack. • You cannot record date and time information from a DV cassette. 1. Set [DV Record Audio...
Instructions
Page 52
... Remote Control at the remote sensor of the Recorder. When using a DVD, first press the DVD button. Reset the clock setting and Timer Recording setting. (If you set the clock setting to Recorder is not set . Symptom The Recorder does not start playback. Camcorder is set to C code automatically. Has the power supply been stopped temporarily? (TIMER Record) indicator light does not appear after programming timer. The disc is changed to correct time. Camcorder image is not possible. Eject the tape in VR mode...
... Remote Control at the remote sensor of the Recorder. When using a DVD, first press the DVD button. Reset the clock setting and Timer Recording setting. (If you set the clock setting to Recorder is not set . Symptom The Recorder does not start playback. Camcorder is set to C code automatically. Has the power supply been stopped temporarily? (TIMER Record) indicator light does not appear after programming timer. The disc is changed to correct time. Camcorder image is not possible. Eject the tape in VR mode...


