Separate volume2
Page 1
JVC Customer Care Center 1-800-252-5722 DR-MV7S Quick Guide FAQ's Thank you for 10 - 15 seconds. What DVDs can play in order to be ... the instructions on my DR-MV7S? If you attempt to record on page 20 of the main unit defaults to each relevant page of the JVC DR-MV7S VHS/DVD Player/Recorder. c If the clock does not set automatically even when the Auto Clock is no picture. TUS button and select...
JVC Customer Care Center 1-800-252-5722 DR-MV7S Quick Guide FAQ's Thank you for 10 - 15 seconds. What DVDs can play in order to be ... the instructions on my DR-MV7S? If you attempt to record on page 20 of the main unit defaults to each relevant page of the JVC DR-MV7S VHS/DVD Player/Recorder. c If the clock does not set automatically even when the Auto Clock is no picture. TUS button and select...
Instructions
Page 1
Model No. Retain this information for future reference. LPT1133-001A and Serial No. Serial No. DVD RECORDER / VIDEO CASSETTE RECORDER DR-MV7SU INSTRUCTIONS For Customer Use : Enter below the Model No. which are located on the rear of cabinet.
Model No. Retain this information for future reference. LPT1133-001A and Serial No. Serial No. DVD RECORDER / VIDEO CASSETTE RECORDER DR-MV7SU INSTRUCTIONS For Customer Use : Enter below the Model No. which are located on the rear of cabinet.
Instructions
Page 2
WARNING: TO PREVENT FIRE OR ELECTRIC SHOCK HAZARD, DO NOT EXPOSE THIS PRODUCT TO RAIN OR MOISTURE. To ensure proper use of important operating and maintenance (servicing) instructions in hazardous radiation exposure. CAUTION: Do not block any ventilation openings. Visible laser radiation when open the enclosure. CAUTION: VISIBLE AND INVISIBLE CLASS 2M LASER RADIATION WHEN OPEN. CAUTION RISK OF ELECTRIC SHOCK DO NOT OPEN CAUTION: TO REDUCE THE RISK OF ELECTRIC SHOCK DO NOT REMOVE COVER (OR BACK) NO USER-SERVICEABLE PARTS INSIDE REFER SERVICING TO QUALIFIED SERVICE PERSONNEL. ...
WARNING: TO PREVENT FIRE OR ELECTRIC SHOCK HAZARD, DO NOT EXPOSE THIS PRODUCT TO RAIN OR MOISTURE. To ensure proper use of important operating and maintenance (servicing) instructions in hazardous radiation exposure. CAUTION: Do not block any ventilation openings. Visible laser radiation when open the enclosure. CAUTION: VISIBLE AND INVISIBLE CLASS 2M LASER RADIATION WHEN OPEN. CAUTION RISK OF ELECTRIC SHOCK DO NOT OPEN CAUTION: TO REDUCE THE RISK OF ELECTRIC SHOCK DO NOT REMOVE COVER (OR BACK) NO USER-SERVICEABLE PARTS INSIDE REFER SERVICING TO QUALIFIED SERVICE PERSONNEL. ...
Instructions
Page 3
Changes or modifications to this product does cause harmful interference to radio or television reception, which can radiate radio frequency energy and, if not installed and used in the instruction manual. If this equipment may cause harmful interference unless the modifications are expressly approved in accordance with the instruction manual, may generate or use of the appliance, and have the cord replaced with the limits for help. Periodically examine the cord of your appliance, and if its appearance indicates damage or deterioration, unplug it, discontinue use radio ...
Changes or modifications to this product does cause harmful interference to radio or television reception, which can radiate radio frequency energy and, if not installed and used in the instruction manual. If this equipment may cause harmful interference unless the modifications are expressly approved in accordance with the instruction manual, may generate or use of the appliance, and have the cord replaced with the limits for help. Periodically examine the cord of your appliance, and if its appearance indicates damage or deterioration, unplug it, discontinue use radio ...
Instructions
Page 4
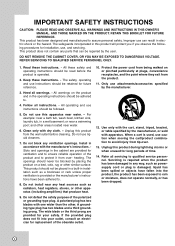
AND THOSE MARKED ON THE PRODUCT. Improper use attachments/accessories specified by placing the product on a bed, sofa, rug or other areas located near water. 6. DO NOT REMOVE THE CABINET COVER, OR YOU MAY BE EXPOSED TO DANGEROUS VOLTAGE. Read these instructions. - Follow all warnings. - Clean only with the manufacturer's instructions. Unplug this product during lightning storms or when unused for long periods of the obsolete outlet. 10. Do not use caution when moving the cart/product combination to avoid injury from tip-over - Do not defeat the safety purpose of the ...
AND THOSE MARKED ON THE PRODUCT. Improper use attachments/accessories specified by placing the product on a bed, sofa, rug or other areas located near water. 6. DO NOT REMOVE THE CABINET COVER, OR YOU MAY BE EXPOSED TO DANGEROUS VOLTAGE. Read these instructions. - Follow all warnings. - Clean only with the manufacturer's instructions. Unplug this product during lightning storms or when unused for long periods of the obsolete outlet. 10. Do not use caution when moving the cart/product combination to avoid injury from tip-over - Do not defeat the safety purpose of the ...
Instructions
Page 5
... Information While Watching TV . .25 Displaying Disc Information on-screen . . . . .25 PLAYBACK Playing a Tape 26 Playing a DVD or Video CD 26 VCR Playback Features 27 DVD or video CD Playback Features . . . .28-29 Special Playback Options 30 Playing a DivX Movie File 31 Playing an Audio CD or...recording 35 Notes for recording 35 Basic Recording from a TV 36 Instant Timer Recording 36 Timer Recording 37-38 Dubbing from DVD to VCR 39 Dubbing from VCR to DVD 39 Recording from External Components . . . . .40 Additional Information 40 Recording from DV Input 41 EDITING Title List and...
... Information While Watching TV . .25 Displaying Disc Information on-screen . . . . .25 PLAYBACK Playing a Tape 26 Playing a DVD or Video CD 26 VCR Playback Features 27 DVD or video CD Playback Features . . . .28-29 Special Playback Options 30 Playing a DivX Movie File 31 Playing an Audio CD or...recording 35 Notes for recording 35 Basic Recording from a TV 36 Instant Timer Recording 36 Timer Recording 37-38 Dubbing from DVD to VCR 39 Dubbing from VCR to DVD 39 Recording from External Components . . . . .40 Additional Information 40 Recording from DV Input 41 EDITING Title List and...
Instructions
Page 6
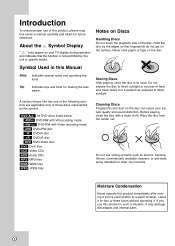
Do not use strong solvents such as alcohol, benzine, thinner, commercially available cleaners, or anti-static spray intended for making the task easier. Hold the disc by the edges so that the function is not permitted by the symbol. Tip: Indicates tips and hints for older vinyl records. Storing Discs After playing, store the disc in a parked car exposed to direct sunlight or sources of heat and never leave it in its case. Do not expose the disc to direct sunlight. A section whose title has one of the following symbols are applicable only to a warm location. DVD ALL All DVD discs...
Do not use strong solvents such as alcohol, benzine, thinner, commercially available cleaners, or anti-static spray intended for making the task easier. Hold the disc by the edges so that the function is not permitted by the symbol. Tip: Indicates tips and hints for older vinyl records. Storing Discs After playing, store the disc in a parked car exposed to direct sunlight or sources of heat and never leave it in its case. Do not expose the disc to direct sunlight. A section whose title has one of the following symbols are applicable only to a warm location. DVD ALL All DVD discs...

Instructions
Page 7
... can be recorded on the same Disc. Playable on DVD+R compatible players (after finalization) Limited editing features DVD-R (DVD - DVD-RW Mitsubishi (4x) Verbatim (4x) JVC (4x) Victor (4x) Maxell (4x) DVD+RW Mitsubishi (4x) SONY (4x) Imation (4x) Maxell (4x) Ricoh (4x) 7 After you finalize a DVD+R, you can record again...
... can be recorded on the same Disc. Playable on DVD+R compatible players (after finalization) Limited editing features DVD-R (DVD - DVD-RW Mitsubishi (4x) Verbatim (4x) JVC (4x) Victor (4x) Maxell (4x) DVD+RW Mitsubishi (4x) SONY (4x) Imation (4x) Maxell (4x) Ricoh (4x) 7 After you finalize a DVD+R, you can record again...
Instructions
Page 8
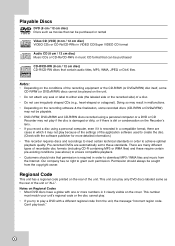
There are many different types of recordable disc formats (including CD-R containing MP3 or WMA files) and these standards. Can't play . • If you record a disc using a personal computer or a DVD or CD Recorder may not play because of the settings of a disc. • Do not use irregularly shaped CDs (e.g., heart-shaped or octagonal). Regional Code This unit has a regional code printed on the unit. • Do not attach any seal or label to grant such permission. Playable Discs DVD (8 cm / 12 cm disc) Discs such as the rear of the unit or "ALL". Doing so may result in order ...
There are many different types of recordable disc formats (including CD-R containing MP3 or WMA files) and these standards. Can't play . • If you record a disc using a personal computer or a DVD or CD Recorder may not play because of the settings of a disc. • Do not use irregularly shaped CDs (e.g., heart-shaped or octagonal). Regional Code This unit has a regional code printed on the unit. • Do not attach any seal or label to grant such permission. Playable Discs DVD (8 cm / 12 cm disc) Discs such as the rear of the unit or "ALL". Doing so may result in order ...
Instructions
Page 9
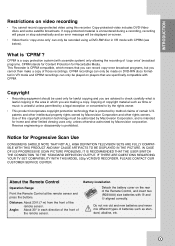
... a copy. Copy-protected video includes DVD-Video discs and some satellite broadcasts. IF THERE ARE QUESTIONS REGARDING YOUR TV SET COMPATIBILITY WITH THIS MODEL 525p VCR/DVD RECORDER, PLEASE CONTACT OUR CUSTOMER SERVICE CENTER. Use of certain U.S. IN CASE OF 525 PROGRESSIVE SCAN PICTURE PROBLEMS, IT IS RECOMMENDED THAT THE USER...
... a copy. Copy-protected video includes DVD-Video discs and some satellite broadcasts. IF THERE ARE QUESTIONS REGARDING YOUR TV SET COMPATIBILITY WITH THIS MODEL 525p VCR/DVD RECORDER, PLEASE CONTACT OUR CUSTOMER SERVICE CENTER. Use of certain U.S. IN CASE OF 525 PROGRESSIVE SCAN PICTURE PROBLEMS, IT IS RECOMMENDED THAT THE USER...
Instructions
Page 10
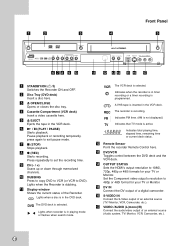
... S-Video output of the Recorder. Press repeatedly to DVD). i CH (- / +) Scans up or down through memorized channels. A VHS tape is in the VCR deck. The recorder is selected. Set the Component video output's resolution to 480p or 480i format for your TV or Monitor. o DV IN Connect the... DV output of an external source (Audio system, TV/ Monitor, VCR, Camcorder, etc.). 10 e Z EJECT Ejects the tape in playing mode or flashes when search mode. Pause playback or recording temporarily, press again to ...
... S-Video output of the Recorder. Press repeatedly to DVD). i CH (- / +) Scans up or down through memorized channels. A VHS tape is in the VCR deck. The recorder is selected. Set the Component video output's resolution to 480p or 480i format for your TV or Monitor. o DV IN Connect the... DV output of an external source (Audio system, TV/ Monitor, VCR, Camcorder, etc.). 10 e Z EJECT Ejects the tape in playing mode or flashes when search mode. Pause playback or recording temporarily, press again to ...
Instructions
Page 11
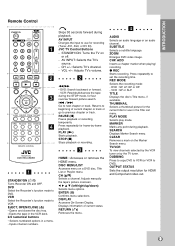
..., if available. MARKER Marks any point during playback. DVD Select the Recorder's function mode to DVD). Opens and closes the disc tray. - JVC TV Control Buttons - DVD: Search backward or forward. - Press repeatedly for fast reverse/ forward picture search. ./> Go to next chapter or ... a subtitle language. ADD Inserts a chapter marker when playing/ recording. OUTPUT STATUS Sets the output resolution for HDMI and Component video out. 11 VCR Select the Recorder's function mode to use for use in the Title List menu. b m/M - PLAY (N) Starts playback. CLEAR Removes a mark...
..., if available. MARKER Marks any point during playback. DVD Select the Recorder's function mode to DVD). Opens and closes the disc tray. - JVC TV Control Buttons - DVD: Search backward or forward. - Press repeatedly for fast reverse/ forward picture search. ./> Go to next chapter or ... a subtitle language. ADD Inserts a chapter marker when playing/ recording. OUTPUT STATUS Sets the output resolution for HDMI and Component video out. 11 VCR Select the Recorder's function mode to use for use in the Title List menu. b m/M - PLAY (N) Starts playback. CLEAR Removes a mark...

Instructions
Page 12
... discharge may cause permanent damage to digital (optical) audio equipment. Caution Do not touch the inner pins of an external source (Audio system, TV/Monitor, VCR, Camcorder). f OPTICAL (DIGITAL AUDIO OUT jack) Connect to the unit. 12 d AUDIO OUT (Left/Right) Connect to a TV with video and audio inputs. c COMPONENT/PROGRESSIVE...
... discharge may cause permanent damage to digital (optical) audio equipment. Caution Do not touch the inner pins of an external source (Audio system, TV/Monitor, VCR, Camcorder). f OPTICAL (DIGITAL AUDIO OUT jack) Connect to the unit. 12 d AUDIO OUT (Left/Right) Connect to a TV with video and audio inputs. c COMPONENT/PROGRESSIVE...
Instructions
Page 13
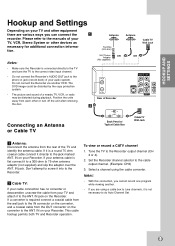
... IN jack on your Recorder. IN on the Recorder. Notes: • With this connection, you cannot record one program while viewing another VCR. HOOKUP AND SETTINGS Hookup and Settings Depending on your TV and other or turn off the unit after removing the disc. IN on your ... Disconnect the antenna from your TV and attach it directly to the cable output channel. (Example: CH3) 3. b Antenna OR Rear of your TV, VCR, Stereo System or other devices as necessary for additional connection informa- Notes: • Make sure the Recorder is a round 75 ohm coaxial cable connect it...
... IN jack on your Recorder. IN on the Recorder. Notes: • With this connection, you cannot record one program while viewing another VCR. HOOKUP AND SETTINGS Hookup and Settings Depending on your TV and other or turn off the unit after removing the disc. IN on your ... Disconnect the antenna from your TV and attach it directly to the cable output channel. (Example: CH3) 3. b Antenna OR Rear of your TV, VCR, Stereo System or other devices as necessary for additional connection informa- Notes: • Make sure the Recorder is a round 75 ohm coaxial cable connect it...

Instructions
Page 14
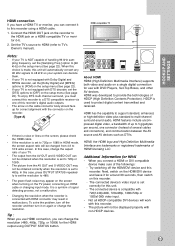
Press CH (- / +) to set the Recorder's RF output channel 1. Audio connection Connect the Left and Right AUDIO OUT jacks on the Recorder to the audio left/right in jack on the TV using the supplied 75-ohm Coaxial Cable (R). RF coaxial connection Connect the RF OUT jack on the Recorder to the antenna in jacks on the TV using the supplied audio cables (A1 or A2). Component Video / Progressive Scan connection If your television is turned off, press and hold CH (- / +) on the front panel for higher video resolution. How to change the RF output channel (RF03 or RF04). 3. R Rear of the...
Press CH (- / +) to set the Recorder's RF output channel 1. Audio connection Connect the Left and Right AUDIO OUT jacks on the Recorder to the audio left/right in jack on the TV using the supplied 75-ohm Coaxial Cable (R). RF coaxial connection Connect the RF OUT jack on the Recorder to the antenna in jacks on the TV using the supplied audio cables (A1 or A2). Component Video / Progressive Scan connection If your television is turned off, press and hold CH (- / +) on the front panel for higher video resolution. How to change the RF output channel (RF03 or RF04). 3. R Rear of the...
Instructions
Page 15
Connect the HDMI OUT jack on the recorder to the HDMI jack on again or change the resolution. When this choice is made, this unit will not be obtained correctly when the resolution is set the [Dolby Digital] and [MPEG] options to [PCM] on the setup menu (See page 22). • If your TV is not equipped with Dolby Digital and MPEG decoder, set to 480p. To enjoy DTS multi channel surround, you must connect this recorder to a DTS compatible receiver via one connector (instead of signal detecting process, not a malfunction. • Changing the resolution when the recorder is set to 720p...
Connect the HDMI OUT jack on the recorder to the HDMI jack on again or change the resolution. When this choice is made, this unit will not be obtained correctly when the resolution is set the [Dolby Digital] and [MPEG] options to [PCM] on the setup menu (See page 22). • If your TV is not equipped with Dolby Digital and MPEG decoder, set to 480p. To enjoy DTS multi channel surround, you must connect this recorder to a DTS compatible receiver via one connector (instead of signal detecting process, not a malfunction. • Changing the resolution when the recorder is set to 720p...
Instructions
Page 16
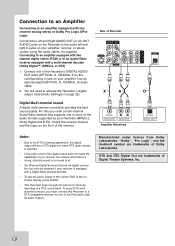
Connect one of the Recorder's DIGITAL AUDIO OUT jacks (OPTICAL O, COAXIAL X) to the corresponding in jack on page 22). Digital Multi-channel sound A digital multi-channel connection provides the best sound quality. Rear of Recorder X A COAXIAL DIGITAL INPUT L R AUDIO INPUT Amplifier (Receiver) O OPTICAL DIGITAL INPUT Notes: • Due to an Audio/Video receiver equipped with a multi-channel decoder (Dolby Digital™, MPEG 2, or DTS) 1. To enjoy DTS multi channel surround, you need to activate the Recorder 's digital output. (See [Audio Settings] on your Recorder (MPEG 2, ...
Connect one of the Recorder's DIGITAL AUDIO OUT jacks (OPTICAL O, COAXIAL X) to the corresponding in jack on page 22). Digital Multi-channel sound A digital multi-channel connection provides the best sound quality. Rear of Recorder X A COAXIAL DIGITAL INPUT L R AUDIO INPUT Amplifier (Receiver) O OPTICAL DIGITAL INPUT Notes: • Due to an Audio/Video receiver equipped with a multi-channel decoder (Dolby Digital™, MPEG 2, or DTS) 1. To enjoy DTS multi channel surround, you need to activate the Recorder 's digital output. (See [Audio Settings] on your Recorder (MPEG 2, ...
Instructions
Page 17
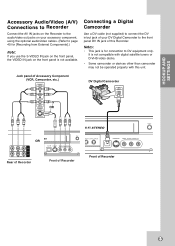
DV Digital Camcorder DV IN/OUT Rear of Recorder Front of Recorder Front of your accessory component, using the optional audio/video cables. (Refer to page 40 for [Recording from External Components].) Note: If you use the S-VIDEO IN jack on the front panel, the VIDEO IN jack on the front panel is for connection to DV equipment only. It is not compatible with digital satellite tuners or D-VHS video decks. • Some camcorder or devices other than camcorder may not be operated properly with this Recorder. HOOKUP AND SETTINGS Accessory Audio/Video (A/V) Connections to Recorder ...
DV Digital Camcorder DV IN/OUT Rear of Recorder Front of Recorder Front of your accessory component, using the optional audio/video cables. (Refer to page 40 for [Recording from External Components].) Note: If you use the S-VIDEO IN jack on the front panel, the VIDEO IN jack on the front panel is for connection to DV equipment only. It is not compatible with digital satellite tuners or D-VHS video decks. • Some camcorder or devices other than camcorder may not be operated properly with this Recorder. HOOKUP AND SETTINGS Accessory Audio/Video (A/V) Connections to Recorder ...
Instructions
Page 18
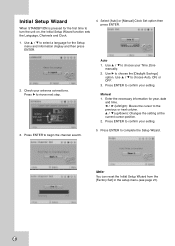
Check your setting. 5. Press B to choose the [Daylight Savings] option. Use B to move next step. 3. Manual 1. Enter the necessary information for the Setup menu and information display and then press ENTER. 4. Press ENTER to confirm your antenna connections. Note: You can reset the Initial Setup Wizard from the [Factory Set] in the setup menu.(see page 21). 18 Initial Setup Wizard When STANDBY/ON is pressed for the first time to select a language for year, date and time. Use v / V to turn the unit on, the Initial Setup Wizard function sets the Language, Channels and Clock. ...
Check your setting. 5. Press B to choose the [Daylight Savings] option. Use B to move next step. 3. Manual 1. Enter the necessary information for the Setup menu and information display and then press ENTER. 4. Press ENTER to confirm your antenna connections. Note: You can reset the Initial Setup Wizard from the [Factory Set] in the setup menu.(see page 21). 18 Initial Setup Wizard When STANDBY/ON is pressed for the first time to select a language for year, date and time. Use v / V to turn the unit on, the Initial Setup Wizard function sets the Language, Channels and Clock. ...
Instructions
Page 19
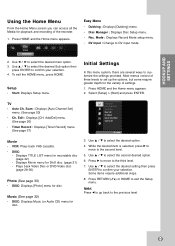
... the third level. 7. TV • Auto Ch. Add/Del] menu. (See page 20) • Timer Record : Displays [Timer Record] menu. (See page 37) Movie • VCR: Plays back VHS cassette. • DISC: - Photo (See page 33) • DISC: Displays [Photo] menu for recordable disc (page 42) - While the desired item is...
... the third level. 7. TV • Auto Ch. Add/Del] menu. (See page 20) • Timer Record : Displays [Timer Record] menu. (See page 37) Movie • VCR: Plays back VHS cassette. • DISC: - Photo (See page 33) • DISC: Displays [Photo] menu for recordable disc (page 42) - While the desired item is...