
Instructions
Page 5
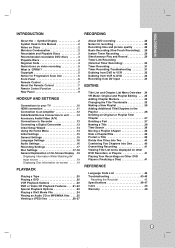
... Progressive Scan Use 5 Front Panel 6 Remote Control 7 About the Remote Control 7 Remote Control Function 8 Rear Panel 9 HOOKUP AND SETTINGS Connections to your TV 10 HDMI connection 11 Connection to an Amplifier 12 Cable/Satellite box Connection to unit . . . . .13 Accessory Audio/Video (A/V) Connections to Recorder 13 Connecting a Digital Camcorder 13 Initial Setup Wizard 14 Using the Home Menu 14 Initial Settings 15 General Settings 15 Language Settings 16 Audio Settings 16 Recording Settings 17 Disc Settings 17-18 General Explanation of On-Screen Display .19 Displaying...
... Progressive Scan Use 5 Front Panel 6 Remote Control 7 About the Remote Control 7 Remote Control Function 8 Rear Panel 9 HOOKUP AND SETTINGS Connections to your TV 10 HDMI connection 11 Connection to an Amplifier 12 Cable/Satellite box Connection to unit . . . . .13 Accessory Audio/Video (A/V) Connections to Recorder 13 Connecting a Digital Camcorder 13 Initial Setup Wizard 14 Using the Home Menu 14 Initial Settings 15 General Settings 15 Language Settings 16 Audio Settings 16 Recording Settings 17 Disc Settings 17-18 General Explanation of On-Screen Display .19 Displaying...
Instructions
Page 6
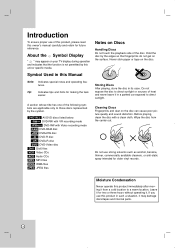
... disc. If you use this product in a parked car exposed to those discs represented by the edges so that the function is not permitted by this unit or specific media. A section whose title has one of the following symbols are applicable only to direct sunlight. Before playing, clean the disc with Video recording mode RAM DVD-RAM disc +RW DVD+RW disc -R DVD-R disc +R DVD+R disc DVD DVD-Video disc DivX DivX files VCD Video CDs ACD Audio...
... disc. If you use this product in a parked car exposed to those discs represented by the edges so that the function is not permitted by this unit or specific media. A section whose title has one of the following symbols are applicable only to direct sunlight. Before playing, clean the disc with Video recording mode RAM DVD-RAM disc +RW DVD+RW disc -R DVD-R disc +R DVD+R disc DVD DVD-Video disc DivX DivX files VCD Video CDs ACD Audio...
Instructions
Page 8
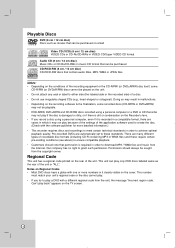
... in VIDEO CD/Super VIDEO CD format Audio CD (8 cm / 12 cm disc) Music CDs or CD-Rs/CD-RWs in which it clearly visible on the rear of the application software used to achieve optimal playback quality. Can't play only DVD discs labeled same as movies that can be sought from the copyright owner. Permission should note that can play back" appears on the Recorder...
... in VIDEO CD/Super VIDEO CD format Audio CD (8 cm / 12 cm disc) Music CDs or CD-Rs/CD-RWs in which it clearly visible on the rear of the application software used to achieve optimal playback quality. Can't play only DVD discs labeled same as movies that can be sought from the copyright owner. Permission should note that can play back" appears on the Recorder...
Instructions
Page 9
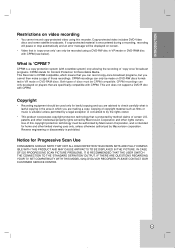
... 525 PROGRESSIVE SCAN PICTURE PROBLEMS, IT IS RECOMMENDED THAT THE USER SWITCH THE CONNECTION TO THE 'STANDARD DEFINITION' OUTPUT. CPRM recordings can only be played on video recording • You cannot record copy-protected video using a DVD-RW disc in which means that you can record copy-once broadcast programs, but you are making a copy. patents and other rights owners. Notice for Recordable Media. CPRM recordings can only be used only for home and other limited viewing uses only, unless...
... 525 PROGRESSIVE SCAN PICTURE PROBLEMS, IT IS RECOMMENDED THAT THE USER SWITCH THE CONNECTION TO THE 'STANDARD DEFINITION' OUTPUT. CPRM recordings can only be played on video recording • You cannot record copy-protected video using a DVD-RW disc in which means that you can record copy-once broadcast programs, but you are making a copy. patents and other rights owners. Notice for Recordable Media. CPRM recordings can only be used only for home and other limited viewing uses only, unless...
Instructions
Page 10
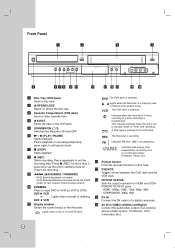
d Z EJECT Ejects the tape in playing mode or flashes when search mode. Pause playback or recording temporarily, press again to DVD). Press z (REC) for more than 3 seconds to set the unit to standby mode for HDMI and COMPONENT OUTPUT jacks. - DVD b VCR k Display window Shows the current status of an external source (Audio system, TV/ Monitor, VCR, Camcorder, etc.). 6 Lights when the Recorder is inserted in the DVD deck. A VHS tape is in the VCR deck. b Z OPEN/CLOSE Opens or closes the disc tray. c Cassette Compartment...
d Z EJECT Ejects the tape in playing mode or flashes when search mode. Pause playback or recording temporarily, press again to DVD). Press z (REC) for more than 3 seconds to set the unit to standby mode for HDMI and COMPONENT OUTPUT jacks. - DVD b VCR k Display window Shows the current status of an external source (Audio system, TV/ Monitor, VCR, Camcorder, etc.). 6 Lights when the Recorder is inserted in the DVD deck. A VHS tape is in the VCR deck. b Z OPEN/CLOSE Opens or closes the disc tray. c Cassette Compartment...
Instructions
Page 11
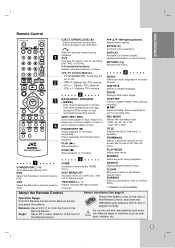
... (m/M) - PLAY (N) Starts playback. STOP (x) Stops playback or recording. TRACKING (+ / -) Adjusts manually the tape's picture onscreen. Displays information of the Remote Sensor. d AUDIO Selects an audio language or an audio channel. z REC Starts recording. VCR: SP or SLP. About the Remote Control Operation Range Point the Remote Control at the Remote Sensor and press the buttons. Ejects the tape in the Title List menu. TV STANDBY/ON: Turns the TV on a DVD disc, Title List or Playlist menu. VOL +/-: Adjusts TV's volume. SKIP (. / >) Go to set the recording time...
... (m/M) - PLAY (N) Starts playback. STOP (x) Stops playback or recording. TRACKING (+ / -) Adjusts manually the tape's picture onscreen. Displays information of the Remote Sensor. d AUDIO Selects an audio language or an audio channel. z REC Starts recording. VCR: SP or SLP. About the Remote Control Operation Range Point the Remote Control at the Remote Sensor and press the buttons. Ejects the tape in the Title List menu. TV STANDBY/ON: Turns the TV on a DVD disc, Title List or Playlist menu. VOL +/-: Adjusts TV's volume. SKIP (. / >) Go to set the recording time...
Instructions
Page 14
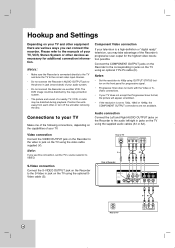
... playback. S-Video connection Connect the S-VIDEO OUTPUT jack on the Recorder to the video in jacks on the Recorder to the S-Video in jack (record deck) of your TV Make one of the following connections, depending on the front panel for the highest video resolution possible. Notes: • Set the resolution to your audio system. • Do not connect the Recorder via another VCR. Connections to 480p using the video cable supplied (V). Rear of TV S-VIDEO INPUT COMPONENT/PROGRESSIVE SCAN VIDEO INPUT AUDIO INPUT...
... playback. S-Video connection Connect the S-VIDEO OUTPUT jack on the Recorder to the video in jacks on the Recorder to the S-Video in jack (record deck) of your TV Make one of the following connections, depending on the front panel for the highest video resolution possible. Notes: • Set the resolution to your audio system. • Do not connect the Recorder via another VCR. Connections to 480p using the video cable supplied (V). Rear of TV S-VIDEO INPUT COMPONENT/PROGRESSIVE SCAN VIDEO INPUT AUDIO INPUT...
Instructions
Page 15
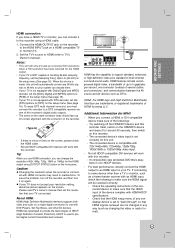
... this choice is not equipped with DVD Players, Set-Top Boxes, and other than a TV or monitor, such as changing the video or audio format). 11 Notes: • This unit will automatically convert any nondisplay device is connected with HDMI-HDCP specifications. - To solve the problem, turn it on again. Connect the HDMI OUTPUT jack on the recorder to protect digital content transmitted and received. HDMI, the HDMI logo and High-Definition Multimedia Interface...
... this choice is not equipped with DVD Players, Set-Top Boxes, and other than a TV or monitor, such as changing the video or audio format). 11 Notes: • This unit will automatically convert any nondisplay device is connected with HDMI-HDCP specifications. - To solve the problem, turn it on again. Connect the HDMI OUTPUT jack on the recorder to protect digital content transmitted and received. HDMI, the HDMI logo and High-Definition Multimedia Interface...
Instructions
Page 16
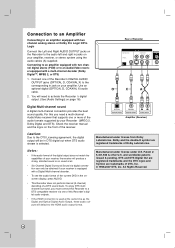
... see the audio format of the current DVD in the onscreen display, press AUDIO. • This Recorder does not perform internal (2 channel) decoding of a DTS sound track. Notes: • If the audio format of the digital output does not match the capabilities of your receiver, the receiver will be obtained if your amplifier, receiver, or stereo system using the audio cables (A) supplied. C a u t i o n: Due to an Audio/Video receiver equipped with two channel digital stereo...
... see the audio format of the current DVD in the onscreen display, press AUDIO. • This Recorder does not perform internal (2 channel) decoding of a DTS sound track. Notes: • If the audio format of the digital output does not match the capabilities of your receiver, the receiver will be obtained if your amplifier, receiver, or stereo system using the audio cables (A) supplied. C a u t i o n: Due to an Audio/Video receiver equipped with two channel digital stereo...
Instructions
Page 17
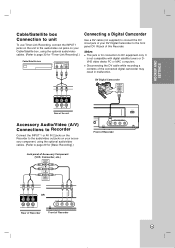
... the connected digital camcorder may result in /out jack of your accessory component, using the optional audio/video cables. (Refer to page 30 for "Timer-Link Recording".) Cable/Satellite box AUDIO OUT VIDEO OUT Connecting a Digital Camcorder Use a DV cable (not supplied) to connect the DV in malfunction. Notes: This jack is not compatible with digital satellite tuners or DVHS video decks PC or MAC computers. It is for [Basic Recording].) Front of Recorder Rear of Recorder Front...
... the connected digital camcorder may result in /out jack of your accessory component, using the optional audio/video cables. (Refer to page 30 for "Timer-Link Recording".) Cable/Satellite box AUDIO OUT VIDEO OUT Connecting a Digital Camcorder Use a DV cable (not supplied) to connect the DV in malfunction. Notes: This jack is not compatible with digital satellite tuners or DVHS video decks PC or MAC computers. It is for [Basic Recording].) Front of Recorder Rear of Recorder Front...
Instructions
Page 20
... will default to two-channel PCM audio. [OFF] (for Dolby Digital / MPEG): Select when connected to select (Audio) option and press B. Sampling Freq. (Frequency) If your amplifier to the type of Home Menu when play a DVD disc; Display Menu Select a language for Disc Subtitle): Turn off Subtitle. Dolby Digital / DTS / MPEG [Bitstream]: Select [Bitstream] if you connect the DIGITAL AUDIO OUTPUT jack to an amplifier or other equipment with 'Disc menu/list' button (on the setting of audio...
... will default to two-channel PCM audio. [OFF] (for Dolby Digital / MPEG): Select when connected to select (Audio) option and press B. Sampling Freq. (Frequency) If your amplifier to the type of Home Menu when play a DVD disc; Display Menu Select a language for Disc Subtitle): Turn off Subtitle. Dolby Digital / DTS / MPEG [Bitstream]: Select [Bitstream] if you connect the DIGITAL AUDIO OUTPUT jack to an amplifier or other equipment with 'Disc menu/list' button (on the setting of audio...

Instructions
Page 21
... [None]. Use v / V to Video mode. The recording mode will appears. DVD-RW disc is used . Select the [Disc Record Mode] option then press B. 2. Use v / V to format the disc. SP (Standard Play), SLP (Super Long Play). On the Audio 2 setting, the overdubbed sound is initialized to select (Disc) option and press B. However, you to listen to select press B. (Recording) option and Disc Record Mode You can set the picture quality for VCR recording; Press HOME and the Home menu appears. 2. Select [Setup] > [Start] and...
... [None]. Use v / V to Video mode. The recording mode will appears. DVD-RW disc is used . Select the [Disc Record Mode] option then press B. 2. Use v / V to format the disc. SP (Standard Play), SLP (Super Long Play). On the Audio 2 setting, the overdubbed sound is initialized to select (Disc) option and press B. However, you to listen to select press B. (Recording) option and Disc Record Mode You can set the picture quality for VCR recording; Press HOME and the Home menu appears. 2. Select [Setup] > [Start] and...
Instructions
Page 22
... for the disc. Keyboard menu appears. PBC PBC stands for Playback Control and refers to special menus and navigation features that are available on some Video CDs. [ON]: Video CDs are played the same way as Audio CDs. Caution Once you have finalized a DVD-R and DVD+R disc, you will appear. 3. The Recorder starts finalizing the disc. Follow the instructions and download the video onto a disc for navigating the disc. Note: Finalization can take...
... for the disc. Keyboard menu appears. PBC PBC stands for Playback Control and refers to special menus and navigation features that are available on some Video CDs. [ON]: Video CDs are played the same way as Audio CDs. Caution Once you have finalized a DVD-R and DVD+R disc, you will appear. 3. The Recorder starts finalizing the disc. Follow the instructions and download the video onto a disc for navigating the disc. Note: Finalization can take...
Instructions
Page 24
.... 4. Press EJECT, OPEN/CLOSE (Z) to control the DVD deck. 2. Press EJECT, OPEN/CLOSE (Z) to resume playback (from the scene point). Playback starts automatically. Notes: S-VHS Quasi Playback (SQPB) • This Recorder can play back S-VHS recorded tapes, however, it will clear the stopped point. 5. Scan forward. Insert a pre-recorded video cassette. • If the unit is powered off . Playback Playing a Tape 1. Press DVD to close disc tray or press STANDBY/ON (1/&), the disc tray closes automatically and unit turns off , it cannot make recordings using HOME menu. 4.
.... 4. Press EJECT, OPEN/CLOSE (Z) to control the DVD deck. 2. Press EJECT, OPEN/CLOSE (Z) to resume playback (from the scene point). Playback starts automatically. Notes: S-VHS Quasi Playback (SQPB) • This Recorder can play back S-VHS recorded tapes, however, it will clear the stopped point. 5. Scan forward. Insert a pre-recorded video cassette. • If the unit is powered off . Playback Playing a Tape 1. Press DVD to close disc tray or press STANDBY/ON (1/&), the disc tray closes automatically and unit turns off , it cannot make recordings using HOME menu. 4.
Instructions
Page 32
... a recording mode). Disc types and recording formats, modes, and settings This recorder can change the recording format (Video mode or VR mode) before you record still pictures or audio only, the recording time may be shorter. • If you record anything on a DVD-RW disc in the Title List (Original) menu only hides the title, it does not actually erase the title from the recorder. • If the unit detects the copy-protected signal while recording, the recording...
... a recording mode). Disc types and recording formats, modes, and settings This recorder can change the recording format (Video mode or VR mode) before you record still pictures or audio only, the recording time may be shorter. • If you record anything on a DVD-RW disc in the Title List (Original) menu only hides the title, it does not actually erase the title from the recorder. • If the unit detects the copy-protected signal while recording, the recording...
Instructions
Page 33
... set the DVD recorder to 10min recording time or the VHS recorder to record it will be canceled. • The Recorder will automatically return to change VCR mode and perform the VCR playback or recording. Notes: • You cannot play a DVD during the Instant Timer Recording, it using CopyGuard, you wish VCR playback or record during the DVD playback, press VCR to begin recording. 3. Notes: • Check that the component you want them. Press REC once to change DVD mode...
... set the DVD recorder to 10min recording time or the VHS recorder to record it will be canceled. • The Recorder will automatically return to change VCR mode and perform the VCR playback or recording. Notes: • You cannot play a DVD during the Instant Timer Recording, it using CopyGuard, you wish VCR playback or record during the DVD playback, press VCR to begin recording. 3. Notes: • Check that the component you want them. Press REC once to change DVD mode...
Instructions
Page 37
.../32kHz. Using the recorder's remote, you cannot control the second DVD from this one. • You cannot control this recorder. Make sure your camcorder, you want to select the DV input. 3. Press z REC once to start from. Recording is connected to the front panel DV IN jack. In Video mode, the final frame of audio, video, data and control signals. Note: When 'Not connected to camcorder' shows on screen for a while after turnning the...
.../32kHz. Using the recorder's remote, you cannot control the second DVD from this one. • You cannot control this recorder. Make sure your camcorder, you want to select the DV input. 3. Press z REC once to start from. Recording is connected to the front panel DV IN jack. In Video mode, the final frame of audio, video, data and control signals. Note: When 'Not connected to camcorder' shows on screen for a while after turnning the...
Instructions
Page 47
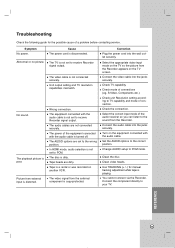
... correct input mode of a problem before contacting service. Clean video heads. Symptom No power. Abnormal or no picture. Picture from the Recorder appears on the equipment connected with the audio cable. The AUDIO options are set to PCM. S-Video, Components etc.). Use TRACKING (+ / -) for the possible cause of the audio receiver so you can listen to the sound from the external component is not set to receive Recorder signal output. The audio cables are dirty. Check TV capability. Change AUDIO setup...
... correct input mode of a problem before contacting service. Clean video heads. Symptom No power. Abnormal or no picture. Picture from the Recorder appears on the equipment connected with the audio cable. The AUDIO options are set to PCM. S-Video, Components etc.). Use TRACKING (+ / -) for the possible cause of the audio receiver so you can listen to the sound from the external component is not set to receive Recorder signal output. The audio cables are dirty. Check TV capability. Change AUDIO setup...
Instructions
Page 52
... buttons 7 O On-Screen Display 19 OUTPUT 9 P PAUSE 6, 7, 21 PLAY 6, 7, PLAY MODE 7, 22 Playable Discs 3 Playback DVD 22-23 Audio CD or MP3/WMA 25 JPEG 26-27 VCR 20 Power cord G-2, 6 Power Save Mode 15 Protect 34, 39 R Random 24 Rear Panel 9 REC 7 REC MODE 7 Record mode DVD 17 Recordable time 46 Recording DVD 28 Recording Settings 17 Regional code 4 Remote Control 7 Rotate 26 S Sampling Freq. 15 Search Time Search 38 Marker Search 23 Setup 14 Show 34, 39 Slide Show 27 Sound 19 SP mode...
... buttons 7 O On-Screen Display 19 OUTPUT 9 P PAUSE 6, 7, 21 PLAY 6, 7, PLAY MODE 7, 22 Playable Discs 3 Playback DVD 22-23 Audio CD or MP3/WMA 25 JPEG 26-27 VCR 20 Power cord G-2, 6 Power Save Mode 15 Protect 34, 39 R Random 24 Rear Panel 9 REC 7 REC MODE 7 Record mode DVD 17 Recordable time 46 Recording DVD 28 Recording Settings 17 Regional code 4 Remote Control 7 Rotate 26 S Sampling Freq. 15 Search Time Search 38 Marker Search 23 Setup 14 Show 34, 39 Slide Show 27 Sound 19 SP mode...

other
Page 1
... accepts a progressive scan signal. How can I record TV program? You need to change the resolution setting. See page 30 of your owner's manual. LVT2015-001A 0209SKMLGEEGL c If the picture is showing a distorted picture. c You must "Finalize" the DVD before you have an Auto Clock Setting. How can I use the remote control or front panel buttons. If your clock as Cable/Satellite box. c Please wait until the picture appears normally to manually set the Clock. My newly recorded DVD plays in my...
... accepts a progressive scan signal. How can I record TV program? You need to change the resolution setting. See page 30 of your owner's manual. LVT2015-001A 0209SKMLGEEGL c If the picture is showing a distorted picture. c You must "Finalize" the DVD before you have an Auto Clock Setting. How can I use the remote control or front panel buttons. If your clock as Cable/Satellite box. c Please wait until the picture appears normally to manually set the Clock. My newly recorded DVD plays in my...


