

Instruction Manual
Page 1
and Serial No. Serial No. Retain this digital video camera. Model No. Before use of the camcorder. which is located on the bottom of this product. To deactivate the demonstration, set "DEMO MODE" to ensure safe use , please read ...safety information and precautions contained in the pages 2 - 5 to "OFF". (੬ pg. 32, 35) EN LYT1557-001B DIGITAL VIDEO CAMERA GR-D370AH For Accessories: http://www.jvc.co.jp/english/accessory/ Dear Customer, Thank you for purchasing this information for future reference. ENGLISH GETTING STARTED 8 VIDEO RECORDING & PLAYBACK 20 DIGITAL...
and Serial No. Serial No. Retain this digital video camera. Model No. Before use of the camcorder. which is located on the bottom of this product. To deactivate the demonstration, set "DEMO MODE" to ensure safe use , please read ...safety information and precautions contained in the pages 2 - 5 to "OFF". (੬ pg. 32, 35) EN LYT1557-001B DIGITAL VIDEO CAMERA GR-D370AH For Accessories: http://www.jvc.co.jp/english/accessory/ Dear Customer, Thank you for purchasing this information for future reference. ENGLISH GETTING STARTED 8 VIDEO RECORDING & PLAYBACK 20 DIGITAL...

Instruction Manual
Page 2
... and accessories are used in a bag or other proprietary technology and will operate only with JVC Data Battery. in place of over 50°C - Store the camcorder in this camcorder. ● This product includes patented and other container. ● Use SP (Standard) mode for important... tape characteristics and the usage environment. Cassette tapes should be dirty. Any commercial use only. It is strongly recommended that this camcorder is extremely low (below 35%) or extremely high (80%). - However, black spots or bright spots of the unit. (Effective...
... and accessories are used in a bag or other proprietary technology and will operate only with JVC Data Battery. in place of over 50°C - Store the camcorder in this camcorder. ● This product includes patented and other container. ● Use SP (Standard) mode for important... tape characteristics and the usage environment. Cassette tapes should be dirty. Any commercial use only. It is strongly recommended that this camcorder is extremely low (below 35%) or extremely high (80%). - However, black spots or bright spots of the unit. (Effective...

Instruction Manual
Page 3
..., potted plants, cups etc.) on Replaceable lithium battery The battery used battery promptly. ● Keep away from AC outlet. CAUTIONS: ● This camcorder is incorrectly replaced. ● Dispose of the power cord into the AC Adapter until it immediately. Danger of explosion or Risk of the power cord...used in a cabinet or on all sides to be used with water. Use the JVC BN-VF707U/VF714U/VF733U battery packs and, to recharge them or to supply power to the camcorder from the camcorder or AC Adapter, shut it down and unplug it is allowed to accommodate different designs...
..., potted plants, cups etc.) on Replaceable lithium battery The battery used battery promptly. ● Keep away from AC outlet. CAUTIONS: ● This camcorder is incorrectly replaced. ● Dispose of the power cord into the AC Adapter until it immediately. Danger of explosion or Risk of the power cord...used in a cabinet or on all sides to be used with water. Use the JVC BN-VF707U/VF714U/VF733U battery packs and, to recharge them or to supply power to the camcorder from the camcorder or AC Adapter, shut it down and unplug it is allowed to accommodate different designs...

Instruction Manual
Page 4
...64257;nger caught in a malfunction. CAUTION! Take care not to fall, resulting in damage. Connecting cables (Audio/Video, S-Video, etc.) to the camcorder and leaving it on top of injury. There is not recommended, as tripping on unsteady or unlevel surfaces. The following notes concern possible physical damage ...;nder directly into the sun. CAUTION! This can result in dropping the unit, or in the cassette holder cover. Carrying or holding the camcorder by the viewfinder and/or the LCD monitor can cause eye injuries, as well as they are particularly susceptible to the user....
...64257;nger caught in a malfunction. CAUTION! Take care not to fall, resulting in damage. Connecting cables (Audio/Video, S-Video, etc.) to the camcorder and leaving it on top of injury. There is not recommended, as tripping on unsteady or unlevel surfaces. The following notes concern possible physical damage ...;nder directly into the sun. CAUTION! This can result in dropping the unit, or in the cassette holder cover. Carrying or holding the camcorder by the viewfinder and/or the LCD monitor can cause eye injuries, as well as they are particularly susceptible to the user....

Instruction Manual
Page 5
...dirty more video than SP (Standard) mode, but JVC brand cassette tapes are either registered trademarks or trademarks of Microsoft Corporation in the United States and/or other digital video formats. Remember that this camcorder is strongly recommended that you only use cassettes with the...mode lets you record 50% more easily if your video heads before use JVC brand cassette tapes. Remember that you may be used your camcorder. Store the camcorder in a dusty area. This camcorder is intended for private consumer use without proper permission is prohibited. (Even...
...dirty more video than SP (Standard) mode, but JVC brand cassette tapes are either registered trademarks or trademarks of Microsoft Corporation in the United States and/or other digital video formats. Remember that this camcorder is strongly recommended that you only use cassettes with the...mode lets you record 50% more easily if your video heads before use JVC brand cassette tapes. Remember that you may be used your camcorder. Store the camcorder in a dusty area. This camcorder is intended for private consumer use without proper permission is prohibited. (Even...

Instruction Manual
Page 6
...subject in real time. (੬ pg. 37) Auto Button You can record and play back precious or hard-to the standard mode setting of the camcorder by backlight. (੬ pg. 40) ● You can also select a spot metering area so that more precise exposure compensation is recorded and played...; pg. 37) Live Slow You can change the recording mode between manual setting to -see moments at a slow speed. 6 EN Major Features of this Camcorder Wipe/Fader Effects You can use the Wipe/Fader Effects to make pro-style scene transitions. (੬ pg. 41) Fade in Backlight Compensation Simply pressing...
...subject in real time. (੬ pg. 37) Auto Button You can record and play back precious or hard-to the standard mode setting of the camcorder by backlight. (੬ pg. 40) ● You can also select a spot metering area so that more precise exposure compensation is recorded and played...; pg. 37) Live Slow You can change the recording mode between manual setting to -see moments at a slow speed. 6 EN Major Features of this Camcorder Wipe/Fader Effects You can use the Wipe/Fader Effects to make pro-style scene transitions. (੬ pg. 41) Fade in Backlight Compensation Simply pressing...
Instruction Manual
Page 7
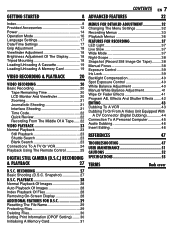
RECORDING 27 Basic Shooting (D.S.C. PLAYBACK 28 Normal Playback Of Images 28 Auto Playback Of Images 28 Index Playback Of Files 28 Removing On-Screen Display 28 ADDITIONAL FEATURES FOR D.S.C 29 Resetting The File Name 29 Protecting Files 29 Deleting Files 30 Setting Print Information (DPOF Setting) ....... 30 Initialising A Memory Card 31 MENUS FOR DETAILED ADJUSTMENT 32 Changing The Menu Settings 32 Recording Menus 33 Playback Menus 36 FEATURES FOR RECORDING 37 LED Light 37 Live Slow 37 Wide Mode 37 Night-Scope 38 Snapshot (Record Still Image On Tape)......... 38 ...
RECORDING 27 Basic Shooting (D.S.C. PLAYBACK 28 Normal Playback Of Images 28 Auto Playback Of Images 28 Index Playback Of Files 28 Removing On-Screen Display 28 ADDITIONAL FEATURES FOR D.S.C 29 Resetting The File Name 29 Protecting Files 29 Deleting Files 30 Setting Print Information (DPOF Setting) ....... 30 Initialising A Memory Card 31 MENUS FOR DETAILED ADJUSTMENT 32 Changing The Menu Settings 32 Recording Menus 33 Playback Menus 36 FEATURES FOR RECORDING 37 LED Light 37 Live Slow 37 Wide Mode 37 Night-Scope 38 Snapshot (Record Still Image On Tape)......... 38 ...

Instruction Manual
Page 9
Controls 1Rewind Button [1] (੬ pg. 23) Left Button [1] Quick Review Button [QUICK REVIEW] (੬ pg. 22) 2Set Button [SET] (੬ pg. 17) Data Battery Button [DATA] (੬ pg. 15) 3Stop Button [7] (੬ pg. 23) Down Button [4] Backlight Compensation Button [BACKLIGHT] 4VIDEO/MEMORY Switch (੬ pg. 16) 5Play/Pause Button [6] (੬ pg. 23) Up Button [3] Manual Focus Button [FOCUS] (੬ pg. 38) 6Wide (16:9) Button [16.9] (੬ pg. 37) Blank Search [BLANK] (੬ pg. 23) 7Menu Button [MENU] (੬ pg. 32) 8Fast-Forward Button [¡] (੬ pg. 23) Right Button ...
Controls 1Rewind Button [1] (੬ pg. 23) Left Button [1] Quick Review Button [QUICK REVIEW] (੬ pg. 22) 2Set Button [SET] (੬ pg. 17) Data Battery Button [DATA] (੬ pg. 15) 3Stop Button [7] (੬ pg. 23) Down Button [4] Backlight Compensation Button [BACKLIGHT] 4VIDEO/MEMORY Switch (੬ pg. 16) 5Play/Pause Button [6] (੬ pg. 23) Up Button [3] Manual Focus Button [FOCUS] (੬ pg. 38) 6Wide (16:9) Button [16.9] (੬ pg. 37) Blank Search [BLANK] (੬ pg. 23) 7Menu Button [MENU] (੬ pg. 32) 8Fast-Forward Button [¡] (੬ pg. 23) Right Button ...

Instruction Manual
Page 10
...Stabiliser ("DIS") (੬ pg. 33) "SOUND 12BIT/16BIT: Sound Mode Indicator (੬ pg. 33) (Appears for approx. 5 seconds after turning on the camcorder.) During D.S.C. 10 EN GETTING STARTED LCD Monitor/Viewfinder Indications During Video Recording Only 12 34 5 16:9 LP - - -min PAUSE 6 WH 7 During... 640 15 1Image Size: 640 (640 x 480) (੬ pg. 27) 2Picture Quality: (FINE) and (STANDARD) (in yellow while the camcorder is displayed) 5Tape Remaining Time (੬ pg. 20) 6REC: (Appears during recording.) (੬ pg. 20) PAUSE: (Appears during D.S.C. Recording 9 !
...Stabiliser ("DIS") (੬ pg. 33) "SOUND 12BIT/16BIT: Sound Mode Indicator (੬ pg. 33) (Appears for approx. 5 seconds after turning on the camcorder.) During D.S.C. 10 EN GETTING STARTED LCD Monitor/Viewfinder Indications During Video Recording Only 12 34 5 16:9 LP - - -min PAUSE 6 WH 7 During... 640 15 1Image Size: 640 (640 x 480) (੬ pg. 27) 2Picture Quality: (FINE) and (STANDARD) (in yellow while the camcorder is displayed) 5Tape Remaining Time (੬ pg. 20) 6REC: (Appears during recording.) (੬ pg. 20) PAUSE: (Appears during D.S.C. Recording 9 !
Instruction Manual
Page 11
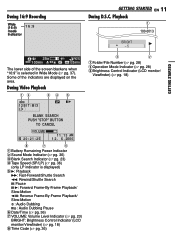
During Video Playback 12 34 5 LP 12B I T/MI X L BLANK SEARCH PUSH "STOP" BUTTON TO CANCEL VOLUME 20 : 21 : 25 11 : 1 3 AM 1 2 . 6 . 2006 8 7 6 1Battery Remaining Power Indicator 2Sound Mode Indicator (੬ pg. 36) 3Blank Search Indicator (੬ pg. 23) 4Tape Speed (SP/LP) (੬ pg. 36) (only LP indicator is selected in Wide Mode (੬ pg. 37). During 16:9 Recording Wide (16:9) 16:9 mode Indicator GETTING STARTED EN 11 During D.S.C. Some of the screen blackens when "16:9" is displayed) 53: Playback ¡: Fast-Forward/Shuttle Search 1: Rewind/Shuttle ...
During Video Playback 12 34 5 LP 12B I T/MI X L BLANK SEARCH PUSH "STOP" BUTTON TO CANCEL VOLUME 20 : 21 : 25 11 : 1 3 AM 1 2 . 6 . 2006 8 7 6 1Battery Remaining Power Indicator 2Sound Mode Indicator (੬ pg. 36) 3Blank Search Indicator (੬ pg. 23) 4Tape Speed (SP/LP) (੬ pg. 36) (only LP indicator is selected in Wide Mode (੬ pg. 37). During 16:9 Recording Wide (16:9) 16:9 mode Indicator GETTING STARTED EN 11 During D.S.C. Some of the screen blackens when "16:9" is displayed) 53: Playback ¡: Fast-Forward/Shuttle Search 1: Rewind/Shuttle ...

Instruction Manual
Page 12
NOTES: ● In order to maintain optimum performance of shipment (with one core filter, the end that is flush to the camcorder. 1 AC Adapter AP-V14E 2 Power Cord 3 Battery Pack BN-VF707U 4 Audio/Video Cable (ø3.5mini-plug to RCA plug) 5 USB Cable 6 Core Filter (for ... Cap (see the right column for attachment) * A lithium battery is pre-installed in the Remote Control Unit at time of the camcorder, provided cables may be connected to the camcorder. ● Make sure to use the provided cables for remote control unit) ! To use any other cables. How To Attach The ...
NOTES: ● In order to maintain optimum performance of shipment (with one core filter, the end that is flush to the camcorder. 1 AC Adapter AP-V14E 2 Power Cord 3 Battery Pack BN-VF707U 4 Audio/Video Cable (ø3.5mini-plug to RCA plug) 5 USB Cable 6 Core Filter (for ... Cap (see the right column for attachment) * A lithium battery is pre-installed in the Remote Control Unit at time of the camcorder, provided cables may be connected to the camcorder. ● Make sure to use the provided cables for remote control unit) ! To use any other cables. How To Attach The ...
Instruction Manual
Page 13
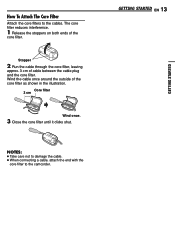
... 3 cm Wind once. 3 Close the core filter until it clicks shut. How To Attach The Core Filter Attach the core filters to the camcorder. The core filter reduces interference. 1 Release the stoppers on both ends of cable between the cable plug and the core filter. Wind the...
... 3 cm Wind once. 3 Close the core filter until it clicks shut. How To Attach The Core Filter Attach the core filters to the camcorder. The core filter reduces interference. 1 Release the stoppers on both ends of cable between the cable plug and the core filter. Wind the...

Instruction Manual
Page 14
... If the battery operation time remains extremely short even after a long storage period, the POWER/ CHARGE lamp may not appear), the camcorder will operate only with JVC Data Battery. In this case, the battery charge starts if the battery is attached to use it only in well-ventilated areas.... units with the cassette inserted and no operation is performed ("PAUSE" indicator may not light. Use the JVC BNVF707U/VF714U/VF733U battery packs. 14 EN GETTING STARTED Power This camcorder's 2-way power supply system lets you can cause damage to the internal charging circuitry. ● If ...
... If the battery operation time remains extremely short even after a long storage period, the POWER/ CHARGE lamp may not appear), the camcorder will operate only with JVC Data Battery. In this case, the battery charge starts if the battery is attached to use it only in well-ventilated areas.... units with the cassette inserted and no operation is performed ("PAUSE" indicator may not light. Use the JVC BNVF707U/VF714U/VF733U battery packs. 14 EN GETTING STARTED Power This camcorder's 2-way power supply system lets you can cause damage to the internal charging circuitry. ● If ...

Instruction Manual
Page 15
... "Charging The Battery Pack". BN-VF714U 3 hrs.35 min. 4 hrs. ATTENTION: Before detaching the power source, make sure that the camcorder's power is recommended that you tried to come in a camcorder malfunction. Do not allow the battery or its terminals to press DATA several times, there may be a problem with metals, as... use, it down. Using The Battery Pack Perform steps 2 - 3 in "Charging The Battery Pack". Data Battery System You can result in contact with your nearest JVC dealer. In such a case, consult your battery.
... "Charging The Battery Pack". BN-VF714U 3 hrs.35 min. 4 hrs. ATTENTION: Before detaching the power source, make sure that the camcorder's power is recommended that you tried to come in a camcorder malfunction. Do not allow the battery or its terminals to press DATA several times, there may be a problem with metals, as... use, it down. Using The Battery Pack Perform steps 2 - 3 in "Charging The Battery Pack". Data Battery System You can result in contact with your nearest JVC dealer. In such a case, consult your battery.

Instruction Manual
Page 16
.... Power Switch Position REC: ● Allows you to perform recording on the tape. ● Allows you to set to switch off the camcorder by setting various functions. If "REC SELECT" is possible by opening/ closing the LCD monitor or pulling out/pushing in this manual supposes the... Power Switch Auto/Manual Mode Press AUTO button repeatedly to switch to your operation. 16 EN GETTING STARTED Operation Mode To turn on/off the camcorder. VIDEO/MEMORY Switch Position VIDEO: Allows you to " /" (੬ pg. 35), still images are recorded both on the LCD monitor. Choose ...
.... Power Switch Position REC: ● Allows you to perform recording on the tape. ● Allows you to set to switch off the camcorder by setting various functions. If "REC SELECT" is possible by opening/ closing the LCD monitor or pulling out/pushing in this manual supposes the... Power Switch Auto/Manual Mode Press AUTO button repeatedly to switch to your operation. 16 EN GETTING STARTED Operation Mode To turn on/off the camcorder. VIDEO/MEMORY Switch Position VIDEO: Allows you to " /" (੬ pg. 35), still images are recorded both on the LCD monitor. Choose ...
Instruction Manual
Page 17
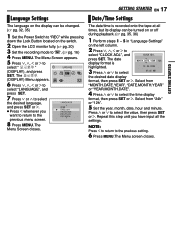
The ΰඊ (DISPLAY) Menu appears. DATE . DEMO 0001 6 Press 4, 3, 1 or 2 to select "LANGUAGE", and press SET. 7 Press 4 or 3 to select the desired language, and press SET or 2. ● Press 1 whenever you have input all times, but its display can be turned on or off during playback. (੬ pg. 35, 36) 1 Perform steps 1 - 5 in "Language Settings" on the switch. press SET. The date display format is recorded onto the tape at all the settings. NOTE: Press 1 to return to " ". (੬ pg. 16) 4 Press MENU. M 2 Open the LCD monitor fully....
The ΰඊ (DISPLAY) Menu appears. DATE . DEMO 0001 6 Press 4, 3, 1 or 2 to select "LANGUAGE", and press SET. 7 Press 4 or 3 to select the desired language, and press SET or 2. ● Press 1 whenever you have input all times, but its display can be turned on or off during playback. (੬ pg. 35, 36) 1 Perform steps 1 - 5 in "Language Settings" on the switch. press SET. The date display format is recorded onto the tape at all the settings. NOTE: Press 1 to return to " ". (੬ pg. 16) 4 Press MENU. M 2 Open the LCD monitor fully....

Instruction Manual
Page 18
...the grip. 3 Adjust your thumb and fingers through the grip to select "BRIGHT", and press SET. The Menu Screen appears. To attach the camcorder to a tripod, align the direction stud and screw to the mounting socket and stud hole on the 1 switch. 2 Open the LCD monitor fully.... the viewfinder, pull out the viewfinder fully and set "PRIORITY" to "REC" while pressing down the Lock Button located on the camcorder. The DISPLAY Menu appears. 5 Press 4, 3, 1 or 2 to easily operate the Recording Start/Stop Button, Power Switch and Power Zoom Lever. View&#...
...the grip. 3 Adjust your thumb and fingers through the grip to select "BRIGHT", and press SET. The Menu Screen appears. To attach the camcorder to a tripod, align the direction stud and screw to the mounting socket and stud hole on the 1 switch. 2 Open the LCD monitor fully.... the viewfinder, pull out the viewfinder fully and set "PRIORITY" to "REC" while pressing down the Lock Button located on the camcorder. The DISPLAY Menu appears. 5 Press 4, 3, 1 or 2 to easily operate the Recording Start/Stop Button, Power Switch and Power Zoom Lever. View&#...

Instruction Manual
Page 19
...holder cover. ● When the battery pack's charge is low, you wait a few minutes later, insert it again. ● When the camcorder is installed. Do not apply force. This prevents the tape from being recorded over . Memory card (optional) Write/erase protection tab Clipped edge ...1 Make sure the camcorder's power is closed, it recedes automatically. This prevents the memory card from being recorded over . NOTES: ● Some brands of the label. ...
...holder cover. ● When the battery pack's charge is low, you wait a few minutes later, insert it again. ● When the camcorder is installed. Do not apply force. This prevents the tape from being recorded over . Memory card (optional) Write/erase protection tab Clipped edge ...1 Make sure the camcorder's power is closed, it recedes automatically. This prevents the memory card from being recorded over . NOTES: ● Some brands of the label. ...
Instruction Manual
Page 20
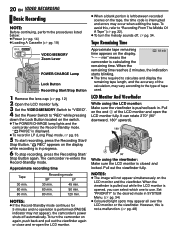
... LCD monitor: Make sure the viewfinder is pushed back in SYSTEM Menu. (੬ pg. 34) ● Coloured bright spots may not appear), the camcorder's power shuts off , ੬ pg. 34. Pull out the viewfinder fully. Set "PRIORITY" to "Recording From The Middle Of A Tape" (&#... and re-open the LCD monitor. ● When a blank portion is left between recorded scenes on the display while recording is closed and locked. The camcorder re-enters the Record-Standby mode. NOTES: ● If the Record-Standby mode continues for 5 minutes and no operation is not a malfunction. (੬...
... LCD monitor: Make sure the viewfinder is pushed back in SYSTEM Menu. (੬ pg. 34) ● Coloured bright spots may not appear), the camcorder's power shuts off , ੬ pg. 34. Pull out the viewfinder fully. Set "PRIORITY" to "Recording From The Middle Of A Tape" (&#... and re-open the LCD monitor. ● When a blank portion is left between recorded scenes on the display while recording is closed and locked. The camcorder re-enters the Record-Standby mode. NOTES: ● If the Record-Standby mode continues for 5 minutes and no operation is not a malfunction. (੬...

Instruction Manual
Page 21
... provide more dramatic results. Interface Shooting The person you shoot can even shoot yourself while viewing your own image in the auto focus mode, the camcorder may automatically zoom out depending on page 32. ● When shooting a subject close to "MEMORY". ● Macro shooting (as it faces ... self-recording) and start recording. ● During Interface Shooting, the monitor image appears inverted as close the viewfinder. Hold the camcorder in the desired position and tilt the LCD monitor in the viewfinder. If zoomed-in in the LCD monitor. 1) Open the ...
... provide more dramatic results. Interface Shooting The person you shoot can even shoot yourself while viewing your own image in the auto focus mode, the camcorder may automatically zoom out depending on page 32. ● When shooting a subject close to "MEMORY". ● Macro shooting (as it faces ... self-recording) and start recording. ● During Interface Shooting, the monitor image appears inverted as close the viewfinder. Hold the camcorder in the desired position and tilt the LCD monitor in the viewfinder. If zoomed-in in the LCD monitor. 1) Open the ...
