Software Guide
Page 2
... Structure and Extensions 10 For Windows® Users Preparation 11 Software Installation 11 Connections 13 Connecting the Camera to the PC 13 Disconnecting the USB cable 14 Viewing the Contents of a Recording Medium .... 15 Copying Files to the PC 23 Help/Readme 23 JVC SOFTWARE LICENSE AGREEMENT IMPORTANT TO CUSTOMERS: PLEASE MAKE SURE TO READ THIS CAREFULLY BEFORE INSTALLING OR USING THE SOFTWARE PROGRAM NAMED "DIGITAL PHOTO NAVIGATOR" ("Program") ON YOUR PC...
... Structure and Extensions 10 For Windows® Users Preparation 11 Software Installation 11 Connections 13 Connecting the Camera to the PC 13 Disconnecting the USB cable 14 Viewing the Contents of a Recording Medium .... 15 Copying Files to the PC 23 Help/Readme 23 JVC SOFTWARE LICENSE AGREEMENT IMPORTANT TO CUSTOMERS: PLEASE MAKE SURE TO READ THIS CAREFULLY BEFORE INSTALLING OR USING THE SOFTWARE PROGRAM NAMED "DIGITAL PHOTO NAVIGATOR" ("Program") ON YOUR PC...
Software Guide
Page 11
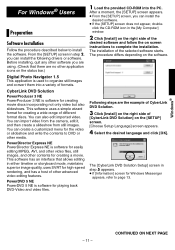
... import video from the camera, edit it, and then create a slideshow from still images. After a moment, the [SETUP] screen appears. ● From the [SETUP] screen, you can create a customized menu for easily editing MPEG, AVI, and other video files, still images, and other advanced video editing features. Following steps are no other application icons on screen instructions to DVD or other media. You can install the following drivers or software...
... import video from the camera, edit it, and then create a slideshow from still images. After a moment, the [SETUP] screen appears. ● From the [SETUP] screen, you can create a customized menu for easily editing MPEG, AVI, and other video files, still images, and other advanced video editing features. Following steps are no other application icons on screen instructions to DVD or other media. You can install the following drivers or software...
Software Guide
Page 13
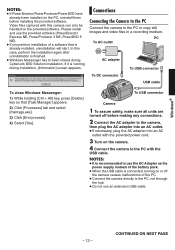
... the USB cable is running during CyberLink DVD Solution installation. Please install and use the provided software (PowerDirector Express NE, PowerProducer 3 NE, PowerDVD 5 NE). ● If you perform installation of the PC. ● Connect the camera directly to been closed during installation, [Information] screen appears. If it is connected, turning on the PC, uninstall them before making any connections. 2 Connect the AC adapter to the camera, then plug the AC adapter...
... the USB cable is running during CyberLink DVD Solution installation. Please install and use the provided software (PowerDirector Express NE, PowerProducer 3 NE, PowerDVD 5 NE). ● If you perform installation of the PC. ● Connect the camera directly to been closed during installation, [Information] screen appears. If it is connected, turning on the PC, uninstall them before making any connections. 2 Connect the AC adapter to the camera, then plug the AC adapter...
Software Guide
Page 15
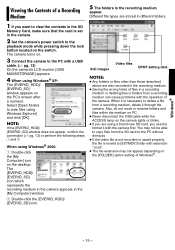
... card to the PC without doing so. ● If the video file is not recorded or saved properly, the file is necessary to [EXTMOV] folder with the operation of the camera. The camera turns on. 3 Connect the camera to the playback mode while pressing down the lock button located on the desktop. Different file types are using Windows® XP: The [EVERIO_HDD]/ [EVERIO_SD] window appears on the [FOLDER] option setting of Windows...
... card to the PC without doing so. ● If the video file is not recorded or saved properly, the file is necessary to [EXTMOV] folder with the operation of the camera. The camera turns on. 3 Connect the camera to the playback mode while pressing down the lock button located on the desktop. Different file types are using Windows® XP: The [EVERIO_HDD]/ [EVERIO_SD] window appears on the [FOLDER] option setting of Windows...

Software Guide
Page 17
... format ...files prepared on any application other than the provided software ...edited files which do not have been edited on a JVC Hard Disk Camcorder. ● Be sure to turn off the SVRT function when editing the video files using PowerDirector Express NE. (Do not check the checkbox [Use SVRT to save rendering time].) ● Delete files in the [EXTMOV] folder by using multiple files. 2 Connect the camera to the PC with the USB cable, and open...
... format ...files prepared on any application other than the provided software ...edited files which do not have been edited on a JVC Hard Disk Camcorder. ● Be sure to turn off the SVRT function when editing the video files using PowerDirector Express NE. (Do not check the checkbox [Use SVRT to save rendering time].) ● Delete files in the [EXTMOV] folder by using multiple files. 2 Connect the camera to the PC with the USB cable, and open...

Separate volume1
Page 12
... DVD recorder by simply using the enclosed S/AV cable. Completed DVDs can be stored in their ability to function as a mini-editing suite, allowing basic editing functions such as erasing unwanted movies and rearranging selected pictures. For Further information, please refer to SOFTWARE INSTRUCTION AND USB CONNECTION GUIDE. Additional information For users wishing to view their edited movie with their own video camera, it is also possible to edit movies by using the time...
... DVD recorder by simply using the enclosed S/AV cable. Completed DVDs can be stored in their ability to function as a mini-editing suite, allowing basic editing functions such as erasing unwanted movies and rearranging selected pictures. For Further information, please refer to SOFTWARE INSTRUCTION AND USB CONNECTION GUIDE. Additional information For users wishing to view their edited movie with their own video camera, it is also possible to edit movies by using the time...
Instructions
Page 2
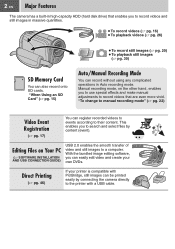
.... Direct Printing (੬ pg. 46) If your own DVDs. Manual recording mode, on Your PC (੬ SOFTWARE INSTALLATION AND USB CONNECTION GUIDE) USB 2.0 enables the smooth transfer of video and still images to record videos that enables you to the printer with PictBridge, still images can also record onto SD cards. "When Using an SD Card" (੬ pg. 15) Auto/Manual Recording Mode You can easily edit video and create your printer is compatible with a USB cable. Editing Files on...
.... Direct Printing (੬ pg. 46) If your own DVDs. Manual recording mode, on Your PC (੬ SOFTWARE INSTALLATION AND USB CONNECTION GUIDE) USB 2.0 enables the smooth transfer of video and still images to record videos that enables you to the printer with PictBridge, still images can also record onto SD cards. "When Using an SD Card" (੬ pg. 15) Auto/Manual Recording Mode You can easily edit video and create your printer is compatible with a USB cable. Editing Files on...

Instructions
Page 3
... recording media for demonstration at least 10 MB/s). ● MultiMediaCards are those by your important recorded data to conserve power. Precautions on the power again. ● When using the camera. Check the compatibility of these batteries must be strictly followed. ● If the camera is recommended to copy your dealer or JVC service center, be replaced. Format recording medium before using the AC adapter, the access lamp lights up, and the LCD turns off its power...
... recording media for demonstration at least 10 MB/s). ● MultiMediaCards are those by your important recorded data to conserve power. Precautions on the power again. ● When using the camera. Check the compatibility of these batteries must be strictly followed. ● If the camera is recommended to copy your dealer or JVC service center, be replaced. Format recording medium before using the AC adapter, the access lamp lights up, and the LCD turns off its power...

Instructions
Page 6
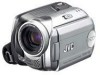
... When Using an SD Card 15 RECORDING Video Video Recording 16 Registering Files to Events 17 Zooming 18 16:9 Mode 18 LED Light 18 Deleting a File 19 Checking the Remaining Space on the Recording Media 19 Still image Still Image Recording 20 Zooming 21 Continuous Shooting 21 LED Light 21 Deleting a File 21 Video / Still image Manual Recording 22 Manual Setting in MSET Menu 22 Nightalive 25 Backlight Compensation 25 Spot Exposure Control 25 PLAYBACK Video Video Playback 26 Various Operations during Playback 27 File Search Function 28 Date Index Screen...
... When Using an SD Card 15 RECORDING Video Video Recording 16 Registering Files to Events 17 Zooming 18 16:9 Mode 18 LED Light 18 Deleting a File 19 Checking the Remaining Space on the Recording Media 19 Still image Still Image Recording 20 Zooming 21 Continuous Shooting 21 LED Light 21 Deleting a File 21 Video / Still image Manual Recording 22 Manual Setting in MSET Menu 22 Nightalive 25 Backlight Compensation 25 Spot Exposure Control 25 PLAYBACK Video Video Playback 26 Various Operations during Playback 27 File Search Function 28 Date Index Screen...
Instructions
Page 11
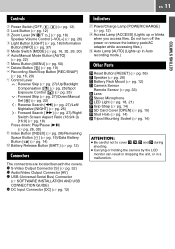
...] O USB (Universal Serial Bus) Connector (੬ SOFTWARE INSTALLATION AND USB CONNECTION GUIDE) P DC Input Connector [DC] (੬ pg. 12) Indicators Q Power/Charge Lamp [POWER/CHARGE] (੬ pg. 12) R Access Lamp [ACCESS] (Lights up in Auto recording mode.) Other Parts T Reset Button [RESET] (੬ pg. 56) U Speaker (੬ pg. 26) V Battery Pack Mount (੬ pg. 12) W Camera Sensor Remote Sensor (੬ pg. 33) X Lens Y Stereo Microphone a LED Light (੬ pg. 18, 21) b Grip Strap (੬ pg. 14) c SD Card Cover [OPEN...
...] O USB (Universal Serial Bus) Connector (੬ SOFTWARE INSTALLATION AND USB CONNECTION GUIDE) P DC Input Connector [DC] (੬ pg. 12) Indicators Q Power/Charge Lamp [POWER/CHARGE] (੬ pg. 12) R Access Lamp [ACCESS] (Lights up in Auto recording mode.) Other Parts T Reset Button [RESET] (੬ pg. 56) U Speaker (੬ pg. 26) V Battery Pack Mount (੬ pg. 12) W Camera Sensor Remote Sensor (੬ pg. 33) X Lens Y Stereo Microphone a LED Light (੬ pg. 18, 21) b Grip Strap (੬ pg. 14) c SD Card Cover [OPEN...
Instructions
Page 13
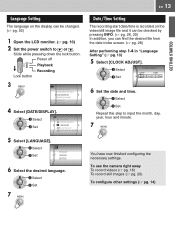
... Select Set ENGLISH 6 Select the desired language. Slide while pressing down the lock button. Power off Playback Recording Lock button 3 CAMERA SETTING BASIC SETTING REC MEDIA SETTING DATE/DISPLAY REGISTER EVENT QUALITY WIND CUT 4 Select [DATE/DISPLAY]. Select Set 7 EN 13 Date/Time Setting The recording start date/time is recorded on the display can find the desired file from the date index screen. (੬ pg. 28) After performing step 1-4 in "Language Setting" (੬ pg. 13) 5 Select [CLOCK ADJUST]. Language Setting The language on the video/still image file...
... Select Set ENGLISH 6 Select the desired language. Slide while pressing down the lock button. Power off Playback Recording Lock button 3 CAMERA SETTING BASIC SETTING REC MEDIA SETTING DATE/DISPLAY REGISTER EVENT QUALITY WIND CUT 4 Select [DATE/DISPLAY]. Select Set 7 EN 13 Date/Time Setting The recording start date/time is recorded on the display can find the desired file from the date index screen. (੬ pg. 28) After performing step 1-4 in "Language Setting" (੬ pg. 13) 5 Select [CLOCK ADJUST]. Language Setting The language on the video/still image file...
Instructions
Page 17
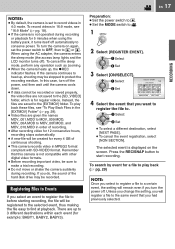
... record videos in MPEG2 format compliant with other digital video formats. ● Before recording important video, be recorded or saved properly, the video files are saved to the [EXTMOV] folder. In this camera is not compatible with SD-VIDEO format. To play back these files, see "16:9 Mode" (੬ pg. 18). ● If the camera is not operated during recording. Select Set 3 Select [ON/SELECT]. The selected event is displayed on again, set to start recording. Unless you change...
... record videos in MPEG2 format compliant with other digital video formats. ● Before recording important video, be recorded or saved properly, the video files are saved to the [EXTMOV] folder. In this camera is not compatible with SD-VIDEO format. To play back these files, see "16:9 Mode" (੬ pg. 18). ● If the camera is not operated during recording. Select Set 3 Select [ON/SELECT]. The selected event is displayed on again, set to start recording. Unless you change...
Instructions
Page 22
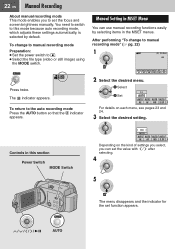
...; Select the file type (video or still image) using the MODE switch. 16:9 Press twice. Controls in the MSET menus. Manual Setting in MSET Menu You can set the value with / after selecting. 4 5 The menu disappears and the indicator for the set the focus and screen brightness manually. 22 EN Manual Recording About manual recording mode This mode enables you can use manual recording functions easily by selecting items in this mode because auto recording mode, which adjusts these settings automatically, is selected...
...; Select the file type (video or still image) using the MODE switch. 16:9 Press twice. Controls in the MSET menus. Manual Setting in MSET Menu You can set the value with / after selecting. 4 5 The menu disappears and the indicator for the set the focus and screen brightness manually. 22 EN Manual Recording About manual recording mode This mode enables you can use manual recording functions easily by selecting items in this mode because auto recording mode, which adjusts these settings automatically, is selected...
Instructions
Page 26
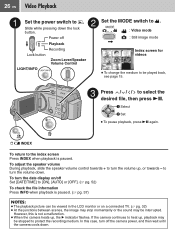
..., turn the volume down the lock button. : Video mode Power off : Still image mode Playback Recording VIDEO Lock button Zoom Lever/Speaker Volume Control 53/53 Index screen for videos LIGHT/INFO ● To change the medium to be stopped to protect the recording medium. to select the desired file, then press 49. In this is paused. (੬ pg. 37) NOTES: ● The playback picture can be viewed in the LCD monitor or on /off the camera power, and...
..., turn the volume down the lock button. : Video mode Power off : Still image mode Playback Recording VIDEO Lock button Zoom Lever/Speaker Volume Control 53/53 Index screen for videos LIGHT/INFO ● To change the medium to be stopped to protect the recording medium. to select the desired file, then press 49. In this is paused. (੬ pg. 37) NOTES: ● The playback picture can be viewed in the LCD monitor or on /off the camera power, and...
Instructions
Page 45
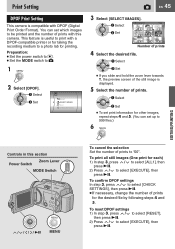
... 999 files.) 6 EDITING/PRINTING Controls in this camera. Select Set RESET SELECT IMAGES ALL1 CHECK SETTINGS EN 45 3 Select [SELECT IMAGES]. Select Set ● If you slide and hold the zoom lever towards T, the preview screen of the still image is displayed. 5 Select the number of prints 4 Select the desired file. You can set which images to be printed and the number of prints with this section Zoom Lever Power Switch MODE Switch / / / / 49 MENU...
... 999 files.) 6 EDITING/PRINTING Controls in this camera. Select Set RESET SELECT IMAGES ALL1 CHECK SETTINGS EN 45 3 Select [SELECT IMAGES]. Select Set ● If you slide and hold the zoom lever towards T, the preview screen of the still image is displayed. 5 Select the number of prints 4 Select the desired file. You can set which images to be printed and the number of prints with this section Zoom Lever Power Switch MODE Switch / / / / 49 MENU...
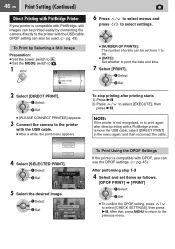
Instructions
Page 46
... date and time. 7 Select [PRINT]. Select Set PRINT THIS IMAGE SET 5 Select the desired Image. After that, press MENU to return to select [EXECUTE], then press 49. DPOF setting can also be used. (੬ pg. 45) To Print by connecting the camera directly to the printer with a PictBridge printer, remove the USB cable, select [DIRECT PRINT] in the menu again, and then reconnect the cable. Select Set NUMBER OF PRINTS DATE...
... date and time. 7 Select [PRINT]. Select Set PRINT THIS IMAGE SET 5 Select the desired Image. After that, press MENU to return to select [EXECUTE], then press 49. DPOF setting can also be used. (੬ pg. 45) To Print by connecting the camera directly to the printer with a PictBridge printer, remove the USB cable, select [DIRECT PRINT] in the menu again, and then reconnect the cable. Select Set NUMBER OF PRINTS DATE...

Instructions
Page 56
.... 12 ● Replace the dead battery with a fully charged one. - To reset the camera 1) Press RESET using the AC adapter, the camera enters the sleep mode, - the access lamp lights, and the LCD monitor turns off accidentally. The power was turned ● The drop detection function operated. 51 off . Set the power switch to OFF, and turn off once and turned on again. The camera returns to [OFF]. No display appears. ● When using a piece of...
.... 12 ● Replace the dead battery with a fully charged one. - To reset the camera 1) Press RESET using the AC adapter, the camera enters the sleep mode, - the access lamp lights, and the LCD monitor turns off accidentally. The power was turned ● The drop detection function operated. 51 off . Set the power switch to OFF, and turn off once and turned on again. The camera returns to [OFF]. No display appears. ● When using a piece of...
Instructions
Page 60
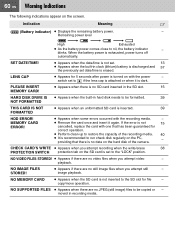
Indication Meaning ੬ (Battery indicator) ● Displays the remaining battery power. - SET DATE/TIME! ● Appears when the date/time is not set date/time is erased. NO VIDEO FILES STORED! ● Appears if there are no data on the hard disk of the recording media. 40 ● It is recommended to run check disk regularly on with the recording media. - ● Remove the card once and insert it is dark. image playback. blinks. HARD DISK DRIVE IS ● Appears when the built...
Indication Meaning ੬ (Battery indicator) ● Displays the remaining battery power. - SET DATE/TIME! ● Appears when the date/time is not set date/time is erased. NO VIDEO FILES STORED! ● Appears if there are no data on the hard disk of the recording media. 40 ● It is recommended to run check disk regularly on with the recording media. - ● Remove the card once and insert it is dark. image playback. blinks. HARD DISK DRIVE IS ● Appears when the built...
Instructions
Page 66
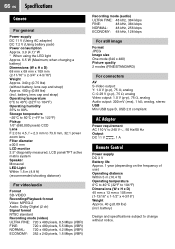
...;C to 50°C (-4°F to 122°F) Pickup 1/6" (680,000 pixels) CCD Lens F 2.0 to 4.5, f = 2.3 mm to 73.6 mm, 32:1 power zoom lens Filter diameter ø30.5 mm LCD monitor 2.5" diagonally measured, LCD panel/TFT active matrix system Speaker Monaural LED Light Within 1.5 m (4.9 ft) (recommended shooting distance) For video/audio Format SD-VIDEO Recording/Playback format Video: MPEG-2 Audio: Dolby Digital (2 ch) Signal format NTSC standard Recording mode (video) ULTRA FINE: 720 x 480 pixels, 8.5 Mbps (VBR...
...;C to 50°C (-4°F to 122°F) Pickup 1/6" (680,000 pixels) CCD Lens F 2.0 to 4.5, f = 2.3 mm to 73.6 mm, 32:1 power zoom lens Filter diameter ø30.5 mm LCD monitor 2.5" diagonally measured, LCD panel/TFT active matrix system Speaker Monaural LED Light Within 1.5 m (4.9 ft) (recommended shooting distance) For video/audio Format SD-VIDEO Recording/Playback format Video: MPEG-2 Audio: Dolby Digital (2 ch) Signal format NTSC standard Recording mode (video) ULTRA FINE: 720 x 480 pixels, 8.5 Mbps (VBR...
Instructions
Page 72
... Symbols 16:9 Mode 18 A AC Adapter 12, 63 B Backlight Compensation 25 Battery Pack 12 Brightness Control 52 C Changing Event Registration 54 Changing the Menu Settings 50 Cleaning Up a Recording Medium 40, 52 Clock Adjust 53 Connecting to a TV, VCR or DVD Recorder 32 Continuous Shooting 21, 55 Copying/Moving Still Image Files 48, 52 D Data Battery 14 Date Display Order 53 Date Index Screen 28 Date/Time Setting 13 Deleting Files 36 Demonstration Mode 51 Digital Image Stabilizer (DIS 53 Direct Printing 46, 55...
... Symbols 16:9 Mode 18 A AC Adapter 12, 63 B Backlight Compensation 25 Battery Pack 12 Brightness Control 52 C Changing Event Registration 54 Changing the Menu Settings 50 Cleaning Up a Recording Medium 40, 52 Clock Adjust 53 Connecting to a TV, VCR or DVD Recorder 32 Continuous Shooting 21, 55 Copying/Moving Still Image Files 48, 52 D Data Battery 14 Date Display Order 53 Date Index Screen 28 Date/Time Setting 13 Deleting Files 36 Demonstration Mode 51 Digital Image Stabilizer (DIS 53 Direct Printing 46, 55...


