Software Guide
Page 2
... You only on the PC with a Camera 17 Playing Back Copied Video 17 User's Guide/Help/Readme 18 For Macintosh Users Preparation 19 Software Installation 19 Connections 21 Connecting the Camera to the PC 21 Disconnecting the USB cable 21 Viewing the Contents of this Agreement, JVC grants to You a nonexclusive right to use the Program. Contents For All Users For All Users JVC SOFTWARE LICENSE AGREEMENT .... 2 Notice for your personal backup...
... You only on the PC with a Camera 17 Playing Back Copied Video 17 User's Guide/Help/Readme 18 For Macintosh Users Preparation 19 Software Installation 19 Connections 21 Connecting the Camera to the PC 21 Disconnecting the USB cable 21 Viewing the Contents of this Agreement, JVC grants to You a nonexclusive right to use the Program. Contents For All Users For All Users JVC SOFTWARE LICENSE AGREEMENT .... 2 Notice for your personal backup...
Software Guide
Page 11
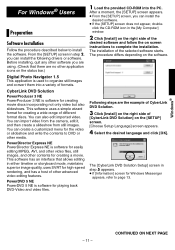
... also edit imported video. This software uses a simple wizard format for Windows Messenger appears, refer to complete the installation. You can install the following drivers or software. The installation of different format discs. Windows® - 11 - CyberLink DVD Solution PowerProducer 3 NE PowerProducer 3 NE is software for easily editing MPEG, AVI, and other video files, still images, and other advanced video editing features. You can create a customized menu for creating a movie. PowerDirector Express...
... also edit imported video. This software uses a simple wizard format for Windows Messenger appears, refer to complete the installation. You can install the following drivers or software. The installation of different format discs. Windows® - 11 - CyberLink DVD Solution PowerProducer 3 NE PowerProducer 3 NE is software for easily editing MPEG, AVI, and other video files, still images, and other advanced video editing features. You can create a customized menu for creating a movie. PowerDirector Express...
Software Guide
Page 13
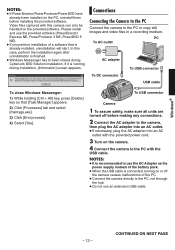
... CyberLink DVD Solution installation. Connections Connecting the Camera to the PC Connect the camera to the PC to use the provided software (PowerDirector Express NE, PowerProducer 3 NE, PowerDVD 5 NE). ● If you perform installation of the battery pack. ● When the USB cable is already installed, uninstallation will start. Video files captured with the USB cable. PC To AC outlet AC adapter To USB connector To DC connector USB cable To close Windows Messenger...
... CyberLink DVD Solution installation. Connections Connecting the Camera to the PC Connect the camera to the PC to use the provided software (PowerDirector Express NE, PowerProducer 3 NE, PowerDVD 5 NE). ● If you perform installation of the battery pack. ● When the USB cable is already installed, uninstallation will start. Video files captured with the USB cable. PC To AC outlet AC adapter To USB connector To DC connector USB cable To close Windows Messenger...
Software Guide
Page 15
... need to the playback mode while pressing down the lock button located on the PC's screen after a moment. Different file types are using a brand new SD card, you want to view the contents in the SD Memory Card, make sure that the card is set in a recording medium or deleting files or folders from a recording medium can cause problems with a USB cable. (੬ pg. 13) On the camera's LCD monitor [USB MASSSTORAGE] appears. 4 When using Windows...
... need to the playback mode while pressing down the lock button located on the PC's screen after a moment. Different file types are using a brand new SD card, you want to view the contents in the SD Memory Card, make sure that the card is set in a recording medium or deleting files or folders from a recording medium can cause problems with a USB cable. (੬ pg. 13) On the camera's LCD monitor [USB MASSSTORAGE] appears. 4 When using Windows...

Software Guide
Page 17
Windows® Playing Back Files Edited on the PC with a Camera To use the camera to play back the video files (MPEG2 files, with the USB cable, and open the [EXTMOV] folder. Copy the video files ("MOV_xxxx.mpg") to the [EXTMOV] folder. 3 Press the recording REC/SNAP button while the index screen is displayed. 4 After [MPG] is saved. The video files can be selected in folder units. Viewing the video for a single file Drag and drop a MOD file over...
Windows® Playing Back Files Edited on the PC with a Camera To use the camera to play back the video files (MPEG2 files, with the USB cable, and open the [EXTMOV] folder. Copy the video files ("MOV_xxxx.mpg") to the [EXTMOV] folder. 3 Press the recording REC/SNAP button while the index screen is displayed. 4 After [MPG] is saved. The video files can be selected in folder units. Viewing the video for a single file Drag and drop a MOD file over...

Separate volume1
Page 12
... erasing unwanted movies and rearranging selected pictures. The edited data can import these features on the go. For Further information, please refer to "Users Guide" of using Everio cameras is in your computer at a later date. For further information, please refer to SOFTWARE INSTRUCTION AND USB CONNECTION GUIDE. Additional information For users wishing to view their edited movie with their own video camera, it is also possible to edit movies by using the camera directly...
... erasing unwanted movies and rearranging selected pictures. The edited data can import these features on the go. For Further information, please refer to "Users Guide" of using Everio cameras is in your computer at a later date. For further information, please refer to SOFTWARE INSTRUCTION AND USB CONNECTION GUIDE. Additional information For users wishing to view their edited movie with their own video camera, it is also possible to edit movies by using the camera directly...
Instructions
Page 2
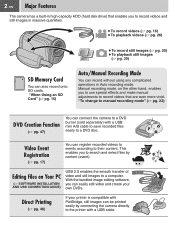
... a DVD disc. Manual recording mode, on Your PC (੬ SOFTWARE INSTALLATION AND USB CONNECTION GUIDE) USB 2.0 enables the smooth transfer of video and still images to record videos and still images in Auto recording mode. "To change to manual recording mode" (੬ pg. 22) DVD Creation Function (੬ pg. 47) You can also record onto SD cards. "When Using an SD Card" (੬ pg. 15) Auto/Manual Recording Mode You can record without using any complicated operations in massive quantities. ● To record videos (੬ pg. 16) ● To playback videos...
... a DVD disc. Manual recording mode, on Your PC (੬ SOFTWARE INSTALLATION AND USB CONNECTION GUIDE) USB 2.0 enables the smooth transfer of video and still images to record videos and still images in Auto recording mode. "To change to manual recording mode" (੬ pg. 22) DVD Creation Function (੬ pg. 47) You can also record onto SD cards. "When Using an SD Card" (੬ pg. 15) Auto/Manual Recording Mode You can record without using any complicated operations in massive quantities. ● To record videos (੬ pg. 16) ● To playback videos...

Instructions
Page 3
... using this camera are not supported. Check the compatibility of time passes without operation ● When using the camera. How to work with sound) that was made properly. Format recording medium before using the battery, the power will only operate with the SD card, bring your important recorded data to conserve power. This will automatically turn off (the camera enters the sleep mode). If the camera does not operate correctly, reset the camera. (੬ pg. 58) If a problem occurs with a JVC Data Battery...
... using this camera are not supported. Check the compatibility of time passes without operation ● When using the camera. How to work with sound) that was made properly. Format recording medium before using the battery, the power will only operate with the SD card, bring your important recorded data to conserve power. This will automatically turn off (the camera enters the sleep mode). If the camera does not operate correctly, reset the camera. (੬ pg. 58) If a problem occurs with a JVC Data Battery...

Instructions
Page 6
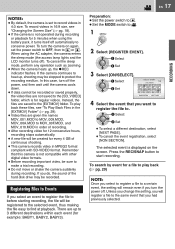
... When Using an SD Card 15 RECORDING Video Video Recording 16 Registering Files to Events 17 Zooming 18 Changing the Screen Size 18 LED Light 18 Deleting a File 19 Checking the Remaining Space on the Recording Media 19 Still image Still Image Recording 20 Zooming 21 Continuous Shooting 21 LED Light 21 Deleting a File 21 Video / Still image Manual Recording 22 Manual Setting in MSET Menu 22 Nightalive 25 Backlight Compensation 25 Spot Exposure Control 25 PLAYBACK Video Video Playback 26 Various Operations during Playback 27 File Search Function 28 Date Index Screen...
... When Using an SD Card 15 RECORDING Video Video Recording 16 Registering Files to Events 17 Zooming 18 Changing the Screen Size 18 LED Light 18 Deleting a File 19 Checking the Remaining Space on the Recording Media 19 Still image Still Image Recording 20 Zooming 21 Continuous Shooting 21 LED Light 21 Deleting a File 21 Video / Still image Manual Recording 22 Manual Setting in MSET Menu 22 Nightalive 25 Backlight Compensation 25 Spot Exposure Control 25 PLAYBACK Video Video Playback 26 Various Operations during Playback 27 File Search Function 28 Date Index Screen...
Instructions
Page 11
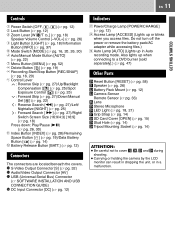
... lights up or blinks when you access files. M S-Video Output Connector [S] (੬ pg. 32) N Audio/Video Output Connector [AV] O USB (Universal Serial Bus) Connector (੬ SOFTWARE INSTALLATION AND USB CONNECTION GUIDE) P DC Input Connector [DC] (੬ pg. 12) Indicators Q Power/Charge Lamp [POWER/CHARGE] (੬ pg. 12) R Access Lamp [ACCESS] (Lights up when connecting to a DVD burner [sold separately].) (੬ pg. 47) Other Parts T Reset Button [RESET] (੬ pg. 58) U Speaker (੬ pg. 26) V Battery Pack Mount (੬ pg. 12) W Camera Sensor Remote...
... lights up or blinks when you access files. M S-Video Output Connector [S] (੬ pg. 32) N Audio/Video Output Connector [AV] O USB (Universal Serial Bus) Connector (੬ SOFTWARE INSTALLATION AND USB CONNECTION GUIDE) P DC Input Connector [DC] (੬ pg. 12) Indicators Q Power/Charge Lamp [POWER/CHARGE] (੬ pg. 12) R Access Lamp [ACCESS] (Lights up when connecting to a DVD burner [sold separately].) (੬ pg. 47) Other Parts T Reset Button [RESET] (੬ pg. 58) U Speaker (੬ pg. 26) V Battery Pack Mount (੬ pg. 12) W Camera Sensor Remote...
Instructions
Page 13
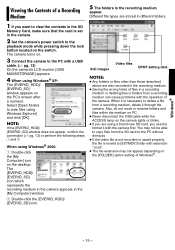
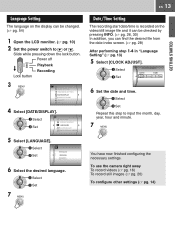
... language. Select Set CLOCK ADJUST DATE TIME JAN 31 2006 11 : 07 AM 6 Set the date and time. To use the camera right away To record videos (੬ pg. 16) To record still images (੬ pg. 20) To configure other settings (੬ pg. 14) GETTING STARTED Power off Playback Recording Lock button 3 CAMERA SETTING BASIC SETTING REC MEDIA SETTING DATE/DISPLAY REGISTER EVENT QUALITY WIND CUT 4 Select [DATE/DISPLAY]. Select Set Repeat this step to or . Language Setting The language on the video/still image file...
... language. Select Set CLOCK ADJUST DATE TIME JAN 31 2006 11 : 07 AM 6 Set the date and time. To use the camera right away To record videos (੬ pg. 16) To record still images (੬ pg. 20) To configure other settings (੬ pg. 14) GETTING STARTED Power off Playback Recording Lock button 3 CAMERA SETTING BASIC SETTING REC MEDIA SETTING DATE/DISPLAY REGISTER EVENT QUALITY WIND CUT 4 Select [DATE/DISPLAY]. Select Set Repeat this step to or . Language Setting The language on the video/still image file...
Instructions
Page 17
... sleep mode, perform any operation such as zooming. ● When the camera heats up to 3 different destinations within each event (for 5 minutes when using the AC adapter, the camera enters the sleep mode (the access lamp lights and the LCD monitor turns off . In this camera is not compatible with SD-VIDEO format. Instead, the files are up , the 7REC indicator flashes. There are saved to start recording. Select Set SELECT...
... sleep mode, perform any operation such as zooming. ● When the camera heats up to 3 different destinations within each event (for 5 minutes when using the AC adapter, the camera enters the sleep mode (the access lamp lights and the LCD monitor turns off . In this camera is not compatible with SD-VIDEO format. Instead, the files are up , the 7REC indicator flashes. There are saved to start recording. Select Set SELECT...
Instructions
Page 22
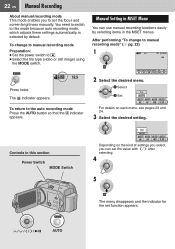
... file type (video or still image) using the MODE switch. 16:9 Press twice. To return to manual recording mode" (੬ pg. 22) 1 16:9 [0h56m] AUTO AUTO AUTO AUTO OFF OFF AE AF WB S.SP P.AE EF 2 Select the desired menu. After performing "To change to manual recording mode Preparation: ● Set the power switch to set function appears. / / / / 49 AUTO 22 EN Manual Recording About manual recording mode This mode enables you can use manual recording functions easily by selecting items in this mode because auto recording mode, which adjusts...
... file type (video or still image) using the MODE switch. 16:9 Press twice. To return to manual recording mode" (੬ pg. 22) 1 16:9 [0h56m] AUTO AUTO AUTO AUTO OFF OFF AE AF WB S.SP P.AE EF 2 Select the desired menu. After performing "To change to manual recording mode Preparation: ● Set the power switch to set function appears. / / / / 49 AUTO 22 EN Manual Recording About manual recording mode This mode enables you can use manual recording functions easily by selecting items in this mode because auto recording mode, which adjusts...

Instructions
Page 26
... Video Playback 1 2 Set the power switch to . To turn the volume up , playback may be played back, see page 15. 3 Press / / / to [ON], [AUTO] or [OFF]. (੬ pg. 54) To check the file information Press INFO when playback is paused. Set the MODE switch to . If the camera continues to turn the date display on/off the camera power, and then wait until the camera cools down . To adjust the speaker volume During playback, slide the speaker volume control...
... Video Playback 1 2 Set the power switch to . To turn the volume up , playback may be played back, see page 15. 3 Press / / / to [ON], [AUTO] or [OFF]. (੬ pg. 54) To check the file information Press INFO when playback is paused. Set the MODE switch to . If the camera continues to turn the date display on/off the camera power, and then wait until the camera cools down . To adjust the speaker volume During playback, slide the speaker volume control...

Instructions
Page 30
... . IMAGE 53/53 Index screen Date index screen For details on /off Playback Recording Lock button LIGHT/INFO Zoom Lever 2 Set the MODE switch to be used for still image INDEX ● To change the medium to . : Video mode : Still image mode IMAGE 53/53 Index screen for still images. Power off Set [DATE/TIME] to [ON], [AUTO] or [OFF]. (੬ pg. 54) To check the file information Press INFO when playback is paused. (੬ pg. 37) File Search Function One-touch operation enables...
... . IMAGE 53/53 Index screen Date index screen For details on /off Playback Recording Lock button LIGHT/INFO Zoom Lever 2 Set the MODE switch to be used for still image INDEX ● To change the medium to . : Video mode : Still image mode IMAGE 53/53 Index screen for still images. Power off Set [DATE/TIME] to [ON], [AUTO] or [OFF]. (੬ pg. 54) To check the file information Press INFO when playback is paused. (੬ pg. 37) File Search Function One-touch operation enables...
Instructions
Page 45
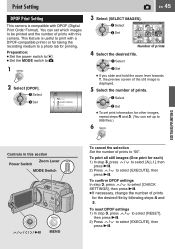
... / to . 1 2 Select [DPOF]. Select Set RESET SELECT IMAGES ALL1 CHECK SETTINGS EN 45 3 Select [SELECT IMAGES]. To confirm DPOF settings In step 3, press / to select [EXECUTE], then press 49. This feature is compatible with this section Zoom Lever Power Switch MODE Switch / / / / 49 MENU To cancel the selection Set the number of prints with DPOF (Digital Print Order Format). DPOF TOTAL: 0 7/59 Select Set 00 00 00 00 00...
... / to . 1 2 Select [DPOF]. Select Set RESET SELECT IMAGES ALL1 CHECK SETTINGS EN 45 3 Select [SELECT IMAGES]. To confirm DPOF settings In step 3, press / to select [EXECUTE], then press 49. This feature is compatible with this section Zoom Lever Power Switch MODE Switch / / / / 49 MENU To cancel the selection Set the number of prints with DPOF (Digital Print Order Format). DPOF TOTAL: 0 7/59 Select Set 00 00 00 00 00...
Instructions
Page 46
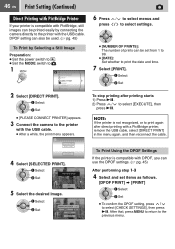
... the USB cable. DPOF setting can also be used. (੬ pg. 45) To Print by connecting the camera directly to the printer with the USB cable. ● After a while, the print menu appears. 6 Press / to select menus and press / to select settings. ● [NUMBER OF PRINTS]: The number of prints can be printed easily by Selecting a Still Image Preparation: ● Set the power switch to ● Set the MODE switch...
... the USB cable. DPOF setting can also be used. (੬ pg. 45) To Print by connecting the camera directly to the printer with the USB cable. ● After a while, the print menu appears. 6 Press / to select menus and press / to select settings. ● [NUMBER OF PRINTS]: The number of prints can be printed easily by Selecting a Still Image Preparation: ● Set the power switch to ● Set the MODE switch...
Instructions
Page 62
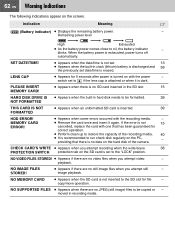
... previously set to run check disk regularly on the screen. 62 EN Warning Indications The following indications appear on the PC, - When the battery power is no JPEG (still image) files to nil, the battery indicator - switch set to be copied or - playback. moved in clock (lithium) battery is erased. SET DATE/TIME! ● Appears when the date/time is not set. 13 ● Appears when the built-in recording media. NO MEMORY CARD ●...
... previously set to run check disk regularly on the screen. 62 EN Warning Indications The following indications appear on the PC, - When the battery power is no JPEG (still image) files to nil, the battery indicator - switch set to be copied or - playback. moved in clock (lithium) battery is erased. SET DATE/TIME! ● Appears when the date/time is not set. 13 ● Appears when the built-in recording media. NO MEMORY CARD ●...

Instructions
Page 68
...;C to 50°C (-4°F to 122°F) Pickup 1/6" (680,000 pixels) CCD Lens F 2.0 to 4.5, f = 2.3 mm to 73.6 mm, 32:1 power zoom lens Filter diameter ø30.5 mm LCD monitor 2.7" diagonally measured, LCD panel/TFT active matrix system Speaker Monaural LED Light Within 1.5 m (4.9 ft) (recommended shooting distance) For video/audio Format SD-VIDEO Recording/Playback format Video: MPEG-2 Audio: Dolby Digital (2 ch) Signal format NTSC standard Recording mode (video) ULTRA FINE: 720 x 480 pixels, 8.5 Mbps (VBR...
...;C to 50°C (-4°F to 122°F) Pickup 1/6" (680,000 pixels) CCD Lens F 2.0 to 4.5, f = 2.3 mm to 73.6 mm, 32:1 power zoom lens Filter diameter ø30.5 mm LCD monitor 2.7" diagonally measured, LCD panel/TFT active matrix system Speaker Monaural LED Light Within 1.5 m (4.9 ft) (recommended shooting distance) For video/audio Format SD-VIDEO Recording/Playback format Video: MPEG-2 Audio: Dolby Digital (2 ch) Signal format NTSC standard Recording mode (video) ULTRA FINE: 720 x 480 pixels, 8.5 Mbps (VBR...

Instructions
Page 72
TERMS EN A AC Adapter 12, 65 B Backlight Compensation 25 Battery Pack 12 Brightness Control 54 C Changing Event Registration 56 Changing the Menu Settings 52 Cleaning Up a Recording Medium 40, 54 Clock Adjust 55 Connecting to a TV, VCR or DVD Recorder 32 Continuous Shooting 21, 57 Copying/Moving Still Image Files 51, 54 D Data Battery 14 Date Display Order 55 Date Index Screen 28 Date/Time Setting 13 Deleting Files 36 Demonstration Mode 53 Digital Image Stabilizer (DIS 55 Direct Printing 46, 57 Drop Detection...
TERMS EN A AC Adapter 12, 65 B Backlight Compensation 25 Battery Pack 12 Brightness Control 54 C Changing Event Registration 56 Changing the Menu Settings 52 Cleaning Up a Recording Medium 40, 54 Clock Adjust 55 Connecting to a TV, VCR or DVD Recorder 32 Continuous Shooting 21, 57 Copying/Moving Still Image Files 51, 54 D Data Battery 14 Date Display Order 55 Date Index Screen 28 Date/Time Setting 13 Deleting Files 36 Demonstration Mode 53 Digital Image Stabilizer (DIS 55 Direct Printing 46, 57 Drop Detection...


