
Instructions
Page 8
Table of Contents Important Safety Precautions . 2 Warnings 5 Quick Setup 10 Unpacking your TV 10 TV Models 12 TV Remote Control 14 Getting Started 15 The Remote Control 15 Connecting Your Devices 16 Interactive Plug In Menu 30 Remote Programming . . . . . 33 Setting CATV, VCR and DVD Codes . . . 33 CATV or Satellite Codes 33 ... Front Panel Lock 54 V1 Smart Input 54 Video Input Label 55 Position Adjustment 56 Power Indicator 56 Video-1 Monitor Out 57 TV Speaker 57 Audio Out 57 Digital-In 58 Digital-In Audio 58 Center CH Input 59 Picture Adjust 60 Picture Settings 60 Adjust...
Table of Contents Important Safety Precautions . 2 Warnings 5 Quick Setup 10 Unpacking your TV 10 TV Models 12 TV Remote Control 14 Getting Started 15 The Remote Control 15 Connecting Your Devices 16 Interactive Plug In Menu 30 Remote Programming . . . . . 33 Setting CATV, VCR and DVD Codes . . . 33 CATV or Satellite Codes 33 ... Front Panel Lock 54 V1 Smart Input 54 Video Input Label 55 Position Adjustment 56 Power Indicator 56 Video-1 Monitor Out 57 TV Speaker 57 Audio Out 57 Digital-In 58 Digital-In Audio 58 Center CH Input 59 Picture Adjust 60 Picture Settings 60 Adjust...

Instructions
Page 10
... guide, your purchase of the following items. In addition to make sure you for your television box should include: Television x 1 Remote Control x 1 AA Batteries x 2 AA Alkaline AA Alkaline TV CATV VCR DVD POWER ASPECT MULTI SCREEN TWIN INDEX SELECT SLEEP FREEZE SWAP ML/MTS DISPLAY + INPUT 123 D/A 4 5 6 i.... CHANNEL SUB LIGHT MUTING CH GUIDE VOL OK VOL Note: Your television CH MENU BACK and/or remote VCR CHANNEL VCR DVD PREV NEXT POWER TV VCR REW PLAY FF control may differ LAMP/PROGRAM POWER REC STOP PAUSE OPEN CLOSE STILL PAUSE from the examples RM-...
... guide, your purchase of the following items. In addition to make sure you for your television box should include: Television x 1 Remote Control x 1 AA Batteries x 2 AA Alkaline AA Alkaline TV CATV VCR DVD POWER ASPECT MULTI SCREEN TWIN INDEX SELECT SLEEP FREEZE SWAP ML/MTS DISPLAY + INPUT 123 D/A 4 5 6 i.... CHANNEL SUB LIGHT MUTING CH GUIDE VOL OK VOL Note: Your television CH MENU BACK and/or remote VCR CHANNEL VCR DVD PREV NEXT POWER TV VCR REW PLAY FF control may differ LAMP/PROGRAM POWER REC STOP PAUSE OPEN CLOSE STILL PAUSE from the examples RM-...

Instructions
Page 12
These will help assist you connect your television to another device, as well as use the remote to set up your specific TV and remote. SERVICE ONLY ATSC /DIGITAL CABLE IN I DIGITAL IN AV COMPULINK III VIDEO (DIGITAL) _ AUDIO (DIGITAL) CABLE CARD CENTER CHANNEL INPUT ...AUDIO PC IN (D-SUB) L AUDIO OUTPUT 75Ω (VHF/UHF) R R MONITOR /REC OUT LICENSED UNDER THE FOLLOWING U.S. Rear Panel Diagram MODELS: HD-52G886 HD-52G786 HD-56G886 HD-56G786 Note: The terminal labeled "SERVICE ONLY", is exclusively used to update the software version. PATENTS 6,183,091 6,419,362 12 ...
These will help assist you connect your television to another device, as well as use the remote to set up your specific TV and remote. SERVICE ONLY ATSC /DIGITAL CABLE IN I DIGITAL IN AV COMPULINK III VIDEO (DIGITAL) _ AUDIO (DIGITAL) CABLE CARD CENTER CHANNEL INPUT ...AUDIO PC IN (D-SUB) L AUDIO OUTPUT 75Ω (VHF/UHF) R R MONITOR /REC OUT LICENSED UNDER THE FOLLOWING U.S. Rear Panel Diagram MODELS: HD-52G886 HD-52G786 HD-56G886 HD-56G786 Note: The terminal labeled "SERVICE ONLY", is exclusively used to update the software version. PATENTS 6,183,091 6,419,362 12 ...

Instructions
Page 14
... VOL OK VOL CH MENU VCR CHANNEL PREV NEXT BACK VCR DVD POWER TV VCR REW PLAY FF REC STOP PAUSE OPEN CLOSE STILL PAUSE RM-C14G RM-C14G MODELS: HD-52G886 HD-52G786 HD-56G886 HD-56G786 • For information on remote control buttons, see pages 67 - 77 and 81 - 86. •...; i.LINK MENU, TIMER, SUB CHANNEL, FAVORITE and GUIDE buttons are for digital channels. Quick Setup TV Remote Control TV CATV VCR DVD POWER ASPECT MULTI...
... VOL OK VOL CH MENU VCR CHANNEL PREV NEXT BACK VCR DVD POWER TV VCR REW PLAY FF REC STOP PAUSE OPEN CLOSE STILL PAUSE RM-C14G RM-C14G MODELS: HD-52G886 HD-52G786 HD-56G886 HD-56G786 • For information on remote control buttons, see pages 67 - 77 and 81 - 86. •...; i.LINK MENU, TIMER, SUB CHANNEL, FAVORITE and GUIDE buttons are for digital channels. Quick Setup TV Remote Control TV CATV VCR DVD POWER ASPECT MULTI...

Instructions
Page 15
...Key Feature Buttons The four key feature buttons at the center of five channels per second. To move rapidly through the available CH channels. POWER T TV CATV MUL VCR DVD Note: • If the lamp replacement message appears when you first need to operate a cable box. • Slide the ... to control a VCR. If this manual. If you take longer than three minutes, the remote control codes for basic operation of the remote. Slide the cover back into place. If you need to begin using JVC's Hyperscan feature, press and hold CH+ or CH-. See pages 33 - 36. Move the switch...
...Key Feature Buttons The four key feature buttons at the center of five channels per second. To move rapidly through the available CH channels. POWER T TV CATV MUL VCR DVD Note: • If the lamp replacement message appears when you first need to operate a cable box. • Slide the ... to control a VCR. If this manual. If you take longer than three minutes, the remote control codes for basic operation of the remote. Slide the cover back into place. If you need to begin using JVC's Hyperscan feature, press and hold CH+ or CH-. See pages 33 - 36. Move the switch...

Instructions
Page 20
... or DVD player sends a signal to the television telling it is compatible with the JVC AV CompuLink unit you push the VCR's PLAY button. • If your JVC brand VCR has "A code/B code remote control switching" (see your VCR's instruction book), using VCR A code will automatically turn...detailed connection information. • AV CompuLink is not, contact JVC Parts Department at the rear of the AV CompuLink cable into your JVC DVD player and the device will switch the TV to input 1. • Refer to JVC AV Compu Link JVC's AV CompuLink feature makes playing video tapes or DVDs totally...
... or DVD player sends a signal to the television telling it is compatible with the JVC AV CompuLink unit you push the VCR's PLAY button. • If your JVC brand VCR has "A code/B code remote control switching" (see your VCR's instruction book), using VCR A code will automatically turn...detailed connection information. • AV CompuLink is not, contact JVC Parts Department at the rear of the AV CompuLink cable into your JVC DVD player and the device will switch the TV to input 1. • Refer to JVC AV Compu Link JVC's AV CompuLink feature makes playing video tapes or DVDs totally...

Instructions
Page 26
...manual for more devices to your television. AV Receiver MONITOR OUT Y PB PR MONITOR OUT S-VIDEO OVER Y VIDEO L Pb I AUDIO I R Pr INPUT-1 TV Rear Panel 1) Connect an S-Video Cable from the AV Receiver's MONITOR OUT, to the S-Video INPUT-1 on the back of your television. 2) Connect a Yellow ...Component Cable from many different devices, without having to change or use the other devices like a DVD player. • Use your AV Receiver's remote to switch to the different devices you have connected. • Some AV Receivers may not respond when the V1 Smart Input function is turned on...
...manual for more devices to your television. AV Receiver MONITOR OUT Y PB PR MONITOR OUT S-VIDEO OVER Y VIDEO L Pb I AUDIO I R Pr INPUT-1 TV Rear Panel 1) Connect an S-Video Cable from the AV Receiver's MONITOR OUT, to the S-Video INPUT-1 on the back of your television. 2) Connect a Yellow ...Component Cable from many different devices, without having to change or use the other devices like a DVD player. • Use your AV Receiver's remote to switch to the different devices you have connected. • Some AV Receivers may not respond when the V1 Smart Input function is turned on...
Instructions
Page 32
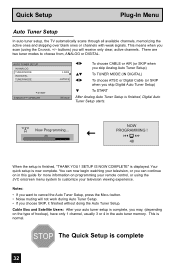
...PROGRAMMING ! 48 When the setup is complete 32 Notes: • If you may, (depending on programming your remote control, or using the CHANNEL +/- This is now complete. You can continue on in this guide for more... in the auto tuner memory. Quick Setup Plug-In Menu Auto Tuner Setup In auto tuner setup, the TV automatically scans through all available channels, memorizing the active ones and skipping over blank ones or channels with weak...customize your television, or you scan (using the JVC onscreen menu system to choose from, ANALOG or DIGITAL. Your quick setup is normal.
...PROGRAMMING ! 48 When the setup is complete 32 Notes: • If you may, (depending on programming your remote control, or using the CHANNEL +/- This is now complete. You can continue on in this guide for more... in the auto tuner memory. Quick Setup Plug-In Menu Auto Tuner Setup In auto tuner setup, the TV automatically scans through all available channels, memorizing the active ones and skipping over blank ones or channels with weak...customize your television, or you scan (using the JVC onscreen menu system to choose from, ANALOG or DIGITAL. Your quick setup is normal.
Instructions
Page 33
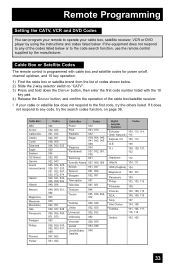
... the CATV, VCR and DVD Codes You can program your remote to operate your cable or satellite box does not respond to the first ...107 104, 108 Toshiba 101, 104, 117, 118, 119 Uniden 102, 103 33 Cable Box or Satellite Codes The remote control is programmed with the 10 key pad. 4) Release the DISPLAY button, and confirm the operation of the codes listed... below or to the code search function, use the remote control supplied by using the instructions and codes listed below . 2) Slide the 2-way selector switch to any code, ...
... the CATV, VCR and DVD Codes You can program your remote to operate your cable or satellite box does not respond to the first ...107 104, 108 Toshiba 101, 104, 117, 118, 119 Uniden 102, 103 33 Cable Box or Satellite Codes The remote control is programmed with the 10 key pad. 4) Release the DISPLAY button, and confirm the operation of the codes listed... below or to the code search function, use the remote control supplied by using the instructions and codes listed below . 2) Slide the 2-way selector switch to any code, ...

Instructions
Page 34
... VCR brand from the list of codes shown below. 2) Slide the first 2-way selector switch to "TV" and the other 2-way selector switch to the first code, try the search codes function on the remote and press PLAY. 34 VCR Codes Admiral 035 Aiwa 027, 032, 095 Akai 029, 072, 073..., 049, 050, 089 Goldstar 064 Gradiente 083, 084, 081, 000, 001 Hitachi 023, 045, 058, 093, 027, 081 Instant Replay 024, 023 Jensen 003 JVC 003, 004, 005, 000, 001, 002, 006, 007 VCR Marantz Marta Memorex MGA Minolta Mitsubishi Multitech NEC Olympic Optimus Orion Panasonic Penney Pentax Philco Philips...
... VCR brand from the list of codes shown below. 2) Slide the first 2-way selector switch to "TV" and the other 2-way selector switch to the first code, try the search codes function on the remote and press PLAY. 34 VCR Codes Admiral 035 Aiwa 027, 032, 095 Akai 029, 072, 073..., 049, 050, 089 Goldstar 064 Gradiente 083, 084, 081, 000, 001 Hitachi 023, 045, 058, 093, 027, 081 Instant Replay 024, 023 Jensen 003 JVC 003, 004, 005, 000, 001, 002, 006, 007 VCR Marantz Marta Memorex MGA Minolta Mitsubishi Multitech NEC Olympic Optimus Orion Panasonic Penney Pentax Philco Philips...
Instructions
Page 35
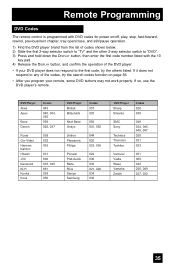
...Player Aiwa Apex Bose Denon Funai Go-Video Harman Kardon Hitachi JVC Kenwood KLH Konka Koss Codes 043 040, 054, 055 058... 023 051 050 042 020, 049 027, 032 35 If so, use the DVD player's remote. Remote Programming DVD Codes The remote control is programmed with DVD codes for power on/off, play, stop, fast-forward, rewind,... previous/next chapter, tray open/close, and still/pause operation. 1) Find the DVD player brand from the list of codes shown below. 2) Slide the first 2-way selector switch to "TV...
...Player Aiwa Apex Bose Denon Funai Go-Video Harman Kardon Hitachi JVC Kenwood KLH Konka Koss Codes 043 040, 054, 055 058... 023 051 050 042 020, 049 027, 032 35 If so, use the DVD player's remote. Remote Programming DVD Codes The remote control is programmed with DVD codes for power on/off, play, stop, fast-forward, rewind,... previous/next chapter, tray open/close, and still/pause operation. 1) Find the DVD player brand from the list of codes shown below. 2) Slide the first 2-way selector switch to "TV...
Instructions
Page 36
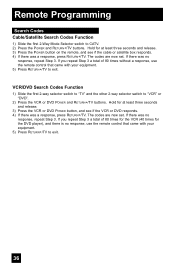
... was no response, repeat Step 3. If you repeat Step 3 a total of 80 times without a response, use the remote control that came with your equipment. 5) Press RETURN+/TV to exit. If you repeat Step 3 a total of 80 times for the VCR (40 times for at least three seconds... Codes Function 1) Slide the first 2-way selector switch to "TV" and the other 2-way selector switch to CATV. 2) Press the POWER and RETURN+/TV buttons. The codes are now set . If there was a response, press RETURN+/TV. Remote Programming Search Codes Cable/Satellite Search Codes Function 1) Slide the ...
... was no response, repeat Step 3. If you repeat Step 3 a total of 80 times without a response, use the remote control that came with your equipment. 5) Press RETURN+/TV to exit. If you repeat Step 3 a total of 80 times for the VCR (40 times for at least three seconds... Codes Function 1) Slide the first 2-way selector switch to "TV" and the other 2-way selector switch to CATV. 2) Press the POWER and RETURN+/TV buttons. The codes are now set . If there was a response, press RETURN+/TV. Remote Programming Search Codes Cable/Satellite Search Codes Function 1) Slide the ...

Instructions
Page 37
... PICTURE ADJUST. Pressing the CH+ or CH- The "interactive plug-in menu" will appear the first time the TV is the one currently selected. If you use the Menu button on the remote control. buttons. buttons to move left or right to: • Select a highlighted menu item • Select ...submenu • Select numbers in certain menu options • Turn the volume up the onscreen menu, press the MENU button on the TV's side panel instead of the remote, an additional menu screen showing VIDEO STATUS and ASPECT will see most frequently are: π† √® Up and Down arrows...
... PICTURE ADJUST. Pressing the CH+ or CH- The "interactive plug-in menu" will appear the first time the TV is the one currently selected. If you use the Menu button on the remote control. buttons. buttons to move left or right to: • Select a highlighted menu item • Select ...submenu • Select numbers in certain menu options • Turn the volume up the onscreen menu, press the MENU button on the TV's side panel instead of the remote, an additional menu screen showing VIDEO STATUS and ASPECT will see most frequently are: π† √® Up and Down arrows...

Instructions
Page 38
..., the onscreen menu will automatically shut off. • Button names in this guide are selected. 38 The selected feature and option on the remote control. (These buttons are shown on the next page. Notes: • If you make adjustments to select an option from the highlighted feature... or down arrow at the top of the onscreen menus are also the CH +/- Onscreen Menus The Onscreen Menu System Your television comes with JVC's onscreen menu system. Selected Option (Green) LANGUAGE CLOSED CAPTION ENG. Selected Option (Blue) To move to a different feature use the π...
..., the onscreen menu will automatically shut off. • Button names in this guide are selected. 38 The selected feature and option on the remote control. (These buttons are shown on the next page. Notes: • If you make adjustments to select an option from the highlighted feature... or down arrow at the top of the onscreen menus are also the CH +/- Onscreen Menus The Onscreen Menu System Your television comes with JVC's onscreen menu system. Selected Option (Green) LANGUAGE CLOSED CAPTION ENG. Selected Option (Blue) To move to a different feature use the π...

Instructions
Page 54
...INPUT LABEL POSITION ADJUSTMENT POWER INDICATOR NEXT PAGE SELECT OPERATE ON OFF ON OFF (2/5) MENU EXIT • Use the remote control. • Press the MENU button on the side of the TV for FRONT PANEL LOCK will remain ON. V1 Smart Input This feature is used if you lose your television, turn... ON/OFF the TV, press the power button for more than 3 seconds. Note: • To turn this if your batteries die, or you have an AV Receiver connected to your remote control. INITIAL SETUP PREVIOUS NOISE MUTING FRONT PANEL LOCK V1 SMART ...
...INPUT LABEL POSITION ADJUSTMENT POWER INDICATOR NEXT PAGE SELECT OPERATE ON OFF ON OFF (2/5) MENU EXIT • Use the remote control. • Press the MENU button on the side of the TV for FRONT PANEL LOCK will remain ON. V1 Smart Input This feature is used if you lose your television, turn... ON/OFF the TV, press the power button for more than 3 seconds. Note: • To turn this if your batteries die, or you have an AV Receiver connected to your remote control. INITIAL SETUP PREVIOUS NOISE MUTING FRONT PANEL LOCK V1 SMART ...

Instructions
Page 57
... connected to a stereo system, you can turn off , the sound from MONITOR OUT terminal. buttons on your TV's remote control. After 5 seconds, it to ON, make sure that the TV volume level is connected to output sound for 5 seconds. If you select it from OFF to "ON". Audio Out If...out gives you the option of controlling the volume level with your TV's remote control. Note: • After the TV has been turned off the TV speakers and listen to the audio through your television is low! If the TV volume is adjusted using the VOLUME+/- INITIAL SETUP PREVIOUS VIDEO-1MONITOR ...
... connected to a stereo system, you can turn off , the sound from MONITOR OUT terminal. buttons on your TV's remote control. After 5 seconds, it to ON, make sure that the TV volume level is connected to output sound for 5 seconds. If you select it from OFF to "ON". Audio Out If...out gives you the option of controlling the volume level with your TV's remote control. Note: • After the TV has been turned off the TV speakers and listen to the audio through your television is low! If the TV volume is adjusted using the VOLUME+/- INITIAL SETUP PREVIOUS VIDEO-1MONITOR ...

Instructions
Page 67
... will appear on the left, the new channel will appear. If you press the menu button, only the picture adjust screen will appear on the remote control. Note: After you press any multiscreen buttons, if you don't operate, the MAIN CHANNEL SCREEN will be automatically selected about 8 seconds later. &#... the picture from the component terminal and DIGITAL-IN terminal will not work in Twin mode. • When the cable card is inserted into the TV, the combination of analog broadcasting and digital broadcasting will not appear in the TWIN mode. • When it is in NORMAL or INDEX mode....
... will appear on the left, the new channel will appear. If you press the menu button, only the picture adjust screen will appear on the remote control. Note: After you press any multiscreen buttons, if you don't operate, the MAIN CHANNEL SCREEN will be automatically selected about 8 seconds later. &#... the picture from the component terminal and DIGITAL-IN terminal will not work in Twin mode. • When the cable card is inserted into the TV, the combination of analog broadcasting and digital broadcasting will not appear in the TWIN mode. • When it is in NORMAL or INDEX mode....
Instructions
Page 69
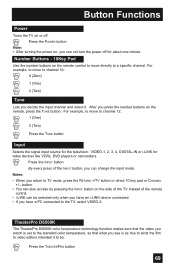
...-3. Notes: • When you press the number buttons on the side of the TV instead of the INPUT button, you have an i.LINK device connected. • If you can also access by pressing the INPUT button on the remote, press the TUNE button. button. • You can change the input mode. ...Number Buttons - 10Key Pad Use the number buttons on , you decide the input channel and select it to be selected only when you have a PC connected to TV mode, press the RETURN +/TV button or direct...
...-3. Notes: • When you press the number buttons on the side of the TV instead of the INPUT button, you have an i.LINK device connected. • If you can also access by pressing the INPUT button on the remote, press the TUNE button. button. • You can change the input mode. ...Number Buttons - 10Key Pad Use the number buttons on , you decide the input channel and select it to be selected only when you have a PC connected to TV mode, press the RETURN +/TV button or direct...
Instructions
Page 71
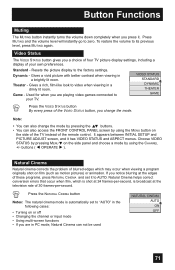
...VIDEO STATUS button, you change the mode by using the CHANNEL +/- Theater - Video Status The VIDEO STATUS button gives you a choice of four TV picture display settings, including a display of these programs, press NATURAL CINEMA and set to "AUTO" in a dimly lit room. Gives a ...button By every press of 30 frames-per -second, is automatically set it to zero. Natural Cinema Natural cinema corrects the problem of the remote control. Press MUTING and the volume level will instantly go to AUTO. To restore the volume to your own preferences. buttons ( √...
...VIDEO STATUS button, you change the mode by using the CHANNEL +/- Theater - Video Status The VIDEO STATUS button gives you a choice of four TV picture display settings, including a display of these programs, press NATURAL CINEMA and set to "AUTO" in a dimly lit room. Gives a ...button By every press of 30 frames-per -second, is automatically set it to zero. Natural Cinema Natural cinema corrects the problem of the remote control. Press MUTING and the volume level will instantly go to AUTO. To restore the volume to your own preferences. buttons ( √...

Instructions
Page 76
... in one of the remote control. Press MENU to center. • You can also access the FRONT PANEL CONTROL screen by using the MENU button on the side of the TV instead of the onscreen ...menus. NTSC, 480i, 480p ASPECT PANORAMA CINEMA FULL REGULAR HD (1080i, 720p) ATSC (1080i, 720p) ASPECT PANORAMA ZOOM ... has VIDEO STATUS and ASPECT menus. Back This button allows you to go back in the menu to access JVC's onscreen menu system. When you change the size. buttons ( √ OPERATE ® ). • ...
... in one of the remote control. Press MENU to center. • You can also access the FRONT PANEL CONTROL screen by using the MENU button on the side of the TV instead of the onscreen ...menus. NTSC, 480i, 480p ASPECT PANORAMA CINEMA FULL REGULAR HD (1080i, 720p) ATSC (1080i, 720p) ASPECT PANORAMA ZOOM ... has VIDEO STATUS and ASPECT menus. Back This button allows you to go back in the menu to access JVC's onscreen menu system. When you change the size. buttons ( √ OPERATE ® ). • ...


